Unfortunately, there is no need to talk about the high quality of fuel sold at our gas stations. The fuel contains a large number of different impurities, including small particles of dirt. If the car did not have special devices, engine overhaul would become commonplace. To clean fuel, a car has a special device - a fuel filter.
The mistake of beginners is that they consider this knot to be almost eternal. In this case, the filter element is replaced rarely or not at all. But a contaminated component is dangerous for a car - it harms the engine, since these particles are an abrasive, and when they get into the engine, they settle in the combustion chamber and do not completely burn when ignited, this has a very detrimental effect on the combustion chamber and all engine components. This is why replacing the fuel filter is so important, and this work should be done on time.
The problem is that many car owners don't know how to access the device and replace it. In fact, there is nothing complicated here - all the work can be done with your own hands and without visiting a service station. The main thing is to study the instructions, decide on the location of the unit and prepare the tool.
1449644110_2279_4_13_01_kopirovat
Remove the fuel pump fuse from the mounting block.
Remove the fuel pump fuse from the mounting block.
Remove the fuel pump fuse from the mounting block.
We start the engine and let it idle until it stops due to fuel exhaustion. Then turn on the starter for 3-4 seconds. After this, the pressure in the fuel system will be released.
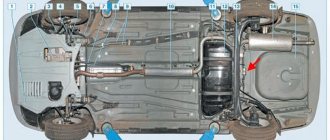
The fuel filter is mounted on the fuel tank next to the right side sill.
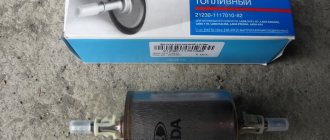
Selection of fuel filters
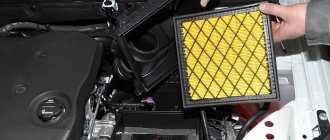
The first thing you need to know for selection is that the fuel filter on the Lada Kalina is double: a coarse mesh and a fine filter. Each element is purchased separately, but there is nothing complicated in selecting fuel filters. They are inexpensive and are the same on all modifications of the Lada Kalina.
The coarse filter is a flat mesh with a plastic fitting that fits onto the fuel pump. Externally, it is a cylinder made of plastic or metal, with two fittings at the ends.
Filters can be purchased both original and analogues. The only thing that needs to be mentioned is that fine filters with a metal body are considered more reliable than filters with a plastic body.
Judging by the reviews, the SCT fine filter, article number ST-342, is an excellent price/quality ratio. Although, if you are not short on funds, you can take something like BOSCH.
1449643930_2279_4_13_06_kopirovat
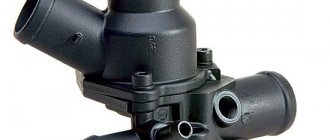
The arrow on the filter housing should be directed in the direction of fuel flow - towards the front of the car.
The arrow on the filter housing should be directed in the direction of fuel flow - towards the front of the car.
The arrow on the filter housing should be directed in the direction of fuel flow - towards the front of the car.
We put the tips of the fuel pipes onto the filter fittings until the clamps snap into place.
Kalina filter: Replacement, Replacement timing, Signs of blockage
The Lada Kalina car has been produced by the Russian AvtoVAZ plant for a long time. During its existence, this model received two modifications, which differed in appearance, but the internal part, such as the engine, transmission and their components, remained virtually unchanged.
As everyone knows, for reliable operation of the entire power plant, it is necessary to have a frequency in the internal combustion engine. Lada Kalina is equipped with a large number of different filters, which are consumables and require frequent replacement to keep the car in good working order.
Dirty filters on a car can lead to problems with the engine and even damage it.
This article describes the filters used on the Lada Kalina car, describes in detail the process of replacing them, as well as the purpose and functions of all filters in this car.
1449643933_2279_4_13_07–2048×1365
The fuel filter must be located between stops that prevent it from moving in the bracket.
The fuel filter must be located between stops that prevent it from moving in the bracket.
The fuel filter must be located between stops that prevent it from moving in the bracket.
Having installed the fuel pump fuse, turn on the ignition and check the tightness of the connections.
Replacing the fuel filter Lada Kalina
What happens if clogged fuel filters are not replaced in time?
If the oil filter is changed with an oil change, that is, quite often. But replacing fuel filters, especially coarse filters, is often neglected. If you do not change the fuel filter elements, eventually the engine will begin to run unevenly, traction will be lost, the car will twitch, and be reluctant to respond to sharp pressure on the gas pedal.
...and their replacement
The Lada Kalina service book recommends changing the filter every 30 thousand kilometers or more often when using low-quality fuel. Unfortunately, it is impossible to check the quality of gasoline after each refueling, but the likelihood of dirty gasoline getting into the tank is high. For this reason, motorists change the element approximately twice as often as the car manufacturer recommends.
There are no recommendations on service intervals for the fuel pump mesh in the regulations. Motorists determine the need to replace or clean it independently. Signs of a dirty coarse filter include low fuel pressure in the power system and excessively loud operation of the fuel pump. It is useful to inspect the screen element each time there is a need to remove the fuel module.
Work on removing and installing fuel filters is carried out by disconnecting the negative terminal of the battery from the car body. The sequence of operations for the Lada Kalina station wagon, sedan or hatchback, as well as for modifications with eight or sixteen-valve engines, is the same.
Replacing the fuel filter
Replacing the Lada Kalina fine fuel purification element will not take much time. To work, you will need a container for remaining fuel, a screwdriver and a 10 mm wrench.
Before removal, relieve pressure in the engine power supply system:
- Use a screwdriver and open the fuse box hatch in front of the gear shift lever.
Using a screwdriver, use a screwdriver to open the fuse box hatch in front of the gear shift lever. - Pull out the middle fuse that powers the fuel pump.
Pull out the middle fuse that powers the fuel pump. - Start the engine, do not turn it off until the gasoline is completely exhausted. After stopping, turn the crankshaft once or twice with the starter.
It is more convenient to change this element on an inspection pit or a lift. Replacement procedure:
- Disconnect the negative terminal of the battery.
- Squeeze the clamps and disconnect the inlet and outlet tubes from the fine filter. Collect any remaining gasoline that leaks out into a container.
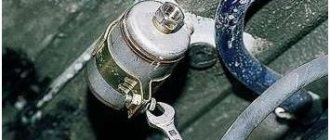
Squeeze the clamps, disconnect the inlet and outlet pipes from the fine filter - Loosen the bolt of the metal fastening clamp.
Loosen the bolt of the metal fastening clamp - Remove the filter and drain the fuel into a container.
Remove the filter, drain the fuel from it into a container - If a plastic clamp is installed, simply remove the fuel filter from it.
If a plastic clamp is installed, simply remove the fuel filter from it. - Install the new one, placing the arrow on the housing towards the front of the machine.
Install the new filter with the arrow on the housing facing towards the front of the machine. - Tighten the metal clamp bolt.
- Place the fuel inlet and outlet hoses onto the fittings. Press them against the filter housing until the clamps click.
- Restore power to the fuel pump, connect the battery.
- Start the engine, inspect the fuel line connections, and check for gasoline leaks.
When developing the Kalina, VAZ implemented such modern solutions as the production model, such as LED backlighting of the instrument cluster and keys, electric locking for reverse gear, perfectly illuminating headlights with electric corrector and polycarbonate glass without a lens, a heating and ventilation system with recirculation built into the instrument cluster trip computer... Compared to other VAZ models of the late nineties, Kalina stood out, as they say, to everyone.
Oleg Polazhinets Wheels
Video: replacing the Lada Kalina fuel filter
Replacing the coarse filter
It is more convenient to change the fuel pump strainer when there is a minimum amount of fuel in the tank.
- Fold back the seat, lift the trim flap, and free access to the fuel pump hatch.
Remove the seat, lift the trim flap, free access to the fuel pump hatch - Unscrew and remove the hatch cover, remove dust and dirt from the fuel module cover.
Unscrew and remove the hatch cover, remove dust and dirt from the fuel module cover - Disconnect the electrical connector from the module.
Disconnect the electrical connector from the module - To relieve pressure in the power system, start the engine and wait for it to stop spontaneously after running out of gasoline. Turn the crankshaft two or three times with the starter.
- Turn off the ignition. Disconnect the battery from the car body.
- Release the clamps and disconnect the fuel hoses from the fittings on the fuel module cover.
Release the clamps, disconnect the fuel hoses from the fittings on the fuel module cover - Turn the module's clamping ring counterclockwise, resting the screwdriver against the protrusion.
Turn the module's pressure ring counterclockwise, resting the screwdriver against the protrusion - Remove the ring.
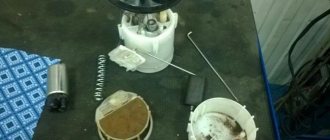
Remove the retaining ring - Pull the fuel module out. Drain the fuel from its housing.
Pull out the fuel module - Remove the rubber o-ring. To prevent dust and foreign objects from entering the tank, cover the hatch.
Remove the rubber o-ring - Use a screwdriver to press out the latch and disconnect the electrical connector on the inner surface of the fuel module cover.
Use a screwdriver to press out the latch and disconnect the electrical connector on the inner surface of the fuel module cover. - Hook it with a screwdriver and disconnect the drain tube from the module body.
Use a screwdriver to remove the drain pipe from the module body. - Press out the four latches.
Release the four latches - Remove the fuel module cover along with the electric fuel pump.
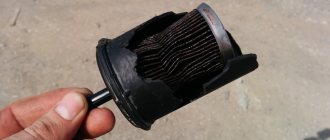
Remove the fuel module cover along with the electric fuel pump - Use a screwdriver to pry off the strainer from the fuel pump.
Use a screwdriver to remove the strainer from the fuel pump. - Install a new cleaning element. Assemble the module in the reverse order of disassembly.
- Install the hatch rubber gasket and the fuel module, pointing the arrow on the cover towards the car trunk.
Install the fuel module, pointing the arrow on the cover towards the trunk of the car - Secure the module with a clamping ring. Connect the fuel pipes and electrical connector.
- Connect the battery terminal. Start the engine, inspect the connections of the pipes with the fittings, check for fuel leaks.