| Does the interior of the LADA Kalina not warm up well in the cold season, and does the windshield and side windows freeze or fog up? There is only one reason - the stove does not heat well . The heating, air conditioning and ventilation system of the LADA Kalina interior performs a number of functions (heats, cools, ventilates the interior); in this article we will look at the heater design separately. |
The design of the Lada Kalina car heater and its typical malfunctions
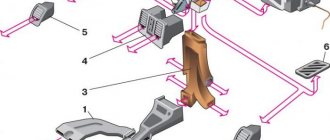
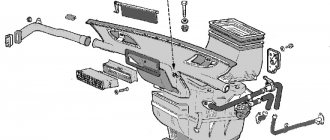
The heater in a car transfers heat from the engine to the cabin. Without heating, the windows quickly fog up and become frosty in winter. On Kalina, the location of the stove allows for the possibility of integrating an air conditioner. The system is designed extremely simply and clearly, and is the same for models regardless of body type - station wagon, sedan or hatchback. It is shown schematically in the photo.
Heating system diagram
- The air duct exit is on the left.
- Air duct on the left.
- Windshield air ducts.
- Air duct distribution housing.
- Heater.
- Ventilation duct on the right.
- The air duct exit is on the right.
- Air duct for heating feet.
- Air duct for heating the interior.
- The air duct outlet is in the center.
The design uses the supply and exhaust circulation principle. Air enters the cabin, heated by the coolant, which simultaneously removes excess heat from the engine. The stove operates as a result of the radiator being heated by coolant. Then, with the help of a fan, the heated air flows through the air ducts through the deflectors into the car interior.
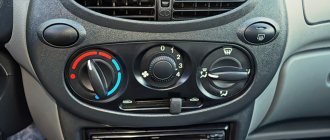
The heater control unit consists of the following elements:
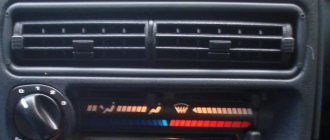
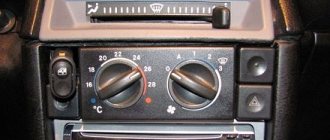
- Temperature regulator. By turning the knob, you can adjust the temperature of the air entering the cabin. Turning to the blue zone adds cold air, turning to the red zone adds hot air.
- Fan speed switch. It regulates the speed of air flow into the cabin.
- Air flow direction switch - to the windshield and down, only down to the feet, to the upper part of the cabin, to the windshield and side windows.
- Recirculation handle. Enables air circulation inside the cabin, while no air enters from outside. Can be used for a short time due to fogging of windows.
- Rear window defogger.
The control system also includes air duct deflectors. They can be closed or opened, and can also be used to regulate the direction of air flow.
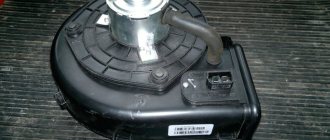
Air from the street enters the air intake through the air filter. The air is then forced into the ducts by an electric fan. The interior is heated by a heater (heater radiator), which is installed under the panel. When the engine is running, heated coolant circulates through the radiator, heating the air passing through it.
1 — heater fan electric motor; 2 — heater fan casing; 3 — air recirculation damper; 4— air ducts; 5 — heater casing; 6 — inlet pipe of the heater radiator; 7 — heater radiator outlet pipe.
The Lada Kalina heater dampers are controlled by a mechanical control unit. When the handles on the block are rotated, the rods are wound/unwound on a special roller inside the control unit. The rods have the following purpose:
- Recirculation flap drive rod.
- Drive rod for the heated windshield flap.
- Leg heating flap drive rod.
Thus, the Lada Kalina stove dampers are controlled mechanically without the use of automation. The only electronic part in the design is an additional resistor, which, depending on the position of the handle on the heater control unit, determines the fan rotation speed. This operating principle is very simple and reliable.
The Lada Kalina air heater is considered one of the best in terms of heat performance in the VAZ family, but is far from the most reliable in operation. Problems begin almost at the car dealership, as many motorists say. But most of the problems are completely solvable, and often even without the involvement of car service specialists.
| Does the interior of the LADA Kalina not warm up well in the cold season, and does the windshield and side windows freeze or fog up? There is only one reason - the stove does not heat well. The heating, air conditioning and ventilation system of the LADA Kalina interior performs a number of functions (heats, cools, ventilates the interior); in this article we will look at the heater design separately. |
Hello, dear owners and fans of the Lada Kalina! In winter, the performance of the heating system becomes of paramount importance. If the stove is blowing cold air, then this is a real problem that needs to be addressed immediately. Otherwise, you can forget about traveling. We will tell you what to do if the stove does not work.
The functions of the stove are not only to create comfortable conditions in the cabin, but also to heat the windows. Therefore, driving in winter with a faulty heater is problematic. The stove on Kalina is no different from similar devices in other cars. A traditional supply and exhaust heater model is used. In the engine cooling system, antifreeze is heated to 90 °C and supplied to the radiator through pipes. Due to the hot liquid, the air is heated and sent through the air ducts into the car interior.
The heating system design includes:
- radiator;
- air distributor;
- fan;
- ventilation filter;
- air ducts
After familiarizing yourself with the structure of the stove, we proceed to check the functionality of all its elements. Let's find out the reason why cool air is blowing from the Kalina stove. Before starting each operation, we first start the engine.
Fan check:
- We move the handle to the extreme position;
- We change the speed from first to fourth;
- We determine the intensity of the air supply (if the fan is working, the air flow should increase).
If during the test you find that the fan does not work in all modes, check the integrity of the resistor and switch. Replace parts if necessary. If the air supply is low, change the filter.
Adjusting the dampers
- We move the regulator to the extreme position;
- Set the fan to maximum;
- Use the handle to adjust the air direction.
If, when turning the knob, the direction of the air flow does not change, the control unit is broken. Most likely, the rod has fallen off, the roller has broken, or the damper has jammed. The control unit is located in the glove compartment area. We remove the panel and eliminate the causes of the breakdown.
It is easy to determine the functionality of the device. If, when switching the handle, the air temperature does not change, it means the sensor is broken and needs to be replaced.
Changing the radiator
If during the inspection it is determined that the radiator is faulty, then it must be repaired or replaced. The design of Kalina is such that this unit is not very conveniently located. It may take a long time to get to him. There are two options for replacing or repairing a radiator - contact a service center for help or act independently. If you decide to try your hand and spend a few “unforgettable” hours in your own garage, we will tell you how to remove and replace the radiator.
Sequencing:
- drain the coolant;
- remove the battery (including the stand);
- remove the air filter and air duct;
- remove the driver's seat;
- release the gas and brake pedals (then they will need to be moved to the side);
- dismantle the power steering;
- disconnect the tubes and take out the radiator.
Installation of a new unit is carried out in the reverse order. When performing the operation, carefully fold the parts in the order in which they were removed. Otherwise, you will spend even more time figuring out where and what part to install. To replace the radiator, ask friends for help. It is better if it is 2-3 people.
A possible reason why the heater may blow cold air is an antifreeze leak. The most obvious sign of such a malfunction is that heat is supplied to the cabin only at high speeds. Determine where the fluid is dripping and fix the problem. Add antifreeze. The cabin will be warm.
It is more convenient to check the stove using the principle “from simple to complex.” Make sure there is antifreeze and check the fuse. You may not need to move on to something more complex.
Maybe you have encountered other malfunctions and have experience in eliminating them? Share this useful information with readers in the comments.
See you soon and good luck on the roads!
DIY seat ventilation
The above description of how the seat ventilation system works allows you to make a similar system with your own hands, based on the information received. In this case, seat ventilation can be installed in at least three different ways.
Installation of a ready-made kit (kit)
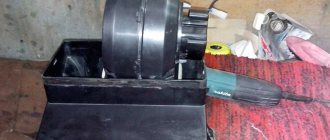
To do this, use a ready-made set of parts and assemblies that are commercially available, for example, as shown in the photo below:
Do-it-yourself installation of such a kit involves removing the seat trim, perforating it, as well as positioning and connecting the fans in the right places. As a rule, such a system has several speeds for regulating fan performance, which allows you to select the best option based on the current climatic conditions.
DIY installation using individual elements
To perform ventilation yourself using individual elements, you need to buy:
- computer fans;
- plastic mesh instead of a spacer;
- buttons, wires.
Their installation begins with the seats being dismantled and the places where the fans will be attached are determined, then holes are cut out in the foam rubber for them.
In these places, excess foam rubber is cut off and instead of it, a cut mesh fifteen millimeters thick is laid.
After the mesh has been installed, previously cut foam rubber must be laid on top of it, in which holes with a diameter of one centimeter must be made.
The fans are connected by wires, the button for turning on the ventilation in the seat is located on the panel, or in any other convenient place.
Seat ventilation system using a car heater
You can do the blowing with your own hands without using fans. How this is done should be clear from the given figure and photo. With this approach, air from the stove is supplied to the seat using a corrugation. Such an air supply system will allow not only cooling, but also heating of the seats. It is best if the corrugation is installed inside the channel.
How the Lada Kalina stove works
The vehicle's heating system must work properly. It is not difficult to achieve uninterrupted operation of the stove if you know the structure of the Lada Kalina stove. The heater creates a comfortable stay in the car interior, creating visibility for the driver. The stove design provides for the use of small-class machine options.
- Anti-lock braking system.
- Airbags.
- Electric power steering.
New Lada Kalina models were developed, which were already equipped with additional options:
- Electric door window lifts.
- Reliable heater.
- Heated seats.
- Interior air conditioning device.
The Lada Kalina heater device is designed for heating and cooling the car interior. If the car does not heat up, the windows fog up, or you feel discomfort, then you need to test the performance of the heating system. Understand the functioning of the stove on Kalina.
Design features of the Lada Kalina engine cooling system
The LADA Kalina engine cooling system is liquid, closed type, with forced circulation. Consists of an engine cooling jacket, a radiator with an electric fan, a thermostat, a pump, an expansion tank and connecting hoses. Design of the LADA Kalina cooling system
Cooling system: 1 — expansion tank; 2 — radiator outlet hose; 3 - inlet hose; 4 - radiator; 5 — steam exhaust hose; b — radiator supply hose; 7 — electric fan; 8 — electric fan casing;
9 — coolant temperature sensor; 10 — coolant temperature indicator sensor; 11 — throttle assembly; 12 — bracket for the coolant pump pipe; 13 — coolant pump; 14 — coolant pump pipe;
| Expansion tank. Coolant is poured into the system through the expansion tank. It is made of translucent polyethylene, which allows you to visually monitor the liquid level. To do this, the marks “MAX” and “MIN” are marked on the wall of the tank. In the upper part of the tank there is a pipe for connecting to the radiator steam exhaust hose, in the lower part there is a pipe for connecting to the inlet hose. |
| Expansion tank cap with valves. The tightness of the system is ensured by the inlet and outlet valves in the expansion tank cap. The exhaust valve maintains increased (compared to atmospheric) pressure in the system on a hot engine (due to this, the boiling point of the liquid becomes higher, steam losses are reduced). It begins to open at a pressure of at least 1.1 bar. The intake valve opens when the pressure drops to system relative to atmospheric pressure by 0.03-0.13 bar (on a cooling engine). |
| The coolant pump is a vane, centrifugal type, driven from the crankshaft pulley by a timing belt. The pump housing is aluminum. The roller rotates in a double-row bearing. The bearing is lubricated for its entire service life. The outer ring of the bearing is locked with a screw. A toothed pulley is pressed onto the front end of the roller, and an impeller is pressed onto the rear end. A thrust ring made of a graphite-containing composition is pressed to the end of the impeller, behind which there is an oil seal. The pump housing has a control hole to detect fluid leakage when the pump fails. It is recommended to replace the pump as an assembly. The redistribution of liquid flows is controlled by a thermostat. |
The cooling system consists of two so-called circulation circles:
- The movement of liquid through the cooling jacket and radiator forms a large circulation circle.
- The movement of liquid through the engine cooling jacket, bypassing the radiator, is a small circle of circulation.
The cooling system also includes a heater radiator and a throttle body heating unit. Liquid circulates through them constantly and does not depend on the position of the thermostat valves.
The heating system in the cabin of the budget Lada Kalina model can significantly increase comfort for the driver and his passengers. It ensures that the required temperature conditions are maintained inside the car. Along with such useful options as:
- "ABS";
- airbag;
- electric power steering;
- electric front windows;
- front seat heating function,
Common faults
The stove itself on Kalina is well conceived, but due to the poor quality of the elements and parts, various troubles constantly happen to it. Even the latest models with climate control have various “diseases”.
The list of the most common faults looks like this:
- The heater core is leaking;
- the heater damper is jammed or does not open completely;
- failure of the fan or control unit;
- gear motor failure;
- the temperature sensor or heater resistor has become unusable;
- The cabin filter is clogged.
To find out where this or that element of the heating system is located, you should look at the operating instructions; there will definitely be a corresponding diagram there.
The design of the Kalina stove without climate control is such that the air sucked in by the fan passes through the air filter and enters the heater radiator. There it is heated and supplied to different areas of the cabin through adjustable grilles and openings. The dampers are controlled and the fan speeds are switched manually. This heating system is more reliable because it does not contain any electronics.
Let's sum it up
The heating system is simple. Timely diagnostics can save the owner of a LADA Kalina from unexpected breakdowns; the heater circuit will also help with this. Monitor the level of antifreeze, change it according to the regulations, and the system radiator will serve its regulated life, delighting you with warmth and comfort in the cabin.
Find out the cost of repairs
Repair work?
Why do clients choose us?
Heating and Repair
We have the best prices!
These system elements are very important. Therefore, the compliance of each part of the system must be carried out deliberately. The garage heating assembly has certain parts. The heating installation includes air vents, fasteners, pipes, a connection system, manifolds, batteries, thermostats, an expansion tank, pressure-increasing boiler pumps. On this tab we can select the necessary structural components for your cottage.
How to repair the interior stove of Lada Kalina
It is not always possible to determine the cause of a heating malfunction in a car the first time, so we will consider the most common problems and methods for eliminating them.
Before you independently look for a problem in the car’s heating system, you should study the principle of its operation.
The heating system control unit analyzes the data received from the ceiling temperature sensor. After this, he compares the obtained parameters with those set by the driver on the stove panel. If the difference in readings deviates by approximately 2 degrees, the heater control unit sends a command to the micro-gearbox. The latter, in turn, opens and closes the heater dampers, through which a heated air flow enters the cabin.
For this reason, if in a Lada Kalina a hot or cold stream of air is blowing from the heater, it does not matter how the knob is installed on the heater panel - it is worth checking the cabin temperature sensor.
To change this or that part of the heating system, it is not at all necessary to seek help from specialists. This will help save time, but not money. If you follow the recommendations, you can replace some system components yourself.
Even beginners can replace the Kalina stove fan. The main problem is its location. For this reason, most of the time is spent not replacing the part, but dismantling it.
Guide to upgrading the VAZ 2110 stove
- Correcting deficiencies in airflow of side deflectors
This deficiency can be corrected by one of two methods. The simplest method is to simply seal all the holes into which the air flow is dispersed, this will greatly increase the efficiency of glass blowing. The second method is to lay corrugations instead of air ducts, but this method is more effective in improving the airflow for the feet of front and rear passengers; for the side deflectors the improvements will be insignificant.
That is why it is better to do sealing. To do this, you need to use modelin (anti-creaking). Using this material, it is necessary to seal everything, including bolt holes.
Diagnosis and troubleshooting
The easiest way to resolve the issue is regarding the cabin filter. For the first time, thorough blowing of the element will be enough, but then it is better to replace it. The real problem is a leaking radiator or a broken fan; an expensive replacement of the unit cannot be avoided. An equally high price will have to be paid for a new control unit.
It will be somewhat cheaper to install a new temperature sensor, gearmotor or resistor for the Kalina heater. Moreover, the malfunction still needs to be correctly diagnosed, which can be quite difficult. A burnt resistor is easily identified - the fan only runs at maximum speed.
It is more difficult to check the sensor hidden in the lighting shade. Symptom of a malfunction - a hot or cold stream flows from one or more grilles, regardless of the position of the regulator handle.
It is more difficult to detect how well the mechanical heater regulator is functioning. To do this, you need to get to it by disassembling part of the front panel. In the same way, the proper operation of the air dampers is determined.
Holes in trunk trim
You will need: Hyundai/Kia side ventilation grill (article 874854В000, price about 125 rubles) or VAZ 2110 door ventilation grill (article 21100810410200, price 10 rubles)
Improvement using the example of the Lada Vesta car (author evgeniy333orel)
Procedure:
- Make a hole in the trunk trim (in the side).
- Make small holes for the legs of the grill.
- Install the grille and secure it with screws from the inside.
New Lada: Kalina hatch, standard speaker wiring. VAZ forum
According to owners' reviews, this set of modifications allows for improved ventilation in the car interior, which prevents the windows from fogging up even in rainy weather.
Let us remind you that we previously told you how to install seat ventilation with your own hands and whether it is worth doing it.
Keywords: rear shelf of Lada Priora | rear shelf of Lada Granta | rear shelf lada xray | rear parcel shelf 4x4 | rear shelf of Lada Vesta | rear shelf of Lada Kalina | rear shelf of Lada Largus | trunk of Lada Vesta | trunk of Lada Granta | trunk lada xray | trunk of Lada Priora | trunk of Lada Kalina | trunk of Lada Largus | 4x4 trunk | rear shelf Niva | Niva trunk | universal article
6
Found an error? Select it and press Ctrl Enter..
- Rating of reliable engines with a service life of 500 thousand km without major repairs
- Replacing low and high beam lamps on Lada Kalina 2nd and 1st generation
- Installation of washer fluid level sensor on Lada Largus
- Installing cruise control on Lada Granta FL (new generation)
Maintenance of Lada Kalina: checking the stove
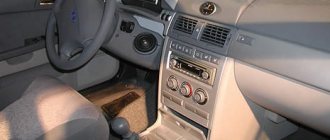
Interior heating control panel
Proper operation of the heating system in your car is important all year round. At the same time, as winter approaches, the health of the heating system becomes extremely important. The efficient operation of the stove on Kalina ensures a comfortable stay in the car, as well as visibility for the driver.
The heating system of the Lada Kalina is no different from similar devices in other cars. Despite the reliable and simple design that the Kalina stove has, this device requires periodic maintenance.
Design solutions.
Replacing the heater radiator on a VAZ-2110: the difference between the new model and the old one, article numbers, where the heater radiator is located
The appearance of the Kalina corresponded to fashionable trends at that time; biodesign was very popular in the 90s, thanks to which the front of the car turned out to be “cute and smiling.” Thanks to its smooth lines and rounded shapes, the car looked quite modern and harmonious, as evidenced by the fact that it was in demand not only in Russia, but in countries such as Germany, for example.
In addition to the exterior, the designers abandoned previous interior developments, which did not at all match the appearance of the car. This is how the updated interior appeared, which was designed using the latest equipment in mathematical models. The spaciousness and ease of seating of the Kalina were many times higher than the level of previous models.
They didn’t skimp on Kalina’s interior design at all, as a result of which the interior turned out to be not only modern, but also very ergonomic.
Let's move on to specific examples. One of them is the seatback tilt adjustment mechanism. These mechanisms are manufactured by the German company Keiper, which specializes in the development of these units. This is not the only example of the participation of foreign companies in the development of the Kalina’s interior; the seats were also designed with the help of other foreign companies.
In the late 90s, the Kalina filling differed in many ways from its relatives:
- instrument panel lighting with LEDs;
- electric reverse gear lock;
- factory air conditioner, which could regulate the temperature itself;
- light switch;
- new generation headlights;
- recirculation of the heating system and ventilation system.
The design of the platform is what really did not give the designers freedom of action. The steering rack is located quite high and is attached to the engine shield. Because of this, it is problematic to balance the driving performance of the car. By experimenting with the suspension, Kalina managed to give it precision when cornering, unlike the VAZ-2110.
At first, the Kalina was equipped with an eight-valve 1.6-liter engine.
However, everything can't be perfect!
The first cars became famous for the fact that up to 50% of their power steering units were faulty, they simply failed! This significant flaw caused a lot of noise among the people, because there were cases when cars turned completely in the wrong direction.
Later, of course, this defect was corrected by the Kalina designers. The front of the production car was slightly modified, but the light and smooth steering wheel was appreciated (mostly by women). Electric power steering instead of hydraulics is the right solution for Kalina.
Thus, through experiments with the internal and external appearance of the Kalina, by 2001 it had acquired its final form. The changed appearance of the Kalina was very reminiscent of the Opel Corsa, and the sedan was similar to the Chevrolet Corsa.
Ultimately, the designers came up with a car tailored for the B-class. It could be compared to the Fiat Palio and Renault Symbol. However, Kalina turned out to be more affordable in its price category and more compact.
So, VAZ managed to create a new generation car, which was different from its predecessors in almost every way, even though the platform was not the first freshness. In Kalina-2, which is successfully used today, a fairly large number of technical solutions remain from the old version of Kalina.
Removing and installing the heater radiator
If you need to install a new stove on a Lada Kalina car, you need to choose this part correctly, focusing on the following criteria:
- the material from which the product is made. Aluminum devices are less expensive, but they have one significant drawback - if cracks or other defects appear, replacing the radiator is not possible. You can throw it away immediately without wasting time. Therefore, it makes sense to purchase, albeit expensive, but reliable and repairable copper-brass part;
- the presence of coolant swirlers, which are made of high-quality plastic. Radiators with such elements work much more efficiently and become less clogged.
The operation is very labor-intensive, for which the car service center will charge you a hefty sum. But there is another, slightly barbaric, but fast and widely practiced method. The work flow diagram is as follows:
- Drain the antifreeze, disconnect and remove the battery, and then disconnect the hoses from the heater pipes.
- Unscrew the nut located near the fittings in the engine compartment. It holds a steel plate that will interfere with the removal of the heater.
- Remove the gas pedal and pull out the steel brake pedal shaft. Unscrew the decorative panel and behind it the plastic panel covering the stove radiator.
- To remove it, cut an opening in the plastic frame that allows you to pull the radiator towards the driver.
- Install the new element and reassemble in the reverse order. The cut opening can be sealed with plastic and decorated in any suitable way.
| When the engine is running, heated fluid from the cooling system circulates through the heater core, heating the air passing through it. The amount of air passing through and around the radiator is set by the central heater damper, depending on the position of the temperature control knob installed on the instrument panel. |
The air distribution throughout the cabin can be adjusted by rotating the control knob for the air distribution flaps, as well as by turning the flaps and guide blades of the instrument panel ventilation grilles.
We remove the instrument panel, guided by the article - “Removing the instrument panel assembled with a heater.”
Using a Phillips screwdriver, unscrew the three self-tapping screws securing the heater casing cover and the radiator pipe seal frame
Remove the heater casing cover.
Remove the radiator pipe seal frame.
Remove the radiator from the heater housing
Install the heater radiator in reverse order.
Having released the clamp of the wire block, disconnect it from the heater fan motor.
Remove the engine ventilation hose from the fitting
Using a Phillips screwdriver, unscrew the three self-tapping screws securing the electric motor to the fan casing.
Remove the electric motor assembly with the heater fan.
Install the heater fan motor in reverse order.
Summary
The Lada Kalina car is available with a ventilation and heating unit or with an air conditioning unit. For the first option, it is impossible to provide a cabin climate whose temperature will be lower than the ambient temperature.
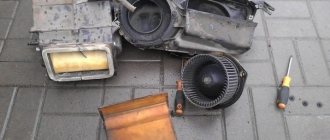
The “weak point” in the interior heating system of the VAZ Kalina is the heater radiator. The heat exchanger on this car is made of aluminum (tubes and honeycombs) and plastic (tanks), so the service life of this part is not that long. Over time, the radiator loses its seal and begins to leak, which can lead to serious problems. The designers placed the engine ECU under the heater housing. If the radiator leaks, the antifreeze flowing from it gets onto the control unit, which causes it to burn out.
There is only one way to solve the issue of a leaking heater radiator on a VAZ Kalina - replace the damaged heat exchanger with a new one, since aluminum heater radiators are not repairable. But here a second problem arises - how best to carry out the replacement. The heater on the VAZ Kalina was not designed well, so replacing the radiator is a complicated procedure.
According to the automaker's recommendation, replacing the heater radiator with a Kalina can only be done by removing the front panel from the car. Removing the panel is a labor-intensive operation due to the large number of fasteners, and at the same time it is necessary to dismantle a number of interior elements - the front seats, steering column, pedal unit. An additional negative factor in replacing the heater radiator on a VAZ Kalina with removing the front panel is the appearance of “crickets” after assembly.
The only advantage of the replacement technology recommended by the automaker is that no alterations or modifications to the heater are required to remove or install the heat exchanger. Car enthusiasts have come up with alternative methods for replacing the heater radiator without removing the front panel, but each option has disadvantages.
Control unit for ventilation and heating system LADA Kalina
Before removing all the necessary parts, cables and other components from Kalina, prepare a new radiator, pipes and clamps. The pipes will be required in case the old ones are worn out or they have never been changed over the years of operation. As practice shows, hoses are most susceptible to wear due to temperature changes, so in any case they need to be changed from time to time.
Instructions on how to change the radiator are presented below:
- We begin the replacement procedure in the engine compartment. First, place a container under the drain hole and drain all consumables from the radiator. If you notice that the coolant is already old and has exhausted its service life, which can be understood by its color and deposits, then it is also better to change the antifreeze.
- You need to ensure the most convenient access to all pipes and hoses of the radiator assembly in the engine compartment. To do this, dismantle the power unit air filter housing, the battery, and its platform. Next, you need to disconnect all the lines from the radiator unit in the engine compartment. Having done this, you can use a wrench to unscrew the nut that secures the metal casing to the engine shield. This nut is located next to the pipes that go into the Kalina's interior.
- Next, we move into the car interior. You need to remove the gas pedal; to do this, unscrew the three nuts. As for the brake pedal, it cannot be removed, so just move it to the side as far as possible.
- Now you have to cut the steel casing as shown in the photo, and then cut off the tubes of the radiator assembly. Having done this, you can dismantle the device from the pedals, but to do this you will also need to unscrew the bolts that secure it.
- Before installing a new radiator device, it will be necessary to carefully sand its tubes. Please note that they should be as even as possible. After all surfaces are ready, a line with a widened end is put on the upper tube, and a line with a narrower end is put on the lower tube. The remaining outputs must be connected in the engine compartment instead of the old ones. Also note that on the side of the Kalina’s interior, it is advisable to treat the place where the lines exit into the engine compartment with sound-insulating material.
Price issue
It is recommended to start work on your own only if you have a garage and a set of tools. Complete disassembly and assembly of the front panel will take the whole day; the simplified method will require at least 3 hours. Tool for work:
- a good set of screwdrivers and wrenches;
- set of heads for 7,8,10,13;
- pliers;
- hacksaw for metal;
- sharp knife;
- Bulgarian;
- reinforced hoses with a diameter of 20 mm;
- container and hose for draining coolant;
- new radiator.
There should be good lighting at the workplace, and during disassembly it will be convenient to put all small parts in separate boxes. After the engine has cooled down a little, begin replacing the heater radiator. This is possible in two ways: by removing the entire panel and by partially disassembling and cutting off the wall of the heater housing.
The most convenient way to get to the unit is from the passenger seat, which will have to be dismantled so that you don’t have to do acrobatics inside the cabin. The chair runners are held in place by 4 13 mm nuts; unscrewing them is not difficult. Further work on replacing the fan is carried out in the following sequence:
- Remove the cabin filter and remove dirt and dust from the opening.
- Unscrew 4 screws located on the back wall of the glove compartment, and another one under the right heater grille.
- Remove the plastic cover from the stand and unscrew the 2 screws that secure the panel and the blower unit.
- Remove the blower unit, lift the plastic panel and loosen the 2 fan mounting nuts underneath it.
- Move the dashboard as far back as possible and secure it. The turbine must be removed from below, from a lying position.
You should not rush to change the fan when it only works at speed 1 and the heater switch is at maximum. This is a sure sign that the resistor located below the glove compartment has failed. The part is a small green plastic panel with a connection connector. Replacing the heater resistor is carried out without any disassembly; you just need to disconnect the connector and unscrew the 2 screws that secure it to the body.
| When the door windows are closed, air is supplied to the cabin by an electric fan. The intensity of the air supply is regulated by the rotation speed of the electric fan impeller. The fan electric motor has four speed modes (lower speeds are provided by an additional resistor with two windings). |
| Air intake is carried out through an air intake installed under the windshield frame. To clean the air entering the cabin, a filter element made of non-woven synthetic material is installed at the heater air intake. The exhaust is carried out due to the vacuum that occurs near the rear of the body when the car is moving. |
Exhaust deflectors are built into the body panels under the rear bumper. The interior is heated by a heater installed under the instrument panel.
1 - air supply ducts for passengers in the rear seat. 2 - side nozzles for supplying air to the driver and passenger on the front door or on the windows of the front doors. The air flow is controlled by grilles (in the vertical direction and flaps in the horizontal direction. 3 - glass blowing nozzles. 4 - windshield blowing nozzles. 5 - upper air supply nozzle. 6 - central supply nozzles to the cabin. 1 - air temperature regulator; 2 - fan operating mode switch; 3 - air flow distribution regulator; 4 - air recirculation control lever; 5 - rear window heating switch
The intensity of the air supply into the cabin is regulated by turning the handle of the fan operating mode switch. This turns on one of four fan speeds. By turning the switch handle clockwise, we increase the fan rotation speed.
| the air flow through the side and central deflectors enters the upper part of the car interior to blow air over the driver and passengers; |
| the air flow enters the lower part of the cabin, into the driver and passenger foot areas; |
| the air flow enters the lower part of the cabin, into the driver’s and passengers’ foot areas, as well as through the blower nozzles to the windshield and windows of the front doors of the car; |
| The air flow through the blower nozzles enters the windshield and glass of the front doors of the car. |
By turning the handle of the air temperature regulator, we change the temperature of the air entering the cabin. To increase the air temperature, turn the regulator handle to the left, to the red sector of the scale, and to decrease the air temperature, turn to the right, to the blue sector.
The air recirculation mode (stopping the flow of outside air into the cabin) is recommended to be used when you need to quickly lower or increase the air temperature in the cabin, as well as when driving in dusty areas or in dense traffic to prevent exhaust gases from entering the cabin.
The recirculation mode can only be turned on for a short time, since this does not allow fresh air to enter the cabin and the windows may fog up. To turn on the air recirculation mode, move the air recirculation control lever to the extreme right position. To allow outside air to enter the cabin, move the lever to the extreme left position.
The directions and intensity of air flows through the side and central deflectors of the ventilation and heating system are regulated by corresponding rotation of the guide vanes and changing the position of the deflector flaps until they are completely closed.
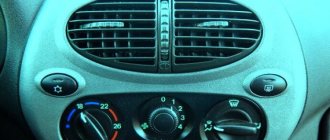
1 — handwheel for adjusting the direction of air flow left and right; 2 — handwheel for adjusting the flow intensity through the deflectors (when rotating up, the damper opens, down, it closes)
The direction of air flow through the deflector up and down is adjusted by pressing on the top or bottom of the deflector. The directions and intensity of the air flow through the side deflectors of the ventilation and heating system are regulated in almost the same way (the flow intensity adjustment handwheel turns left and right).
1. Start the engine.
2. Turn the air temperature control knob counterclockwise to the extreme position (blue sector).
3. Using the heater fan control knob, we alternately turn on the four speeds of the electric fan.
Based on the intensity of the air flow from the nozzles, we check the operation of the electric fan and the change in the rotation speed of its impeller when changing modes (1 is the minimum speed, and 4 is the maximum).
If the electric fan does not work in all modes, check the additional resistor and switch. If the electric fan does not work, then check the power supply circuit of the electric fan.
4. Turn on the maximum speed of the electric fan.
5. By turning the control knobs for the heater dampers and ventilation grilles, we monitor the change in the direction of air flow. If there is no change in flow distribution, the damper actuator is most likely faulty.
6. Having warmed up the engine to operating temperature, turn the air temperature control knob clockwise to the extreme position (red sector).
7. Make sure that the air coming out of the panel nozzles has become warm. If the air temperature has not changed, the central damper actuator may be faulty.
8. Turn the temperature control knob to the blue sector - cold air should enter the cabin. If the temperature does not decrease, it means that the central damper drive is faulty.
“Human” hood or ventilation with valves
Interior ventilation. I wonder if anyone has ever wondered how it is made in modern Samara? Not at all like the entire global auto industry has been doing for the last quarter of a century. And not even at all in the same way as it was done on the Samaras produced in the 1990s. This can cause all the problems - fogging, stuffiness, cold in winter, dirt in the doors, dust in the cabin, weak air flow from the deflectors.
And at one point I got tired of it all. In particular, the biggest inconvenience was the fogging of windows in wet weather, especially when there are two or more people in the car. Combined with the “high” panel, this is a disaster. When it rained, everything got much worse. Moreover, there was no cabin filter.
The car was also soundproofed and sealed in the doors, but it only froze my feet in the winter and caused dirt to spread in the doors. After this, I began to notice that my ears began to become blocked, the air was not coming out anywhere at all, that is, the pressure in the cabin was being created quite strongly. I thought the problem was blocked ventilation, but I remembered that as soon as I bought the car, the problem already existed, and the windows sweated quite a lot.
In this regard, it was decided to take this issue seriously. It was necessary to put valves in the trunk, as on all modern cars, and an adapter for the 2110 filter, a very useful thing, simply necessary for Samara. There should still be a cabin filter - less dirt will get in, and with the adapter the ventilation system will be sealed, and in total - no leaves and dust in the air ducts.
For the upcoming work, I collected information, went to forums, looked for pictures, diagrams, photographs, and looked at how it was done on different machines. I found a lot of useful things and realized that I could implement this in my car, I went to the car market and bought valves from Kalina, but they were smaller than those of the “twelve”. But then, in 2009, it was quite difficult to find valves for the “two-wheeler,” because in the 2110 family, cars began to be equipped with them only after 2006, and today they are sold almost everywhere. (And looking ahead, I’ll say that you can pick up similar valves even from a foreign car.)
So, the only thing left to do is to deliver it.
The summer season has arrived, I came to the dacha. May 1 - everyone goes to the demonstration, and I go to the garage. Using the Murzilka, removing the bumper is just two steps, about 10 minutes. As it turned out, it had to be removed with the brackets; the bolts could not be unscrewed; I spent a good hour and a half on all this work. When I finally removed the trunk, I began to try on where to put the whole thing.
I thought it might not fit under the headlights, or closer to the center, but on a flat panel under the number, which is much easier. In the end, as a true “vasoman”, I was pushed away from the simple path, and I decided to put it under the headlights.
I removed the plastic, there was not much dirt there after seven years, just dust. I made a pattern from a piece of splen. I decided to modify the valve by sawing off the top edge, since according to calculations it should go flush with the bumper. Having attached the pattern, I made markings on the body. Everything is by eye, without any special measurements, no certainty.
I sawed through the space for the valve. This was my first communication with the “Bulgarian’s wife,” so I didn’t have to count on the “evenness” of the cut. I sawed off the edge of the valve from below so that it would not touch the bracket for attaching the bumper, and then, at the bottom of the cut, I went over it with a hammer, bent the metal and inserted the valve.
And the time has come to check your work. I turn on the fan, and there it is, a stream of air! It turns out, as expected, the system works. If you close one valve with your hand, the rubber bands on the second open much more.
The bumper fits into place normally and does not hit anything. I was even surprised that everything went without difficulties. The amplifier is of course close, but nothing interferes with the operation of the valve. Now you put your hand under the bumper, and air flows from there.
Then, out of curiosity, he reclined the seat and sat in the cabin. I turn on the fan, the valves open, the second speed is higher, the third is even higher. In order for them to close when the fan is on, you need to open the window more than three centimeters, and when you slam the door, they open very strongly. It feels like in practice the interior has become much better ventilated.
One day it was quite hot, I was driving along the Moscow Ring Road with the windows closed, the fan turned on at second speed. Quite comfortable at speeds of 80–120 km/h. Previously, this would have been a complete gas chamber. Thanks to the adapter with its filters, the fan can be turned off at 100 kilometers per hour, and then the air flow enters the cabin by gravity. Exhaust gases do not enter the cabin, either with the windows closed or open. The glass quickly becomes dry, in winter the interior warms up perfectly, the wind does not blow heat through the doors, and they are now clean. Which I am certainly happy about.
Sergey Turlyansky, Moscow
Checking heating system elements
The ventilation and heating system of the car interior is a supply and exhaust system, while the temperature of the liquid heated above 90 °C from the engine cooling system is used to heat the interior.
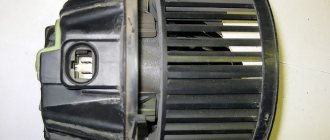
Heater parts: 1 — filter housing for the interior ventilation and heating system; 2 - filter element; 3, 4, 5, 6, 7 — air ducts; 8 — radiator casing and heater air distributor; 9 — heater radiator; 10 — casing of the electric heater fan; 11 — electric heater fan
Ventilation and heating system element:
- electric motor assembled with impeller 1118-8118020-01
- electric fan switch 1118-3709608
- additional heater resistor 2123-8118022
If the heater on the Lada Kalina does not work - it blows cold air - it is better to look for the reason, starting with the simplest thing. You should not immediately disassemble complex components. Typically, most problems arise from minor problems.
temperature sensor
If only hot or, conversely, only cold air blows from the air duct nozzles, regardless of the position of the damper, the cause of the malfunction is the interior temperature sensor. It is located in the ceiling, in the lampshade. The problem is solved by replacing the sensor.
If switching modes and air flow speed does not produce anything (a whistle or crackling sound is heard, the fan begins to make noise), the malfunction is related to the electric fan. To check this, you need to do the following:
- Set the temperature control knob to the extreme blue zone position.
- After that, use the switch to change the fan speeds from first to fourth.
Refinement of the air duct system of the VAZ furnace, dismantling the standard installation
If you have a little time and desire, modifications to the VAZ 2110 stove can be done much more thoroughly, namely:
- sealing the cracks in the front panel of the torpedo air ducts;
- modernization of the car stove damper;
- modernization of the heating system for the rear seats and driver's feet, installation of corrugated heating ducts.
All this will certainly result in the desired result and significant heat transfer from the stove, but first you need to remove the dashboard along with the dashboard and heater air ducts, for which you need to:
- 1. Remove the floor tunnel lining cover and the interior heating air ducts of the VAZ 2110, and then the body itself, screwed with self-tapping screws to the bottom of your car;
- 2. To remove the instrument panel, you will first need to dismantle the glove box by unscrewing it from its hinges and turning off the glove box light;
- 3. Through the formed niche, unscrew the mounting bolts of the instrument panel;
- 4. Having unscrewed all the fastening screws of the panel in its upper and lower parts, as well as on the controller bracket, we can finally remove the instrument panel from the mounting studs;
- 5. In order to remove the panel from the car interior, you will need to disconnect the electrical connectors for connecting the devices.
Checking heating system elements
Using a slotted screwdriver, press out the spring holder of the air temperature regulator rod shell and remove the holder
Remove the rod from the air temperature regulator lever.
Using a slotted screwdriver, press the spring holder of the air temperature regulator rod sheath from the heater body and remove the holder.
Remove the air temperature regulator rod from the lever on the heater body.
We install the new air temperature regulator rod in reverse order.
The sequence of operations for replacing the switch rods with the operating mode of the fan and air flow distribution regulator is similar.
The entire procedure is carried out with the engine running.
Checking the heating fan and ventilation system:
- We move the temperature regulator knob of the control unit to the extreme position (blue zone).
- Smoothly switch the fan speed from first to fourth speed.
- We monitor the intensity of incoming air, outgoing air and the air duct. With each speed, its flow should intensify.
If Kalina’s stove still does not work, we check the functionality of the fuse, indicated F5 in the diagram. Together with him we check the power circuit. If the fan does not work at any speed or its intensity does not change linearly, it is worth checking the switch and additional resistor. If there is insufficient air flow, the cabin air filter should be replaced.
After everything described, we move on to checking the heater dampers. For this:
- We move the temperature regulator to the extreme position (blue zone), set the fan speed to maximum.
- We rotate the damper control knob on the block, at the same time we control changes in the direction of the air coming out of them.
If the air flow does not change its direction, this indicates a malfunction in the mechanical part of the heater control unit. For example, the rod has fallen off or the roller is not screwed onto it due to a breakage, or the damper is simply jammed. At
If the climate control system is installed, it is worth checking the performance of the micromotor gearbox of the ventilation unit damper, air conditioner and heater. For this:
- warm up the engine to operating temperature;
- We move the temperature regulator to the extreme red zone;
- we control the presence of warm or hot air flow from the air ducts.
If the air flow temperature remains unchanged, you should check the functionality of the mechanical part of the heater control. When using climate control, we carry out the above operations. We also check the serviceability of the engine cooling system.
In conclusion, we note that if you are not confident in your abilities and capabilities, it is better to send the car for diagnostics to trained specialists, because any mistake you make leads to the replacement of an entire unit or system, which will have a significant impact on the family budget!