Which LEDs to choose for instrument panel illumination
To highlight the readings in the Granta or Kalina instrument cluster, green SMD-3528 LEDs are used. Instead, you can use SMD LEDs of different brightnesses. Here are the most commonly used:
- very bright SMD 5050 (luminous flux - 15 Lumens);
- bright SMD 3825 (brightness 7-9 Lumens)
- medium brightness SMD 3528 (about 5 Lumens);
- medium brightness SMD 3028 (about 5 Lumens);
- not bright SMD 3020 (about 4 Lumens);
- not bright SMD 3014 (about 3 Lumens).
The numbers after SMD mean the ratio of width and length, for example, an SMD 3528 LED has dimensions of 3.5 mm by 2.8 mm. You can buy everything you need on AliExpress (see catalog).
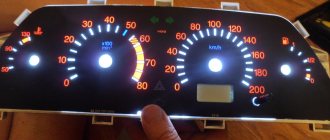
The approximate difference in LED brightness is shown in the photo:
Please note that using very bright LEDs to illuminate the instrument panel, reading readings in the dark may not be comfortable (they will dazzle). In this case, you can reduce the brightness by tinting the dashboard with a film (we select the light transmittance to taste). We recommend using SMD LEDs with a luminous flux of up to 5 Lumens for tuning the instrument panel.
We collect
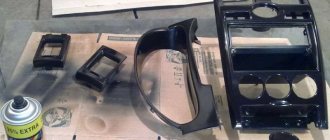
When everything is ready, we begin to slowly assemble the console. First of all, we install the substrate. Apply sealant to the back side and glue it to the panel.
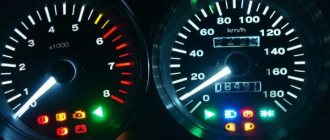
Then we put the arrows and protective glass in place. After modernization, the instrument panel looks bright and unusual.
LED lighting not only looks unusual and bright, but is also a good addition to the car in terms of economy, which helps save battery power, since LEDs consume 80% less energy than a regular light bulb.
Source
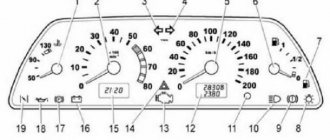
How to change the color of the instrument cluster illumination
1. Use SMD of the desired color. For example, use white LEDs to illuminate one part of the panel, and blue LEDs for the other.
2. Use a light filter (electrical tape or film of different colors) together with white LEDs. We stick it on the desired area, as a result of which we get the illumination of the desired color. To change the color, you do not need to use a soldering iron, just disassemble the instrument panel and stick a film of a different color.
It is worth noting that the hands have an orange coating. To change the illumination of the hands, wipe off the varnish with nail polish remover and, if necessary, apply a new varnish of a suitable color. Another option is to use LEDs for the arrows of the desired color.
You can change the backlight of the screen (display) not only by replacing its LEDs, but also by turning the film over. First, we tear off the film from the display, clean the remaining adhesive with a solvent and glue the film on the back side. This results in an inversion of the panel display:
3. Use RGB-SMD LEDs. If you want to change the backlight color at once. In this case, you will have to additionally output switching control.
Why and how often to change the backlight
Dashboard lighting bulbs are replaced primarily when they burn out. Sometimes the owner may not like the color scheme. In this case, the light sources are also reinstalled. Often people try to replace them with brighter and more durable led elements. The specifics of such work require knowledge of the basics of electrical engineering and the ability to correctly calculate the characteristics of the devices used. Otherwise, you can simply damage the equipment. Therefore, if you have insufficient experience, it is better to contact a specialized car service center for help.
Do-it-yourself dashboard overexposure
You will need: remove and disassemble the instrument cluster, SMD LEDs (unsoldered from LED strip or LED lamp), soldering iron.
The process of replacing LEDs on the instrument panel board consists of unsoldering the standard SMD LED and soldering a new one in its place. During such tuning, there are several important points to consider:
- take your time so as not to damage the conductive traces of the board;
- observe the polarity (SMD LEDs have a bevel on one side, install a new LED in the same position);
- do not overheat the LEDs; high temperatures may cause them to fail;
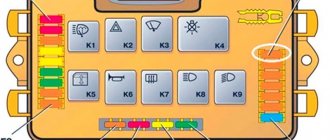
After soldering the required LEDs, it is recommended to check the backlight. To connect the instrument cluster at home, you need to apply +12V to pins 19 and 21, and ground to 17. You can also verify that the installed LEDs are working properly using a multimeter in “tester” mode, connecting the probes to the LED according to the polarity (red probe is plus) :
Panel assembly
Once you have verified that all the LEDs are working, you can assemble the panel. To do this, you need to bring all the wiring from the backlight onto the board and solder it securely. Soldering the wires must be done in a certain sequence, otherwise the LEDs will not light up. If there are long wires left, it is advisable to shorten them so that during installation they do not fall into the grooves of the latches. When all errors have been eliminated, you can put the instrument panel in place and screw it in place.
Using a similar principle, it’s time to replace the buttons for turning on the low beam, the dimensions of the power windows, etc. But you need to take into account some of the features of the buttons. The VAZ-2114 car may have strictly standard buttons and a newer modification.
In order to get to the LED in the old version of the button, it will have to be completely disassembled, and it is important not to lose the springs, which are conductors. Assembling old samples will also require a lot of time and perseverance. With the new type of buttons, everything is much simpler, since they are attached using latches, and metal plates are installed inside instead of springs.
Purpose of additional lighting
Additional dashboard lighting is intended for:
- ensuring a more original appearance of the instrument panel;
- better lighting of the main components of the PCB;
- providing additional lighting for the car interior;
- increasing safety while driving - if the backlight of the instrument panel effectively illuminates the dashboard, this will allow the driver to pay attention to the main parameters in a timely manner.
Installing a diode light bulb in the tidy
If you want your instrument lighting to be as efficient as possible, then the best option would be to install LEDs; in this case, you have several options:
- The dashboard lighting can be arranged using individual LED elements, so you can provide effective decorative lighting. It is necessary to take into account that the diodes themselves may have different colors; accordingly, such lighting can become part of the tuning.
- Also, the backlight of the instrument panel can be organized using a diode strip, which is often used in everyday life. If you get tired of the color of the glow, the diode strip can be completely replaced. The installation procedure will not take much time, since the tape has a self-adhesive backing.
Which light bulbs are suitable
In most modern cars, the following three types of light bulbs are used to illuminate the dashboard:
| Lamp type | Peculiarities |
| Flask only | This light bulb is easily inserted into a socket already located on the device. The main advantage is the possibility of constant reinstallation when the old ones burn out, which in the end will be beneficial. An example of this type is the Philips BlueVision Ultra. It is installed both in the dimensions and in the dashboard. |
| Flask with cartridge | In production, the flask with leads is inserted into the cartridge and welded. A burnt-out light bulb will have to be replaced along with the socket, which is quite expensive. |
| LED | Long-lasting LED elements are also made with removable and non-removable bases and can last about 40-50 years without burning out. However, they are more expensive than regular light bulbs and produce a strictly cold light, which is not always comfortable for visual perception. |
Advantages of LED lighting
The modern automotive market offers users a huge number of different types of lighting sources that can be used for car tuning. It must be taken into account that not every car needs this, since most manufacturers today equip cars with diode lighting during production.
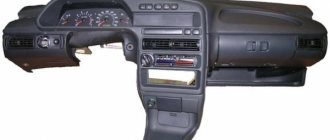
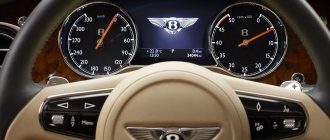
Photo gallery “Different dashboards”
However, in many cars, the backlight of the speedometer and other instrument panel elements is not as effective as we would like, so car owners decide to change it. In particular, this is especially true for older vehicles produced when LED lighting was not as common.
Why many car enthusiasts choose LEDs:
- Due to the small size of the light sources themselves. This makes it possible to install a light bulb anywhere on the control panel.
- Easy to solder diode components together for their further connection. But you need to take into account that if you are dealing specifically with a diode strip, then to perform this task you should follow some rules.
- The ability to achieve full illumination even with the use of a limited number of diode elements.
- One of the main advantages is that the car owner can organize both regular white and colored lighting. You can use yellow, red, green, blue light sources. In addition, if one of the components fails, it can be easily replaced if necessary.
- Diode lamps consume significantly less electricity. This is especially true for cars with anti-theft systems that operate on a battery (the author of the video is the MrMacyuk channel).
Simple and fast upgrade
In principle, with your own hands you can either completely replace the instrument panel of a VAZ 2110 or tuning the existing one.
One of the quite popular options is replacing light bulbs with LEDs. Moreover, there is no difficulty in this - you need to remove the light bulbs and insert LEDs in their place.
However, there is one small trick: they work well only if the polarity is observed! If the LED does not light up immediately when connected, you need to remove it, turn it 180 degrees, then reinsert it into the socket.
Even such a simple replacement will increase the brightness of the dashboard, but this is not enough, it is hardly worth completing the tuning with your own hands.
Instructions for replacing the backlight
So, if you decide to change the color of the control panel lighting, then first of all you need to go to the store and buy diodes or LED strip.
- First of all, disconnect the terminals from the battery.
- Sit behind the wheel of a car, move the seat back, if possible, lower the steering wheel.
- The next step will be to remove the tidy itself. The dismantling process will be individual for each car, so at this stage we recommend using the service book for setting up and operating your car. It should describe in detail all the nuances of this process. But in general, this procedure usually does not cause difficulties for car enthusiasts - you just need to unscrew the bolts or disconnect the clamps, and then disconnect all the wires connected to the device.
- Then the glass is detached or peeled off. If it is fixed with glue, then a hairdryer may be required to unstick it; you should treat the tidy around the perimeter with hot air.
- When the glass is disconnected, you can check the functionality of existing lighting sources using a tester. Of course, this is necessary if you are just replacing burnt out bulbs and not all LEDs. Now we change the lamp itself - for this, first of all, the base is dismantled - it can be unscrewed by hand or with pliers, counterclockwise. This procedure is repeated in a similar way with all other light sources.
- If the light bulbs themselves are soldered to the device, then you will need a soldering iron to remove them. Unsolder all light sources one by one. In this case, you need to be very careful, since when changing the backlight and replacing lamps, you can accidentally damage the tracks on the panel.
- When all light sources are sealed off, the procedure for installing new diodes is performed. Now you just need to solder them into the seats and check their functionality.
Price issue
The cost of diode light bulbs today averages from 20 to 150 rubles per piece, depending on the type and manufacturer. As for the tape, its average price is about 100-200 rubles per meter.
Organization of backlighting of stove control buttons
The second most popular situation in organizing the lighting of the dashboard in a car is the illumination of the stove control buttons.
Stove control buttons
Foil reflector
The organization of the backlight of the console buttons intended for controlling the stove is carried out as follows:
- First, remove the handles, as well as the glass from the control unit;
- We make a reflector out of foil. It will need to be secured under the removed glass;
- then carefully unscrew the lower part of the console. Under it there will be a cartridge with an old light source, which must be replaced;
- replace the old light bulb with an LED;
Ready-made console lighting
The simplest way to create backlighting involves the following manipulations:
- take the button out of the console;
- we disassemble it into its component elements;
- inside such a button there should be a light bulb that changes to an LED;
- if necessary, you can remove the light filter from the button or combine it with a new diode glow. As a result, you can get a new beautiful and unique shade.
As you can see, illuminating the console designed to control the stove in a car is quite easy.
How many light bulbs are there in the 2107 dash for illumination?
To illuminate a standard seven panel, only five light bulbs are used. Some drivers add light bulbs to enhance the effect, but this is unnecessary if you replace the standard elements with more efficient diodes.
What kind of light bulbs are suitable for the 2107 instrument lighting?
The machine is equipped with standard AMN 12-3-1 (T3W) type illuminators, which are responsible for illuminating the board and main instruments. Light bulbs of type A12-1.2 (W1.2.) are responsible for illuminating the indicators.
Such elements usually shine dimly, producing diffused and faded light.
LED lamps in the VAZ 2107 panel
For standard tidy, it is recommended to use inserts with the type of base described above. Based on the specified rating, you can select diode and more modern analogues with increased performance.