We change the gearbox shifter on a VAZ-2112 with our own hands
The gearbox is one of the most complex mechanisms in the entire car. Despite this fact, you should not panic and be afraid to repair it yourself. Even the gearbox can be repaired or prevented on its own. For example, owners of a VAZ-2112 car can replace the rocker in their garage.
How to repair a car
Many car owners of VAZ-2110, VAZ-2111, VAZ-2112 cars are faced with unpleasant vibration on the gear shift knob, which is caused by increased play in the connection. The appearance of play occurs as a result of wear of the gear shift pad. Symptoms of a broken rocker pad include rattling and loss of gear shift clarity. These symptoms include another malfunction - a broken gear selection rod hinge. If you're having problems with it, here's how to replace your selector rod pivot.
If you replaced the gear selector rod joint, and the problem did not go away, the rattling and vibration of the rocker remained, then you need to pay attention to the rocker pad
Replacing the backstage
If adjusting the link does not correct the situation, then it will need to be replaced. To do this you will need to prepare the following tool:
- The part itself (new backstage);
- Flat screwdriver;
- Wrenches of different sizes;
- Lubrication.
It is also ideal to use a lift for work, but if this is not available, then an overpass or pit will do. It is recommended to carry out the work with an assistant.
During the repair process you need:
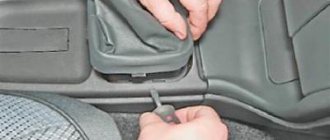
- While sitting in the passenger compartment, remove decorative elements (cover, gear selector, etc.). You can use a screwdriver for this work. The selector can be removed by simply pulling it up.
Removing the gearshift knob cover
Unscrew the nuts and bolt of the reverse lock bracket
Unscrew the bolts of the gear lever shaft
Unscrew the pinch bolt of the drive rod clamp
We remove the link together with the gear shift knob
After replacement, adjustments should be made. As practice shows, such work does not take much time, approximately 1 hour of work. Therefore, you should not immediately go to the service center. It is better to do the repairs yourself and be proud of the successful work.
Video about DIY replacement
Diagnostics
In any car, the gearbox slide serves to prevent the car from switching gears on its own . This part needs to be monitored and looked after; in addition, over time it becomes loose and requires adjustment. If the adjustment has not been made for a long time or it was performed poorly, then the driver will feel uncomfortable when driving the car.
As practice shows, those car owners who forget about the rocker and its adjustment can, over time, destroy the entire transmission system. And this is a very expensive repair.
It is because of this that prevention should be carried out, as well as due attention should be paid to the scenes. If the car begins to behave somehow differently, then it is necessary not to delay the repair.
To understand that the rocker requires adjustment or replacement, you just need to monitor the operation of the gearbox.
As a rule, when a failure occurs, the following symptoms appear:
- Difficulty when engaging 1st gear. As a rule, it is difficult to engage the gear; the driver has to practically drive the lever in to engage 1st speed.
- Possibly difficult shifting from 1st to 2nd speed.
- Due to a loose lever, it is not 1st speed that is engaged, but reverse. This is very dangerous, especially at a traffic light, at the start. It is necessary to urgently repair the rocker, otherwise the problem will only get worse.
- Difficulty engaging 5th gear, while other speeds can be engaged smoothly.
- There is play in the shift knob. As a rule, the rocker only requires replacement and adjustment is not necessary.
- Extraneous sounds appeared coming from under the car, or rather from the gearbox. As a rule, the sound becomes ringing. This problem is a disease of the entire VAZ 2110-2112 family. As a rule, such a ringing can appear after repairing the car’s suspension.
- When driving, the speed may jump. In other words, the car, gaining acceleration, independently disables the engaged gear and switches to neutral speed. For further driving, you will need to keep the lever at the desired speed constantly so that it does not jump out.
- Strong vibration that occurs on the shift knob. This is due to the failure of the scenes. It will need to be repaired to solve the problem.
If the symptoms described above appear, then you will need to begin repair work. You should completely replace the linkage or simply adjust it and gear shifting will become comfortable again. Therefore, it should be adjusted before replacing.
Adjusting the work of the scenes
The adjustment procedure will save money that could possibly be spent on completely replacing it.
Adjustment is made only in cases where:
- The gearbox was removed and installed back;
- Previously, repairs were carried out to replace the cardan;
- In the case when the hinges on the slide have turned.
Of course, adjustments can be made at other points as described earlier. Do not forget that even minimal gaps can disrupt the correct operation of the entire transmission.
Naturally, before starting repair work and adjustments, you will need to prepare the right size wrenches . With their help, the clamps will be loosened. You should also place bricks, stones or special anti-roll devices under the wheels.
When everything is ready, you can begin the work process itself. To do this you need:
- It is recommended to use an overpass or pit for repairs; if these are not available, then use reliable jacks. Next, you should go to the garage.
- When the car is ready for repair, it is necessary for safety to put on the handbrake and throw bricks or specialized devices under the wheels that will prevent the car from rolling away.
- Next, you need to crawl under the car and find a special clamp. It connects the hinge and the rocker itself. Then you will need to loosen it using a wrench.
That's the whole process of adjusting the scenes. Nothing complicated, the main thing is to follow safety precautions.
Price issue
If you decide to replace the rocker seal at the same time as installing the rocker itself, this can be considered absolutely the right thing to do. Additionally, replacing the driveshaft will not cost much, but the efficiency of such a comprehensive repair will be much higher.
Actions on your own, you only have to purchase the necessary parts and ordinary consumables. If you contact a car service, the minimum cost of the service will be 800-1000 rubles. That is, the savings are obvious.
The curtain itself costs about 400 rubles. From here it becomes clear why we did not advise buying a repair kit, but rather completely replacing the part. There will be no savings as such, but the difference as a result of the repair will be significant.
Replacing the universal joint on a VAZ 2110, VAZ 2111, VAZ 2112
Welcome! The backstage cardan is what people usually call it, but in reality it is called the “Gearbox control drive rod joint”, something like this, thanks to it, gear shifting is carried out, or rather, not thanks to it, but thanks to your hands, that is, in that the moment when you grab the gearshift knob and shift it, by means of a rod that goes from the rocker itself to the box and the next gear is engaged, and the cardan is an intermediary in this matter and an assistant in shifting gears, if the cardan is severely deformed, then you simply cannot change gear You can, or you can shift, but with great effort, and it’s not a fact that that particular gear will turn on and not any other.
Note! In order to change this hinge (in the future it will be called that), you will need to stock up on tools, which will include: Wrenches and spanners (Whichever is more convenient for you), and you will also need a screwdriver and a rubber hammer (If you have this one, if not, then take the regular one)!
Summary:
Where is the rocker shaft? You can only see it if you get under the bottom of the car and move the boot (Indicated by a red arrow) that protects it to the side; for an example, see the photo below, on which the blue arrow indicates the location of this very hinge:
When do you need to change the driveshaft? It is changed as it wears out, namely, when it wears out, the gears may not engage correctly, for example, you turn on the first gear and your reverse gear turns on instead, and also this hinge, many car owners are replaced with the same hinge, but only from the viburnum, but indeed the hinge is from Kalina does not have any play, therefore the gears are engaged clearly and the gearshift lever travel itself becomes less than if we take, for example, a standard hinge from a VAZ 2110, but there is one thing!
The whole point is that the Kalinovsky joint has no play, which means it will put more force on the gearbox, in addition, due to the fact that there is no play in the joint from the viburnum, all the vibration that comes from the box will reach the gearshift knob, unlike the original one a hinge from which much less vibration will go to the handle.
Note! Let’s say something else about the viburnum hinge, if your gearbox hasn’t been repaired for a long time and from time to time it knocks out gears when driving (Gears can knock out gears due to heavily worn gear teeth and because of worn out forks that are responsible for engaging the gear), then It is not recommended to install a Kalinovsky hinge on your car, because as mentioned earlier, it transfers more load to the box and therefore it will fail very quickly, so be careful!
How to replace the universal joint on a VAZ 2110-VAZ 2112?
Note! It is possible to remove this hinge only on an overpass, inspection hole, or if you raise the car, because this hinge is located under the bottom and you will need to crawl under it to unscrew both bolts that secure it!
Removal: 1) At the beginning, as you already understood, you will need to crawl under the car, after that, look for the boot (Indicated by the arrow) and the hinge itself, which is located under this boot, so after that, take two keys in your hands and hold the bolt with one to prevent it from turning , loosen the nut of this bolt a little as shown in the figure, and after the clamp nut is loosened, grab the rod with your hand and remove it from the hinge as shown in the small figure.
Note! Before you start unscrewing the nut of the tie rod bolt, drag the boot towards the box so that it does not interfere, and after you disconnect the link, drag the boot towards it and thereby completely remove it from the car!
2) Now you will need to unscrew another bolt that secures the hinge in the front part to the gear selector rod, so after this bolt is unscrewed, you can pull the hinge and calmly remove it from the place where it is installed.
Note! When you install the new joint, you will need to get these bolts into the hole in the gear selector rod, so remember approximately where this bolt is located after installing the new joint in the same place and screw it in so that it fits into the hole in the gear selector rod!
Installation: Installation of a new hinge is carried out in the reverse order of removal, but only when you install the hinge, the link will definitely need to be adjusted, otherwise the gears will not engage clearly and instead of, for example, first gear as mentioned earlier, the reverse gear may easily engage. (For information on how to adjust the rocker, see the article entitled: “Replacing the rocker on a VAZ”)
Additional video: If you want to learn in more detail how the hinge is removed and installed, then watch the video below that clearly shows everything:
Source
Alternative supports
Replacement cushion for VAZ 2110
Considering the long-standing problem of Samara and a dozen, the manufacturer immediately released a whole series of alternative pillows:
Let's now consider their features:
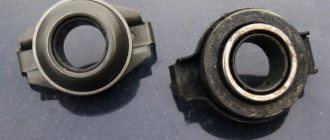
- The support of JSC-BRT and the peculiarity of its structure is contained in a hinged product, which replaced the bearing in this place. At first glance, it looks like a panacea, since the general principle of operation seems to be clear: the creators of this technical innovation used an element that has increased rigidity in the radial direction. At first glance, the sounds should disappear and the car should become silent on uneven roads, however, conflicting reviews from the motorists themselves do not allow us to completely agree with this fact.
- An alternative to OAO-BRT is SS-20, where a steel bushing was installed in place of the standard bearing, which was completely welded into a rubber damper. The manufacturer of this new product claims that the SS-20 will completely eliminate the appearance of elevators and extraneous sounds. Moreover, the manufacturer directly promises that the SS-20 will be able to guarantee the classic behavior of the rocker (see Replacing the rocker on a VAZ 2110 on your own): regardless of the topography of the road surface, the lever will be stable and without extraneous sounds.
- The developers of "Assomi" boldly claim that the use of a special prescription rubber mixture will completely smooth out all impacts and sound noise, thereby significantly increasing the overall level of comfort of the car.
VAZ 2110 gearbox rocker
So, you need to choose who to trust, because there are a huge number of manufacturers to choose from, who all guarantee the high quality of their products. And most importantly, they guarantee that they managed to create a universal high-tech product that is most effective from a practical point of view.
When to change your pillow
VAZ 2110 backdrop
Factors that indicate the need to replace the wing cushions:
- extraneous sound during movement, the irradiation of which can even spread to the body of the vases;
- traces of hardening or cracking of the rubber cushion are visible, as well as if it is separated from its metal base;
- there is a pronounced increasing vibration that has not previously been observed;
- in case of unsatisfactory backlash length, etc.
Replacing the backstage on VAZ 2110, VAZ 2111, VAZ 2112
Welcome! The rocker - it is responsible for changing gears in the car, it stands under the bottom of the car and goes into the interior, at the end of the rocker (on its rod) a cover is put on, which is popularly called the gearshift knob cover, you also grab this cover when changing gears in the car .
Note! To replace the rocker on a car of the tenth family, you will need to stock up on: A set of wrenches, as well as an extension cord with a socket head and a screwdriver!
Summary:
Where is the backstage? As mentioned earlier, it is hidden under a cover (Indicated by an arrow), so to get to it you will need to first pry the cover in the front part with your nails and then remove it from the backstage and then you will have almost complete access to it, and practically because that the rest of the rocker is located under the bottom of the car.
When do you need to change the backstage? Many people at the very last moment think about the rocker, because if the rocker is incorrectly adjusted or worn out, such things happen to the car that the first thing that comes to mind is a malfunction of the box, but still, let's look at these things that will tell you that the rocker is not adjusted correctly or needs to be replaced, firstly, the rocker may stop engaging the first gear, and with the exception of all the others except the first, the fifth may not engage, and the last sign that also indicates a malfunction of the rocker is when you get into the car, engage first gear and then give the gas to take off beautifully, but instead of your car starting to move forward, it suddenly goes back into the car parked behind, of course I don’t want you to find yourself in such a situation, well, the point is that when malfunction or if the rocker is incorrectly adjusted, after engaging first gear, reverse gear can easily engage and you will go back without expecting it.
conclusions
At the end of the work done, it is necessary to make a test drive and check the functionality of the rocker and gear shifting. If necessary, the procedure must be repeated in a similar manner.
The rocker - it is responsible for changing gears in the car, it stands under the bottom of the car and goes into the interior, at the end of the rocker (on its rod) a cover is put on, which is popularly called the gearshift knob cover, you also grab this cover when changing gears in the car .
Replacement
If it was not possible to improve the performance of the gearbox, then the whole problem is in the linkage, which has failed. It will need to be replaced or repaired.
In addition to the symptom described above, when the gears do not shift normally, vibration of the shift lever can be a problematic symptom of a damaged linkage.
Note. If vibration of the shift lever is observed, this means that there is increased play in the lever hinges, which need to be repaired.
We arm ourselves with the necessary tools:
keys 10, 12, 14; side cutter; screwdriver
Started:
open the hood of the car;
we find the nut of the bolt responsible for the terminal connection of the tip of the lever and the gear shift rod;
remove the turnbuckle from it, as well as the protective cover;
we return to the car interior;
remove the frame of the lever cover that controls the gearbox (you need to remove the cover, despite the force of the latches holding it);
the lever cover must be turned inside out;
We take a knife or side cutter with which we cut the clamp securing the cover;
remove the cover from the lever.
Note. The clamp securing the gear lever boot is a disposable option. Therefore, it is not a pity to cut it, but during installation you should install a new one.
remove the lining of the floor tunnel in the cabin (front part);
Unfasten the axle lock from the lever;
remove the lever axis, removing it from the holes of the rocker and lever;
Now the gear shift lever will come out easily if you pull it up;
it’s time to push the guide sleeve inside the lever body with a screwdriver (you should move it along the shaft);
now we find four bolts securing the lever housing to the body;
turn them inside out;
remove the body;
remove the shaft;
the guide sleeve is removed from the shaft.
Note. We carefully inspect all removed parts. If, for example, the hole in the guide bushing is worn out or its rubber mass is deformed, the entire bushing is replaced as an assembly. Also, if there is play in the hinges or the hole for the lever axis is badly worn, the entire linkage is replaced.
we install the parts back;
We adjust the gear shift drive.
The corresponding video will help you learn more about replacing the scenes with your own hands. It is also recommended to study photo materials.
The step-by-step instructions presented above are a chance to save a lot on repairs, the price of which at service stations is growing every day.
How to check a wheel bearing follow the link.
Adjustment
Before repairing a car with your own hands, it is necessary to eliminate all risk factors regarding the problematic shifting of the rear and fifth speeds of your vehicle.
Remember that setting the scenes can be done using numerous methods, which are in some way interconnected with each other, but are performed in completely different ways. And so we will try to give all the options for the process of regulating the scenes on a domestic car.
Firstly, we carry out the process of regulating the scenes using reverse speed. We switch the box to move it back, first you need to loosen the clamp and the lever switch to where it should be located when reverse gear is engaged. After this, you must carefully tighten the clamp. After all the procedures, the problem regarding the adjustment of the backstage is completed, which means it is completely resolved. Secondly, you can use the second method. This method is used when it is not possible to easily switch to reverse speed in automobile mode. Here it is necessary to do all the work that is associated with regulating the first gear. Switch the box to first gear, loosen the rocker clamp, remember that it is located at the bottom of your vehicle. Next, turn the rocker drive counterclockwise until the gearshift lever rests against the plastic stopper for the reverse gear. Now you need to tighten the clamp and complete the process of adjusting the rocker of your vehicle.
Perhaps now we can try to answer the question of how to set the neutral state of the gearbox shift knob? Probably, you should start with an accurate and detailed calculation of the depth of landing of your vehicle's rocker on the cardan.
It is worth remembering that after such changes, the gearbox lever may begin to make a nasty rattling sound. Please also remember that in this case you can drive your vehicle under such circumstances. There is only one drawback: the driver worries about the technical condition and begins to be distracted from the road. No more nasty sounds can harm you or your vehicle. In any case, it is necessary to foresee in advance all kinds of breakdowns and technical deficiencies that could cause severe damage.
How to change
If you don’t bother with alterations and find where the short-throw VAZ 2112 gearbox assembly is sold.
Then let's do the replacement:
To gain access to the bolts securing the gearbox lever, we need to remove the protective decorative cover from it along with the knob
The knob itself is not screwed to the lever, so it will be enough to pull it hard to remove it
Now you need to disconnect the gearbox lever rod from the cardan; to do this, you first need to loosen the clamp using a key at “13”
Pulling the shaft off the cardan
Let's go to the salon
And remove the locking ring, then remove the lever with the ball and spring from the plastic case
Then we pull the lever with the rod into the cabin, to make it more convenient, you can disconnect the rod from it, although it can be pulled out without disconnecting, it’s already been checked
We go down the car to disconnect the traction drive
First of all, we pull off the rubber boot from it, then, using the “10” key, unscrew the bolt that is attached to the left side of the cardan shaft
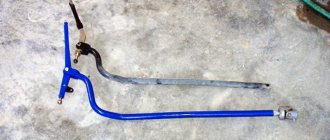
The VAZ 21124 short-stroke gearbox requires replacing the Priorovsky cardan with a Kalinovsky one
As you can see, the cardan rods differ greatly in length
This problem can be solved by simply shortening the Kalinovsky rod
This must be done, taking into account the type of short-stroke link
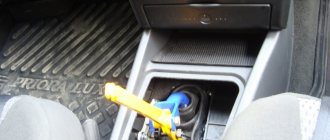
There are situations when the rod may not fully enter
As a result, the gearbox lever moves towards the parking brake.
This can be corrected by shortening, if necessary, know that you need to cut off no more than 1-2 centimeters
We install the “Kalinovsky” cardan, first lubricate it from the inside with “Litol” lubricant
The fastening bolt screws in easily because it has a cone-shaped shape; you should not tighten it, however.
Installing traction through the cabin
It is more convenient to perform the installation with an assistant: so that one holds it in the cabin by the elastic band, and the second carefully stretches the rod
Now assembly
And so we have in our hands the short-throw shift link of the VAZ 2112 gearbox, the removal of the old one is completed, all that remains is to screw on the new link:
We put a rod on the cardan shaft
Then we assemble the mechanism that blocks accidental engagement of reverse gear, lubricate the spring ball
Adjusting the gearbox lever
Then we clamp the clamp on the rod with the “13” key
Note: If you assemble the mechanism that blocks accidental engagement of reverse gear first, then due to the long rod it may not be possible to put the cardan rod on the rod. Shortening the driveshaft may solve the problem. And don’t forget to put the boot on the driveshaft.
Now let’s adjust the mechanism that blocks accidental engagement of reverse gear, since after adjusting the rocker it may not fall on the blocking plate to which it usually clings
A similar problem is solved as follows: remove the plate and adjust the hook
In the bracket itself that secures the plate, there is a cutout for which the engagement occurs
Our task is to adjust or modernize this plastic hook using sandpaper or a file
I once found out while driving why the rear one was switched on instead of the first one. The solution was proposed to be simple and effective: replacing the lining with a stop (which blocks the reverse gear from being engaged without pressing the lever). Yes, the old lining and axle were ground off and definitely needed replacement. But it did not help. The lever rested against the pad and the rear one still turned on. Adjusting the backstage helped. It can be done by two people if there is a hole in 5-10 minutes.
It was necessary to loosen the screw that holds together part of the rod coming out of the passenger compartment into the box. Move the lever slightly to the left 1-2 centimeters. Tighten again. And that’s it, the gears engage as they should, from stop to first and second. From pressing and then to the left - back.
We also pumped up the tires and replaced the left rear nipple (it was leaking). Included in the amount.
The gearbox on the VAZ-2110 sometimes starts to act up. If you neglect the care and maintenance of this part of the car, you can get many problems with the operation of the gearbox. As a rule, these are inaccuracies in gear shifting, characteristic “knocking out” of the gear, crunching and clanging when manipulating the gearbox lever. Some car owners believe that all these symptoms indicate a gearbox failure.
How to replace and adjust the rocker on a VAZ 2110-VAZ 2112?
Backstage adjustment:
Note! Before you go to the auto store and buy a new rocker, be sure to try to adjust the old one first so as not to waste money, maybe everything is fine with the old rocker!
1) At the very beginning of the operation, we will tell you why the adjustment of the rocker may go wrong, namely, after removing the box, after replacing the cardan shaft, or after unscrewing the nuts and bolts that secure the tension clamps of the rods that come from the rocker, and in other cases.
2) Now let’s move on to the actual adjustments, firstly, you will need to first drive the car into a pit or lift it using a lift, then climb under the bottom of the car and there you will find the boot under which the driveshaft itself is located (the boot is indicated by a red arrow), next to with this cardan and the boot that covers it, the end of the rod coming from the rocker itself will be attached, and this end will be attached using a tie clamp, so take two screwdrivers in your hands and with their help loosen the bolt nut a little (the nut is indicated by a blue arrow, and the bolt green), while when you loosen, hold the bolt itself with one wrench so that it does not turn, and with the other at this time loosen the nut, after the nut is slightly loosened, take a screwdriver in your hands and insert it into two holes, namely in the hole between the tie clamp (Indicated by a yellow arrow) and into the hole of the rod itself (Indicated by a white arrow), thereby widening both holes (In fact, these are not holes but a groove, so in the future we will use this word) so that the link rod can easily move relative to gear selector rod.
Note! Before you crawl under the car, put the car into first gear!
3) After you loosen the tension clamp, get out from under the car and return to the car interior. In the cabin, move the gear shift lever all the way to the left, but forward or backward and do not even try to pull it.
4) And to complete the operation, again climb under the car and tighten the nut of the same bolt that secured the tie rod of the rocker link.
Note! When all the operations are completed, test the gearshift lever for functionality, namely, check whether all gears engage clearly, start the car, drive it a little and if the shifter is working, then everything will be fine and you won’t even need to change anything!
By the way, another way (almost the same method) of adjusting the rocker, see the video clip below, in this video an example is shown on a VAZ 2109 car, but don’t pay attention to this, since the entire gear shift mechanism is on front-wheel drive cars VAZ, including the top ten, is practically no different from each other!