Lada Kalina Station Wagon Snow White › Logbook › Installing a standard antenna with GPS/GLONASS.
Greetings boys and girls!
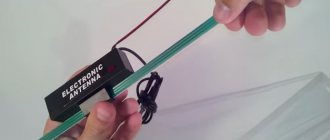
As you remember from this post, Snow White and I received a standard antenna, which is installed on equipment with standard navigation. It has two wires: the first is connected to the MMC as a radio signal receiver, the second is used to receive a GPS signal. For work we will need: ● A Phillips screwdriver with a long blade and a magnetic tip. ● Socket wrench or socket with extension 8. ● Socket wrench or socket with extension 22. ● Electrical tape. ● Ties. ● Wire cutters. ● Puller for plastic parts.
So let's get started: first of all, we remove the lampshade. To dismantle the lampshade, carefully remove the glass by prying it in the corresponding recesses. Then we remove the plastic screen, carefully prying it off from the front and back; it is secured with three latches.
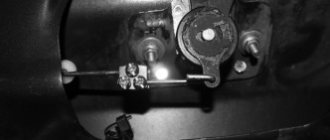
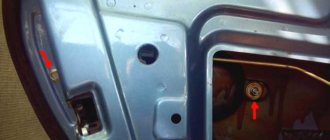
And before us appear two self-tapping screws securing the lampshade to the ceiling. We unscrew them, carefully remove the lampshade from the ceiling upholstery, unfasten the power supply and remove the lampshade completely. We see the mounting of the antenna and its wires. Using a size 8 wrench, unscrew the fastening nut, move the wire to the side and remove the antenna from the outside.
We isolate the wire just in case (I didn’t dismantle it, because it doesn’t interfere), then we pass the wires of the new antenna into the hole and install it. NB:
If you work alone, then secure the antenna on the roof with electrical tape, tape or something else, so that during the process of fixing it with a nut, it does not try to escape from us.
Then we carefully separate them. The antenna wire for the radio signal will go along the right post, and for GPS on the left. Why is that? Because for cars with standard navigation, the wire is connected through an extension cord. On the advice of sokol787, I took a different route, routing the wires to different racks. The wire is just long enough to reach the dashboard.
After the antenna is mounted, remove the passenger sun visor and its fastenings, unfasten the passenger pillar trim and the side panel trim. And we begin to carefully lay the wire under the ceiling, leading it to the rack, where we secure it with standard electrical tape.
Then, bypassing the side airflow nozzles, we bring it down and take it under the glove compartment. We put our hand under the glove compartment and feel the groove for securing the standard connector. We take it out, unfasten the old wire and connect ours. We have radio. We put the wire back into the groove, install the trim and sun visor back.
We perform similar manipulations on the driver's side. Then, using a puller, carefully remove the decorative lining and unscrew the self-tapping screw securing the lining of the shield. Don’t forget about the top two, after which we carefully pull it towards ourselves, having first lowered the steering column. We unscrew the four screws securing the instrument panel, bring it towards us and carefully unfasten the harness. It is secured with a lock, so be careful. Having removed the instrument panel we see. We see that the connector is “male”, just like on our antenna wire.
Since the GPS receiver is located in the device itself, an adapter was ordered for 250 rubles from Uncle Liao’s booth. I didn’t want to pay 850 rubles for a standard extension cable. Therefore, the instrument panel was returned to its place, the GPS cable was wound up and temporarily hidden under the counter, and the navigation still works as it did through the u-blox 7 whistle. When the adapter arrives, I will connect everything and test the antenna in action. So don't switch