Replacing the coil with a 16-cl. engine
I think that there is no need to talk about the fact that VAZ 2110, 2111 and 2112 engines come in both 8 and 16 valves.
In previous articles we have already looked at the process of replacing a module with an 8-cell one. motor. Today we’ll look at the example of another power unit - 16V. On the one hand, this is convenient, and if one of them fails, you don’t have to change everything. On the other hand, maintenance is more expensive when replacing all these parts at once.
It’s quite easy to do the replacement yourself and for this you will need:
- socket head 10;
- extension;
- ratchet handle.
Ignition module
As mentioned above, the “ten” has 4 engine types: 16 and 8 valve internal combustion engines, as well as with a volume of 1.5 and 1.6 liters. This will lead to differences in the ignition modules. Depending on the installed engine with a certain volume, its own ignition module will be installed.
Differences
The main differences between the modules will be the size and mounting holes. In a 1.5 liter internal combustion engine, the ignition module is larger in size in contrast to the 1.6 liter engine. The cost of the modules depends on the manufacturers, but it should be noted that the MZ from a 1.5 liter engine is always more expensive than a 1.6 liter one.
16 valve MZ
In a 16-valve internal combustion engine, the ignition module is installed on the valve cover near the oil filler neck.
8 valve MZ
The MZ on an 8-valve engine is installed on the front of the cylinder block between the dipstick and the breather.
History of the VAZ 2106 car
The VAZ 2106 diagram gives motorists a detailed idea of the location of the main components of the vehicle. This model is a small-class car (the version that was exported is Lada 2106) with a four-door body.
It is equipped with an engine with a displacement of 1.57 liters and a power of 75.5 hp. The motor is located in the front part, along the longitudinal axis. The history of the VAZ 2106 brand began in 1976. It was a modernized model 2103.
In the summer of 1998, production of cars and their modifications was stopped at AvtoVAZ OJSC, but, at the same time, began at RosLada in the city of Syzran. Since July 2001, this model began to be produced from vehicle kits at DOJSC Izhmash-Avto.
Device
The ignition module has a common structure regardless of engine size. Inside the switch there are two high-voltage coils and an electronic circuit with many keys.
The coils are designed to switch high voltage and supply it to the spark plug to form a reliable spark in the combustion chamber of the engine.
The ignition module produces a spark in pairs, that is, each of the coils located inside the module is responsible for generating a spark on two cylinders: the first-fourth, the second-third.
Symptoms of a problem
Based on some signs, it can be determined that the culprit of a malfunctioning internal combustion engine is the MZ. Below is a small list of symptoms indicating failure of the MH.
- Failure of two cylinders at once, namely 1-4 or 2-3;
- Increased fuel consumption;
- Detonation at idle speed;
- The engine does not develop power;
- Difficult starting on a hot internal combustion engine;
These signs indicate a malfunction in the ignition system. These signs also apply to other possible breakdowns: spark plugs, wires and even injectors, but first of all you need to pay attention to the MH.
Checking for errors
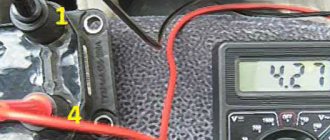
Checking the ignition device for malfunctions always concerns the location of the wires on the ignition module of the VAZ 2114. For simple diagnostics, we simply measure the resistance between the wires of the first and fourth cylinders and the second and third cylinders with a multimeter. If the indicator is 5.5 kOhm (switch the multimeter to ohmmeter mode!), then everything is in order. There are also other checks:
- The first thing to check is the wiring block; it is better to disconnect it and check it with a multimeter in voltmeter mode: we attach the multimeter probe to pin A, and throw the other one onto the ground of the sliders. We start and look at the voltmeter values: excellent. If the voltage fluctuates around 12 V. If there is no voltage, check the ignition coil fuse, it may blow, as well as the correct connection of all contacts. By the way, about that. Another way of checking can indicate that the circuit of contacts is closed incorrectly: by connecting a tester to both contacts - A and B - connect a multimeter to it; if it blinks, then the circuit is in perfect order.
- It’s worth checking all the high-voltage elements (with the same multimeter in ohmmeter mode); if they are installed incorrectly, the ignition coil will burn out.
- To understand whether the ignition module behaves correctly, move the wire block, you can knock on it. The contact should not disappear, if the engine responds to your movements, the contact is unclear. It can break at any moment.
Symptoms of an ignition coil malfunction are often displayed by the system during basic diagnostics in a service center (or in a garage environment via a connected laptop with a special program) in the form of errors:
- P0351 – break in the winding of wires of cylinders 1-4
- P0352 – break in the wire winding of cylinders 2-3
- P3000 (P3001 P3002 P3003 P3004) – the ignition does not work.
All these errors are motivation for a deeper diagnosis of the situation, on which the decision will depend: replace the module with a new one, or repair it. Also, these errors may indicate a possible malfunction of one of the spark plugs or an explosive contact.
Cost and article
The table below shows the cost of the VAZ 2110 ignition module depending on the manufacturer and VAZ engine size.
| Engine volume | Number of valves | Manufacturer | vendor code | Price, (rubles) |
| 1,6 | 8 | JSC SOATE | 2111-3705010-03 | 905 |
| 1,5 | 8 | BOSCH | F000ZS0211 | 2600 |
| 1,5 | 16 | StarVolt | 2112-3705010 | 1600 |
| 1,5 | 16 | Omega | 2112-3705010 | 1590 |
Replacement
Replacement is quite simple and effortless. To replace, you will need a ratchet with an extension and a 10mm socket.
Replacement process
- We remove the negative mark from the battery, since the work is carried out on the electrical equipment of the car. This will avoid an unintentional short circuit in the vehicle's network.
- We remove the high-voltage wires from the MZ and the power connector.
- We unscrew the nuts securing the MZ and dismantle it.
Pay attention to the order in which the wires are connected. Do not confuse them, otherwise the car engine will not start. Cylinder numbering starts from the timing mechanism from left to right. Connect the wires as it is written on the Ministry of Health.
Source
Checking the performance of the coil
How to check the ignition coil of a VAZ-2106 car at home? The best way is to use a multimeter or ohmmeter. Winding testing using this equipment is carried out as follows:
- to make sure that the primary winding is in good condition, connect an ohmmeter to its side terminals and look at the resistance readings. For a fully working ignition coil, it should be at least 3-4 ohms. Otherwise, the device will need to be repaired or replaced;
- to check the secondary winding, one of the ohmmeter outputs is connected to the same side one, and the second one is connected to the central terminal on the pulse transformer itself. The normal value is somewhere in the range of 7.5-9.2 ohms. To get accurate data, it is better to consult your vehicle's owner's manual. If there are any deviations, the ignition coil must be replaced.
Before performing the checks described above, you must disconnect the negative terminal from the battery. This will help eliminate the risk of short circuits.
Replacing the ignition coil on a VAZ 2110, VAZ 2111, VAZ 2112
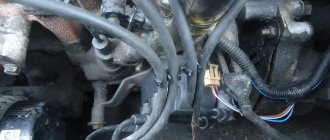
Where is the ignition coil located? Its location is not very convenient, especially if the battery is not removed from the car, but why? Yes, because it is located under the battery, and getting to it can be a little problematic, especially if a person is of a large build.
Note! If the battery still bothers you, then look at the article: “Replacing the battery”, it describes in detail how to remove the battery from the car!
When should you change the ignition coil? 1. The ignition coil itself can live a very long life, but as they say, anything happens in this life! Therefore, below we will describe several problems that can help you understand that the ignition coil has become unusable:
- The first problem that an engine may experience when a coil fails is that the car’s engine starts to run jerkily.
- Then the engine speed may begin to fluctuate.
- The engine may also be unstable at idle.
2. Now let's look at the external damage that requires replacing the ignition coil:
- Firstly, it must be replaced if through cracks are visible on the plastic cover of the coil.
- And also if chips and signs of overheating appear on it.
- And in addition to all this, the ignition coil must be replaced if there are traces of oil on it, which has leaked from the coil due to its overheating, or due to its defect and other things.
Checking the performance of the coil
How to check the ignition coil of a VAZ-2106 car at home? The best way is to use a multimeter or ohmmeter. Winding testing using this equipment is carried out as follows:
- to make sure that the primary winding is in good condition, connect an ohmmeter to its side terminals and look at the resistance readings. For a fully working ignition coil, it should be at least 3-4 ohms. Otherwise, the device will need to be repaired or replaced;
- to check the secondary winding, one of the ohmmeter outputs is connected to the same side one, and the second one is connected to the central terminal on the pulse transformer itself. The normal value is somewhere in the range of 7.5-9.2 ohms. To get accurate data, it is better to consult your vehicle's owner's manual. If there are any deviations, the ignition coil must be replaced.
Before performing the checks described above, you must disconnect the negative terminal from the battery. This will help eliminate the risk of short circuits.
How to replace the ignition coil on a VAZ 2110-VAZ 2112?
Removal: 1) Before starting work, be sure to disconnect the battery by removing the “-” terminal from it. (How to de-energize the battery, read the article: “Replacing the battery”, in the “first” paragraph).
2) Then, approaching the ignition coil, disconnect one single high-voltage wire from its central part.
3) Next, use a wrench to unscrew the two side nuts that hold the ends of the wires in place on the side of the coil.
4) Next, when the nuts are unscrewed, remove both side wires from the coil.
5) And to complete the operation, unscrew the two side nuts securing the ignition coil itself to the bracket.
Description and purpose
Ignition coil VAZ 2114 8 valves, VAZ 2113, VAZ 2115 are two two-output ignition reels mounted in a single casing. It is designed to convert low on-board voltage (12 volts) into high sparking voltage. Sparking occurs in two pots at once (1-4 and 2-3). The ignition solenoid is connected to the spark plugs by high-voltage wires with permanent tips.
Below, in the figure, the design of the ignition coil of the VAZ 2114 8 valves is presented
Where is the ignition coil of the VAZ 2110
Today the ignition module 2112 failed. Having studied the issue of price, and the price is 1380 rubles, I decided that I don’t need it, especially since new modules are a 50/50 lottery. I estimated the budget for assembling the God's spark and evaluating its advantages (reliability and low repair costs), I realized that its cost is equal to the cost of a new ignition module. 2 Astro switches for 260 rubles, 2 bundles of wires for the switch for 110 rubles, 1 ignition coil connector 2111 - 70 rubles. I had a 2111 coil. Total 810 rub. With a new coil, the budget would be 1400. I got the connection diagram here - www.drive2.ru/cars/lada/2…/vazmaker48/journal/81951
In half an hour I assembled the wiring and went to connect it. Started it up the first time. Unfortunately, after 10 minutes of operation, one of the switches burned out. Most likely because I didn’t secure them to ground. I replaced the switch and spent the evening riding, everything works great.
In general, if you don’t feel sad about suddenly spending 1000 rubles, then I’m happy with the result.
I think that there is no need to talk about the fact that VAZ 2110, 2111 and 2112 engines come in both 8 and 16 valves. In previous articles we have already looked at the process of replacing a module with an 8-cell one. motor. Today we’ll look at the example of another power unit - 16V.
On the one hand, this is convenient, and if one of them fails, you won’t have to change everything. On the other hand, maintenance is more expensive when replacing all these parts at once.
It’s quite easy to do the replacement yourself and for this you will need:
- socket head 10
- extension
- ratchet handle
Malfunctions
Diagnosing the problem will not be a problem for you if you understand a little electrical engineering and know how to work with a device such as a multimeter. If not, we recommend that you contact a specialist. A professional check of the ignition module of a VAZ 2110 using a multimeter will give you the result you need and will allow you to answer important questions.
Do not rush into repairs, since the problem may not lie in this element at all. Before checking the ignition module on a VAZ 2110, consult with professionals and arrange a check of your car. You will have to spend time and money on this, but it is better to be prepared for troubles.
Quite often, short-term breakdowns occur in the system, which soon disappear. The check engine light does not detect them, but they remain in the controller and are entered into its memory. If you try to read errors on the controller with a tester, it will not show anything, since there were problems, but now they are gone.
We have already become familiar with the signs of a malfunction in the VAZ 2110 ignition module, and the reasons for such situations may be dirty contacts, poor ground connection, electrical interference, and so on.
Connection diagram for VAZ 2107 switch
The contactless ignition system of the VAZ 2107 includes:
- Candles.
- Ignition distributor (sensor).
- Anti-interference screen.
- Non-contact slider position sensor.
- Switch that controls spark generation.
- Ignition coil.
- Assembly block.
- Ignition switch relay.
- Ignition switch on the steering column.
Wire “A” goes to the positive terminal of the car generator output. The connection diagram for the VAZ 2107 switch is shown in the figure:
Signs of a malfunction of the VAZ 2107 switch
The main symptom of a switch failure is the absence of a spark at the spark plugs. Alternatively, the spark may not be powerful enough or disappear periodically. In this case, the engine starts poorly, runs intermittently, stalls at idle, loses power, or its speed constantly fluctuates. It should be remembered that all these signs can also appear due to malfunctions of other parts of the ignition system: the Hall sensor. wires and spark plugs, ignition coil, distributor. The spark also disappears when the timing belt breaks and there is no contact in the power supply circuit of the ignition system. To accurately determine the cause, it is necessary to separately check the functionality of the switch.
Repair
So, for the VAZ 2110 the most common problem is the disappearance of voltage on cylinders 2 and 3. After some time, the engine starts working normally again if you press the rear plate of the module.
You should not put up with such a situation; it is better to immediately check the functionality of the unit, restore or replace it completely.
Removing the module
The procedure is quite simple.
- Disconnect the negative cable from the battery.
- Remove the plastic cover that covers the motor.
- Remove the wires from the spark plugs.
- Disconnect the wires from the ignition module. Their numbering is indicated on special white rings. And the cylinder number is indicated on the ignition module housing.
- Disconnect the connector from the ignition module.
- Using a 10mm socket, unscrew the three nuts that hold the block we are looking for.
- Carefully remove it, after which you can begin further work.
Now let's move directly to working with the module:
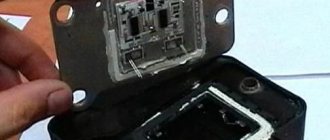
- Open the aluminum plate on the ignition module. A flathead screwdriver is useful for this.
- Inside you will find a small printed circuit board with electronic components. It is covered with a transparent layer of silicone, which will have to be removed.
- There are also wires that connect the board to the connector contacts. They are made of aluminum, so they can tear quickly.
- Tear off all the wires from the contacts, don’t be afraid. Others will be installed in their place. By the way, experts recommend using stranded wires used in computer mice.
- The ignition module circuit includes two switches and two powerful transresistors. If you decide to change these elements, you need to know that the switches are manufactured by SGS-THOMSON (model L497D1), and the transistors are of the BU931 type.
- The contacts are made of aluminum, so you will need a special flux to work with this metal.
- We solder the wiring to the board. It is more difficult to solder to the transistor collectors, since they are covered with a special material, the soldering of which is problematic. Therefore, try to hide the top coating from the element as carefully as possible. To prevent the soldering iron from transferring all the heat to the plate, place it on the stove and heat it to 180 degrees Celsius.
- Solder the wires to the contacts on the module so that they are as short as possible.
- Cover the areas where you soldered with varnish. Regular nail polish borrowed from your wife will do.
- Check if the ignition module is working.
- If everything is fine, coat the inner surface with a special autosealant, then reassemble in the reverse order.
- Upon completion of assembly, the wiring should be positioned fairly freely. Make sure that they are not compressed inside the box and that the integrity of the connections is not broken.
Carrying out such a repair of the ignition module on a VAZ 2110 with your own hands will not be difficult. But be careful, act carefully and consistently. Pay special attention to the soldering process.
If the cause of the malfunction lies elsewhere, then there is a high probability that it is better to simply replace the VAZ 2110 8-valve ignition module with a new one. The search may drag on without yielding results. Replacing the element will completely solve the current problem.
Video on repairing KZ VAZ
Source
| 1 | accumulator battery; |
| 2 | main relay; |
| 3 | ignition switch; |
| 4 | spark plug; |
| 5 | ignition coil VAZ 2114 8 valves model 54.37005; |
| 6 | controller; |
| 7 | crankshaft position sensor; |
| 8 | master disk. |
| 1 | ignition switch; |
| 2 | main relay; |
| 3 | battery; |
| 4 | atmospheric filter; |
| 5 | diagnostic connector; |
| 6 | dashboard; |
| 7 | tachometer; |
| 8 | check lamp; |
| 9 | speedometer; |
| 10 | immobilizer sensor with indicator; |
| 11 | immobilizer manual device; |
| 12 | electric fan of the engine cooling structure; |
| 13 | electric fan relay; |
| 14 | controller; |
| 15 | DTOZH; |
| 16 | ignition coil VAZ 2114 8 valves, VAZ 2113, VAZ 2115; |
| 17 | spark plug; |
| 18 | DPRV; |
| 19 | sprayers; |
| 20 | throttle assembly; |
| 21 | TPDZ; |
| 22 | DMRV; |
| 23 | empty control; |
| 24 | Lambda probe; |
| 25 | car speed sensor; |
| 26 | DPKV; |
| 27 | DD; |
| 28 | crankshaft pulley; |
| 29 | gasoline filter; |
| 30 | petrol pump relay; |
| 31 | gasoline tank; |
| 31 | gasoline unit; |
| 32 | two-way valve; |
| 33 | gravity throttle; |
| 34 | reverse breather; |
| 35 | check valve; |
| 36 | adsorber purge throttle; |
| 37 | adsorber; |
| 38 | separator. |
| 1 | spark plug 4 pots; |
| 2 | spark plug 3 cylinders; |
| 3 | spark plug 2 pots; |
| 4 | spark plug cylinder 1; |
| 5 | ignition coil VAZ 2114 8 valves; |
| 6 | diagnostic connector; |
| 7 | 1 pot sprayer; |
| 8 | injector 2 cylinders; |
| 9 | 3 pot sprinkler; |
| 10 | 4 cylinder injector; |
| 11 | ECU; |
| 12 | fuel pump switch; |
| 13 | to the electric cooling radiator fan; |
| 14 | connector for connecting the engine radiator electric fan; |
| 15 | main relay for engine control mode; |
| 16 | DMRV; |
| 17 | remote sensing; |
| 18 | DTOZH; |
| 19 | empty traffic controller; |
| 20 | adsorber purge throttle; |
| 21 | DPKV; |
| 22 | DD; |
| 23 | oxygen concentration sensor; |
| 24 | to the ignition switch; |
| 25 | Immobilizer ECU; |
| 26 | immobilizer sensor with signaling device; |
| 27 | car speed sensor; |
| 28 | spare pad; |
| 29 | to the battery positive; |
| 30 | DPRV; |
| 31 | block for connecting to the car's electrical network; |
| 32 | fuel unit; |
| F1 | fuse for the ECU and engine control structure circuits; |
| F2 | ECU fuse; |
| F3 | fuel pump line fuse |
A little about prices
We have already noted which switch and transistor are used when repairing the ignition module of a dozen. The first costs about 3 dollars, and for the second you will have to pay about 6 dollars.
Some craftsmen use a domestic analogue of the transistor - model KT848A . Of course, it costs less. But its problem is its lower quality and larger size, which somewhat complicates the repair process.
Source