A malfunction of the phase sensor , which is also called a camshaft position sensor, leads to the engine starting to operate in pair-parallel fuel supply mode. That is, each injector fires twice as often. Because of this, fuel consumption increases, exhaust toxicity increases, and problems with self-diagnosis arise. A malfunction of the sensor does not cause more serious problems, but if it fails, replacement is not delayed.
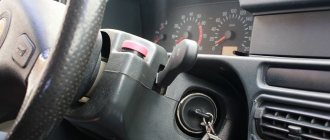
The purpose of the phase sensor and why it is not on Priora 21116
If there is a suspicion that the camshaft sensor is faulty, many car owners resort to immediately replacing the product without understanding the true cause of the breakdown. In order to correctly approach the issue of troubleshooting this element, you must first understand why it is needed.
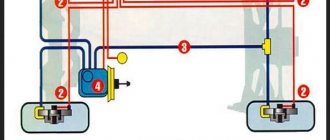
The camshaft sensor DPRV or DF phase sensor is an electrical element through which the angle of rotation of the camshaft is controlled at a certain point in time. It monitors the position of the gas distribution mechanism, thereby ensuring the possibility of phased fuel injection into the cylinders. Phased injection is a method of controlling injectors. For one complete cycle, in which the crankshaft makes two revolutions, there is one opening of the injector in each cylinder.
Phased injection scheme
Thanks to the use of a phase sensor, it became possible to implement phased injection, which ultimately has a positive effect on fuel consumption and other technical indicators.
This is interesting! On Priora there are 8 valves with 21116 engines, there are no phase sensors, since phased fuel injection occurs based on an algorithm embedded in the ECU, in which the main role is played by the electronic gas pedal (E-gas). However, it is important to understand that early Priors with 21114 engines have such sensors, and they are structurally different from the elements used on Priors with 16-valve engines.
Features of the principle of operation of the DPRV on Priora
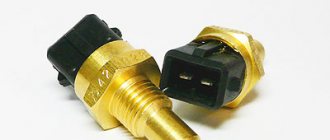
It should be noted that Priors use two types of camshaft sensors. For engines 21114 with 8 valves, it looks like this, as shown in the photo below.
They are called end caps. Below is a diagram indicating the numbers of original parts.
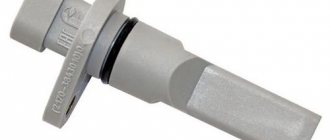
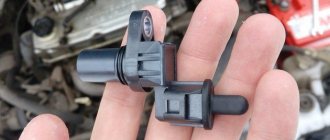
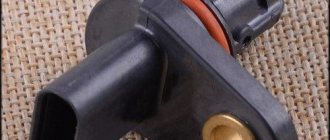
For 16-valve Priora cars, this sensor has a different appearance. The main difference is the presence of a slot (slot) at the end. Due to this gap, such products are called slotted. The photo below shows the appearance of the element.
A diagram indicating the sensor and its fastening elements is presented below.
The difference between the devices lies not only in the design, but also in their location, but you can learn about this in detail below. Next, we move on to consider the operating principle of such elements. Their operating principle is based on the Hall effect, familiar to many from physics lessons. To refresh your knowledge, below is a corresponding illustration.
Both sensors used on Priors have an identical operating principle, so next we will consider how they function using the example of 16-valve engines.
- There is a metal disk on the camshaft timing pulley (it is called a master disk). The design of this disk is not solid, but with a slot. The photo below shows a pulley with a drive disk inside. It is important to understand that this design is used on Priors with 16-valve engines.
- There is a groove (slot) in the tip of the sensor through which the disk rim passes during engine operation.
- When the slot of the master disk passes through the groove of the sensor, a low voltage pulse of about 0V is supplied to the controller (ECU). This indicates that the piston of the first cylinder is at the end of the compression stroke.
On a Priora with engine 21114, a camshaft with a cam is installed, through which the position of the valve timing is determined.
It is important to note that camshaft position sensors come in inductive and digital types. Priors use devices of the second type, which are distinguished by high accuracy and the ability to determine the position of the camshaft at the moment the engine starts.
The camshaft position sensor has three contacts. Two of them are the power supply (plus and minus) of the DPKV, and the third is a signal signal, by which the ECU determines the position of the camshaft at a certain point in time.
Converter device
What does it transform? The device uses the Hall effect - conductors with direct current placed in a magnetic field create a potential difference (voltage). This property is used in smartphone compasses.
The sensor reacts to proximity to metal by changing the voltage on the wire. The system is the same as on the crankshaft.
- DPRV has the same design features as the crankshaft sensor. The main part of the device is the coil.
- It receives 12 V voltage through two wires when the ignition is on.
- The third wire is the signal wire, the voltage on it is about 95% of the nominal value.
When the reference point passes the sensor, the potential difference becomes equal to 0.2 - 0.5 V, depending on the make of the car. This signal is sent to the electronic control unit.
About the consequences of a malfunction of the Priora DPRV
The phase sensor on the Priora affects the correct functioning of the engine. The malfunction of this element leads to a number of the following negative consequences:
- Reduced power and dynamic performance. This is due to the fact that when the ECU does not receive a signal from the DF, it goes into emergency mode. In this case, not phased fuel injection occurs, but pairwise parallel injection.
- Fuel consumption increases by approximately 10-20% (0.5-1 liter).
- The engine warm-up speed decreases, which leads to frequent turning on of the cooling fan.
- Problematic or prolonged engine starting (starts up 2-3 seconds after turning the key).
- Reduced service life of the catalytic converter, the cells of which receive unburned fuel and are burned.
That is why it is extremely important to pay attention to this element. The cost of the product is low, but in order to correctly determine that the above consequences arise due to a malfunction of the phase sensor, you need to pay attention to the characteristic signs.
This is interesting! The sealing ring for DPRV Priora has serial number 21110-3706042-00.
What signs indicate a malfunction of the Priora phase sensor
There are a number of characteristic signs that can help you determine that the camshaft position sensor has failed. These include:
- One of the main signs is prolonged engine starting. If such a symptom is detected, then it is necessary to pay attention to the serviceability of the DPRV.
- Unstable engine operation at idle (increased vibration).
- The engine starts to stall or stall.
- “Check Engine” lights up on the instrument panel. Moreover, the indication can light up constantly or light up periodically.
- On the BC or when diagnosing the engine, errors are detected with codes P0340 (power circuit malfunction), P0341 (inconsistency in the range of operating characteristics), P0342/P0343 (weak/high signal from the DPRV), P0344 (signal from the sensor is intermittent), P0345 (unstable circuit voltage ) and P0346 (high readings from DPRV).
The camshaft sensor rarely fails, and most often this occurs due to mechanical damage or a malfunction of the power circuit. We will consider below what types of malfunctions of such a product occur, and how to ensure that the DPRV is broken.
Diagnostics
Signs of a problem include the following:
- increased fuel consumption;
- startup problems;
- Unstable motor operation.
You can diagnose and determine that the camshaft sensor needs to be replaced with your own hands. The vehicle diagnostic light is the first and easiest way to find out that something is wrong with your car. If the “Check engine” icon lights up on the dashboard, it is necessary to perform computer diagnostics. You can read error codes in the special operating instructions that come with each car.
DF on Priora: main types of faults
The resource of the DPRV is quite large, but sometimes already at 100 thousand (some earlier, some later) problems may arise with its functioning. The reasons for the failure of such a product are very different, so let’s look at the most common ones among car owners:
- Mechanical damage to the sensor. It usually manifests itself in the form of chipping of the working part of an element or fastener, and occurs due to contact with the pulley plate.
- The magnet falls out, which can also happen during the operation of the vehicle.
- The sensor power supply is faulty. Most often, the reason is hidden in damaged wiring. However, the possibility of contact oxidation cannot be excluded.
If there is a suspicion of a malfunction of the DPRV on the Priora, then it is necessary to look for the cause of the failure. First, let's find out where the phase sensor is located on the VAZ-2170.
Reasons for sensor failure
A DPRV malfunction can occur for several reasons, and replacing it will not always solve the problem. The reasons why the device does not work may be the following:
- lack of contact between the device and the signal wire;
- the presence of moisture at the connection point of the DPRV;
- violation of the integrity of the wire, including its short circuit;
- incorrect power connection;
- axial timing runout;
- steel shavings on the device body;
- violations in the operation of the internal combustion engine control unit;
- incorrectly set gap.
Where is the camshaft position sensor installed on Priora?
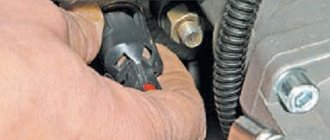
On 8-valve Priors, the phase sensor is installed near the valve cover (next to the connection of the air filter housing with the air duct pipe) on the opposite side of the timing pulley. The photo below shows its location.
However, it is important to remember that DPRVs are installed on 8-valve Prioras only with engine 21114. These are power units produced for VAZ-2110 cars. They were also installed on Prioras in the Standard configuration and in hatchback and sedan body styles.
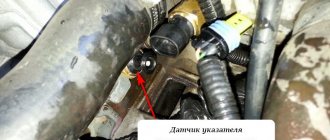
On Priors with 16-valve engines, this sensor is located in a different location. It is installed on the front left of the cylinder head.
Below is a close-up view of its location.
And the installation location of the phase sensor on the Priora is directly in the engine structure.
Getting to the sensor is not difficult, but the biggest difficulty is unscrewing the far mounting bolt that secures the product. Let's take a closer look at how to remove the DPRV on a Priora and what you will need for this.
Instructions for removing and replacing the camshaft position sensor Priora 16 valves
If there is a suspicion that the phase sensor itself (and not its circuit) is faulty, then it needs to be removed and checked. If it is found to be faulty, it must be replaced.
To remove the DPRV on a Priora, you will need to perform the following steps:
- Turn off the ignition (it is not necessary to remove the terminal), and disconnect the power plug.
- Using a 10mm wrench, unscrew the two mounting bolts.
- If access to one of them is free, and you can get to it with a regular ratchet, then access to the second is limited.
- To unscrew it, you will need to use a curved spanner or a socket and a “5” hexagon (shown in the photo below).
- Before unscrewing the DPRV mounting bolts, you need to remove the generator belt.
- Next, we gain access to the fasteners and unscrew them.
- After this, we remove the phase sensor and proceed to check or replace it. The product is installed in a similar way. When installing, be sure to pay attention to the presence of a rubber O-ring. The manufacturer recommends tightening the mounting bolts with a torque of 6-8 Nm.
Below is a video about the best and easiest way to remove the DPRV on a Priora without damaging it.
Checking DPRV on Priora
After removing the sensor, inspect its condition. The absence of external defects does not mean that the part is working properly. If there is mechanical damage to the case, the product must be replaced and does not need to be checked. Next, we will consider the general picture of testing manipulations for the serviceability of the DPRV and its circuit.
- Using a multimeter, we check the presence of power in the chip. To check, you need to set the measuring range on the device above 12V, then touch the first and second contacts (A and B) with probes, turning on the ignition (be careful not to provoke a short circuit).
- We touch the first and second contacts, and record the presence of voltage in the circuit. It should be equal to the value of 12V (on-board network).
- Below is a pinout diagram for the power supply circuit of the DPRV.
- The next way to check is to connect the multimeter probes to pins 1 and 3 (A and C) of the power chip. After this, turn on the ignition, and with the sensor missing, determine the voltage, which should be about 11V. The controller has a resistor, so the voltage on the signal wire should be 1V lower depending on what is supplied to the sensor.
- If the circuit is working properly, then we check the sensor. To do this, connect it to the chip (removed sensor), after which you need to attach the probe from a red multimeter to terminal “C” (on the back of the chip). Connect the black probe to terminal “A”. Turn on the ignition and note the presence of voltage on the signal wire of the sensor. It should be about 11-11.5V, that is, 90% of the applied voltage to the DPRV. If this is the case, then the device is presumably working properly. To make sure of this for sure, you need to bring a metal part (preferably a plate into the slot) to the end of the sensor. If the voltage drops to zero, this will indicate that the device is working properly.
This completes the procedure for checking the serviceability of the camshaft position sensor, and you can draw appropriate conclusions about the serviceability of the product. If the sensor shows inappropriate values, it should be replaced.
In the event of a power supply circuit malfunction, it is necessary to check the condition of the wires. To do this, you need to know the pinout of the contacts. To test the power wires, you need to connect the tester probes to terminal “2” on the sensor chip and terminal “45” on the controller terminal block. Next, the serviceability of the wire core responsible for the signal circuit is checked in the same way. To do this, connect the probe to contact “3” on the sensor and “79” on the controller terminal block
.
Once the cause of the malfunction has been found, you can begin to eliminate it. On Priors, the problem of chain breakage in the bundle, where the corrugation bifurcates, occurs very often. That is why it is recommended that before dismantling the sensor on the Priora, check the serviceability of the circuit and power wires.
More accurate and correct operation of the sensor is checked using an oscilloscope.
Replacing the device
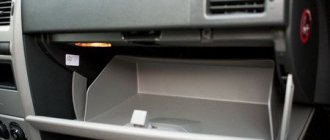
Dismantling the part is not difficult. We find it behind the air filter. The phase sensor housing is secured with a bolt.
First, disconnect the terminals from the battery. In this case, the electronic unit will be de-energized. The control unit memory is reset to zero.
If you don't turn off the on-board network, you won't feel the difference. After replacement, the unit will maintain the same mode as with a faulty phase sensor. Process control returns to normal only after several engine starts.
Tools and materials for removing the sensor are available in the arsenal of every motorist. You need to prepare a key for ten, sealant, alcohol, rags. It is convenient to unscrew the fastening bolt using a socket wrench. Take the sealant from ZOLLEX. It is designed for temperatures up to 350°C.
Replacing the sensor will take 10 minutes. First of all, disconnect the wire block from the phase sensor. To do this, you need to bend the latch with one hand and pull out the wiring with the other. Next, unscrew the only bolt. It's on the back side. We take out the body of the spare part.
Do not apply great force when removing the DF.
Moreover, you should not use impact-type locksmith tools. The plastic housing may crack. Residues will fall inside.
Before installing a new device, you need to clean the seat. Apply a thin layer of sealant to the joining ring. Let stand for a few minutes. We put the camshaft sensor in place. We tighten the bolt.
Feel free to connect the wires. Oxidized contacts on the plug are cleaned with alcohol. The pinout of the wires will not be disturbed. The VAZ 2115 has a lock. When connecting the terminal block, watch the latch. The latch should engage.
That's all. Don't forget to connect the terminal to the battery. Turn on the ignition. We start the car and watch the instrument panel. The indicator should go out within a second after starting. This means that the replacement was successful.
Of course, the main test of the VAZ 2115 will take place on the road. Therefore, we turn on the gear and enjoy the growl of the engine. If the problem is solved, the engine will restore its former agility, and the car will restore its acceleration dynamics.
Why did the VAZ oil pressure drop?
How to make a power bumper for a Niva?
This is interesting: What is a hydromechanical gearbox