Lada Kalina diagnostic connector
The diagnostic connector in Lada cars is called OBD and is standard for many car brands. In the first injection models of Lada, such as the VAZ 2110, etc. The first generation OBD connector, the so-called OBD-1, was used. Modern cars, such as the Lada Kalina, use a modern OBD-2 connector. The modern connector differs from its predecessor in speed of operation and speed of data transfer, as well as in that it is universal.
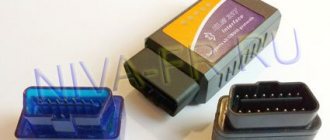
Why does the OBD2 GM12 pin adapter for VAZ, Daewoo not work?
Having ordered an OBD2 - GM 12pin diagnostic cable and connecting it to a VAZ family car, many are faced with various troubles.
The best, so to speak, of which is simply the impossibility of diagnosing the car, but there are also cases where the fuel pump turns on or there is a short circuit in the electrical wiring, and if you’re lucky, the matter will be dealt with by simply replacing the fuses.
After such experiments, the average person takes the cable in his hands and, waving it, scolds the seller and the manufacturer.
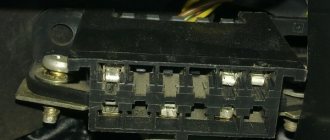
The above troubles are usually a consequence of incorrect cable pinout, that is, power is supplied to the device along the wire through which information is to be read, or power is supplied to the fuel pump along the wire through which power is supplied. And what do you tell the latter to do? Right! Turn on and work.
But no matter how strange and incomprehensible everything now turns out to be, and it may sound absurd, the cable actually turns out to be serviceable and working. Yes, yes, workers, and even the pinout is correct. Correct, but not suitable for our car brand.
How so? You ask? And the answer here is simple. The cord is only intended for a different brand of car, and this brand is called nothing less than DAEWOO.
Types of diagnostics
There are several different types and methods for diagnosing Lada Kalina.
- Using the dashboard;
- At the technical station service;
- Using the ELM-327 device;
Diagnostics on the dashboard
This type of diagnosis is quite common, but has a large number of disadvantages. With this method of identifying errors in a car, you will not be able to detect the cause of the breakdown. The instrument panel only displays a combination of numbers, supposedly with an error code, but, as a rule, such diagnostics have a high error and are often mistaken.
Diagnostics at a service station
This type of diagnosis is one of the most correct. During diagnostics at the station, a special professional device is connected to your car, which accurately determines the breakdown in your car. The big disadvantage of this method is its cost; craftsmen charge more than 1,000 rubles for their work just for one connection of the device to the car.
Diagnostics using ELM-327
Chinese craftsmen were able to make a device that is barely larger than the size of a matchbox, and whose functions are practically not inferior to a more expensive professional scanner. Since the OBD-2 connector is widely used, the ELM-327 scanner is suitable for many cars.
The cost of a scanner on the AliExpress website ranges from 5 to 10 dollars, which is equivalent to a one-time diagnosis at the station.
The device has two versions 1.5 and 2.1. It should be noted that to work with domestic cars it is necessary to purchase version ELM-327 v1.5. Version 2.1, although cheaper, refuses to work with domestic internal combustion engine control units.
When purchasing, you should know what operating system your smartphone is running on, since this scanner works in tandem with a smartphone. If you have an iPhone, then you need to buy a scanner with Wi-Fi, and if you have an Android smartphone, then you just need to buy a scanner with Bluetooth.
Connection via adapters
p, blockquote 28,0,0,0,0 —>
If a non-standard connector is installed on your car (cars manufactured before 2000, or trucks or commercial vehicles), you can use special adapters or make them yourself.
p, blockquote 29,0,0,0,0 —>
On the Internet you can find a diagram for reconnecting connector pins similar to that shown in the figure:
p, blockquote 30,0,0,0,0 —>
p, blockquote 31,0,0,0,0 —>
If the car is in constant use or for professional work as an auto electrician, it is easier to purchase an adapter (adapter set).
p, blockquote 32,0,0,0,0 —>
For the AUTOCOM diagnostic scanner they look like:
p, blockquote 33,0,0,0,0 —>
p, blockquote 34,0,0,0,0 —>
The minimum standard set for passenger cars includes eight adapters. One connector of the adapter is connected to the OBD connector of the car, the other to the OBD diagnostic cable or directly to the BLUETOOTH ELM 327 scanner.
p, blockquote 35,0,0,0,0 —>
The use of adapters does not provide vehicle diagnostics in all cases. Some cars do not support OBD pairing even though they can be connected to the OBD connector. This applies more to older cars.
Applications for car diagnostics
There are many different car diagnostic applications available in both the AppStore and PlayMarket app stores. We will look at the most popular ones.
OpenDiag Mobile 2.0
This application is from Russian developers and is the most popular in terms of diagnosing Russian cars. It was developed specifically for Lada cars and allows you to accurately determine errors in the car.
OpenDiag allows you to constantly monitor the car without removing the scanner from the diagnostic connector.
Pros:
- Fast connection;
- Large selection of parameters;
- Review of parameters online;
Minuses:
- Absence from AppStore;
- There are paid blocks;
CarScanner
The most popular program among iOS users, it has all the necessary functions for diagnosing a car. Initially, the program was developed for many cars, but priority was given to foreign cars.
Pros:
- Fast connection;
- Constant program updates;
Minuses:
- Not full functionality for working with Russian cars;
- No error decoding;
Key performance indicators
A complete engine performance analysis will be checked.
- Battery voltage level (UACC). To carry out the test, it is necessary to turn on all the most powerful sources of energy consumption. If the voltage reading on the diagnostic screen is less than it should be, you will have to check all electrical circuits separately. Normal values are from 14 to 14.5 V.
- Mass air flow (AIR). The indicator is determined by the mass air flow sensor. Without diagnostic equipment, checking air flow is impossible. To obtain the value, you need to press the gas pedal until the speed is 5000. If the sensor is working, the indicator rises to a level of 200-250 kg/h.
- Injection pulse duration (INJ). This is the time fuel is injected into the cylinder while each injector is open. Indicators that exceed the norm indicate that the injectors are most likely clogged and clogged. To fix the problem, the parts should be washed. The reasons may also be a clogged fuel filter or a pump failure. To accurately diagnose the problem, press the gas pedal. Normally, the indicators should be from 3 to 5 in a calm, idle state and from 15 to 20 when gasping.
- Oxygen indicator before the catalyst (ALAM1). It should not exceed 0.7 V and, reaching this figure, go back down. This indicates that the feedback is working properly.
- Number of idle speed control (FSM) steps. In other words, the idle speed control sensor. It is a stepper electric motor with a cone-shaped plug attached to the shaft. When the engine is idling, this figure is 40-60 steps, when accelerating - from 150 to 180 steps.
- Estimated fuel consumption (QT). For a complete diagnosis, check the pressure in the fuel rail and the voltage in the spark plugs. It wouldn't hurt to check the compression on the cylinders and find out the CO. However, for all these measurements, in addition to the diagnostic connector and standard equipment, you will need another, expensive device and the connection of experienced professionals. Therefore, here you will have to limit yourself to one indicator: from 0.6 to 0.9 l/hour at idle.
Diagnostic example
Below is a diagnostic method using the ELM-327 device version 1.5 on a Lada Kalina car, through the OpenDiag program on the Android operating system.
Diagnostics must be carried out with the engine or ignition on.
We install the scanner into the diagnostic connector and wait for the lamps on the scanner to start blinking.
On your smartphone, go to settings in the Bluetooth section. In the available devices we find our scanner under the name OBD-II, connect to it. The device will ask for a password, enter the password – 1234 .
After pairing with the scanner, open the OpenDiag program and click on the menu button, there we select the required connection type, in our case it is Bluetooth.
Click on the icon in the upper corner and select scanner from the list of devices.
The connection process is completed, the application itself will automatically detect the model and version of the ECU and display errors that are stored in the block.
Deciphering error codes
The first character is a letter and indicates a fault block:
- B - body;
- C - suspension;
- P — engine (ECM, gearbox);
- U - data exchange bus.
The second character is a number, code type:
- 0 — SAE (standard);
- 1.2 - OEM (factory);
- 3 - reserved.
The third character is a number, system:
- 1, 2 - fuel system;
- 3 - ignition system;
- 4 — reduction of exhaust gas toxicity;
- 5 - idle;
- 6 - ECU or its circuits;
- 7, 8 — transmission (automatic transmission).
The fourth and fifth characters are numbers, the error code itself.
Where is OBD 2 located?
The position of the diagnostic block socket is indicated in the vehicle's operating instructions.
There is no single standard for the location of the OBD 2 connector. A number of sources indicate that the device, in accordance with SAE J1962, should be located within a radius of 18 cm from the steering column, but in fact this rule is not observed. According to other sources, this distance should be no more than 100 cm.
It can be installed in the following locations:
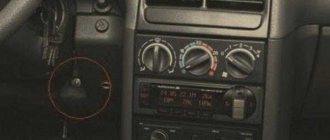
- in the slot in the lower casing of the instrument panel in the area of the driver’s left knee;
- under the ashtray installed in the central part of the instrument panel (some Peugeot models);
- under plastic plugs on the bottom of the instrument panel or on the center console (typical for VAG products);
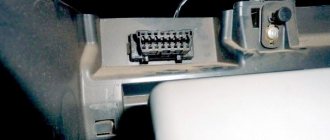
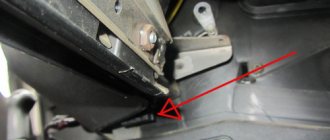
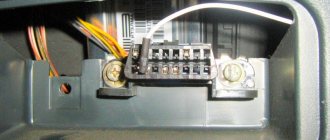
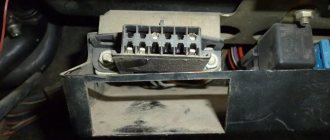
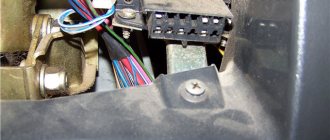
- on the rear wall of the instrument panel behind the glove box body (some Lada models);
- on the center console in the area of the parking brake lever (found on some GM cars, in particular Opel);
- in the lower part of the armrest niche (common on French cars);
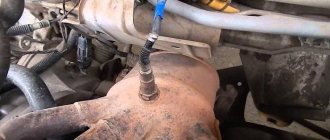
- under the hood near the engine shield (typical of some Korean and Japanese cars).
Necessary tools, materials and programs
To ensure that the verification procedure does not cause you problems, you need to prepare for it in advance.
To ensure correct diagnosis, you will need the following devices:
- Computer. You can use a laptop or tablet; this device will be used to perform the check. It should be noted that a laptop is the preferred option.
- The program with which the check will be carried out. There are a lot of software options today. Each of the utilities has its own features and characteristics; you can download such software without any problems on the Internet.
- K-Line cable for connecting the plug to the computer. You can purchase such a cable at any specialty store. It should be noted that if you decide to use your tablet or mobile phone for diagnostics, and the check will be carried out wirelessly, then you will not need a cable. In this case, you will need to purchase a special adapter to provide a wireless connection.
Photo gallery “What to prepare for diagnostics”
1. Laptop (PC or tablet will do)
2. Diagnostic cable for connection
3. Checking utility