Tuning the headlights on your VAZ-2110 with your own hands will not be difficult if you approach this procedure wisely. In this case, the result will please the owner, and his previously unattractive car will look much more modern. The main thing in this matter is to strictly follow the instructions in order to avoid mistakes.
This brand, as a rule, has optics of such types as “Kirzhach” and “Bosch”. The procedure for dismantling old headlights consists of the following steps:
- First you need to disconnect the blocks with wires and remove the upper part from the radiator grille. To do this, take a key of 10.
- After this, you need to remove the boxes with the wires connected to the direction indicators. Immediately after this, the headlight hydraulic corrector is pulled out using a special latch.
- Next, you need to unscrew the headlight mounting bolts and remove the edge from the place where it engages with the wing.
- After completing this work, the headlight of the car is carefully pulled out.
Website about joints
Everyone knows that Bosch headlights do not illuminate the road well at night.
When driving in the near one, it’s hard to see - the road runs away, but when driving in the far one, you interfere with oncoming cars. I invite you to go with me on an unforgettable journey of tuning Bosch VAZ 2110 headlights. Let's start with the fact that we need to remove and disassemble the headlight. I won’t tell you how to remove and disassemble the headlight. There are many posts on this topic on the Internet, step by step. We need to slightly change the design of the headlights, namely, replace the H1 lamps with H7 ones. In my opinion, the H7 lamp fits perfectly into this headlight. The dimensions of the lamp H1 and H7 are the same both in height and in the location of the chrome thread. Look at the photo: You can drill the required hole with a circular saw like this.
We disassemble and remove all the saws we don’t need. The one closest to the center is our saw, which will drill a hole in the headlight reflector. You need to drill a hole so that the H7 lamp is completely immersed in the hole and rests only on the collar. Taking my son as an assistant (he held the reflector), armed with a drill and loading our saw into the chuck, I drilled a hole. The smell from drilling is not very pleasant, so it is better to drill outside. This is what happened.
By the way, you can drill with another tool. For example, I have this thing. In our store it costs 30 rubles!
Let's try on our H7 Lamps. They fit perfectly and are locked with the same clamps that held the H1 lamps. That's basically all there is to drilling. Now we take a soldering iron and plug it into a socket, and in the meantime we cut off the “+” and “–” terminals that supply the H1 lamp with electricity. We strip the wires, solder other terminals (mothers). We will need 4 of them per headlight. We also need heat shrink casing. Taking advantage of the moment, I inserted LEDs into the dimensions in place of the lamps. This is what happened.
I don’t know about others, but my reflector kept falling off. Here's how I solved this problem:
I simply drilled a hole in advance and screwed in the screw and washer without fully tightening it. Now it's not going anywhere. As for the lamps, I took “Novator” and “Narva” at 55 w each.
Having installed the headlights on the car and adjusted them (by the way, I installed the lamp with the beads facing up), I drove out into the dark on an unlit section of the road. I was very surprised by my result. Now everything is very clearly visible at close-up - not only the road itself, but also the edges of the side of the road. The headlights do not shine 10 meters from the bumper, but further and better. Here's a photo from the car. This is the neighbor.
In the photo the high beam is on, about 35 steps from the car.
I called a friend - he also has a “ten” with Bosch headlights. We compared my headlights and his on the same section of the road. This is what happened. This is the low beam on a friend's car.
I took this photo standing between the cars. There is a difference and what a difference!
This photo is also from about 35 steps closer. On the right is a friend's car, on the left is mine!
Maybe many will start to judge me for ruining the headlights, etc. I'll tell you honestly: before tuning, I tried to install lamps from Osram, Philips, and many others - the result did not suit me. If you find the same article on the Internet, you should know that I wrote it. I received a fee for it, but it was small. And I’m just posting it here because it’s not here. And finally, I want to say (well, just food for thought): now you can insert H4 instead of H7 lamps. But that's a completely different story! Good luck to everyone on the roads! Not a nail or a rod!
Lada 2110 › Logbook › Refinement of lens modules of “Kirzhach” headlights
Hello, today I decided to tell you how I modified the Kirzhach headlight modules so that you can see where you are going at night.
I made the replacement almost a year ago, but the photo report remains. I got most of the information from the website Lada2111.rf / but, as always, I needed to come up with something for myself.
From the moment I started riding in the top ten, I didn't really like the low beam. Everything got better after installing Philips BlueVision 55w H1 lamps, but they are not yet so popular. I didn’t want to go broke with Bosch headlights and really wanted to add “angel eyes” in addition to these lenses. And then one day in a car store I saw LED rings that I really liked, and I decided that it was time to change everything for the better in these headlights (in mine.
On New Year's weekend (this was in 2014) I went to the garage, threw out the bumper, removed the headlights, took it home and washed it off the dirt. I was very worried about the glasses, but in vain. After a “hot shower,” the glass, although lazily, pliably tore off the light with a thin knife.
Headlights love hot showers too =)
After that, disassemble the headlight, remove the headlight bezel (it's shiny garbage) and unscrew the modules. Since we also need beautiful headlights, we paint the mask as desired. I painted it glossy black. It is better not to skimp on paint, otherwise cheap paint may crack or even fly off due to the high temperature inside the headlight.
While the paint dries, let's return to the modules. We sort them out completely. We remove the lens, the shutter, and drill the brass rivets to disconnect the housing and reflector.
Rivets. They need to be pierced.
So, we go to the garage, taking with us part of the module (the one that is NOT a reflector), launch our favorite grinder there and cut the can approximately in half. Of course, you need to mark everything out in advance. You will need to mark the sides with a marker or any other writing/scratching object. Then, according to our signs, we also make cutouts, and then with their help we assemble and configure the module. I just made a hole in one part.
In the same garage we grind down the edge of the module in the place where the lens is attached. The main thing is not to overdo it.
I can also say about the ring, I think not all modules have it. On the module I had the first one, it was experimental, so to speak. That is, as if “everything has already been imprisoned before us.”
As the lens moves closer to the reflector and its focal length does not change, the shutter must also be changed. We find the housing of the old computer power supply, surround the reflector with an awl/nail and cut it into metal using scissors. We finish with sandpaper and smooth it with a file.
The top edge is a little trickier. It should be perfectly smooth. Well, ideally, of course, it won’t work out, but we have to fight for it. We finalize it with a file and sandpaper as a finishing touch.
The edge of the curtain should be smooth
Old and new curtains.
it is necessary to attach the curtain to the reflector exactly in the center in order to obtain the maximum concentration of light right in the immediate vicinity of the cut-off edge (cut-off edge). I recommend using caliber.
To accurately and reliably fix the damper for drilling holes, I glued it to the reflector with superglue.
A uniformly placed high-quality curtain is the key to the success of high-quality light
Next, we assemble the modules with bolts rather than rivets. The edge of the module lens is also painted black.
Pre-assembled module
We connect the assembled module to the power supply/battery and to the wall, which we will focus on later. This is done using the part of the module with the lens that we sawed. Move it back and forth until the edge of the light becomes clear. After tightening the nuts.
Since I also wanted to get rid of this yellowish tint in the headlights, I covered the entire module with self-adhesive foil. This helped a lot.
We install the module into the headlight using elongated bolts with spacers, since we shortened the module itself.
The “eyes” secured the headlights to the mask using the same superglue, I used it for almost a year until they fell off.
Before placing the glass on the sealant, it is best to check that the modules on the spacers rise evenly, otherwise the headlights are unlikely to be adjusted properly.
We put the headlights on the car, wait for the night, and repair it. And here it is, the wow effect. After the review, the light began to please.
How to disassemble and improve headlights on a VAZ-2110: tuning
Tuning the headlights on your VAZ-2110 with your own hands will not be difficult if you approach this procedure wisely. In this case, the result will please the owner, and his previously unattractive car will look much more modern. The main thing in this matter is to strictly follow the instructions in order to avoid mistakes.
This brand, as a rule, has optics of such types as “Kirzhach” and “Bosch”. The procedure for dismantling old headlights consists of the following steps:
- First you need to disconnect the blocks with wires and remove the upper part from the radiator grille. To do this, take a key of 10.
- After this, you need to remove the boxes with the wires connected to the direction indicators. Immediately after this, the headlight hydraulic corrector is pulled out using a special latch.
- Next, you need to unscrew the headlight mounting bolts and remove the edge from the place where it engages with the wing.
- After completing this work, the headlight of the car is carefully pulled out.
We looked at the procedure for removing a Bosch headlight. Now let’s find out how to remove the Kirzhach optics. This work consists of the following stages:
- A flat screwdriver is inserted into the corner of the headlight, as well as a utility knife, which is used to cut off the sealant. If you can’t cut with this tool, you can use a hair dryer;
- then we proceed to remove the reflector. This is done like this: unscrew 3 bolts around the perimeter and unfasten 4 latches;
- then the headlights are carefully removed.
As we can see, removing the headlights on a VAZ-2110 car is absolutely easy.
The situation is different with the modernization of optics. It is very important to understand what is suitable in a particular case and what is not. Let's try to understand this issue.
Causes of poor headlights
This is what we should strive for
You need to look for the reason:
- Faulty lamp.
- Dirty glass.
- damaged or peeling reflector.
- Insufficient voltage.
- The direction of the light flow is not adjusted.
Replacing a dim lamp
The lamp is replaced with a screwdriver (thin) or an awl. The protection box is removed by unscrewing the screws on the headlight unit. Under the cover you can see the holder mechanism and the three-pin block.
Changing the lamp
The procedure begins by disconnecting the terminal block . Next, pressing on the fastening spring, the lamp is removed and then replaced. At the same time, condensation is removed from the reflector block. The presence of this disables the lighting device. Moisture is removed through the drainage duct, after preliminary cleaning. Installation of the lamp, assembly is carried out in the reverse order.
Dirty headlights and cloudy windows
Dirty headlights reduce road illumination by 50%! Moreover, glass ages and becomes cloudy over time. Wiping with a dirty cloth contributes to this, which causes microscopic scratches.
The brightness of the car light is 50%! Depends on the condition of the headlight glass
We recommend: Tinting of front windows is allowed - is it true?
It is possible that there are cracks that allow dust particles and water to pass through (during washing). They settle on the outer and inner surface of the glass, the reflector and lead to low transmission of light rays.
An irreparable mark on the glass is left by specks of dust, grains of sand, and pebbles flying out from under the wheels of oncoming or passing cars. Scratches and microcracks refract and scatter light in different directions , as a result of which the direction of the beam is lost.
Replacing glass in headlights
The option of gluing with transparent film is not a technical solution. The obvious solution is to replace the glass.
Lamps and glass cannot produce any effect if the reflector has peeled off due to prolonged use. On domestic VAZ-2114 cars, it is possible to replace the reflector, for which you should:
- Disconnect the battery and remove the headlight unit (see “Removing the headlight on a VAZ-2114”).
Front view, headlight mounts
- Remove the glass from the sealant, having previously heated it with a household heating element, if there is no construction heating element.
Unfasten the fastening latches and, cutting off the layer of sealant, remove the glass
- Unscrew the lamp, remove the defective reflector, replacing it with a new one. Fresh sealant is applied to the grease-free ends of the glass and the assembled headlight is mounted in place.
We mount the assembled headlight in place
Lamp voltage low
Low voltage at headlight terminals can cause dim light
Low voltage occurs due to a malfunction of the current generator, oxidation or broken contacts . When checking this unit, you need to ensure that the voltage, including at the lamp contacts, is 13.8÷14.2 V. Low voltage can be detected by ringing the circuit and finding a defect and eliminating it.
A typical cause of dim headlights is often the xenon lamps used on the car.
Distorted headlight position
The wrong direction of the beams is due to the distorted position of the headlights.
This happens as a result of a minor impact, even a light touch of the bumper, for example, with a wall when parking, a tree or a curb.
Adjusting the headlights is accompanied by placing the car on a flat area in front of a smooth wall at a distance of 7–10 meters. The accuracy of the direction of the rays can be obtained provided that the tank is filled (more than 50%!) and tires are inflated to the required standard. The machine is loaded as it is normally used.
Two headlight adjustment screws
On the wall, draw with chalk the center of one headlight (the other is covered, for example, with a piece of cardboard) and the center of the body. A second line is made 12 cm lower. The third line is drawn 22 cm below the first. Based on these three projections, a vertical line is drawn covering the center of the headlight and the body. One of the two screws located inside the headlight adjusts the tilt of the light, and the second forms a directed beam .
Turning on the low beam will result in a projection on the second line. Having completed the procedure with the second headlight, you get an adjusted low beam. In this case, the high beam will also be adjusted.
Do-it-yourself headlight tuning on a VAZ-2110: tinting
After dismantling the old headlights, it is necessary to remove the spring in the hydraulic corrector hole. Next, the adjusting screw is unscrewed, after which the optics module with reflector is removed. Before you start painting the part, you need to clean it thoroughly. A degreasing primer is suitable for this. It is not advisable to paint with enamel, since the temperature inside the headlight is always very high. In this case, heat-resistant paint is perfect. It is advisable to carry out the painting procedure itself in a dry room, very carefully, keeping this part at a distance from you.
Application of “GT” devices in VAZ 2110 headlights
Before installing such lamps in “tens” headlights, let’s look at their technical and other features:
- The glow temperature, its coefficient is approximately 4000-5000 Kelvin;
- The maximum luminous efficiency coefficient has been achieved, which is approximately 45-50%;
- During manufacturing, the lamp bulb was enlarged, its body was made chrome;
- The spiral began to be installed with an increased length.
These lamps are widely used in retail chains; purchasing them is not difficult.
“Angel Eyes” - a new type of tuning
Installing “angel eyes” on a car yourself is not at all difficult. There are several options for this procedure:
- buy finished products;
- make them yourself using LED strip;
- make it yourself using a transparent tube.
As practice shows, it is much better to make “angel eyes” yourself, since stores sell very low-quality and short-lived products. You can buy a ready-made LED strip and glue it to the inside of the optics with special glue or sealant. But it will still be more effective and brighter if you use an LED ring made of a plastic tube.
The work in this case consists of the following stages:
- To begin with, the plastic tube is heated using a hair dryer. This must be done so that it bends well. However, you also need to understand that if the product is overheated, it will become deformed.
- After this, use pliers to bend the tube around the can, so you get an even circle.
- When the part has cooled, the edges are sawed off.
- Resistors and LEDs are assembled using the same scheme. It is important to sand the ends thoroughly.
- Then, using a hacksaw, notches are made around the perimeter at approximately a distance of 2-2.5 mm. The ends are covered with foil and a special tube.
- Next, the made ring is attached with glue around the optic lens. It is important that the notches are on the inside.
If you clearly follow the instructions and correctly carry out all stages of the work, the updated headlight will have a very presentable appearance and will be able to last about 7 years without replacement.
Replacing headlight bulbs
The owners' complaints about the lighting of this car mainly relate to electric lamps. An effective replacement can be found if you find and install devices that generate a luminous flux that has increased brightness and intensity. Manufacturers of these devices, both domestic and foreign, have mastered several types of such products:
- Halogen lamps. They are distinguished by a large selection of their sizes and a long period of operation, as well as reasonable cost. As a disadvantage, it is necessary to note their high energy consumption, as well as some features of their installation;
- Xenon lamps. This type of lamp has a high light beam intensity, is environmentally safe, and has a pleasant spectrum close to daylight. However, due to the high likelihood of blinding problems for drivers of oncoming cars, they were prohibited from use;
- "GT" type of lamps. They are classified as a new type of lighting devices; they embody all the best factors of previously produced devices, and therefore are very popular.
Article on the topic: “Which is better xenon or halogen.”
Lada 2110 Black bride › Logbook › Bosch headlights VAZ 2110
Everyone knows that Bosch headlights do not illuminate the road well at night. When driving in the near one, it’s hard to see - the road runs away, but when driving in the far one, you interfere with oncoming cars. I invite you to go with me on an unforgettable journey of tuning Bosch VAZ 2110 headlights. Let's start with the fact that we need to remove and disassemble the headlight. I won’t tell you how to remove and disassemble the headlight. There are many posts on this topic on the Internet, step by step. We need to slightly change the design of the headlights, namely, replace the H1 lamps with H7 ones. In my opinion, the H7 lamp fits perfectly into this headlight. The dimensions of the lamp H1 and H7 are the same both in height and in the location of the chrome filament. Look at the photo:
You can drill the required hole with a circular saw like this.
We disassemble and remove all the saws we don’t need. The one closest to the center is our saw, which will drill a hole in the headlight reflector. You need to drill a hole so that the H7 lamp is completely immersed in the hole and rests only on the collar. Taking my son as an assistant (he held the reflector), armed with a drill and loading our saw into the chuck, I drilled a hole. The smell from drilling is not very pleasant, so it is better to drill outside. This is what happened.
By the way, you can drill with another tool. For example, I have this thing. In our store it costs 30 rubles!
Let's try on our H7 Lamps. They fit perfectly and are locked with the same clamps that held the H1 lamps. That's basically it with drilling. Now we take a soldering iron and plug it into a socket, and in the meantime we cut off the “+” and “–” terminals that supply the H1 lamp with electricity. We strip the wires, solder other terminals (mothers). We will need 4 of them per headlight. We also need heat shrink casing. Taking advantage of the moment, I inserted LEDs into the dimensions in place of the lamps. This is what happened.
I don’t know about others, but my reflector kept falling off. Here's how I solved this problem:
I simply drilled a hole in advance and screwed in the screw and washer without fully tightening it. Now it's not going anywhere. As for the lamps, I took “Novator” and “Narva” at 55 w each.
Having installed the headlights on the car and adjusted them (by the way, I installed the lamp with the beads facing up), I drove out into the dark on an unlit section of the road. I was very surprised by my result. Now everything is very clearly visible at close-up - not only the road itself, but also the edges of the side of the road. The headlights do not shine 10 meters from the bumper, but further and better. Here's a photo from the car. This is the neighbor.
In the photo the high beam is on, about 35 steps from the car.
I called a friend - he also has a “ten” with Bosch headlights. We compared my headlights and his on the same section of the road. This is what happened. This is the low beam on a friend's car.
I took this photo standing between the cars. There is a difference and what a difference!
This photo is also from about 35 steps closer. On the right is a friend's car, on the left is mine!
Maybe many will start to judge me for ruining the headlights, etc. I'll tell you honestly: before tuning, I tried to install lamps from Osram, Philips, and many others - the result did not suit me. If you find the same article on the Internet, you should know that I wrote it. I received a fee for it, but it was small. And I’m just posting it here because it’s not here. And finally, I want to say (well, just food for thought): now you can insert H4 instead of H7 lamps. But that's a completely different story! Good luck to everyone on the roads! Not a nail or a rod!
Preliminary preparation for adjusting the luminous flux of headlights
Headlights must be adjusted not only for good illumination, but also so that the luminous flux does not cause discomfort to oncoming drivers, that is, does not blind them, especially at night. Both low and high beams are adjusted in a car service center, under the supervision of professionals. But if you have, albeit small, but still skills in car repair, you can actually carry out such a process yourself in your own garage, performing it in stages:
- Checking serviceability. First of all, you need to check whether the car headlight range control is working properly. The fact is that this mechanism plays an important and, one might say, the main role in lighting. In order for the light flux to be adjusted according to the rules, you must ensure that it is in good working order and is functioning normally.
- Choosing the right site. The headlights are adjusted on a perfectly level area. Having chosen a suitable place, you should check its levelness using a special level, and if there is no distortion, you can safely park the car on the site.
- Having measured approximately 6 meters from the car, you need to free up space on the wall in order to use it as a kind of screen on which you can make notes with ordinary chalk.
- The headlights can be adjusted correctly only if the car's tank is full, the tire pressure is correct, and a person in the same weight category as the driver is sitting in the driver's seat.
Tail lights on a VAZ 2110: do-it-yourself tuning tricks
Today we will talk about the most attractive option for tuning headlights on a VAZ 2110 with your own hands in terms of effectiveness - angel eyes . This is an invention of the BMW company, which is actively used by owners of other brands to achieve a similar external result.
To carry out such modifications yourself, you will need ingenuity, some available materials and LEDs.
We will consider the option of installing angel eyes on standard Kirzhach headlights. You will see that there is actually nothing complicated in such tuning.
Review of offers of alternative (tuned) optics for VAZ 2110-2112 from ProSport and Hella
It’s worth mentioning right away that such exotics are quite expensive. On average, this kind of offer will cost 2 or 3 times more than the original optics. But all this pays off with the many design delights and sophistication of tuning offered. With alternative headlights from ProSport and Hella, your VAZ 2110 (2112) will look truly impressive and expressive.
The problem is that this kind of optics on the VAZ 2110 often does not have better lighting characteristics and does not guarantee high reliability. Therefore, such headlights for the VAZ 2110 (2112) are good only from an aesthetic point of view. The headlights from the ProSport Aggressor and Hella series have proven themselves best in terms of durability.
If you like the idea of installing tuned optics on your VAZ 2110 (2112), you should also take into account the fact that it is compatible with different modifications of the car. For example, the optics on the VAZ 2112 from ProSport are not installed on coupe-type bodies, and the ProSport series is not suitable for the VAZ 2110 M series.
ProSport Aggressor headlights
Due to the highly controversial advantages of alternative optics on VAZ 2110-2112 cars and its high price, most motorists do not consider purchasing ready-made headlight modifications, preferring to independently tune the original VAZ lighting equipment. In this regard, undoubtedly, TM Kirzhach headlights remain the leader.
Available offers
Unfortunately, you cannot find LED rings that are suitable for the VAZ 2110 to create the angel eyes effect in regular auto parts stores. But they are available in numerous online stores. Therefore, there should be no problems with the search.
Just remember that the inner diameter of the ring is 54 millimeters, and the diameter of the outer ring is 70 millimeters. These parameters are suitable specifically for installation in Kirzhach.
Although you may well go the other way - make your own rings from LEDs. You will need a transparent rod filled with LEDs. You will find similar components...in a building materials store. Just keep in mind that they need to be bent into a ring. To do this, use a hair dryer. It will soften the rod. The procedure requires precision handling, but it is quite possible to do it yourself.
The third option is to purchase at least 8 LEDs for each headlight and buy a plastic rod separately. This is the most complex approach and will require bending the rod, connecting the LEDs evenly and getting them to work.
The choice is yours. Go for it! And if you don’t want to take risks or waste time making your own LED rings a la angel eyes, then order them online. There are more than enough offers there now.
You happen to have LED rings in stock. Therefore, it’s time to start tuning directly, that is, installing LED rings in the headlights. If you have tinted optics, paint the rings black. But don't touch the LEDs themselves. The effect of such modernization will be more impressive.
The installation procedure is as follows.
- Remove the Kirzhach headlights. You will need to remove the glass. To do this, insert a flat screwdriver into the corner of the glass, and insert a sharp stationery knife into this gap with your other hand. This will remove the layer of sealant, allowing the glass to be removed. If you can't, just break the glass and buy a new one. It's quite cheap.
- Handle the optics carefully, do not touch the reflectors, and remove any remaining debris. If this is not done, you will soon have to completely change your headlights. And these are already significant expenses.
- Let's try out the tuning option. To do this, attach an LED ring to the lens.
- We correct inaccuracies. Decorative inserts can interfere with, or rather partially block, the glow from the LEDs. They can be trimmed and filed a little. A completely natural procedure for such tuning.
- Installing angel eyes. They are usually glued to the lens. Use super glue or high quality silicone caulk.
- Connect the power. Power to the LEDs must come from the side lights. Another option is to use a fuse and a separate switch.
- Reinstall the headlights. We put the glass back, just use a simple silicone sealant or liquid nails. The main thing here is to prevent the presence of cracks, due to which the inside of the glass will begin to fog up and condensation will be deposited on it. Over time, this leads to a short circuit.
- There is another option for mounting LEDs - not around the lens, but on the mask using silicone. Then the tape needs to provide the shape of a ring. For this, available means are suitable - a bottle, a glass. You just need to fill it with silicone in the selected place on the mask. The connection is similar to the previous installation option.
Alternative option
If the driver of a VAZ 2110 car believes that simple Kirzhach headlights do not provide good street lighting, you can install a bi-xenon module if desired.
The Kirzhach headlight module and the bi-xenon module are not very different, but this will not be an obstacle to replacing them.
Installing a bi-xenon module consists of several stages:
- Removing the seat module in the headlight to install a new part in its place;
- The next step is to connect the xenon lamp wiring to the stock wiring.
Installation of xenon lamps is very simple, since it occurs without changing the wiring. After the remodel, the lighting will be completely different from what it was before. After changing the modules, the ignition unit is connected to any point, there is plenty of space for it, and it can be installed anywhere at the driver’s request.
After this, everything falls into place and the night glow is practically checked.
After modernization, modifications and various modifications, at the driver’s request, it is necessary to reassemble the Kirzhach headlight on a VAZ 2110 using sealant or special construction sealant.
Rear optics
When tuning optics, do not forget about the rear lights of the VAZ 2110. For them, using an LED strip or ring . It's amazing how much one small element can really change the perception of a car.
In addition to the already discussed option with angel eyes, which can also be installed on the rear lights, some resort to alternative solutions. We offer you one of them.
- LED strip or finished ring;
- Round reflectors, suitable in size for VAZ 2110 headlights;
- High-quality glue or silicone sealant;
- Cylinders for LED rings.
To give a more elegant appearance, reflectors are inserted into the rear light wells. They can play the role of illumination for the rear optics. For example, reverse is illuminated in white, fog lights in red, and turn signals in yellow. Well, or to your taste.
Reflectors are trimmed if necessary, so do not be afraid to take large products. But this is only if the idea of reflectors appeals to you. If not, then follow the analogy of tuning the front optics with angel eyes, and mount the same solution at the rear.
The procedure for tuning the front and rear optics on a VAZ 2110 is not an easy task. This kind of work requires precision, sometimes pinpoint precision. If you have the patience for this, do it yourself. But if you doubt your abilities, there are many tuning studios where your VAZ 2110 will be transformed beyond recognition.
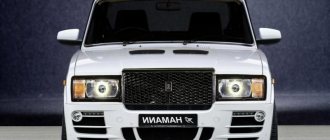
Owners of VAZ cars often make various changes to their design to improve performance and appearance. Along with improving the engine, chassis and body, tuning VAZ headlights is quite common among car enthusiasts.
To improve the front and rear lights on models 2110-2112, you can contact any car service center - specialists will help solve this problem.
However, if you wish, you can do this work yourself - you just need to carefully study the instructions, which explain how this is done.
Disassembling headlights
Before you begin a major overhaul of the headlights in a VAZ 2110 car, you need to perform the following simple steps:
- Their removal and analysis. Using a utility knife, the glass is carefully removed from the lighthouse, and since it is fixed with a special sealant, extreme care must be taken not to break it. But if it does break, then this is not a problem, you can buy it separately;
- After this, the reflector is removed by unscrewing several bolts.
- The next step is to remove all the cables from the back of the headlight and the spring from the place where the hydraulic corrector is inserted, and only after that can you remove the frame with the module itself from the headlight housing.
- Pull out the low beam module with a screwdriver and remove it completely.
To enhance the glow, they are modified, which includes the following steps:
- The lens moves closer to the reflector;
- Modernize curtains;
- Changing the shape of the reflector.
These are the main stages that will ultimately lead to the complete modernization of Kirzhach headlights on a VAZ 2110 car. Now it is necessary to consider each stage separately.
Diffuser in the Kirzhach lighthouse VAZ 2110
Shifting the lens closer to the reflector
The redesign begins with shifting the lens to reduce the area of the lens onto which the light flux falls. As a result, the curvature of the lens will also be reduced.
- Disassembling the module and removing the lens from it. Carefully mark the cut at the intended location of the mold. Mandatory control to ensure that the lens cap does not move from its position, but remains at a distance of 50 mm due to the focal length of the lens;
- Cut out the lens at the marked location and attach it to the module. It is attached using previously made cuts, but the shape itself is shortened. The main thing in all this is that the closer the target is, the greater the insulation will be due to its small area. To avoid losing distance, the optimal approach is to get closer to the 10mm lens.
Carrying out modernization of curtains
To ensure the highest level of modernization and refinement, good and high-quality light distribution is implemented. The curtain has been made more straight so that the light does not blind passing drivers passing in front of a VAZ 2110 in the rear view mirrors. This type of curtains was developed according to the European GOST standard and is very popular.
To do this, you will need cardboard from which the curtain model will be made. The prepared cardboard template is transferred to a metal plate. Metal scissors are used to cut it out, and the finished curtain is attached to the form. Also, if desired, it can be wrapped in foil to improve the diffusion of light, and it can also be used to install fog lights.
The edges are cut to fit the lens on the module body. If you cut them correctly (no more than a millimeter around the ring), the edge of the ring will not interfere with the correct light output.
Changing the reflector shape
If you want to change the width of the light flux without changing its height, you can change the very shape of the spotlights with your own hands. By the way, on imported cars the reflectors have an oval shape, which is the best option.
Modifying the headlights by completely changing the shape of the reflector will help significantly increase the width of the light beam. The reflector on the VAZ 2110 car has a standard round shape, and if you take it and press it to the floor, you can easily get an oval shape.
To reduce the cost of the reflector, it is made of ordinary sheet metal, cast in an economical way, so this material is very elastic and easily changes shape.
Reflector in the Kirzhach lighthouse VAZ 2110
Wear gloves to avoid cutting your hand. But don't get too carried away as there are some standards for the width, which should be 93.2mm at the flat part. If this standard is not supported, the light beam will have a deformed power shape. Therefore, when changing the shape of the reflector, the forces are applied gradually, controlling the change in size. So that when installing the reflector, all the fasteners coincide, they are also oval in shape and the reflector is attached.
These technologically simple changes will allow you to easily and without extra costs upgrade the Kirzhach headlights on a VAZ 2110. But the main thing is that all changes made are not certified and fall entirely on the responsible shoulders of the driver.
After updating the headlights, it is imperative to adjust the headlights of the VAZ 2110.
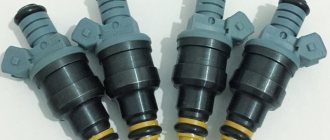
Replacing the H1 lamp in Bosch headlights model 2110 with H7
Many VAZ 2110 owners are faced with the fact that the Bosch lights on their car do not illuminate the road well enough at night. They have a standard H1 lamp installed.
Experts say that if you replace the Bosch with an H7, the situation will improve significantly.
The process of replacing a standard H1 lamp with an H7 in VAZ 2110 lighting sources is quite simple - it consists of the following steps:
- Disconnect all headlight connections.
- We remove the radiator grille - to do this you need to unscrew the bolts that secure it.
- We disconnect the blocks with wires from the turn signals.
- We remove the hydraulic corrector - to do this, press the latch and turn it ninety degrees.
- We unscrew the 3 bolts that secure the flashlight and move it back. We move the eyelash to the center, getting rid of the engagement with the wing.
- Loosen the 2 bolts securing the buffer and remove the eyelash.
- Unscrew another nut and remove the light source.
- We heat the sealant and use a knife to open the headlight.
- The hole for the H1 lamp will need to be drilled. It is smaller in diameter than needed for H
- You will also need to remove the terminals and install those that are suitable for the lamps that we installed - there will be 4 of them.
- After drilling, insert the lamp into the hole and fix it with standard fasteners.
- The fixation of the reflector will need to be adjusted so that it stays in place properly.
- Instead of lamps, we can install LEDs in side lights.
- Next, we assemble the lights back, install them on the car and adjust them.
By installing other lamps, you can make sure that the lighting will be of better quality - there will no longer be problems with visibility during night driving.
A little about the features of headlights
These cars were equipped, as mentioned earlier, with headlights from the Russian JSC Avtosvet and manufactured by German manufacturers. They represent several devices in one housing. In addition to low and high beams, the housing contains side lights and turn signals. The design of lighting devices from different manufacturers has some differences.
In the headlight with low beam of JSC "Avtosvet" there are lenses and a flat screen between the lamps and lenses; in the block headlight it is glued to the body. The light bulb that indicates the side light is located in the high beam headlights. The German manufacturer offers a slightly different design for such a product. For low beam, no lenses are installed, and the screen, in the form of a cap, is located on the glass bulb of the device. Because of such differences, experts do not recommend installing headlights on cars from different manufacturers.
DIY installation of bi-xenon lenses in VAZ 2110 headlights
Installing bi-xenon lenses in the headlights will also help eliminate the problem of insufficient road illumination. This gives us the opportunity to provide high-quality illumination of both the near and far zones, without blinding the drivers of oncoming cars. This makes the light more saturated. This also affects the quality of the review.
Installing lenses with your own hands is a rather labor-intensive and responsible process. You are interfering with the design of the lanterns. If mistakes are made, this may lead to an emergency on the road. All work must be done extremely carefully, conscientiously and responsibly.
The lens installation algorithm is as follows:
- Let's disassemble the headlight. To do this, you need to heat it so that the sealant becomes soft and open it with a knife.
- We remove the reflector.
- Special adapters will need to be made from aluminum or steel sheet, with the help of which the lens will be fixed.
- After installing the lens with edging, we adjust the inside of the headlight. To do this, you can make slits on the side walls and cover the voids with pieces of plastic. We leave space between the lens and the substrate - it will be needed to adjust the lighting.
- We assemble the headlight, making sure that it is sealed tightly. Otherwise, it will fog up during operation, which will affect the quality of lighting.
- After installation, we adjust the lights, after which you can evaluate all the advantages of the tuning performed.
Another option for bi-xenon headlights
What to choose?
It would seem that we are talking about German quality products, which by definition should be better than their domestic counterpart. But in reality things are somewhat different.
Let's look at the key features of Kirzhach and Bosch headlights to determine which ones you should choose for your VAZ 2110 model.
- The purpose of any low beam is to provide good visibility of the roadway at night, while at the same time avoiding dazzling oncoming traffic. Headlights from German and domestic manufacturers cope equally well with these functions.
- The headlights from Kirzhach have a low beam lens, and a reflector is provided for the high beam. German products have two reflectors - for low beam and high beam. The lighting is ultimately the same, but Bosch has better brightness.
- Lenses are actually better than reflectors. They create a clearer line of light and allow the installation of xenon optics.
- As a study of reviews of VAZ 2110 owners using German devices shows, they are characterized by worse illumination in low beam mode.
- Bosch headlights have a very important advantage for many - when the car is driving in cloudy and rainy weather, it provides a better quality glow compared to Kirzhach devices. It's all about the larger surface of the low beam reflector.
- This Bosch plus also comes with a minus - you are deprived of the opportunity to install xenon optics.
- Note that, regardless of the manufacturer, these headlights contain H1 format lamps.
- If we take into account all other characteristics, then the undisputed leader here will be the products of the domestic manufacturer.
Do-it-yourself tinting of rear lights in VAZ 2110-2112 cars
Tinted taillights help make the rear of your car look more stylish and elegant. You can easily do this work yourself if you want to avoid unnecessary financial expenses that would be entailed by calling a car service center. You have the opportunity to tint the taillights of your car using 2 means:
- tinting varnish;
- tint film.
The varnish is sold in special cans. It should indicate that it is intended for car headlights.
The taillights can be removed for work, or all the work can be done without it. The process looks like this:
- you need to thoroughly wash and dry the taillights;
- degrease with alcohol;
- Apply the varnish from a distance of about 30 cm. It is necessary to take breaks between layers for drying. The more layers, the stronger the tinting effect;
- After the last layer has dried, you can perform a special polishing to obtain a matte effect.
Film tinting of rear lights
It must be remembered that the tinting varnish is washed off over time. If you want to remove it from your car's tail lights, use acetone. It will help you easily get rid of tinting varnish.
Film is a more convenient means of tinting, since it can be removed at any time.
On sale you can find a wide selection of different tint films. Try not to save money and buy the highest quality. The price difference won't hit your pocket too hard. The film is applied as follows:
- wash and dry car taillights;
- degrease them;
- we try on the film and do the cutting;
- spray the surface of the headlights with soapy water;
- remove the backing from the film and apply it to the surface to be pasted;
- Use a special rubber spatula to press, smooth and expel all the water and air from the inside;
- After drying, the work can be considered completed.
When tinting your headlights, you must remember that problems may arise with the traffic police. Therefore, do not overdo it with tinting and follow moderation - then there should be no problems with the police.
Tuning headlights with tinting varnish
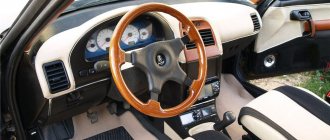
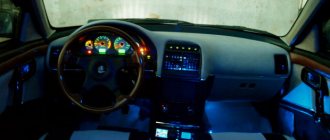
Tuning the dashboard of VAZ 2110
So, the seats and side panels are modernized and the eye falls on the standard dashboard of your “ten”. The old design doesn't look very good and needs updating. Fortunately, you have many options for tuning a VAZ 2110 torpedo with your own hands. Let's take a closer look at what can be done here.
Craftsmen have repeatedly come to the conclusion through trial and error that the best option, and most importantly simple, would be to install a tidy unit from Priora . The only thing that will need to be done is to change the mounting of the electronic control unit, and also install “Prior” sound insulation.
Dashboard from Priora on VAZ 2110
If such tuning is not enough for you, then you can go much further and replace the entire shield. “Ten” allows you to implement this without unnecessary problems. The thing is that there are three options for instrument panels for this modification of the car.
Euro 1 instrument panel VAZ 2110
Euro 2 instrument panel VAZ 2110
Euro 3 instrument panel VAZ 2110
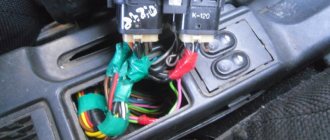
Once you have decided on the type of dashboard, you need to carry out a number of dismantling works. Let's give some advice:
- Disconnect the battery terminals and lower the steering wheel to the lower position if provided;
- With little effort, unscrew the screws on which the panel is attached;
- Disconnect all connectors;
- We carefully unbend the instrument bracket, for example, with pliers;
- We remove the panel.
When the new VAZ 2110 dashboard is installed, you should carry out these manipulations in the reverse order. Be careful and try not to forget to turn on any block.
Replacing the instrument panel backlight
You can also change the lighting of the PP to a more interesting and harmonious one. Most often, LED strip or neon glow is used. Of course, such ready-made torpedoes are already on sale, but their prices are incredibly high. However, you can do everything yourself.
Tuning the instrument lighting of the VAZ 2110
First of all, you need to remove the glass, which serves as protection for the devices. Then we place a sheet of cardboard under the arrows and carefully remove them with a screwdriver. The backing of the devices is attached to the sealant, which must be removed. The easiest way to do this is to use a knife. We are now holding a number of events:
- The light filter should be removed with the same knife, and the remaining paint should be removed with acetone;
- We replace the odometer backlight lamp with a multi-color LED;
- We carry out the same actions with the remaining lamps;
- The hands can be decolorized with solvent and painted in any color you like.
H1 diodes are money down the drain, headlights Bosch VAZ 2110-11-12
Subscribe to the group on Subscribe to Instagram.
Next, vertical stripes are drawn on the previously constructed shield. Three stripes must be marked on the wall and marked with various signs, for example:
- line F must be drawn parallel to the middle of the car;
- line “A” parallel to the left car headlight;
- line “B”, respectively, is right.
Read
Horizontal stripes are marked. A horizontal mark is made through the F line, which we will call H, and stepping back approximately 60-65 cm from it, we draw an additional horizontal mark R. Next, we proceed to adjusting the light flux at home.