Models such as the Chevrolet Niva have limited functionality when driving off-road. A Niva Chevrolet suspension lift with your own hands can help with this problem, since many car enthusiasts purchase this car specifically for the purpose of plowing through rough terrain. This is where the need to refine the model arises.
To improve the all-terrain qualities of the model, it needs to be further modernized. This work consists of increasing the ground clearance and installing tires with studs. Naturally, the second cannot be done until the ground clearance is increased and the lifting process is carried out.
What is lifting and why do it?
The Chevrolet Niva suspension lift is a set of special procedures for re-equipping the car, after which the motorist will have the opportunity to install wheels and tires with a large radius. In addition, due to lifting, the clearance value will increase. All of the above features have a huge impact on the increase in vehicle cross-country ability.
As was said, installing a lift kit on the Niva improves the model’s off-road movement capabilities. If the car owner is a big fan of cross-country travel, then the car will be operated in precisely such conditions, or close to them. And, naturally, in order to overcome a huge number of different obstacles, the car must be equipped with all-wheel drive, suitable studded tires and high ground clearance. The greater the clearance between the road and the bottom of the car, the higher the cross-country ability will be. That is, the Niva suspension lift is simply irreplaceable for lovers of aggressive off-road driving.
Positive aspects of a lifted car
If you carry out a suspension lift on a Chevrolet Niva, the benefits of such work will be noticeable from the first trip. And they will be as follows:
- the ground clearance will increase;
- it will be possible to install special rubber with a large radius;
- aggressiveness will appear in the appearance of the car;
- the model's passability threshold will increase;
- components and mechanisms will receive additional protection from various mechanical influences.
All the benefits, of course, are better felt during off-road travel, where the car will demonstrate its improved driving performance at its best.
The other side of the lifting coin
If everything is clear about the advantages, then the disadvantages of lifting are worth understanding in more detail, because every car enthusiast should know what he will have to face after installing a lift kit on his Niva. In addition, it is important, before starting work, to weigh both sides and make a final decision. So, among the disadvantages of lifting it is worth highlighting:
- reduction of service life due to changes in the angle of their bend of both drives of the model;
- a change in the vehicle’s reaction during a sharp turn or maneuver due to a shift in its center of gravity;
- the appearance of additional load on the chassis and, as a result, a decrease in the service life of its structural components and mechanisms;
- the occurrence of additional load on the transmission, which also causes a decrease in its operating time;
- other unpleasant moments that may arise during installation of the kit.
From the above we can conclude that the lift kit is ideally suited exclusively
for lovers of long trips or cross-country trips. If the car will not be used off-road, or will be driven into such terrain extremely rarely, then the need for lifting will disappear in itself.
A high-quality lift for a car is only one of the possible options for performing high-quality tuning with your own hands. See the latest in global auto tuning for SUVs and crossovers here.
Advantages and disadvantages
Installing a lift kit has an ambiguous effect on the driving performance of the car. The advantages of this type of tuning include:
- Increased ground clearance.
- Improved machine design.
- Possibility of installing larger wheels and mud tires with large lugs.
- Improving cross-country ability on rough terrain.
- Reduces the likelihood of damage to the engine crankcase, exhaust pipe or transmission.
However, the suspension lift not only has a positive effect on the characteristics of the Chevrolet Niva.
A change in the factory design manifests itself in the form of the following disadvantages:
- The breaking angle of CV joints increases. This reduces the service life of the drives.
- The center of gravity rises. The car's behavior when cornering worsens and the likelihood of capsizing increases.
- The load on the transmission and chassis is growing. As a result, parts wear out faster.
Features of lifting installation
Tuning the Niva Chevrolet suspension with your own hands is a fairly simple task. Especially considering that you only need to install a special kit, which is sold with all the instructions. However, this issue should be approached with full responsibility and dedication, since even a small miscalculation can cause big problems.
If you neglect the rules for re-equipping a car, you may end up with a car that is unsuitable for further use. For this reason, if the owner is not confident in his own abilities, then it is better to entrust the work to experienced craftsmen.
Spring options for shevik
- Izh-Techno are an excellent solution for replacing standard models. The cost of the kit is 2800-3200 rubles, but the service life of these models is much longer. For the Chevrolet Niva, the Izh-Techno spring 1 is recommended. The domestic auto industry has something to boast about, so if you do not want to overpay, then it is better to install the Izh-Techno kit.
- Kilen. These products are produced in Sweden, which already indicates their high cost. So, one element costs about 1000-1200 rubles. The thickness of the coils of this product is 14 mm for the front and 14.9 mm for the rear. For comparison: for standard products the size of the coils is smaller and is 13 mm.
- Lesjofors. A practical analogue of Kilen, which even have the same numbers.
- Raid. Currently they occupy a leading position, so we will tell you more about them.
How to lift the front suspension
For those car enthusiasts who, after weighing all the arguments, decided to do the work on their own, below we provide instructions with the full sequence of actions.
First of all, we need to find some jacks. We use one of them to lift the car and remove the front wheel, behind which we loosen the mounting elements of the silent blocks. Using a second jack, which we fix at the location of the ball joint, we gradually raise the car until the spring is compressed. Next, using a special device, we tighten the spring.
Loosen the shock absorber mounting bracket and remove both supports one by one. After which we carry out similar manipulations with the stabilizer.
The next step is dismantling the spring, after which it is necessary to move the hub to the side and install it on the holder.
Please remember that extreme care must be taken when performing these steps to avoid damaging the brake hoses.
After working with the hub, we need to bend the bump stop a few millimeters and replace the two outer standard wheel bolts with similar fasteners, but with a longer length.
In what cases is Niva lifting done?
Increasing clearance is a labor-intensive procedure. It requires special skills and tools. Therefore, lifting is usually performed at a service station. However, if you have the skills, you can install the elevator kit yourself. In this case, it is necessary to pay attention to the following points:
- Lifting requires an integrated approach. Simultaneously with the increase in ground clearance, it is necessary to change the shock absorbers and thrust rods. Otherwise, the suspension lift will make the car unusable.
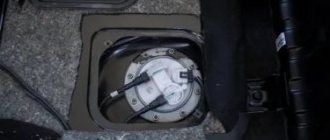
- On the right side of the rear of the body there is a gas tank with ventilation pipes. This must be taken into account if, in addition to lifting, you decide to enlarge the wheel arches.
- If there is a significant change in ground clearance, you should install an extended brake hose and adjust the bump stops. You will also have to reconfigure the pressure regulator in the rear brake circuit.
For tuning at home, it is better to use ready-made factory-made lift kits.
Installation of wheels with a large outer radius. In this case, the craftsmen are faced with a limitation - tires that are too large do not fit into the wheel arches. You have to widen them or move the wheel outside the car, installing extended hubs.
Installation of spacers. This method allows you to slightly raise the body and does not require much labor.
Installation of larger springs. This method is more expensive, but allows you to achieve a greater lifting height of the body.
Installation of wheel reducers on the rear axle. These parts allow the hubs to be lowered and increase the distance from the axle to the ground.
Downward displacement of the front beam. To do this, you will have to weld special fasteners onto the side members and install extended arms.
Installation of extended springs and spacers under ball joints. A simple and inexpensive way to greatly increase ground clearance.
We will divide all the work into two parts. At the first stage we will modernize the front suspension, at the second - the rear. So, let's get to work. First, remove the wheels and release the silent blocks. Next, install a jack under the ball joint, place a board under the latter and raise the car until the spring is compressed.
After this, we install the ties on the spring, tighten it and unscrew the shock absorber mount. Next, remove the lower and upper ball joints and remove the stabilizer. Release the lever and remove the spring. How is the suspension lift done? The Niva remains stationary for now, and at this time we turn the wheel hub to the side and place it on a stand. It is important not to damage the brake hoses.
The Niva lift can be carried out either independently or in a car repair shop. In special stores you can purchase a kit for Niva, which was produced at the factory. However, it is worth remembering that this is still an intervention in the car. Therefore, you need to carry out this process yourself only if you have knowledge and experience. If you are in doubt, it is best to turn to professionals.
Next up is the rear axle
Let’s immediately say that the process of lifting the rear axle will take much more time and effort from the owner, since a set of equipment and two jacks are not enough to carry it out. In this case, you will have to worry about the presence of an inspection hole, as well as a semi-automatic welding machine.
If everything you need is available, then you can get started.
First you need to put the cups under the springs.
Next, you need to mount the shock absorbers and at the same time, using welding, grab the brackets. When this work is completed, you can see a certain degree of displacement of the rear axle.
This displacement must be removed by increasing the length of each rod.
We will have to cut off the bottom cup and move it a few centimeters. In this work, the crosspiece can be damaged, so the offset must be carried out with extreme care.
All that remains is to weld the cups to a new place, increase the length of the rocker arm by three centimeters and weld the pins under the shock absorbers.
And, of course, as in the case of the front suspension, it is necessary to carry out a wheel alignment.
For lovers of hunting, fishing and outdoor activities, as well as those who want to try themselves and their “Niva” in driving in difficult places at various “rides” or competitions, we can offer to increase the ground clearance of the car (Suspension lifting), due to which It becomes possible to install larger “mud” wheels and the cross-country ability of your vehicle increases.
I want to warn “novice Nivovods” about what they need to remember! The larger the size of tires you install on your car as a result of Lifting, the more alterations your car will require further in the suspension, body, transmission, steering, brake system and power unit! Therefore, you should not be greedy, but weigh all the pros and cons. It is better, of course, to turn to specialists who have already prepared a sufficient number of cars for off-road use (preferably Niva) and will be able to tell you what problems you may encounter further during the construction of the car and its operation later. Now the Internet is replete with various offers about lift kits for the Niva, but often either unprofessional installation of such kits, or “mixing... bought something, thought of something myself...”, leads to incorrect operation of both the suspension and transmission, and the whole machine.
If you decide to contact our workshop for help on this issue, then today we can offer you at least six options for lifting the suspension of the Niva and Sh/Niva, each is interesting in its own way and is discussed in the process of preparing the car for “off-road” upon request the client, taking into account the operating characteristics of his car and the sizes of wheels and tires that he wants to install on his car. I'll tell you about some of them below:
1). We more often carry out a 4.5cm suspension lift based on the standard sizes of springs and shock absorbers (so that you then do not have problems finding spare parts when replacing them later). This makes it possible to install R15 235/75 or R16 235/70 tires (on the correct wheels ). In turn, this will give a rise of another 4 cm. In total, the increase in ground clearance will be 9-10 cm! Thus, at the lower point of the RZM, the clearance is 25 cm, and at the cut of the threshold - 44.5 cm. We do not have a kit for self-installation, because... There are a lot of welding jobs that require skills in dismantling/installing and adjusting the suspension, but then you service it yourself because consumable parts remain standard.
In this version, the NIVA can be used both on paved roads and off-road without losing its comfortable qualities, being in no way inferior to foreign-made jeeps. Wheel alignment is performed according to factory tolerances at any service.
The front suspension lift is carried out by installing directed washers under the lower spring pad (they create the required angle of the front spring... we have them of their own size), and a spacer washer under the ball joint (also of its own size and depends on the length of the spring. Unloads the lever and the spring)
The lower platform of the front spring is digested to move the anti-roll bar lower (so that it does not meet with the outer tips of the tie rods.) The position of the front spring bumper along the spring is also digested, and on older cars, the front spar with the “house of the front shock absorber” is often immediately strengthened during the lift “Very often on Niva 2121-14, when installing wheels with an offset for 235 tires, you have to cut the wheel arches because In this case, this suspension lift cannot cope. (or we rise even higher... with financial consequences, as I wrote above.)
Which lift is suitable for the 2121 series?
In professional circles, do-it-yourself car lifts are divided into body lifts and suspension lifts. The bodywork, accordingly, is designed to lift the body when stands are placed under it, the hose is modified, etc. Such tuning is quite simple, but it is not suitable for Niva 21213, 21214 or 2121, since these cars do not have a frame. Frame structures can be found on the Niva 2329, but only on the rear suspension. Therefore, a Niva 21214 body lift using only our own resources is unlikely.
The Niva suspension lifting is considered more attractive for increasing the vehicle's cross-country ability, since it lifts the entire vehicle and makes it possible to install wheels of a certain diameter without cutting the arches. It is assumed that if a suspension lift of 6 cm is made, then 29-inch wheels can be installed painlessly. They will easily fit in the existing arches, which is enough for the minimum “charge” of the car after the Niva 21214 elevator was made with your own hands.
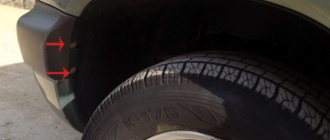
In order to install extreme 33-inch wheels, you will need to cut out the arches and do suspension tuning, since cutting the arches alone only slightly increases the ground clearance and geometric cross-country ability. At the same time, cutting arches 21214 with your own hands without changing the suspension has the advantages that you can get rid of rusted elements, not disrupt the operation of the suspension, and CV joints will have a shortened service life only due to increased loads.
Raised front car suspension
As a rule, the standard Niva 21214 lift is carried out when 31 wheels are installed, which are considered optimal for increasing cross-country ability.
Consequences of lifting
In the struggle to increase the vehicle's cross-country ability, some owners are ready to sacrifice other characteristics. And it should be noted that there is something to sacrifice, but, first of all, let’s highlight the advantages of the modified Chevrolet Niva suspension. After lifting, as an additional measure, special “mud” tires are installed on the car. They have a higher profile, which also leads to increased ground clearance. After installing the elevator from the Niva, you can get a real SUV, and this is the main advantage of such tuning.
There are additional positive aspects that the new suspension brings. This is a change in the image and appearance of the car, the ability to install tires with a larger radius, as well as eliminating the possibility of damage to the engine and gearbox when driving off-road. The elevator cannot but affect traffic flow.
With increased ground clearance, the Niva overcomes obstacles that were inaccessible to it on the stock suspension.
Not without a fly in the ointment. A certain category of auto experts generally speak categorically about changing factory settings. According to an objective assessment, as a result of changes in suspension components, certain negative aspects arise. By raising the gearbox relative to the vehicle axis, the angle between the drive shaft and the axis of the front wheel hub changes. The CV joint begins to experience increased loads. This leads to a decrease in its resource.
It is known that those vehicles whose center of gravity is located as low as possible exhibit greater stability.
After lifting, the center of mass rises relative to the horizon. Statistics show that the Chevrolet Niva lift leads to accelerated wear of suspension and transmission parts. Despite the above arguments, for some motorists, increased cross-country ability is still the determining factor. Indeed, a passable car is considered an invaluable assistant when hunting or fishing.
Step-by-step instruction
Step 1
Body lifting is performed using spacers between the frame and body. It is best to choose aluminum spacers: they are inexpensive and well made. Their main advantage is the strength and rigidity of the attachment of the body to the frame. Foreign companies produce a wide range of aluminum spacers for all models of SUVs. All of them are made at the highest level and are perfect for the Chevrolet Niva. The suspension of each car is calculated individually, since there are no average lifting indicators.
Set of spacers
Step 2
When installing spacers between the body and frame, the task arises of trimming the wheel arches and fenders. You also need to install side mudguards that will protect the glass from flying dirt from under the wheels. Problems. Problems that arise with lines, cables, and steering mechanisms can be resolved without much difficulty. Depending on the type of spacers, the distance from the frame to the body part will be increased by 40-80 millimeters. And in combination with large wheels, ground clearance will increase by 50-150 millimeters. How these operations are performed can be seen in the video, where domestic auto mechanics perform car suspension tuning with their own hands. You can glean a lot of useful information from these materials, since in most cases they are accompanied by sensible comments and explanations about the performance of certain types of work.
Step 3
Lifting the suspension significantly increases the vehicle's maneuverability, but safety suffers: an increase in the center of gravity makes the SUV more difficult to drive. So don't overdo it. Choose a suspension lift height that is optimal for both cross-country ability and safety. You also need to take into account the maximum angle of inclination of the cardan shafts, until reaching which they operate in normal mode. Remember - the greater the angle of inclination of the shaft, the faster it will wear out.
Suspension lifting
Step 4
To combat the increased risk of rollover, widen the track with wheel spacers, negative offset rims, wide tires, or replacing axles (Spicer or Bars). Install disc brakes. This will widen the track by about 40-50 millimeters. You can get rid of the problem of the maximum angle of inclination of the cardan shafts by installing extended shafts and a spacer between the flanges of the cardan shafts and axles. SUVs with differential locks are best suited for lifting. Such cars have increased cross-country ability, and increased ground clearance helps improve this indicator.
Step 5
Now you need to choose a method for lifting the suspension based on what height you want to get in the end. For a small increase, simply add leaves, or install extended spring earrings. You can also replace the springs with others with more springs. Most often, the brake system of a car, for example a UAZ, also needs design changes during the lifting process. There is an alternative way - installing a spacer in the spring mounting brackets. These two options are almost always used on so-called “loaves” due to the preservation of original parts and the ability to raise the car to different heights.
Before and after lifting
Step 6
You should know that for successful off-road driving, cars with high suspension must be as energy-intensive as possible in order to ensure the best possible contact of the wheel with the ground. And the specific power of the car must also correspond to the new design of the suspension and chassis of the car. The wrong lifting method or technology can make the suspension very stiff. To lift the Niva's front spring suspension, place spacers between the chassis support cups and the springs. Another way is to install longer springs. During this operation, it is necessary to take into account the change in the angles of the levers. The more the angle changes, the more difficult the SUV will be to control. To avoid this, lower the arm brackets.
Armoring expensive cars with vinyl film is an excellent measure of protection! You can learn more about the Volkswagen Jetta in our article.
How to modify the VAZ clutch, read the material at https://avtopolza.ru/tyuning-russkix-avto/tyuning-scepleniya-vaz-2110/ link.
Suspension improvement methods
If we consider the principle of lifting, it comes down to increasing the length of the spring.
However, not everything is as simple as it seems, because a longer spring will lose its elasticity. Although many designers try to use this method, you can also find springs on sale with the required parameters. But a more acceptable way to increase the car’s ground clearance is to place spacers under the existing springs.
They should be soft, but have metal protection at the point of contact with the spring. Unfortunately, after such a basic transformation we have to deal with the consequences. The distance between the upper and lower arms of the front suspension changes, therefore, a metal insert is installed under the upper ball joint. Bushings with a thickness of 10 to 20 mm are installed between the lower arm and the lower cup.
The rear suspension is changed using a welding machine. Some lift kits are designed to make the technician’s work more convenient and do not require any drastic interventions. Lifting the car also involves installing spacers for the springs.
How to lift a Niva yourself
If you want to do the Niva lift yourself, then take this procedure very seriously, since despite the simplicity of the work, the slightest mistake will result in irreversible consequences in the future. Therefore, no matter what the car becomes unusable for use, you must strictly follow all the rules, and if there are any doubts, then it is better to turn to a professional.
In order to carry out all the work, it is enough to buy a ready-made lift kit, but there are car owners who upgrade the parts themselves, if you are one of them, then you need to stock up on the following parts:
- Set of springs
- Rubber spacers for springs with steel cups
- Shock absorber kit
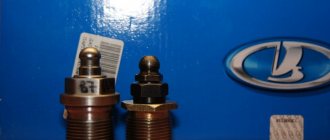
- Special spacers for ball joints, the thickness of which should be approximately 30 millimeters
- Make a special mount for the rear shock absorbers
- There are twelve spacer washers under the cup with the following dimensions:
- For cups and long ball bolts
- Two jacks and a spring tie
You also need to additionally make special spacers for the rear shock absorbers. They can be made from corners, and bushings whose thickness should be approximately 32 millimeters are welded to them.
Composition of the Chevrolet Niva Lift kit
Buying a ready-made lifting kit for a Chevrolet Niva is not a problem. The owner even has the opportunity to choose a priority manufacturer. Since improvement methods differ from each other in some small details, let’s consider the composition of one of the kits:
- Spacers for front and rear springs;
- Inserts for upper ball joints;
- Extended bolts for balls;
- Shock absorber adapters (extensions);
- Mounts for rear shock absorbers;
- Panhard rod adapter;
- Rear brake adjuster rod.
Materials and tools
I don’t argue that in Samara, Nizhny Novgorod, Moscow or cities like Yekaterinburg and St. Petersburg there are many companies ready to do any amount of work on your car and suspension in particular for your money.
If you decide to do everything yourself, I have nothing against it. I only advise you to use only factory-made, high-quality kits for the Niva elevator.
Kits from Izh Techno have earned good reviews; you can also find excellent options in the store on Sedova Street in St. Petersburg. This store is called Niva 4x4. The T 34 lift kit also showed excellent performance. Each of them is excellent for the Niva, which is why it is widely used by car owners when modifying the front and rear suspension.
There is an option to assemble the kit yourself. But this will require accurate drawings and even more time and effort. I don’t see the point in this, since it is better to take a ready-made set after looking at a review of different sets.
To work you will need to take:
- front and always rear new springs;
- spacers made of rubber for springs with a metal cup;
- spacers for the Nivov ball joint (upper);
- shock absorbers;
- brackets for rear shock absorber springs;
- cup washers;
- set of tools;
- jack;
- durable boards;
- ties for working with springs.
Sizes are selected individually, based on what kind of car you have and what results you are aiming for. You can buy something without any problems. Although some elements will have to be ordered or done yourself. That's why buying a ready-made lift kit seems preferable to me.
Get ready to go. Photo and video instructions will help you.
Front suspension lift
You can give a step-by-step algorithm for installing the front suspension kit. For those who know how suspension components work, making changes is not difficult.
- Remove the front wheel.
- Loosen the spring by placing a jack under the lower arm.
- Tighten the spring with special ties.
- Remove the shock absorber.
- Remove the anti-roll bar.
- Unscrew the ball joints from the arms, leaving them on the steering knuckle.
- Unscrew the lower cup and install bushings under it.
- Install the spacer over the spring.
- Raise the lower arm with a jack and install the ball joints. There should be an insert above the top support.
- Screw on the stabilizer.
Rear suspension lift
Let's consider the principle of lifting the rear suspension by replacing some parts.
- Remove the shock absorber.
- Remove the shock absorber bracket.
- Pull and remove the spring.
- Place the spacer on the spring and install the spring.
- Connect the shock absorber bracket supplied.
- Install the shock absorber adapter and install the shock absorber itself.
- Mount the Panhard rod adapter.
- Install a new regulator rod (from the kit)
More complex manipulations are performed when installing larger rubber. The shock absorber bracket is made independently and welded. After installing the spacers, the rear axle moves forward. To fix this, you need to install extended rods. They are made adjustable using homemade couplings. But in some kits such rods are supplied.
Elevator assembly
The installation procedure is divided into installing a front and, accordingly, rear car suspension lift.
There is nothing particularly complicated here. Especially for those who have already had to work with the suspension, change something, repair and dismantle it.
Let's look at the processes separately.
Front suspension
Let's start with the front of the Niva. Then I’ll tell you separately how work is done on the rear suspension of the crossover.
- It all starts with removing the wheels and releasing the silent blocks. The activities are elementary, so we won’t pay much attention to them;
- Securely secure your Niva. To do this, place a jack under the ball joint. The machine rises until the spring is fully compressed;
- Next, the ties are installed on the fastenings and the fastening elements that you will see on the Niva’s shock absorbers are dismantled;
That's it, the work is completed.
Rear suspension
Here you will have to buy yourself or borrow a welding machine from a friend, because you can’t do without welding. Get a semi-automatic one.
The procedure for lifting the rear suspension of a Niva will look something like this:
- The cups are carefully placed under the Nivov springs so as not to be damaged;
- The rear shock absorbers included in the kit are installed on the car. Additionally, I advise you to secure the bracket by welding;
- When you install the element, your rear axle will move forward slightly. To avoid such a change, all rods must be lengthened;
- The lower cup is cut off and shifted by about 20-30 mm. When moving, pay attention to the crosspieces, which are easily damaged;
- The cups are welded firmly into new places using a welding machine;
- The rocker arm of your brake system is extended. As a result, the extension should add 30 mm;
- Pins are welded under the shock absorbers using semi-automatic welding. Just not yours, but car ones.
Be sure to visit the service station after this. Not to show off the work, but to perform a wheel alignment.
Remember that lifting will require further installation of main pairs with a different gear ratio. And forget about alloy wheel sets. Now only stamped discs will be your property.
If you really want to perfect the car, then spend a little more money on a new limited-slip differential.
All responsibility for lifting lies entirely with you, even if you ordered the service from a car service center. Remember that the consequences may be very unpredictable. Although practice shows how satisfied car owners are with the elevator and that such reconstruction brings benefits and driving pleasure. The main thing is to do everything correctly and use only high-quality ingredients. Thank you all for your attention! Subscribe to our website, leave comments, ask questions and invite your friends to join us!
( 3 ratings, average: 5.00 out of 5)
Did you like the article?
Subscribe to updates and receive articles by email!
We guarantee: no spam, only new articles once a week!