An important element in the entire engine system are injectors. They are responsible for fuel injection, which means the operation of the entire engine depends on their lifespan.
Injectors can become unusable due to many factors. The VAZ 2114 injectors themselves last approximately 100-120 thousand kilometers.
However, this is provided that gasoline complies with European standards, but in Russia the standards are often not met, which is why the injectors fail after 60-80 thousand kilometers, or even earlier.
Failure of injectors can adversely affect many vehicle systems. However, the life of the injectors can be increased if they are cleaned in a timely manner.
Why do you need to clean injectors:
- to extend the life of injectors;
- Dirty injectors increase fuel consumption and reduce the vehicle's dynamic performance.
In other words, cleaning the injectors will help the car drive smoother.
What injectors are installed on VAZ 2114/2115 cars
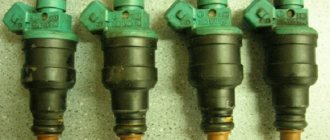
Almost all types of injectors that the VAZ 2114/2115 are equipped with at the factory can be considered interchangeable. Depending on the year of manufacture, injectors manufactured by Bosch and Siemens of different markings were installed on the car.
Model 0280 158 022. The product is compatible only with a 16-valve 1.6-liter engine. The nozzle is black and is designed to operate at an optimal pressure of 3.8 atmospheres.
Model 0280 158 017. An injector with this marking is installed on 8-valve engines with a volume of 1.6 liters. The body is also black.
Modification 0280 158 996 is considered obsolete, since injectors with this marking were installed on cars until 2006. The model was intended for 8-valve power units.
Standard equipment of VAZ 2114/2115 injection engines
VAZ20734 is made in an orange case. The model can be installed on a VAZ 2114/2115 of any year of manufacture, but the modification is paired with an 8-valve engine.
Model VAZ20735 is intended for a 16-valve engine. In terms of its characteristics, it is practically no different from the previous model. The nozzle has a blue marking.
Depending on the marking, it can be used on different types of engines
Engine dismantling process
Of course, the best option would be to replace the engine in a fully equipped workshop, but if this is not possible (and you really want to do tuning), then you should have the following minimum set of equipment:
- winch, hoist or hydraulic lift;
- shoes;
- jacks;
- cart;
- knob with a set of heads;
- spanners;
- screwdrivers.
Nissan engine for VAZ Dismantling is carried out in the following order:
- The car is stopped using a hand brake and shoes, which should be placed under the rear wheels.
- Place the front wheels on jacks.
- With the hood open, disconnect the “mass” terminal and all small hoses and tubes suitable for the engine.
- Seal the pipe inlets to the engine to prevent them from clogging.
- Disconnect the throttle cable from the throttle pipe and bracket.
- Disconnect the air intake hose together with its bracket.
- To dismantle the air filter - to do this, use a sharp blade to cut off the three rubberized supports, due to which it is attached to the engine body.
- Remove the hoses leading to the receiver.
- Disconnect the hose intended for purging the adsorber from the nozzle.
- Remove the wires suitable for the pipe, the ignition module, as well as all others connected to the internal combustion engine.
- Remove the engine splash guard by unscrewing the mounting bolts.
- Drain all the coolant by removing the plugs on the cylinder block and radiator (while opening the reservoir cap).
- Drain the oil by unscrewing the plug cap on the gearbox.
- Disconnect the clutch cable.
- Secure the hooks of the lifting device to the eye bolts located on the gearbox and on the cylinder block, and then remove the engine.
Installation of the new motor is carried out in exactly the same order, but in reverse order. Also, it is important not to forget to connect the wires of all sensors to the correct connectors and refill all technical fluids that were drained during dismantling (coolant and oil).
Despite the fact that some car enthusiasts advise first removing the gearbox and then removing the engine, it is strongly recommended to remove the engine together with the gearbox.
Replacing injectors
The difficulty in identifying problems in the operation of injectors is that the fuel system is quite branched and it is necessary to diagnose the functionality of all its parts. For example, a malfunction such as a decrease in engine power can have two reasons - failure of the injectors or exhaustion of the pump's life.
Clogged injectors can result in sudden jerking of the engine while driving or unstable idle speed. In addition, an increase in fuel consumption can be considered a sign of injector failure.
You can check the functionality of each injector even without removing them. Simply start the engine and remove the wires from the connector of each injector one by one. If immediately after removal the engine starts to twitch or stalls, then the injector is fine. If the stability of the engine does not change with removal of the wire, then the injector needs to be thoroughly cleaned or even replaced.
This material will help you to independently replace or wash the injectors on VAZ 2110-2112 cars: https://vazweb.ru/desyatka/pitanie/zamena-forsunok-vaz-2110-8-klapanov.html
Video: replacing injectors on VAZ 2108 - 2115 injectors
Symptoms of a problem
Fuel rail There are several key symptoms that indicate the presence of such a problem:
- There are misfires at idle;
- There is instability in engine operation;
- The car accelerates more slowly than usual when the gas pedal is fully pressed.
Fuel consumption increases sharply;
It is very important to identify such a problem, since the injectors supply fuel to the system. Without fuel, engine operation is impossible. It is not always worth replacing them immediately, since they often need to be cleaned.
How to remove
The procedure for dismantling and installing injectors is not particularly difficult, but it does take a lot of time. You need to prepare a set of tools in advance:
screwdriver with a flat thin blade;
Before removing the injectors for replacement, it is necessary to relieve the pressure in the vehicle's fuel system. This is a necessary measure to ensure safe work and eliminate the possibility of injury.
To relieve fuel pressure, you must turn off the fuel pump. It is located in VAZ 2114/2115 cars in the fuel tank. The easiest way to get to the pump is through the hatch located under the rear seat cushion. For this:
Find a small hatch under the rug.
Unscrew the screws securing the hatch.
Remove the cover and remove the contact block from the fuel pump housing.
Then you need to start the engine. The engine will run on the amount of fuel that remains in the system, since the pump will not build up pressure after removing the block. You must wait until the engine has completely used up the remaining gasoline and stalls.
More information about replacing the fuel tank in VAZ 2108/2109/2114/2115 cars can be read in this article: https://vazweb.ru/desyatka/pitanie/zamena-benzobaka-vaz-2114.html
The procedure for removing injectors is as follows:
Open the hood of the car and remove the wire from the negative terminal on the battery.
For ease of dismantling, it is recommended to remove the air filter box. It will prevent free access to the engine.
After that, use your finger to snap off the plastic retainer on the engine and disconnect the connector from the throttle valve.
The connector from the idle air control regulator is removed in the same way.
Next, you need to disconnect the connector block from the wiring harness of the injectors themselves.
The injectors can only be removed together with the fuel rail. Therefore, you need to unscrew the bolts securing the ramp to the body.
After which it will be possible to move the ramp to the side so that each of the nozzles moves slightly out of the mounting socket. The wires are removed from the injectors, otherwise it will be impossible to pull out the ramp.
The ramp is pulled out and placed in a clean place. Now you can easily remove all the injectors - they are pressed out using a plastic clamp.
Disconnecting the injectors is only possible after dismantling the ramp itself
Accordingly, new products are inserted in place of the old ones. And then the installation work is carried out in the reverse order.
Let's sum it up
So, the most common and proven methods for flushing the fuel system of engines with your own hands were described above. All that is required for the work is some free time, some simple tools, as well as a special cleaning fluid, which can be easily purchased at any auto store.
Signs of malfunction and checking injection nozzles without dismantling. Diagnostics of injector power supply, performance analysis. Tips and tricks.
Why is it necessary to clean the fuel pump mesh? When is it better to change and how to clean the fuel pump mesh? How to properly remove the fuel pump, subtleties and nuances.
Cleaning a car injector without removing the injectors. Methods for cleaning injectors with removal on a cavitation stand. Ultrasonic and hydrodynamic cavitation.
What happens if you accidentally fill a diesel car with gasoline? Possible consequences for the engine and diesel fuel equipment after refueling with gasoline.
Malfunctions of diesel injectors, checking and self-identification of problems. Cleaning diesel engine injector nozzles, regulating injection pressure.
Features of operation and causes of malfunctions of diesel injectors. How to independently remove, troubleshoot, disassemble and repair diesel engine injectors.
Repair of injectors VAZ 2114/2115
Repairing injectors involves carrying out a number of works at once:
replacement of rubber seals.
After the products have been removed from the fuel rail, you need to take a good look at each of the four nozzles. If there are visible signs of leakage on the body, repair will not be practical. You will have to immediately replace the nozzle with a new one. The differences in flushing and cleaning procedures for 8-valve and 16-valve engines are not significant. Therefore, you can be guided by the same scheme.
Video: the easiest way
If the body is clean and there are no deformations or cracks on it, then repair work is allowed . To do this, you will need to remove the seal from the body and the sprayer. It is recommended to leave these parts in acetone or solvent for 1.5–2 hours. While the parts are being washed, you can use a vacuum cleaner to clean the fuel rail. Next, you need to carefully clean the place where the injectors fit into the ramp using a toothpick or a needle.
Disassembly
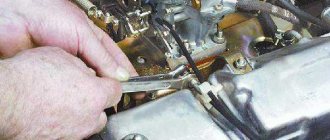
1. Use a slotted screwdriver to move the injector retainer along the fuel rail.
2. Remove the injector from the fuel rail.
3. Similarly, remove the other three injectors.
Warning! The connections of the injectors to the fuel rail and to the intake manifold are sealed with rubber rings. Any damaged O-rings must be replaced.
4. Remove the spring clamps of the injectors from the fuel rail.
6. 24 mm
Unscrew the nut of the fuel supply pipe and remove the end of the pipe from the fuel rail.
Warning! The connection of the tube with the fuel rail is sealed with a rubber ring installed at the end of the ramp. Any damaged fuel line O-rings must be replaced.
7. If necessary, use a metal cap from the wheel nipple to unscrew the spool of the diagnostic fitting.
Replacing rubber rings on VAZ injectors
Today we will talk about replacing rubber rings on injectors on VAZ cars (2114, 2110, Kalina, Granta, etc.). Why did I decide to replace them? Because they were not sealed enough and air was leaking through them (the mixture became lean).
The car's speed was constantly floating and error P0171 lean mixture periodically popped up. Using carburetor cleaning fluid, I checked the main places of the intake manifold for air leaks (by spraying them while the engine was running). When liquid hit the injectors, or rather at their junction with the intake manifold, the engine began to react (the speed began to increase). Thus, it was determined that the rubber (sealing) rings of the injectors needed to be changed.
The first thing to do is relieve the fuel pressure in the rail. For this purpose there is a special nipple at its end. After placing a rag under it, we gradually release the pressure.
Be careful, if the engine has been recently stopped, there will be quite a lot of pressure in the rail. Do not allow fuel to enter the exhaust manifold.
Now that the pressure has been released, you can unscrew the injector rail from the fuel supply hose. There are two nuts with a 17mm wrench. Use one wrench to hold the nut on the hose, and with the second we turn the nut on the ramp.
And the last thing left is to remove the injector power connectors. They are fixed with a metal bracket. To remove the connector, you need to press the bracket and pull the connector up.
The ramp itself with the injectors is attached to the engine with two hex bolts. We unscrew them and the ramp can be pulled out freely.
I only replaced the lower rubber rings of the VAZ injectors, since they were the problem. For prevention, you can also change the upper rings of the injectors. They are changed when they begin to leak fuel (a distinct smell of gasoline is heard).
To make it easier to install the ramp back, you can pre-lubricate the rubber rings of the injectors with silicone grease. Later, during engine operation, it will evaporate.
It is recommended to replace the injector sealing rings every time they are removed from the engine in order to avoid troubles in the future (for example, such as I had).
Source
Checking the power
Let's say we are convinced that the mechanical sprayers are working properly. But now we also need to make sure that power is supplied to each of the elements. Let's look at the wiring of the injectors. There are five wires in the contact block: four are used to supply power, and one (most often pink) is ground. Disconnect the chip with contacts. We take a multimeter in our hands and set the upper limit to 250 ohms.
Then we measure the resistance of each of the four power supply wires of the injector. Normal value: 12 - 15 Ohms. Even while the power unit is operating, the injectors should vibrate slightly. This will be evidence that they are working properly. As for the resource, it is difficult to say anything specifically. Their service life depends largely on a number of factors. I even got 200 thousand.
Features of fuel injection systems
The advantages of fuel injection systems (FIS) include:
- constant pressure level in the fuel system;
- high-quality atomization of the fuel mixture;
- rapid injection of a combustible mixture;
- reduction of noise when the motor is running;
- complete independence of the complex from engine operating modes;
- possibility of implementing several injections simultaneously;
- reduction of exhaust gas toxicity;
- reduction of emissions of solid pollutants into the environment;
- reduction in fuel consumption;
- noticeable increase in productivity.
Design and principle of operation of fuel injection systems
The main element of the fuel system is the pump, which creates and maintains the required fuel pressure. There are various designs of pumps, but the principle of their operation is the same.
Procedure for removing injectors
- First, remove the fuel rail with all the injectors. (You can read about this in more detail on the website in the article “How to remove the fuel rail of injectors?”).
- Next, you need to disconnect the injector wire block, while holding the spring clip.
- Using a screwdriver, move the injector retainer along the ramp.
- We remove the injectors from the ramp, while turning it a little.
- Then remove the O-rings from the injector by prying them off with a flat-blade screwdriver.
- They are removed from the nozzle body itself, as well as from the atomizer. You can throw them away, as they will most likely be replaced with new ones.
Attention! Be careful when removing or installing injectors!
- Do not damage the nozzles or the connector plugs.
- The injectors cannot be disassembled.
- Do not allow engine oil to get inside the injector.
- Do not immerse the nozzles in any detergents, as the nozzles contain electrical components.
And finally, I bring to your attention the following signs of injector malfunction, which in the future will lead to the replacement of the injectors themselves:
- the engine starts to stall at idle;
- fuel consumption in the car increases noticeably;
- the engine cannot start working at full power;
- engine response has become insufficient;
- engine operation has become unstable;
- the amount of CH in the exhaust gases has increased;
- the engine starts to work poorly;
- at idle, the crankshaft rotation speed is reduced;
- failures in the operation of the engine itself while the car is moving.
Injectors used on VAZ 2114–15 cars
For 8- and 16-valve engines of VAZ 2114–15 cars, you can use various interchangeable types of injectors. These include:
- injectors manufactured by Bosch (three types);
- injectors manufactured by Siemens (three types).
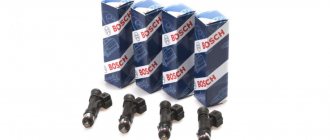
Bosch injectors
The type of injector used depends on the number of valves and engine size:
- Nozzle 0280158022 is black, has a productivity of 1.9644 mg/sec and operates at a pressure of 3.8 atm. Used on 16-valve engines with a volume of 1600 cm 3 and controlled by a controller version “January 7.2”.
There is a marking on the nozzle body to identify it
The injector is intended for use on domestic VAZ 2114–15 cars
The injection device is a modern and efficient product
When purchasing injectors, you need to know the version of the installed control controller (“January 5.1” or “January 7.2”). This is necessary to determine the performance of the injectors.
Siemens Deka injectors
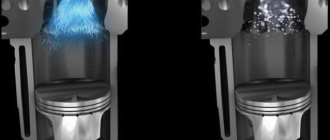
Different models of Siemens injectors can be installed on the same engine. The only thing that matters is the number of valves. Single-jet injectors are installed on an 8-valve engine, and double-jet injectors are installed on a 16-valve engine. In the second case, fuel can be sprayed separately onto the existing intake valves.
Double-jet injectors are marked VAZ20734 (orange) or 20735 (blue).
Eight-valve engines can be equipped with 6393 thick spray injectors. They have a productivity of 1.662 mg/sec at an operating pressure of 3 atm.
Photo gallery: injectors from Siemens
Replacing injectors yourself
VAZ 2114–2115 car engines differ in power and number of valves.
The first VAZ models were equipped with engines with 8 valves
There are engines with 8 and 16 valves.
16-valve engine offers more power and efficiency
The procedure for replacing injectors does not depend on the number of valves. However, on engines with 16 valves, access to the injectors requires the removal of a number of additional elements.
Signs of injector failure
The main symptoms of injector malfunction are:
- the engine is difficult to start and runs unstably;
- the engine stalls at idle;
- the engine slowly picks up speed;
- dips appear while driving;
- fuel consumption increases;
- the toxicity of exhaust gases increases.
Video: identifying an injector malfunction
Diagnostics of injectors without dismantling
The engine injection system consists of many components. Therefore, malfunctions are identified only after a thorough check of all its components. Diagnostics must be carried out for each individual element.
Thus, the reason for the drop in engine power may be injectors, fuel pump, fuel filters, etc. A clogged injector can cause engine failure, make it difficult to start, and increase fuel consumption.
If these signs appear, the injectors can be checked without dismantling. To do this, start the engine and disconnect the connector wires from each injector one by one.
The engine starts and the connector wires from each injector are disconnected
If the engine operates differently when the injector is turned off, then the injector is working properly. If no changes occur, the nozzle should be repaired or replaced with a new one.
Required Tools
To carry out the work you will need the following tools:
- hex wrench 5;
- open-end wrenches for 10, 17 and 24;
- flat and Phillips screwdrivers;
To replace injectors you will need a minimum list of tools
To measure the resistance of the injector and determine its serviceability, a multimeter is required
Procedure for replacing injectors
Replacement of injectors is carried out in the following sequence:
- The car is put on the parking brake.
- The fuel system is depressurized.
- The rear seat cushion is removed.
The fuel pump hatch is located under the rear seat.
The hatch is opened using a shaped screwdriver
If the wires are disconnected, the pump will stop working.
The cover must be removed to gain access to other parts.
For further work it is necessary to remove the air filter
When replacing injectors, the intake manifold must be removed
The hose is removed from the pressure regulating device in the power system complex
The crankcase ventilation hose is disconnected from the valve cover
The oil level dipstick tube is removed from the engine crankcase
To gain access to the injectors, you must disconnect the connector
The connector is removed from the idle air control device
The connector block is disconnected from the injector wiring harness
Using two wrenches, the fuel supply pipes are disconnected
The fuel rail is unscrewed using a hexagon
The fuel rail can be removed without much effort
By squeezing the clamp with the spring, the electrical wiring is removed from each nozzle
A metal bracket holds the injector in the fuel rail
The injector is removed from the fuel rail
Injector cleaner is often used when self-repairing a car's fuel system.
Video: replacing injectors on a 16-valve engine
The algorithm for replacing injectors on VAZ 2114/15 cars practically does not depend on the number of valves on the engine.
Video: replacing injectors on an 8-valve engine
Diagnostics of injectors with dismantling
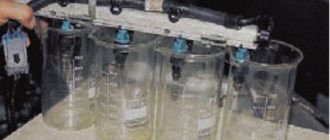
The performance of injectors removed from the engine is checked as follows:
- The negative terminal of the battery is connected.
- The dismantled ramp is connected to the fuel supply pipe and power supply block.
- The ramp is fixed in such a way that it is possible to place identical containers under each of the nozzles.
Identical containers are placed under each of the nozzles
Fuel atomization and the degree of filling of containers are studied
The nozzle is replaced along with the seals
When diagnosing injectors, the integrity of the electrical block is checked
It is recommended to check the injectors for the external shape of the fuel sprays formed by the sprayers and for tightness at a service station. Self-diagnosis in this case is extremely fire hazardous.
The procedure for checking the power supply to the injectors is as follows:
- All power supplies are disconnected from the injectors.
- Two wires are connected to a reliably working block, the other ends connected to the conditionally faulty injector.
- The ignition turns on. If the injector works, then the block is faulty. Otherwise, only the nozzle itself should be replaced.
Troubleshooting an injector using a multimeter consists of the following steps:
- To carry out diagnostics of the injector windings, the negative terminal from the battery is disconnected.
- All pads are disconnected from the injectors.
- The multimeter probes are connected to the injector contacts. In this way its resistance is measured.
The multimeter readings reliably indicate the serviceability of the injector
Compression test, troubleshooting
One of the main reasons for engine repair is decompression. Actually, the troubleshooting itself must be done every 30 thousand km, combining it with valve adjustment.
Signs of the need for early technical inspection of the engine are:
- power surges;
- increase in fuel consumption;
- engine tripping.
Compression test
If you notice similar symptoms, you need to do the following:
- Check the starter and charge the battery.
- Find a compression gauge and warm up the car.
- Remove the spark plugs and fuel supply hose.
- Insert the compression gauge into the spark plug socket of the first cylinder and depress the accelerator.
IMPORTANT! The normal pressure in the VAZ 2114 engine is 1.0 MPa in the standard configuration and 1.4 MPa on an eight-valve engine.
- We turn the key in the ignition and turn the starter for 10 seconds, watching the device, it must be interpreted as follows: a. if the pressure stops at 0.8 mPa and then stops growing or does so slowly, then the cylinder head is broken or there is a leak in the valve; b. if it just grows slowly, it means that the rings have exhausted their service life (by the way, this fact can be checked by adding oil and measuring again, if the pressure returns to normal - the rings are 100% to blame).
After the procedure is repeated for all cylinders, it is necessary to analyze the records. So, in a working engine, compression should not fall below 1 MPa and should not have a spread between the cylinders of more than 0.2 MPa. Otherwise, you will have to repair the engine.
Restoring the functionality of injectors
An inoperative nozzle can be replaced with a new one or properly cleaned. Repairing injectors is ineffective due to their design features.
The reason for incorrect operation of the injectors may be the presence of impurities in the fuel. The accumulation of deposits in the injector occurs especially intensively when the engine is stopped.
During operation, the injector heats up, and the fuel is not able to cool it. Heavy fractions accumulate in the atomizer, thereby reducing the cross-sectional diameter of its channel. Thus, deposits of 5 microns in size can reduce throughput by 25%. The quality of the fuel-air mixture will decrease with all the ensuing consequences.
Domestic gasoline is not always of high quality. Therefore, the injectors lose their functionality after less than 100 thousand kilometers.
Extending injector life
There are practically no differences in the procedures for cleaning and flushing injectors in 8- and 16-valve engines.
There are several ways to extend the life of sprayers:
- With low mileage, it is possible to regularly add various additives to the fuel.
- You can clean the injectors at a service station using ultrasound every 40 thousand km.
- Solvent cleaning is carried out at specialized service stations and is a very expensive procedure.
Self-cleaning injectors
To clean the injectors yourself you will need:
- A set of keys and tools for dismantling injectors.
- Three cans of special cleaner for carburetors or injectors.
Injectors can be cleaned using special products
The metal clamp ensures a tight connection of the hoses
To clean the injectors you will need a 12V light bulb.
To temporarily close the electrical circuit, a two-contact button without fixation is used
For high-quality electrical contact, special terminals are used
Self-cleaning of injectors is carried out in the following order:
- The injectors are being dismantled.
- The injectors are carefully inspected. If there are signs of leakage, the injectors are replaced.
- The O-rings are removed from the body and nozzle.
Rubber rings must be replaced
Ultrasound or chemicals for cleaning the injector?
So, it was decided that the nozzles and injector needed to be cleaned.
Which method should I choose? Common methods are washing the injector without removing the injectors or cleaning the injector on an ultrasonic bench. The cleaning efficiency of the second method is several orders of magnitude higher, but in this case, except for the nozzles, nothing else is cleaned. For VAZ cars, sometimes cleaning is not the right solution. It is much easier and cheaper to simply replace the injectors. Today, simple single-circuit installations are used for washing and cleaning. These are containers in which the solvent is located. The unit is placed next to the machine. A hose is connected to the inlet of the fuel rail to inject the product into the system. The cleaner, which acts as both a cleaning agent and a fuel, is supplied to the system by a compressor.
But there is a drawback: this method does not allow the cleaning fluid to pass through the pressure regulator and shut-off valve. This is ineffective and does not flush out the fuel system. Double-circuit stands are much more efficient, since the cleaning liquid passes through all fuel systems. As for ultrasound, it began to be used back in 1985. A bath for such cleaning is a container with a cleaner. An ultrasonic emitter is installed at the bottom of this bath.
The disadvantage is that you only need to clean the injector nozzle. And modern sprayers cannot be cleaned using ultrasound. And this process is quite labor-intensive.
It is preferable to use imported solvents as a cleaner for injectors and injectors. They are of high quality. These are, for example, injector cleaning products such as the German Liqui Moly, the Belgian Winns or the American Hi-Gear. Domestic products were also tested, but neither “Toilet duckling” nor “Moidodyr” were suitable for these purposes.