Checking the cooling water temperature sensor and its circuits
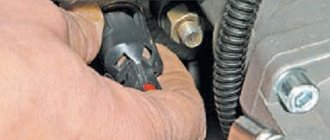
With the ignition off, disconnect the engine control system wiring harness connector from the cooling water temperature sensor.
The block terminals “A” and “B” are marked on its body. By connecting the tester probes to terminal “B” of the block and to the “ground” of the engine, with the ignition on, we measure the voltage of the sensor input signal circuit.
The device should detect a voltage of 4.8-5.2 V. If the voltage does not match, check the serviceability of the circuit (open and short to ground) between terminal “B” of the wiring harness block and terminal “39” of the controller. If the circuit is OK, the controller is faulty.
By connecting the tester probes to terminal “A” of the block and to the “ground” of the motor, we measure the resistance. If the sensor grounding circuit is working properly, the device should register a resistance of less than 1 ohm. A prerequisite for excessive resistance may be an unreliable connection in the blocks connected to the sensor or to the controller. To check the sensor, disconnect the engine control system wiring harness block from it. Using a tester, we measure the resistance of the sensor for 2 values of the cooling water temperature - a non-heated and a warmed-up engine. We compare the acquired values with the control ones, see the table:
| Control values of DTOZh resistance at different cooling water temperatures (approximately) | |
| Cooling water temperature, °C | Resistance. Ohm |
| 100 | 180 |
| 90 | 240 |
| 80 | 330 |
| 70 | 470 |
| 60 | 670 |
| 50 | 970 |
| 45 | 1200 |
| 40 | 1460 |
| 35 | 1800 |
| 30 | 2240 |
| 25 | 2800 |
| 20 | 3520 |
| 15 | 4450 |
| 10 | 5670 |
| 9420 | |
| -4 | 12300 |
| -10 | 16180 |
| -15 | 21450 |
| -20 | 28680 |
If the measured resistance values do not coincide with the control values, the sensor must be replaced.
Source: wiki.zr.ru
see also
Oil in antifreeze
- 5 0 14k
Antifreeze reducing additives
- 7 1 13k
Checking motor sensors
- 368 1 190k
Checking the Cooling Water Temperature Sensor
- 51 0 43k
Antifreeze is bubbling
- 41 1 49k
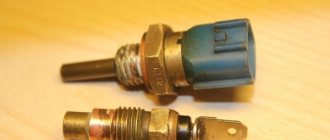
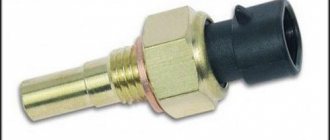
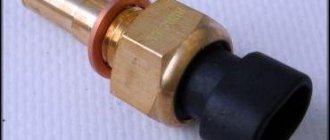
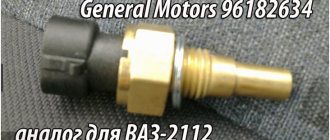
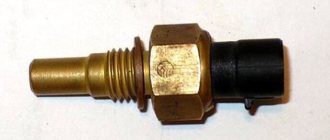
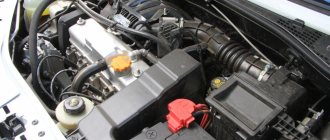
The sensor is installed in the engine cooling water flow on the thermostat, on the cylinder head. On vehicles of the LADA 4x4 family, the sensor is installed on the outlet pipe.
Placement of the cooling water temperature sensor in the engine compartment of cars of the LADA PRIORA family (with the air filter removed): 1 - cooling water temperature sensor
Placement of the cooling water temperature sensor in the engine compartment of cars of the LADA KALINA family (with the air filter removed): 1 - cooling water temperature sensor
Principle of action
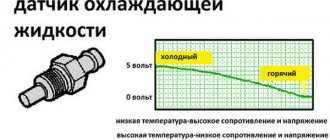
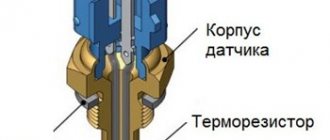
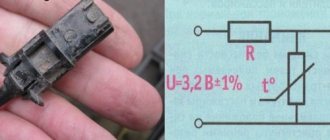
The sensitive element of the cooling water temperature sensor is a thermistor, i.e. a resistor whose electronic resistance varies depending on the temperature. Highest temperature causes low resistance, and low cooling water temperature causes highest resistance. The controller supplies a voltage of 3.3 V to the cooling water temperature sensor circuit.
The controller calculates the cooling water temperature based on the voltage drop across the DTOZH. The voltage drop is relatively highest when the engine is cool and low when the engine is warm. Cooling water temperature is used in most engine control functions.
When a malfunction occurs in the DTOZh circuits, the controller enters its code into its memory, turns on the alarm and the cooling system fan, and calculates the cooling water temperature using a special method.
What is this
As a rule, the temperature sensor in Lada Kalina is a regular thermostat. It plays the role of a resistor that changes its resistance depending on the temperature: the higher it is, the lower the resistance, and, accordingly, vice versa. The sensor's task is to display data on the engine condition on the dashboard. Using these readings, the driver monitors the operation of the car and, in case of problems, takes action.
Checking the temperature sensor
If the sensor (art. 23.3828) fails, difficulties arise in starting a hot engine, and fuel consumption also increases. If you turn off the DTOZh completely, the controller takes this as an open circuit of the temperature sensor and forcibly turns on the fan.
To start checking the DTO of a Priora or Kalina car, you need to know its technical staff. properties: the nominal voltage of the temperature sensor is 3.4V (±0.3), the voltage output at 15 °C should be from 92.1 to 93.3 V, and the resistance at the same time is 4033 - 4838 Ohms; at 128 degrees 18.1 - 19.7 V and resistance 76.7 - 85.1 Ohms. This dependence of temperature and resistance is due to the fact that inside the sensor there is a thermistor with a negative temperature coefficient, therefore, when heated, its resistance decreases. In other words, the controller calculates the temperature of the cooling water based on the voltage drop across the sensor, which has a variable resistance.
Table of dependence of DTOZH resistance on temperature
Checking the motor temperature sensor
To check the cooling water temperature sensor in the engine of the Priora and Kalina cars, you will need a multimeter with a resistance measurement limit set to 100 Ohm - 10 kOhm, a temperature indicator with a measurement scale of at least 100 degrees, as well as a container with boiling water and a table of the relationship between temperature and resistance of the coolant sensor. We connect the sensor terminals to an ohmmeter and place the DTOZH in boiling water, and as the water cools, we measure the resistance readings in control temperature values, and then compare them with tabular lines to come to a conclusion about the serviceability of the cooling water temperature sensor in the car engine.
Replacing the cooling water temperature sensor
Removing DTOZH
- Turn off the ignition.
- Disconnect the wiring harness connector from the sensor.
- Carefully unscrew the sensor (spanner 19).
Installation of DTOZH
- Screw the sensor into the thermostat housing (outlet pipe). The tightening torque of the sensor is 9.3. 15.0 Nm (replaceable extended head 19, torque wrench).
- Connect the wiring harness block to the sensor.
- Add coolant as needed.
Source: etlib.ru
Checking the cooling water sensor on the Lada Kalina
Car : Lada Kalina. Asks : Sasha Bolanenko. The essence of the question : how to check the sensor now?
Nice day again. Last time I asked where the sensor is located, I removed it and want to check it. Maybe it's not him at all. I stopped by to see an electrician, who gave me a hint that I could use a kettle to look at the readings. But which ones?
I don’t want to just buy another sensor, in case the problem is not in it, but in the device panel.
Kalina 2
Lada Kalina of the second version, by and large, differs from its predecessor only in complete restyling. The exterior has undergone many changes as well as the interior design, but the interior has remained the same. “Kalina 1 temperature sensor” remained in its place, although it was supplemented by a fellow from the salon, proudly calling itself “Kalina 2 temperature sensor”. It came along with a new air conditioning system.
Lada Kalina second version
In general, the new car claims to be a class of car higher than its predecessor, and in terms of comfort we can say that the claim is justified. Inside, Kalina 2 has the usual 8 and 16 valve engines. The presence of the same number of valves in the predecessor does not yet cause alarm, but suspicions begin to creep in.
Further more, the same rear drum brakes, stiff suspension, problems in the cabin. However, there are also many corrected problems with Kalina 1. As for the sensors, there is almost complete interchangeability between Kalinas.
As a result, if you decide to replace the first version of the car with the second, but only recently purchased a new high-quality part for it, do not rush to get upset about it. It will almost certainly fit a new car when the time comes.
Sensor check
Verification procedure:
- Remove the chip with wires from the sensor.
- Check for voltage on the block when the engine is running. It must be equal to 5 V.
If the voltage is normal, then you need to remove the sensor and check it . Tools for work:
- Deepest socket head on " 19 ».
- Ratchet or wrench.
- Multimeter.
Any multimeter, which every motorist should have in the garage, is suitable for checking.
Diagnostics (the process of establishing a diagnosis, that is, a conclusion about the nature of the disease and the patient’s condition)
Testing the sensor is done by measuring its internal resistance when immersed in water of a certain temperature.
Diagnostic procedure:
- Partially drain the coolant from the system so that when unscrewing the sensor it does not spill onto the ground. The engine must be cool.
- Disconnect the chip with wires, if you have not done so before.
- Using a wrench, carefully unscrew the sensor.
- The multimeter must be set to resistance measurement mode.
The most common method of checking the sensor is to immerse it in boiling water (the temperature will obviously be 95-100 degrees , you won’t even need a temperature indicator). The sensor resistance at this temperature should be about 177 Ohms . If it differs greatly from this value, you need to change the element.
| Temperature, ° C | Resistance, Ohm |
| 100 | 177 |
| 90 | 241 |
| 80 | 332 |
| 70 | 467 |
| 60 | 667 |
| 50 | 973 |
| 45 | 1188 |
| 40 | 1459 |
| 35 | 1802 |
| 30 | 2238 |
| 25 | 2796 |
| 20 | 3520 |
| 15 | 4450 |
| 10 | 5670 |
| 5 | 7280 |
| 9420 |
Table. Temperature values and corresponding sensor resistance.
If you don’t want to boil water, but have a clear temperature indicator, you can lower the sensor into cool or warm water. For example, at a temperature of +15 degrees the resistance should be about 4.45 kOhm . At a temperature of +40 degrees - about 1.459 kOhm .
Source: korean-car.ru
Replacement
Replacing the DVT is not a difficult job, but it requires basic skills in car repair. To carry out the work, it is necessary to drain the coolant, but some experienced mechanics change this part without draining; it is enough to prepare the necessary tools and wait for the engine to cool.
Step-by-step instructions for replacement with coolant drain
- Remove the negative terminal of the battery;
- Drain the coolant;
- Remove the connector from the sensor;
- Unscrew the sensor and install a new one;
- We assemble in the reverse order;
Step-by-step instructions for replacing without draining the coolant
- Removing the negative battery terminal
- Preparing a new sensor
- Remove the connector from the sensor
- Unscrew the sensor and sharply plug the hole with your finger
- We take the new sensor, bring it to the hole, remove the finger and insert the new sensor into the hole
It is clear that coolant losses are inevitable, but they are negligible if the entire operation is done quickly and thoroughly.
We hope our article was useful to you.
Replacing the cooling water temperature sensors on Kalina
Welcome! Cooling water temperature sensors - if we talk specifically about the Lada Kalina car, then there are only two sensor data in it, one goes to the controller (This is the brain, simply put), and the other to the device, in other words, one sensor indicates what the temperature of the cooling water in the car is and displays this is all for the device, and another one (which gives readings to the controller) turns on the cooling system fan when the car is seething, and also regulates the fuel-air mixture (Simply put, when the car is cool, thanks to this sensor it will warm up faster, because the sensor richens the mixture and the temperature immediately rises), both sensors are necessary and if they fail they will cause quite a bit of trouble, especially for the sensor that gives readings to the device; if it doesn’t work, then you simply won’t know the temperature of the cooling water and therefore the engine can overheat.
Note! To replace both sensors (you will quickly replace only one), stock up on: Wrenches, as well as sockets and a wrench for them; you will also need a multi-meter (This is in this case, if you check the functionality of an old sensor you wish) and a screwdriver!
Brief content:
Where are the cooling water temperature sensors located? We would like to immediately note one not quite fundamental fact, a little lower we have placed a photo in which we have already indicated with arrows the location of both sensors, but the photo shows a VAZ 2110 car, and you have a Lada Kalina, in general there is no particular difference in the engines and these sensors are on them are also actually in the same places, we just wanted to warn you so that you are not very surprised when you look at your own engine, because they may differ slightly, but in general, as already said, they are actually similar, in general the sensor which determines the temperature of the cooling water and gives it to the controller, it is screwed into the thermostat and indicated by a reddish arrow, the 2nd sensor that gives readings to the device is already indicated by a green arrow, but because it is not visible in the photo, we also indicated with a blue arrow the wire that goes to this sensor is connected.
When is it necessary to replace cooling water temperature sensors? The sensors themselves should last quite a long time, but you don’t always come across high-quality ones, and even after almost a month the newest sensors already fail, this is easy to realize, especially if it is a sensor that goes to the device (the indicator will not immediately show the cooling water temperature, arrow it will just lie there, for clarity, this indicator is indicated by an arrow), but with a sensor that goes to the controller it is slightly more difficult and you won’t even immediately understand that it’s time to change it, well, let’s move on to the symptoms, firstly, if the sensor goes to the controller will become unusable, then the car will consume more gasoline (This is due to the fact that the mixture will always be rich) and the cooling fan will not work when the engine overheats, if you saw all this in your car, then change the sensor immediately to a new one or just remove the old one and check it (we explained how both sensors are checked in this article a little lower, so familiarize yourself with it and you will understand everything as you read).
How to determine that the speed sensor is not working
You should immediately pay attention to such signs of malfunction as:
- no idle stability;
- the speedometer does not function correctly or does not function at all;
- increased fuel consumption;
- reduced engine thrust.
Also, the on-board computer may display an error about the absence of signals on the DSA. Naturally, if BC is installed on the machine.
Speed sensor location
Most often, the malfunction is caused by a broken circuit, so first of all, you need to diagnose its integrity. First you need to disconnect the power and inspect the contacts for oxidation and dirt. If it is, then you need to clean the contacts and apply Litol.
Wires often break near the plug, because this is where they bend and the insulation can fray. You also need to check the resistance in the grounding circuit, which should be 1 ohm. If the problem has not been resolved, then it is worth checking the speed sensor for functionality. Now the question arises: how to check the speed sensor?
On VAZ cars, and on others too, a sensor is often installed that operates according to the Hall effect (as a rule, it produces 6 pulses per full revolution). But there are also sensors of a different principle: reed and inductive. First, let's look at testing the most popular DSA - based on the Hall effect. The sensor is equipped with three contacts: ground, voltage and pulse signal.
How to change the cooling water temperature sensors on a VAZ 1117-VAZ 1119?
Removal: 1) These sensors are replaced in a completely identical way, but first it is necessary to de-energize the battery, because when working with electronics, anything can happen and in no case should there be voltage in the on-board network (Voltage in the on-board network, in other words, in the entire car, can be removed by disconnecting the minus terminal from the battery, for more details on how to do this, read the article: “Replacing the battery on VAZ cars”, everything is written in point 1), after this operation we go further, pick up a screwdriver and use it to loosen the screw (Indicated by a reddish arrow) which connects one end of the air pipe to the air filter housing, when the screw is loosened, disconnect the hose at this point (Indicated by a yellow arrow) and put it aside, this will give you good access to both temperature sensors (One for clarity indicated by a green arrow, this is the one that goes to the controller), by the way, also remove the screen from the motor if you have it (It is indicated in the photo with a blue arrow), it can be removed quite simply, just grab the edges with your hands and apply insignificant force , remove the screen from the car engine.
Note! Some people completely remove the air filter housing so that it does not interfere, because if you see that it is in the way for you and without completely removing it, you cannot change the sensor suitable for you, then in this case, remove the air filter housing from the car, read about how to create this in the article: “Replacing the air filter housing on a VAZ”!
2) Now drain the coolant from the radiator (For information on how to do this, see the article: “Changing cooling water on a car”), although you don’t have to drain it, but in this case sharp hands and a little dexterity are needed (Which way It’s up to you to decide, but if you don’t want to drain the liquid from the car, then there’s nothing terrible about it, the main thing is that an air lock does not form, and for this everything needs to be done quickly), then disconnect the wire block from the sensor that is suitable for you (see . photos 1 and 2) and taking a wrench or a socket wrench in your hands, unscrew the sensor that suits you from the hole in which it is screwed (see photos 3 and 4), when the sensor is unscrewed, remove it from the car, in this case, if you did not want to drain the liquid from the radiator, then it will immediately flow out as soon as you remove the sensor, so here you need to remove the sensor in a slightly different way (that dexterity is needed that we previously talked about), this is all done in the following way, first you use a wrench Use the key to turn the sensor out a little and when it’s about to come out, take the newest sensor in one hand and remove the key while doing this, while you begin to turn the old sensor out a little with your fingers, pressing it while doing this (Otherwise liquid will flow through the holes if you don’t press you will) when you understand that the sensor is unscrewed and the liquid is not pouring out only because you press it, sharply remove it and put a new one in its space, while also pressing, wrap the new sensor a little and check whether it works or not.
Note! Photos above 1 and 3 show the sensor going to the controller, while photos 2 and 4 show the sensor going to the device, so be careful!
Installation: The new sensor is installed in its place in the reverse order of removal; when installing, you can lubricate it with sealant so that liquid does not leak through it; in addition, you can check the functionality of an old sensor; for this, prepare a multi-meter and a kettle with a thermometer and a mug , put the kettle next and wait until it boils or just warms up slightly, then pour water into a mug and throw the sensor in there, but you just make sure you don’t drown it with the contacts, otherwise it won’t work right away (the sensor must be thrown in literally the same way as in the photo shown below, in this photo you can clearly see that the contacts of the sensor are not in the water but on the top and nothing will happen to the sensor), how the work is done, pick up a multi-meter and connect the leads coming from it to the sensor (Black wire throw it to minus, in other words, more simply put, on the iron part of the sensor body, and connect the other, reddish wire to the sensor contact), after which the multi-meter should give readings (see. table under the photo below, checking the thermometer and the device’s evidence, the readings should be literally the same or completely different as indicated in the table) in connection with which you determine whether your sensor works or not.
Note! The above described check was carried out on a temperature sensor, which gives readings to the controller. As for the sensor that gives readings to the device, in principle they are checked completely identically, but their values may be different when you inspect them, therefore special attention to don’t pay any attention to this, just check whether the temperature changes when the sensor cools down and when it warms up, if it changes, then everything is in order, if it does not change or changes by a very small value, then in this case change the sensor to the newest one, since yours has already arrived unusable, oh yes, by the way, you can also check the sensor without lowering it into any water, in this case, just stand on the street and understand the ambient temperature, check the sensor and check the table, if everything agrees, go into the room and there you are Do literally the same check by connecting the device, but without lowering the sensor into any water. If the device gives the correct readings in the room at a certain temperature, it means the sensor is working and does not need to be replaced!
Additional video clip: There are simply no videos on the web on replacing the cooling water temperature sensor on Lada Kalina cars, so we took a video on replacing the same sensor but only on another car, specifically on a VAZ 2110, the principle of replacement on both of these karah is actually similar and there is no particular difference between them.
Source: vaz-russia.com
Video “Visual guide to replacing the controller”
To replace the device, you will need:
- two screwdrivers - with a Phillips and a flat tip;
- wrench or socket wrench 10;
- rag.
You will also need a new sensor - Kalinas may use different controllers, so before purchasing, find out exactly which one you need.
So, how to replace the sensor yourself:
- First, you need to turn off the power to the device and put the car on the parking brake by lifting the lever in the cabin.
- Open the hood. At this stage, you need to gain access to the sensor; for this, as we have already reported, you will have to remove the air duct going to the air filter. Alternatively, you can try to move it to the side. To remove, use a flat blade screwdriver to unscrew the clamps.
- Having seen the controller at the installation site, you will need to disconnect the wiring connector connected to it.
- Now take a wrench or socket and unscrew the nut that secures the sensor in its mounting location. The nut itself is located in an awkward place, so unscrewing it may take time. It may be that the nut is stuck to the mounting location, although this rarely happens. To unscrew it, treat the landing site with WD-40.
- Then take a flat-head screwdriver and disconnect the device from the transmission, and then remove it. Using a rag, clean the installation area; this can also be done before removing the sensor. Clean the surface thoroughly to prevent dirt from getting into the box itself.
- Now you can begin installing the new controller. Install the device and connect the connector with the wire to it. Don't forget to reinstall the air pipe.
To avoid mistakes when replacing the sensor, we recommend that you additionally read the detailed instructions for replacing it yourself (the video was published by the Alexandr V channel).
The speed sensor (DS) is an element of the fuel system of engines with an injector. Its purpose is to determine the rotation speed of the front wheels of the car and transmit the received data to the electronic control unit. The controller analyzes the received information and sends it to the instrument panel. In addition, these data are used to calculate the required proportions of fuel and air to form a high-quality fuel-air mixture, which is supplied to the cylinders of the power unit.
The Lada Kalina speed sensor consists of a plastic housing shaped like a cylinder and an electronic sensitive element.
The place where it is located in the engine compartment is not difficult to find. To do this, you need to lift the hood to gain access to the engine compartment. The air pipe connects the throttle to the filter. After unscrewing the clamps, you need to dismantle the air pipe. On top of the gearbox is the DS.
Speed sensor for Lada Kalina
This video demonstrates how to replace a speed sensor with your own hands (the author of the video is Alexandr V).
Of course, the best option would be replacement, because even a repaired speed sensor can sooner or later fail. However, the cost of this spare part is far from low, which is why many car owners undertake to repair it. In most cases, the cause of the malfunction is dirty or broken contacts. This problem can be solved by conventional sealing or gluing with a sealant.
Video about repairs
Every car must have a speed sensor installed, Kalina is no exception. This sensor indicates how fast the vehicle is moving. In some situations it may fail. This is connected directly with the element itself or with a number of adjacent devices.
Before you begin replacing, you need to find the device. Where is the sensor located? The search will not take much time: just open the hood and unscrew the air pipe clamps. Then remove it and look down at the engine: the speed sensor is located on the top of the gearbox.
The main task of this element is to transmit impulsive signals to the controller, which allows you to record the speed at which the car is moving. Naturally, it is impossible to do without a sensor.
What to do if a malfunction occurs? How to replace a part? The first step is to remove the faulty element. To do this you will need a 6 key and a Phillips screwdriver. It is necessary to unscrew the screws and remove the device.
There are several types of sensors, each of them is designated by its own unique number. Therefore, if replacement is necessary, it is important to select a similar element. Otherwise the device will not work.
The speed sensor (DS) is an element of the fuel system of engines with an injector. Its purpose is to determine the rotation speed of the front wheels of the car and transmit the received data to the electronic control unit. The controller analyzes the received information and sends it to the instrument panel. In addition, these data are used to calculate the required proportions of fuel and air to form a high-quality fuel-air mixture, which is supplied to the cylinders of the power unit.
If the DS is faulty, then the following signs appear:
- incorrect speedometer readings, the needle moves chaotically, complete speedometer failure;
- increased fuel consumption;
- The power steering refuses to work;
- the power unit check sign is on;
- The car odometer does not show mileage;
- the arrow indicating the fuel level fluctuates, making it impossible to correctly determine the level;
- the engine does not pull or has lost throttle response;
- The engine stalls at idle.
The listed symptoms can be caused by a breakdown of other devices (the author of the video is Autoelectrics HF).
Causes of breakdowns
The cause of the DS malfunction may be:
- poor contact in the DS connector or its complete absence;
- violation of the integrity of the wiring, the wires oxidize and rust over time;
- contamination on sensitive elements;
- sensor element malfunction.
Checking the cleanliness of the connector
One of the elements of the fuel supply system of injection engines is the speed sensor (DS).
Its role is to determine the speed of rotation of the vehicle's front wheels and transmit this information to the electronic control unit (ECU).
Based on the information received from the sensor, the controller processes it and sends it to the dashboard, and also determines the required proportions of fuel and air for the combustible mixture supplied to the engine cylinders.
In Lada Kalina DS cars, it has a design consisting of a cylindrical plastic body and an electronic sensing element.
The sensor is installed on the top of the gearbox.
Despite the simplicity of the design, the DS often fails. Signs of a faulty sensor are:
- “freezing” or chaotic movement of the speedometer needle;
- incorrect speedometer and odometer readings;
- the error indicator lamp turns on (when checking the computer, it displays error code 0500, 0501);
- violation of engine stability at idle speed;
- increase in fuel consumption.
The reason for this may be:
- absence or poor contact in the sensor connector;
- broken connection wires;
- contamination of the sensitive element;
- failure of the sensitive element.
Undoubtedly, the engine will work with a faulty sensor, and even without it. But in emergency mode. This will not only lead to excessive fuel consumption and the inability to determine travel speed and distance, but can also cause failure of other elements of the vehicle’s fuel system.
Read more: Starter malfunctions and ways to eliminate them; table of main symptoms and possible causes of failure; video on how to repair the device yourself
The price of a speed sensor for Kalina ranges from 300 to 700 rubles, depending on the manufacturer. Replacing it at a service center or service station will cost a maximum of 300 rubles. But you don’t have to overpay for the work, because replacing the DS yourself won’t pose any problems.
- Tools you will need:
- crosshead screwdriver;
- slotted screwdriver;
- socket wrench or socket 10.
Replacement procedure
- Park the car on a level surface and secure it with the parking brake.
- After opening the hood, turn off the power to the on-board circuit by removing the ground wire from the battery terminal.
- For ease of operation, remove the air duct corrugation by loosening the clamp securing it to the mass air flow sensor. Move it aside.
- Disconnect the wires on the sensor by removing them from the connector.
- Using a socket wrench or a 10 mm socket, unscrew the bolt securing the sensor housing.
- Using a slotted screwdriver, pry up the housing and remove the sensor from the gearbox.
- Install a new sensor in its place.
- Connect the connector.
- Install the duct corrugation.
- Connect power.
After completing the repair work, start the engine and check its idle speed. Look at the tachometer readings. Next, check the functionality of the sensor in motion.
Pay attention to the odometer and speedometer readings, compare them with the real ones. If the engine operation returns to normal, you can consider your work successful.
The speed sensor is responsible for measuring the speed of the vehicle. It is he who transmits information to the ECU and thanks to this sensor we see the speed of our car. If you suddenly notice that the speed on the speedometer is lower than the speed of your car, the sensor may have failed and needs to be replaced.
Replacing and checking the cooling water temperature sensor on LADA
The cooling water temperature sensor (CWTS) is one of the parts of the engine control system. Its purpose is to monitor the water temperature in the cooling system. Based on these data, the engine control unit changes the composition of the fuel-air mixture, the crankshaft speed, and the ignition timing.
On all modern LADA cars (XRAY, Vesta, Largus, Granta, Kalina, Priora or Niva 4x4), replacing and checking the cooling water temperature sensor is carried out in the same way.
Signs of DTOZH malfunction
The cooling water temperature sensor affects the start and operation of the motor. Here are some symptoms (Symptom from Greek - case, coincidence, sign - one separate sign, frequent manifestation of any disease, pathological condition or disorder of any vital process)
, indicating that the sensor may be faulty:
- poor engine starting in cool weather;
- increased fuel consumption;
- bad emissions on a cool engine;
- Obstacles in the operation of the engine cooling system fan.
Troubleshooting and repair
The first signs of trouble will be:
- problems with cold starting the car;
- the engine stalls periodically;
- fuel consumption increased;
- The temperature alarm indicator is on;
- Inadequate temperature readings on the dashboard.
When faced with one or more problems from the list, you need to understand what the reason is in more depth. Having opened the hood of the Lada Kalina, you should inspect for coolant leaks. One of the main reasons for a malfunction of the meter may be an insufficient level of antifreeze or its leakage. After making sure that there is no leakage, additionally make sure that the antifreeze level is as required; if there is a deficiency, add fluid.
The next step is to check the contacts and electronic circuit. Over time, the wiring wears out, the contacts rust and oxidize. They might even get dirty. It is necessary to clean them and make sure that the electronic circuit is working properly.
Only after the first two steps of the initial inspection can you begin to inspect the meter itself.
In Kalina, as in many Vases, the detector is installed on the thermostat. However, it is worth considering that it has two DTOZH installed at once. One is associated only with the dashboard and is informative. The other is connected by an electronic circuit to the ECU, and it is the main one.
Dismantling and inspection are carried out as follows:
- first of all, it is necessary to turn off the power to the vehicle and drain the coolant, only after this can you begin direct dismantling;
- then disconnect the connecting wires from the meter. Inspect them and clean them;
- unscrew the sensor itself, you may need a deep head for this;
- After removing the detector, clean it and check its operation. This is usually done by immersing the sensor in a glass of water, then heating it, then cooling it and measuring the resistance of the meter;
- if the old sensor malfunctions, you must buy a new one, since it cannot be repaired;
- Installation of a new or old working device is carried out in the reverse order of its dismantling. Remember that the sensor must have a sealing ring (if it is an old meter, purchase a new seal for it); in addition, you can use sealant;
- check the operation of the device when the car is running, and also make sure that antifreeze does not leak while the system is running.
Substitution
The cooling water temperature sensor is located in the thermostat housing; it is number 14 in the diagram.
To change the DTOZH with your own hands, you should:
- Drain the coolant (car mechanics do not drain it);
- Disconnect the connector with wires;
- Unscrew the sensor (key “19”).
Installation is performed in reverse order. To eliminate the leak, change the copper washer or apply a heat-resistant sealant to the threaded part of the sensor.
Progress of repairs to remove and install the sensor
To make dismantling more convenient, you need to unscrew the clamp of the intake pipe, which goes from the air filter to the throttle assembly:
And after that you need to pull the pipe, pulling it out of its seat. And then move it a little to the side so that it does not interfere, approximately as shown in the photo below:
And the photo below clearly shows the location of the temperature indicator sensor:
First you need to disconnect the power plug, which is fixed in the same way as most others - just lift the latch up and pull the plug:
Now, using an extension cord and a deep socket, unscrew the sensor. If the pipe still gets in the way, you can move it a little more to the side with one hand, and at the same time put on the head with the other. Then unscrew the sensor with a ratchet:
After this, you can completely unscrew the sensor by hand. And this is what it looks like after extraction:
Now you can start replacing this part. Its price is approximately 150 rubles. So, even if you have to change this part, this repair will cost very little.
Taras Kalenyuk
Reading time: 3 minutes
A A
The VAZ automobile plant began production of the Lada Kalina in the late 90s. New, modernized models are still being produced, however, the car still has many weak points, including the engine and suspension and even the coolant temperature sensor.
There is an opinion that the Lada Kalina was assembled according to the principle of “cheaper and more accessible.” This does not mean that the car is bad or not worth the money, on the contrary. Just when buying it, you need to understand that it is better to replace it immediately or be prepared to replace these parts. To understand whether it is worth changing the DTOZH, you need to understand it.
How to check
After removing the sensor, it should be visually inspected for damage or corrosion. The most common method of checking the DTOZ is to replace it with a previously serviceable one.
- multimeter (in voltmeter mode, ohmmeter with a measurement limit from 100 Ohm to 10 kOhm);
- temperature indicator (with a measurement limit of at least 100 o C);
- heat-resistant container with a volume of 0.5 l.
The procedure for checking the power supply circuit of the DTOZH:
- Switch the multimeter to voltmeter mode;
- Remove the block with wires from the sensor and turn on the ignition;
- Connect the negative probe of the multimeter to the ground of the motor, and the other to terminal No. 1 of the block;
- The voltage at the output must be at least 12 V.
If there is no voltage or they are less than 12 V, it means the battery is discharged, the power circuit or the computer is faulty.
Procedure for checking DTOZH:
- Switch the multimeter to ohmmeter mode;
- Prepare a container with hot water (about 100 o C);
- Connect the multimeter probes to the sensor terminals and lower its working part into water;
- We measure the resistance of the DTOZH as the water cools.
The sensor resistance must be close to the data indicated in the table:
| Coolant temperature, °C | DTOZh resistance, Ohm |
| 100 | 177 |
| 90 | 241 |
| 80 | 332 |
| 70 | 467 |
| 60 | 667 |
| 50 | 973 |
| 45 | 1188 |
| 40 | 1459 |
| 35 | 1802 |
| 30 | 2238 |
| 25 | 2796 |
| 20 | 3520 |
| 15 | 4450 |
| 10 | 5670 |
| 5 | 7280 |
| 9420 |
The verification process is also shown in the video:
If the DTOZH turns out to be in good order, the cause of the malfunction may be a bad connector contact, a broken wiring, or a faulty ECU.
Don’t forget to change the antifreeze/antifreeze in the cooling system at the right time, and use the coolant recommended by the manufacturer.
Source: xn--80aal0a.xn--80asehdb