Because You are not logged in. To come in.
Because The topic is archived.
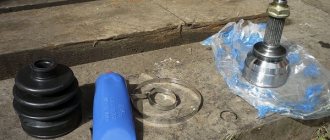
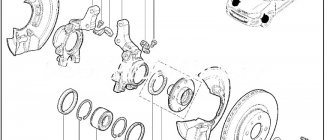
For models 08, 09 and 099 you need to purchase the specified elements with the following catalog number: 2108-2914054. For versions 10, 12, 14, 15, silent blocks with number 2110-2914054 are suitable. The difference between these structures is in the outer diameter (the difference can be seen in Fig. No. 1a). If you try to install silent blocks from the tenth model on the beam, or vice versa, you will be in for an unpleasant surprise.
The rear beam silent blocks on VAZ-2108, VAZ-2109, VAZ-21099, VAZ-2110, VAZ-2112, VAZ-2114, VAZ-2115 vehicles must be replaced if: a characteristic knocking or squeaking sound of rubber appears in the rear of the car, during movement (especially when cornering), the car has lost stability of the rear axle, uneven wear of the rear wheels may also indicate a faulty silent block. How to change rear beam silent blocks ? What tool might you need for this? You will find answers to these questions in this article.
But let’s start, perhaps, with the choice of silent blocks . For VAZ-2108, VAZ-2109, VAZ-21099 you need to buy silent blocks with catalog number - 2108 -2914054, and for VAZ-2110, VAZ-2112, VAZ-2114, VAZ-2115 - 2110 - 2914054. They differ from each other from each other by outer diameter (the difference can be seen in photograph 1a). And if you try to install the rear silent blocks from the “Ten” on the VAZ-2109 beam (or vice versa), then an unpleasant surprise will await you. So, we try not to confuse anything.
Now about the tool. In addition to the standard set of tools, such as a pair of socket wrenches “19”, a hammer and two jacks, you will also need: a wooden block and a device for pressing silent blocks . You can either buy this device or assemble it yourself. If the “buy” option does not suit you for some reason, then look at photo number 1 and remember the dimensions of the main parts: a bolt with a diameter of 12 mm and a length of 170 mm, a ring-cage with a diameter of 50 mm and a height of 40 mm. All other parts of the device will be easy to select.
Step-by-step description of replacing rear beam silent blocks on VAZ-2108, VAZ-2109, VAZ-21099, VAZ-2110, VAZ-2112, VAZ-2114, VAZ-2115 :
- Work on replacing silent blocks should be carried out on an overpass, inspection pit or lift.
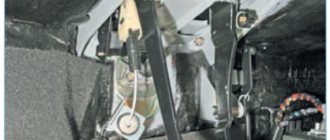
- Using wrenches “19”, unscrew the nuts from both bolts securing the rear beam to the bracket (on the left side, remove the fixing bracket and disconnect the rear brake pressure regulator rod from the beam) photo 2.
- We take out the bolt and slightly raise the car with a jack, and move the beam eye down. And between the body and the beam we insert a wooden block (photo 3).
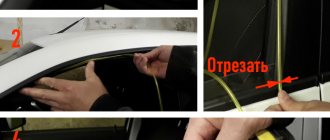
- Next, using a hammer and drift we knock out the silent block (photo 4).
- Before installing a new silent block , the beam eye and the silent block must be lubricated with a soap solution. Then, using the device shown in photo 1, we press in the silent block (see photo 5).
- We remove the wooden block, use a second jack to lift the eye of the beam into the bracket and insert the bolt (photo 6).
All! The worst is over. Tighten the bolts securing the beam to the body bracket with the car completely lowered to the ground.
When using an article or photographs, an active direct hyperlink to the website www.avtorem.info is required!
Welcome, friends, to the DIY car repair website. Silent blocks from the VAZ manufacturer can safely be called a high-quality spare part; they are used in the chassis of various brands of cars because they are an integral part of it.
Durability, of course, depends on the driver’s driving style, but generally their service life is long and amounts to more than tens of thousands of kilometers.
Their main function is to eliminate various deformations and vibrations that occur during operation of your iron horse.
Replacing the silent blocks of the rear beam VAZ 2109, 08, 099 are identical in action, they are marked 2108-2914054. Other brands VAZ 2114, 2115 have different markings, although the silent blocks are very similar, but still different.
Their differences are only in size. It turns out that a tens of rubber bushing can be pressed into the nines beam, but you will have to work hard, because it is a little larger, but the reverse operation can no longer be performed.
Modification of the rear beam 2108
The rear torsion beam in front-wheel drive VAZs is a self-stabilizing type of suspension, since the BEAM itself is a STABILIZER. and the amplifier is needed only to add torsional rigidity to the stabilizer beam.
The reason for writing such an article was a blog entry in which the author tried to strengthen the beam by adding a homemade “stabilizer” to it.
.
The idea was subjected to severe negative criticism; in general, many did not consider the idea useful, but it interested me - the idea of a stiffer beam... Let's move on to the analysis of existing solutions
Repair of injectors VAZ 2110–2112
Repairing injectors means cleaning the product and replacing the O-rings. Simple measures to restore the functionality of the injectors can significantly increase the car’s power and make cold starts easier. Injector repair is possible in the following cases:
- there are no visible deformations on the body;
- the nozzle has not yet exhausted its service life;
- the car owner wants to optimize the operation of the power unit.
In all other cases (cracks and deformations, long service life), it is recommended to replace the nozzles with new ones.
How to blow out and clean oil molds
On cars of the tenth family, injector cleaning may be necessary after 40–50 thousand kilometers. In this case, it is best to carry out the procedure yourself, since you can always observe for yourself the true condition of the motor and its elements, and also save a significant amount on service station services.
Standard suspension
The rear suspension is semi-independent, with an elastic beam, with helical coil springs and double-acting hydraulic telescopic shock absorbers.
The longitudinal arms are welded to the beam through reinforcements. To increase lateral stability and reduce vehicle roll, a stabilizer bar made of ∅14 mm steel rod runs inside the beam. The ends of the rod are welded to the levers.
Pay attention to the bar
1 - beam; 2 — anti-roll bar;
Procedure for cleaning and replacing rubber seals
It is best to remove the injectors from the fuel rail and blow and clean each of them, and at the same time inspect them for wear on the rings. This method has a huge advantage over using an additive, since you can visually check how well the restoration work was carried out.
What tool can you use to make repairs?
To dismantle and replace seals you will need:
- diamond key 8;
- carburetor cleaner;
- a can of compressed air;
- rubber hose (you can use a vacuum cleaner);
- syringe with outlet diameter 10 mm;
- wire approximately 2 meters long;
- standard set of rings for injectors (includes eight products);
- rubber seals for fuel lines.
The repair and cleaning process is as follows:
- Remove the rubber seal from the nozzle.
- Place the rubber hose on the tail part of the nozzle.
- Connect the wire to the battery (you can choose any terminal).
- On the reverse side of the hose, connect an aerosol tube through a syringe to flush the carburetor.
- Holding the entire structure with your hands, spray the cleaner several times until the jets emitted become uniform.
- After cleaning, it is recommended to use the same principle to blow out the injectors with air from a can.
- Next, it is recommended to immediately put new rings on the product, after moistening them with gasoline.
In the photo the nozzle is in critical condition
The injector repair procedure can be considered accessible to beginners and inexperienced drivers. The only difficulty is dismantling the fuel rail, since you will have to first relieve the pressure in the system. Cleaning and replacing the rings on the injectors with your own hands gives the driver the opportunity to carry out the highest quality repairs of these elements and be confident that repeating the procedure will not be necessary for a long time.
Replacing the rear beam on a VAZ 2108
There are many reasons why you will have to remove the rear beam. You will hear a strange sound (metal ringing, thuds, rubber squealing, etc.) from the rear of the car: constantly, only on bumps, or when cornering. Only someone with experience can identify the real problem.
Because there are quite a lot of options: the stabilizer may knock, the silent blocks may “tear” to the side (because of this, you will get the feeling that one shock absorber “disappears” when turning - it knocks quite sharply and strongly), or they are simply worn out, they may “ play" in the axle bearings and so on... I recommend calling a specialist for diagnostics, even if you carry out the repairs yourself.
It is rational to install and dismantle the beam on a lift. But in the absence of such an opportunity, we carefully lift the rear part with a jack and place supports under the “sockets” to rest the jack on the car body. Before doing this, do not forget to place the shoes under the front wheels and engage the gear.
So, the progress of the work:
- We loosen the nuts on the wheels while the car is still on the ground(!).
- We raise the car.
- Remove the shock absorbers from the rear suspension on both sides.
- Disconnect the handbrake cables and remove the cable jackets from the bracket on the body. We bend the brackets that secure the cable to the body and pull both cables out of the brackets. This is all in order to provide convenient access to the mounting bolt of the beam itself.
- The elastic lever of the pressure regulator drive passes through the earring, connecting to the lever bracket. This earring must be disconnected from the bracket on the rear axle beam.
- Now, disconnect the brake hoses, on both sides of the beam, from the tubes. Immediately cover the holes with something to prevent brake fluid from leaking.
- On both sides, unscrew 1 nut from the bolts that secure the beams to the brackets.
- Knock out the bolts (don’t be afraid to knock them, they may “sit” tightly). Now the beam can already be removed by simply rolling it out on wheels; )
Now some recommendations.
- If you plan to disassemble the beam, then in advance you need to loosen the tension on the hub nuts and other connections that are tightened with a large torque.
- It is recommended to replace rubber-metal hinges in a specialized workshop, since this will require a special tool and, preferably, experience in such work.
- The factory documentation talks about dismantling the beam along with the brackets by unscrewing the 3 nuts that hold them in place. However, after using the car for a long time, the studs rust and can easily crack. Therefore, I advise removing the beam by simply unscrewing it from the brackets that continue to “hang” on the body.
What injectors are installed on VAZ 2110–2112 cars
The main advantage of injectors for VAZ cars of the tenth family is that they are interchangeable. There are only two types of sprayers - produced by Bosch and Siemens. And any of them, regardless of marking and year of manufacture, can be replaced with another.
Bosch injectors are usually made in a black body
When selecting, there is only one limitation - engine size. 1.5 injectors are not suitable for 1.6 liter engines.
The Siemens injector has a blue tip
Replacement of silent blocks of the rear beam of VAZ 2108
- To begin, place the car on a jack and remove the wheel from the desired side using a wheel wrench.
- Next, take the 19mm wrenches and unscrew the nuts on the bolts securing the bracket and rear beam.
- Then you need to remove the mounting bracket (it will be on the left) and disconnect the pressure regulator rod in the brake system.
- Now you can pull out the bolt itself and move the rear beam eye downwards. Keep in mind that it must be fixed in this position. The ideal option for this is a small wooden block, which should be placed in the space between the beam and the body.
- Arm yourself with a hammer and a drift, then knock out the old silent block.
- Take a new part and a device for pressing it in, generously coat the seat and the silent block itself with soapy water (it will act as a lubricant) and install it.
- Take another jack, remove the block and raise the beam to the desired level, then insert the bolt and tighten the nut, but do not tighten it. Place the mounting bracket and rod in place.
Place the wheel and remove the car from the jack. Having opened the trunk, sit in the opening and try to rock the car up and down with a large amplitude so that the silent block fits completely into place. Now the nuts of the mounting bolts can be tightened completely.
Procedure for removing oil injectors
Before you begin removing injectors from any car of the tenth VAZ family, you will need to relieve the pressure in the fuel system. Removing any element that is under pressure in any way can result in personal injury.
How to get rid of excess fuel
To relieve the existing fuel pressure, you need to turn off the fuel pump and exhaust the remaining gasoline:
- Fold down the cushion from the back row of seats.
- Below it is the fuel tank hatch.
- Unscrew the screws securing the hatch.
- Disconnect the wiring harness from the pump housing (the wires supply power).
Recommendations for replacing rings
To ensure a good seal, O-rings should be placed with slight tension, which increases the strength of the fastening. They should be replaced according to the following instructions:
- Relieve pressure in the fuel system;
- Remove the ramp with injectors;
- Remove all old rings;
- Clean off any remaining rubber;
- Lubricate the new seals with engine oil;
At the end, you need to return the ramp to its place. It is important to ensure that the seals are not distorted when installing it. You should also avoid using excessive force, which could damage the rubber bands.
Loss of tightness leads to deterioration in vehicle performance. In the most advanced cases, a fire is possible, so despite the small size of the seal, its condition must be treated with extreme care.
We're sorry, but the requests coming from your IP address appear to be automated. For this reason, we are forced to temporarily block access to the site.
A practical look at diagnosing and replacing an injector
Injectors for VAZ 2110 8 valves
Objective reasons for malfunctioning injectors:
- the engine starts with great effort;
- the engine is extremely unstable;
- in case of idle operation, the engine immediately stops functioning;
- the crankshaft rotates at an increased speed if the engine is idling;
- the car engine is not able to produce the maximum degree of its power;
- while moving, some jerks and dips in the functioning of the engine are objectively noticed;
- fuel consumption has increased sharply, without objective reasons;
- exhaust gases contain an increased concentration of CH and CO;
- Due to the loss of tightness of the injectors, a glow ignition effect is observed.
Note. If at least one of the above reasons occurs, then there is only one way out - cleaning the injectors, and general cleaning at that.
Car service specialists and the manufacturer itself recommend cleaning the injectors every 120 thousand kilometers.
Detailed algorithm for cleaning injectors
- The right side of the car engine contains a pressure regulator and a ramp; you need to disconnect their fuel pipes.
Note. Immediately after disconnecting the fuel pipes from the rail pressure regulator, fuel will splash slightly. There is no need to be afraid of this, as this is quite normal.
- Next, you need to release the fuel rail, which is held by the right and left 5-point hex mounting bolts, which must be unscrewed;
- It is first advisable to remove the gas cable so that it does not interfere with unscrewing the right mounting bolt by 5;
Cleaning injectors VAZ 2110 16 valves
- after unscrewing the right hex bolt, you need to move to the left one;
- Not far from the windshield, in the thermostat pipe, there is a wiring harness that provides power to the injectors; they must also be unscrewed.
Note. The injector power harness is located on the left, a short distance from the left hexagonal mounting wire.
- after all of the above elements have been successfully unscrewed, it is necessary to extremely carefully remove the ramp in which the injectors are actually enclosed;
- the ramp is extremely difficult to remove, as it fits very tightly, so in this case, you can use a mount, only as carefully as possible;
- the injectors have special rubber seals, they must be preserved or it is better to simply put them in some separate place;
- the injectors are enclosed in ramp brackets, which must be moved apart to make it possible to remove the injectors themselves;
- after removing the injectors, the first thing you need to do is check their windings, which should be the same;
Cleaning injectors VAZ 2110 8 valves
Note. The essence of checking the winding is to determine the degree of resistance. Each car has a specific injector model, so you need to enter the name of the desired injector model, and then find the value of the degree of resistance that should be and compare it with the current one. In this matter, the main assistant will be an ohmmeter.
- to perform the following technical manipulation you will need a flushing device and a carb cleaner;
- structure of the cleaning device: one wire is connected to a 12 volt light bulb, the other to the base connector, thus a connection between the light bulb and the nozzle must be formed in series.
Note. The basic connector is made independently. Most motorists confuse it with the one located in the car.
- Next, you need to activate the indicator lamp; to do this, you need to connect it to the car battery by connecting the appropriate wires;
- the tube and bottle cleaner must be brought to a special nozzle hole;
- now it is necessary to perform a visual inspection of the spray jet; as a rule, this check takes on average half a bottle of specialized solvent;
VAZ 2110 injectors 16 valves and their washing
- The injector assembly is carried out in the reverse order with the same steps.
Note. Before installation, the nozzle rubber bands must be lubricated with oil, firstly, so that the seal does not wrap, and secondly, this will make it easier to reinstall the ramp back to its original place.
Practical changes in the behavior of cars can be observed when driving on a country road:
Benefits of using rings
Advantages that make O-rings widely popular in injector sealing:
- the symmetry of the design leads to a uniform fit of the seal along the entire circumference;
- ease of manufacture allows you to take into account all the subtleties of injectors of various car brands;
- use of modern materials.
The existing markings make it easy to navigate the interchangeability of seals. This makes it easier to find the ring if it fails. If possible, it is recommended to purchase original rubber bands.
Nozzle, how to clean nozzles with ultrasound, pros and cons of this method
The benefits of this method are quite controversial. Some believe that ultrasound kills injectors because it destroys the mesh, others argue the opposite - that this is a necessary measure when cleaning injectors and that it must be combined with washing them during dismantling. According to some experts, ultrasound affects the ceramic components of the nozzle, so the period of influence must be reduced to a minimum. Another disadvantage of the ultrasonic cleaning method is its high cost.
Types of injector sealing rings
Inlet or upper o-rings are found on both gasoline and diesel injectors. They serve to eliminate air leaks and fuel leakage at the point where the injector is connected to the fuel line. Most often they are made of rubber, because:
- no large mechanical loads;
- the temperature effect is small due to the distance to the hot engine;
- rubber is characterized by high elasticity;
- slow loss of properties under the influence of an aggressive environment.
The lower seal operates under more severe conditions, so the following options are possible:
- metal ring;
- alloy seal;
- rubber, made of a special composition, capable of withstanding temperature and mechanical stress.
To increase reliability, it is possible to simultaneously use a metal and elastic seal. In this case, the lower ring is made of a resistant material, for example, copper, and serves as a flame arrester. The upper ring is in this case protected from adverse influences. It is made of rubber, which ensures the tightness of the system at the proper level.