Print this article Font size 16
It is no secret that the quality of vehicle lighting has a direct impact on the level of safety. Both for the motorist and his passengers, and for other sections of the road.
Many believe that xenon on the VAZ 2110 is installed illegally, and any inspector can fine you a tidy sum of money. Today we will talk about the legality of xenon and the features of its installation on the domestic “ten”.
Question of law
Legal equipment
Therefore, to install xenon as fog lights and main headlights, you will need to purchase a set of legal equipment. There must be an inscription in the form of the letter D on the headlight glass. It indicates that bi-xenon lights are connected to these headlights. Consequently, everything is legal, and therefore there is no need to fear the traffic police post.
If you have xenons but have an H on your headlight glass, you will have problems. This is because such an inscription indicates that halogen lamps must be located under the glass.
We carry out preparatory work for installing headlights on fret 2110
Initially, you need to disassemble the turn signals and separate the glass from them. To do this, you can use a stationery knife with a retractable blade.
The difficulty is that the manufacturer solders the glass with the turn signal and separating them is quite problematic. Therefore, this process may take some time, most often from 40 minutes to 1 hour.
Using a utility knife, you need to make a gap between the glass and the turn signal. This must be done carefully so as not to damage the glass. Next, you need to insert a screwdriver into the resulting hole, while continuing to cut the gaps with a stationery knife. The next step is to remove the headlight mask; to do this, insert a utility knife into the hole and cut through the sealant. The procedure is not complicated, and in a few minutes the mask will be in your hands. When working with a stationery knife, you must follow safety precautions to avoid injuries and cuts.
In the process of work, we need a battery; if necessary, it must be recharged.
The masks are coated with chrome plating; sandpaper can be used to remove it; when cleaning the masks, all chrome plating must be removed as much as possible. Let's move on to painting. First you need to prepare and arrange a place for painting masks; any basement is perfect for this. Before painting, seal the glass of the headlight mask with masking tape.
It is better to paint turn signals in several layers; the best result will be obtained by painting in 3 layers. Leave for some time for the paint to dry. We assemble the turn signals and attach the glass to them, we use liquid nails for fastening, this is very convenient in our case, since in the future we will have to re-disassemble the headlight to implant a yellow LED strip into it, or, as it is also called, “angel eyes”.
The work with the turn signals is completed at this stage. Next, it is necessary to fine-tune the headlights, since most manufacturers do not always pay due attention to this small but very important aspect. In the photo below you can see how the new factory headlight shines before fine tuning.
Benefits and Potential Problems
Bi-xenon does an excellent job of illuminating the roadway and adjacent areas. This applies to both headlights and fog lights. A characteristic feature of xenon is that it emits bright white light with a blue tint.
Xenon in headlights and PTF
Fog lights from Bosch, which are installed on the VAZ 2110, do not have lenses. Instead, reflectors are provided here. This makes the beam of light not low enough.
Therefore, when installing xenon, it is very important to install focusing lenses so that the bi-xenon behaves appropriately. That is, it illuminated the road efficiently and did not blind oncoming cars.
Finalization
In order to make the glow better, they are refined, which includes the following steps:
- Shifting the lens closer to the reflector;
- Modernization of curtains;
- Changing the shape of the reflector.
These are the main stages that will ultimately lead to the complete modernization of Kirzhach headlights on a VAZ 2110 car. Now it is necessary to consider each individual stage.
Lens in the headlight of Kirzhach VAZ 2110
Shifting the lens closer to the reflector
The alteration begins with shifting the lens to reduce the area of the lens onto which the light flux falls. As a result, the curvature of the lens will also become smaller.
- Disassembling the module and removing the lens from it. Carefully mark the cut at the intended location of the module. It is imperative to ensure that the lens curtain does not move from its place, but remains at a distance of 50 mm due to the focal length of the lens;
- Cut off the lens at the marked location and attach it to the module. It is attached using the cuts that were made earlier, but the module itself will become shorter. The main thing in all this is that the closer the lens is, the more heating will occur due to its small area. In order not to miss the distance, the most optimal would be to approximate the lens by 10 mm.
Carrying out modernization of curtains
To carry out modernization and modification at the highest level, good and high-quality light distribution is done. The curtain is made straighter so that the light does not blind passing drivers driving in front of the VAZ 2110 into the rear mirrors. This type of curtain was developed according to the European GOST standard and is very successful.
To do this, you will need cardboard from which the curtain template will be made. The prepared cardboard template is transferred to a plate of metal material. To cut it out, metal scissors are used and the finished curtain is attached to the module. Also, if desired, it can be wrapped in foil to provide better light dispersion; it can also be used to install fog lights.
Under the lens on the module body, the edges are cut off. If they are cut correctly (no more than one millimeter along the ring), then the edge of the ring will not interfere with the correct flow of light.
Changing the reflector shape
If you want to change the width of the light output without changing its height, then you can change the shape of the reflectors yourself. By the way, on imported cars the reflectors have an oval shape, which is the best option.
Refining the headlights with a complete change in the shape of the reflector will help to significantly increase the width of the light beam. The reflector on a VAZ 2110 car has a standard round shape, and if you take it and press it to the floor, you can easily get an oval shape.
To reduce the cost of the reflector, it is made from ordinary sheet metal using an inexpensive cast method and therefore this material is very elastic and can be easily changed in shape.
Reflector in the headlight of Kirzhach VAZ 2110
To avoid cutting your hand, you should wear a glove. But you shouldn’t get too carried away, since there are certain standards for the width, which should be 93.2 mm in the flattened part. If this standard is not maintained, then the light beam will have a deformed feed shape. Therefore, when changing the shape of the reflector, efforts are applied little by little, controlling the change in size. So that when installing the reflector, all the fasteners coincide, they are also made oval in shape, as is the reflector fastening itself.
These changes, simple in their technology, will allow you to easily and without additional costs upgrade the Kirzhach headlights on a VAZ 2110. But the main thing is that all the changes made are not certified and fall entirely on the responsible shoulders of the driver.
After upgrading the headlights, it is imperative to adjust the VAZ 2110 headlights.
Removal
Set
Of course, without dismantling the old headlights it will be impossible to install xenon devices. Dismantling is performed as follows.
- The vehicle is deprived of power by removing the negative terminal from the battery.
- The connectors going to the headlights are disconnected. All without exception.
- The fasteners are removed from the top mount. The bolts are located there.
- The radiator grille is dismantled.
- The bolt that holds the headlight unit in its lower part is removed. He's there alone.
- Next, pry up the cover using a flat-head screwdriver and remove it.
- Now take a 10 mm wrench and use it to remove the fixing nut to the bracket.
- All that remains is to remove the headlight unit.
- Do not forget to pry the hydraulic correction cylinder retainer using the same flat-head screwdriver to remove the unit.
- The direction indicators are removed. To do this, simply unscrew a couple of bolts.
Fine-tuning headlights on Lada 2110
This can be done without disassembling the headlight, but simply by adjusting the curtain. When the location of the curtain changes, the light also changes.
If you cannot achieve the ideal effect right away, you can experiment, for example, turning the curtain while the headlights are on. At the same time, remember at what position of the curtain the light emitted by the headlights suits you best.
As you can see in the photo above, it is necessary to perform various manipulations with the curtain in order to achieve the highest quality light and remove all unnecessary “tails” and “rainbows”.
By following all the recommendations, you can achieve the highest quality light and ensure a good view of the route at any time of the day and in almost any weather conditions. At the same time, spending only 5,148 rubles on such lighting.
After you have set up the light, you need to move on to working with the mask, by which time the paint should already be dry. I would like to add that you need to approach the process seriously, do everything carefully and do it with love. Approximately all work with headlights will take about 4 days.
Module installation
If you want the installation of xenon on a VAZ 2110 to be carried out within the law, buy a new approved module.
Kirzhach in analysis
Just be sure to take into account the fact that the “Bavarian” Hella Lens G2 . This is a second generation module with wider lenses. The first generation is not suitable for us.
Of course, the cars are structurally different, so the installation will have to be slightly adjusted.
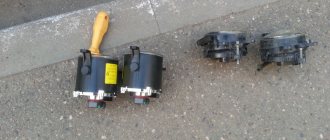
To get started, purchase the necessary materials. Just two pieces:
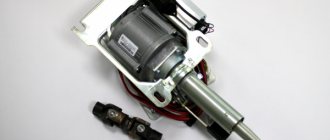
- Ignitor;
- Ignition unit;
- Hella lenses;
- Bi-xenon lights.
Cashback 20% of the cost of the repair kit to the card within 24 hours, for all members of the Drive2.RU community, after publishing a review!
Repair kit for replacing standard lenses with Hella Standard for a VAZ 2110 car. The repair kit is designed to replace standard lenses with modern bi-xenon lenses Hella Standard. You can do the replacement yourself by removing the headlight and opening the glass, or you can contact a car lighting studio or a headlight retrofit specialist with this repair kit (see the list of installers in your city in the website menu). Why is it profitable to purchase a repair kit from us? - the price of new original headlights is 5-10 times higher than the cost of a repair kit - non-original headlights have very low quality light - we have the lowest prices in Russia, our own production base for frames, direct supplies of bi-xenon lenses from the manufacturer's plant Compatibility: VAZ 2110 release Why do standard headlights lose their brightness over time? The reflector coating of standard halogen or xenon lenses, even on premium cars, fades over time and light is lost in the lens reflectors, so the lens module itself has to be replaced. The most optimal solution is to replace the standard modules with Hella Standard bi-xenon lenses using adapter frames for Hella Standard. The set includes: Hella Standard bi-xenon lenses (Hella Standard lenses) - 2 pcs. Adapter frames for installing Hella Standard into Lada 2110 headlights - 2 pcs.
The following can be purchased separately if necessary:
- HOT Melt premium quality automotive sealant (we recommend this particular sealant, since Orgavyl and other soft sealants do not hold glass well) LINK!
- xenon lamps D2S or D2H (we recommend D2H, because the quality of the bulb is as excellent as that of D2S) and xenon ignition units Criline Premium Canbus 55W LINK!
- kit for restoring the transparency of Criline Retrofit Glass headlights, after deep polishing, the increase in brightness plus 200-1000% LINK!
- bi-xenon wiring for connecting low and high beams
- rear rubber covers to seal headlights
- H1 adapters if you plan to use the lens with a halogen lamp
Replacement process: 1. The headlight is removed from the car and opened using an oven or a heat gun. 2. The old lensed module is dismantled and a new Hella 3R module is installed in its place, which is attached to the standard holes using an adapter frame. 3. If necessary, the old sealant is replaced with a new one, the headlight is assembled in the reverse order and installed on the car. 4. If necessary, xenon is changed/installed. 5. For an ideal result, we recommend restoring the clarity of the headlights by deep polishing.
What lamps are best to install? We recommend D2H Criline Premium lamps for three reasons: 1. Korean bulb, in terms of brightness it produces values close to brand lamps Narva (-5%), Philips (-9%), Osram (-8%) 2. Unlike D2S lamps D2H do not require an additional socket for connection to the ignition unit 3. These lamps are priced lower than similar lamps from other manufacturers by 50-70%
Are any improvements needed? In 80-90% of cases, modifications are required when replacing lenses. Retrofit is not a standard replacement of a part; in most cases, the modifications are not significant, but sometimes significant modifications to the headlight housing, masks, transition frame or the lens itself are required.
Installation in a standard headlight unit
Preparing the wiring
This can be done by following a certain sequence of actions:
- The first step is to disconnect the negative cable from the battery;
- Prepare the wiring. The plus goes to a yellow wire, the minus goes to a brown wire. Two minuses and the same number of pluses are crimped one by one, after which they must be carefully insulated;
- Process the holes for the lamps with a simple handy tool - a file. Check periodically to see if the bulbs are included. If you overdo it with sharpening, it will be more difficult to return the sawn material to its place;
- Now install bi-xenon optics;
- The wiring from the light bulbs is pulled through the protective cover. You will have to drill a hole first. Therefore, having a drill at hand is a must;
- After installing the headlight in the base, fix it. Just don’t get too clever with polarity;
- Along with the lamp, instructions for connecting the ignition unit are provided. Follow it, there is nothing complicated in this scheme;
- Replace the headlights;
- Connect the negative terminal back to the battery;
- If the headlights function and turn on as expected, then the work can be considered completed early. There remains the last, but very important stage - adjustment.
As you can see, xenon on a VAZ 2110 is quite real. But to avoid any problems with the law, we advise you to spend a little more money and purchase a full-fledged legal module rather than risk driving past every traffic police post.
A little about the improvement
The purpose of such an operation can be only one, improving the illumination of the roadway. Experts break it down into several stages, they can be as follows:
- Work to move the lens closer to the reflectors;
- Refinement of curtains;
- Changing the shape for the reflector.
Only carrying out all stages of refinement can lead to achieving the desired results in improving Kirzhach optics. We need to talk about these stages separately
Types of bilens
Bi-xenon lenses are distinguished by size and generation into the following types:
- G-1 - first generation regular round lenses. They have a diameter of 80 mm and are designed for installation in headlights with an H-type socket. The standard G-1 kit includes two lenses with decorative lighting “angel eyes”, two lamps, mounting elements;
The first generation of bi-xenon lenses G-3 is the third generation universal bi-xenon lens. They have a round (sometimes oval) shape (diameter 110 mm) and can be installed in headlights with sockets of type H1, H7 and HB4. The kit includes the same items as the G-1;
Third generation bi-xenon lenses G-5 are the smallest lenses. Their diameter is only 64 mm, but their characteristics are in no way inferior to previous generations. G-5 is also universal and can be installed in headlights with H1, H4, H7, HB4 sockets. The composition of the set of these lenses may vary. It all depends on the manufacturer.
Fifth generation bi-xenon lenses
Tuning taillights - main options
Tuning tail lights on a VAZ is most often:
- painting rear lights;
- use of tint film;
- installation of LEDs.
The surface is covered with glossy or matte vinyl film. It can be applied completely, partially in a certain place on the glass and removed at any time. Tinting material is produced in different colors and shades. The film has a protective function and can be used to protect the element from mechanical impacts of small stones.
The film is applied to the outer surface of the headlight in stages:
- Wash and dry the headlight unit.
- Wet the surface with soapy water.
- Cut the film to the required size.
- Remove the backing and apply it to the surface of the lampshade.
- Carefully smooth out from the center to the edges.
- Dry with a hairdryer.
- Remove excess film.
Varnish or paint is an economical option, but not always effective if you apply it yourself. To use, you need to wash and dry the lanterns well, then degrease and varnish.
Tinting should not reduce the brightness of lights by more than 15%. Although the traffic rules do not contain clear instructions on tuning rear optics, questions from the inspector may arise.
Tuning LED headlights have increased brightness and clearly define the dimensions of the car. More often, diode strips are used, which are installed around the perimeter of the rear stop.
Using LEDs
To tune the rear lights of the VAZ 2110, installing LEDs and painting the lampshade are most often used. LEDs are mounted in plastic reflectors after dismantling the headlight unit. For the VAZ 2110 it is recommended to choose two colors: red and yellow. The tapes are soldered and placed on the base inside the headlight unit.
To make the light as bright as possible, the base of the headlight is painted black. Tuning procedure step by step.
- Dismantle the headlight, remove the glass, remove the lamps.
- Fill the inside of the block with a thin layer of polyurethane foam.
- Give the foam the desired shape by determining the areas for installing the LED strip.
- Glue the LEDs onto the base inside the headlight.
- Install glass, connect wiring.
When installing LEDs at 6 Volt dimensions, stops and turns at 12 Volt, capacitors are installed, this prevents overheating of the optics.
LED characteristics
Modern single LEDs, matrix blocks, diode strips produced by well-known companies are distinguished by their high service life and reliability. Technical characteristics of LED blocks:
- service life more than 4000 hours;
- operate at minimum on-board voltage;
- good light data;
- no overheating occurs;
- are not subject to vibration and mechanical effects;
- variety of colors.
The luminous flux of such lamps does not dazzle the eyes and is visible from a great distance. Availability allows for inexpensive and high-quality repairs.
DIY LED tuning of rear lights
To perform LED tuning of rear lights you will need a minimum set of tools and an LED strip of the required length. Do-it-yourself tuning of rear lights on a VAZ 2110 step by step:
- Disassemble the headlight.
- Pull out the diffuser.
- Paint the reflectors black.
- Prepare the site and glue the LEDs.
- Solder stabilizers and wires from old lamps to the tape.
- Place the reflector on top of the diodes.
- Assemble the tuned spotlights and install in the reverse order.
LED pinout
Before connecting the wires, you need to pinout the LEDs. To make them glow, you need to pass an electric current through them in the direction from the anode to the cathode. To do this, a positive charge must be applied to the anode, and a minus charge must be directed to the cathode.
It is recommended to check the LED strip before installing it on the car.
For VAZ 2109
Bi-xenon in the headlight of a VAZ 2109
Installing bi-xenon on a VAZ 2109 will provide many advantages, including a significant improvement in lighting quality. The light emanating from the headlights of the VAZ 2109 will be bright, saturated and pure white. Thus, safety increases significantly and the driver who carries out this tuning protects himself, passengers and pedestrians from accidents in unforeseen situations.
Note. It has been proven that good headlights prevent the driver's eyes from getting tired quickly. As a result, you can travel the longest distances in your car, making much fewer breaks.
Installation Features
VAZ 2109 is probably the most popular car that undergoes such tuning. But you should know some features that make it possible to carry out a competent replacement:
- If the glass on the old optics is corrugated, you will have to pre-polish it, or better yet, completely replace it with a smooth one. If you don't change the glass, or at least polish it, the light won't be normal. He will become distracted, causing harm and discomfort to oncoming drivers. The level of security will be significantly reduced.
- After self-installation, you need to be able to correctly configure and adjust the bi-xenon, otherwise such headlights will blind oncoming drivers.
Installation and connection
- We take out the standard halogen lamp by pressing the clamps.
- The next step is to cut off the wires (yellow and brown). These are pros and cons respectively.
- We crimp the 2 brown wires and place the female wire on them.
- We put a mother on the yellow (positive) wire.
- Since I have Kirzhach headlights, the xenon lamps came in handy. If you have headlights, then it will be a little more difficult for you; they will not immediately have lamps. Widen the diameter of the hole, but do not overdo it (you can use a round file).
- Now you need to make a hole in the protective cover for the wiring. I used a 23mm drill bit.
- We insert the lamp and secure it with clamps.
- We connect “plus” and “minus” with “mothers”, just do not confuse the polarity, this is very important. Because you can screw up either the lamps or the ignition units.
The problem with new headlights
It happens that after installing new headlights, purchased for a lot of money from a reliable, excellent manufacturer, the quality of the glow leaves much to be desired.
Inexperienced drivers attribute everything to a defect or the purchase of a fake disguised as a trusted company. But in reality everything is completely different.
Headlights shine efficiently and efficiently not only depending on the manufacturer. Settings that some people don’t know about or simply forget play a big role
Reviews
Delivery of goods is carried out throughout Russia and the CIS:
1. Russian Post (from 350 rubles and above)
Delivery to all regions of the Russian Federation and CIS countries
2. Transport Companies (from 350 rubles and above)
Delivery throughout Russia and the Republic of Kazakhstan
- TK Energy (nrg-tk.ru)
- TC Business Lines (dellin.ru)
- TC SDEK (www.cdek.ru)
- TK PEK (pecom.ru)
- TK KIT (tk-kit.ru)
3. Pickup
The order can be picked up at the office at Tolyatti, 40 Let Pobedy 38, TD “Malachite”, 1st floor.
The waiting time for sending an order in our online store is approximately 2-7 working days, large orders 7-14 working days. days; color of bumpers, mirrors, body parts, spoilers, etc. 7-14 work. days; sewing covers, upholstery, steering wheels, gear knobs, EVA mats, etc. 7-14 work. days.
During this period, we will send you a tracking number by email. email to track the parcel en route.
DIY dark optics
Tuning VAZ headlights in a dark color is done using matte paint, tape, and a knife. Beforehand, the optics are dismantled and the headlight glasses are separated from the body. The reflector is sealed with masking tape. The inner surface of the headlight is covered with dark paint. Do the same with turn signals. If the glasses of the last element are reddish in color, then they are replaced with transparent analogues.
The next step involves fixing the headlight glass using sealant. Similar tuning
does not have a negative impact on the quality of the light beam of the optics.
to install and connect the fog lights on your own These optics are designed to improve the illumination of the road surface during snowfall, fog or rain. Such tuning is carried out using the following materials:
Diary of VAZ 2110 | Choice of fog lights. PTF Kirzhach
Enjoy watching everyone, I hope my video helped someone with their choice or technical questions) Spare parts
The discharge lamp has no filaments in its design. Here the luminescence process is based on the principle of a light arc. the inert gas glows. There is no field focusing feature for that matter. Thus, an additional element must be used. lens. But this minus is blocked by the light output, which increases several times compared to halogen lamps.
Read:
Thus
, it is not possible
to install an Xe bulb in a headlight using a simple reflector.
Due to improper scattering of the rays, the correct effect will not be obtained. However, this is not the most important thing. It is dangerous that ignoring an important requirement (the presence of a lens in the design) will lead to the appearance of other road users. Possibility of installing xenon in PTF. big question. The direct purpose of fog lights is to highlight the vehicle in low visibility conditions. This light is most fully encountered with light of a yellowish tint. Using these lamps at night serves as a minor addition to the headlight as it illuminates the area directly in front of the car.
In general, a significant increase in comfort and safety while driving will allow us to list the following manipulations with Kirzhakh headlights
:
- installation of gas discharge lamps;
- minor modification of optics design;
- cleaning the lens surface;
- installation of a headlight washing system.
“Angel Eyes” - a new type of tuning
Installing “angel eyes” on a car yourself is not at all difficult. There are several options for this procedure:
- buy finished products;
- make them yourself using LED strip;
- make it yourself using a transparent tube.
As practice shows, it is much better to make “angel eyes” yourself, since stores sell very low-quality and short-lived products. You can buy a ready-made LED strip and glue it to the inside of the optics with special glue or sealant. But it will still be more effective and brighter if you use an LED ring made of a plastic tube.
The work in this case consists of the following stages:
- To begin with, the plastic tube is heated using a hair dryer. This must be done so that it bends well. However, you also need to understand that if the product is overheated, it will become deformed.
- After this, use pliers to bend the tube around the can, so you get an even circle.
- When the part has cooled, the edges are sawed off.
- Resistors and LEDs are assembled using the same scheme. It is important to sand the ends thoroughly.
- Then, using a hacksaw, notches are made around the perimeter at approximately a distance of 2-2.5 mm. The ends are covered with foil and a special tube.
- Next, the made ring is attached with glue around the optic lens. It is important that the notches are on the inside.
If you clearly follow the instructions and correctly carry out all stages of the work, the updated headlight will have a very presentable appearance and will be able to last about 7 years without replacement.
Sources
- ladaautos.ru/vaz-2110/kak-razobrat-i-uluchshit-fary-na-vaz-2110-tyuning.html
- infokuzov.ru/tuning/tyuning-fary-vaz-2110
- drive2.ru/l/458665674647048737/