If you have been told that the standard player installed in your Lada Kalina Sport needs firmware, do not be alarmed. And feverishly go over in your memory which of your friends knows how to operate a sewing machine or remember the address of a nearby studio. This of course applies to older people. Modern youth know very well that changing the current operating control system installed in a computerized device, in order to improve the quality of already installed options and connect new ones, is called firmware.
Firmware in iPhone style
How to return to the regular menu
On the “Desktop” screen, in addition to the “My Device” icon, there is another interesting icon called “Home”. Double clicking on the “Home” icon always returns us to the main menu of the VAZ radio. There is no other way. Before returning to the menu, be sure to close the application. You won’t be able to use Navitel’s voice prompts anyway if you turn on the radio, video, or sound.
Let us note another interesting feature of the Navitel program. You can turn on the radio or play music in the main menu, then open the “Desktop” and launch the application. So, in this mode, only music will sound in the speakers, and not voice prompts from the navigator. Maybe in the firmware modified by AvtoVAZ everything will look different. And we note that another tuning option without reinstalling the firmware is connecting a rear view camera. The driver is also installed here, and that’s it.
Preparing an SD card with software
Apparently, by the end of this year, the City Guide application should appear in AvtoVAZ radios. We, in turn, are considering the option of using another application - Navitel 7.5.0.202. Another suitable version of the program can be considered revision 5.0. Please note that the Navitel application, which can run under Windows CE, is currently no longer for sale.
Fundamental note: the Navitel program in its usual version will not be able to detect the designated GPS receiver, because it works with the “incorrect” hardware ports. Before you can write an application to an SD card, you need to patch it. We install a patch to work with the COM-5 port, then apply another patch that reduces the port speed to 4800 bps.
By saving the modified Navitel application on the SD card, you can use it. The “Navitel Content” folder contains the two most necessary directories (“Maps” and “Speed Cam”). The application is launched by double-clicking on the icon of the exe file located in the “Navitel” folder. By the way, no one bothers you to make a shortcut for this file directly in the root directory. Successful option!
What is the difference between chip tuning and tuning?
Tuning is translated from English as “adjustment” or “tuning” and means work to improve the technical characteristics of a car. It includes the modernization of all engine systems and its tuning: improving the characteristics of the intake system, refining the valve timing, reducing fuel requirements, etc. Other components of the car, such as the gearbox, intake and exhaust systems, suspension and braking system, can also undergo tuning. All this is done with the aim of adapting the machine to certain operating conditions.
Chip tuning is a modification of the car's microprocessor. Since in the modern world it is impossible to imagine any technology without electronics, and under the hood of the car there is now a whole system of microcircuits that control all the main components of the Lada Kalina. It turns out that regular tuning changes the part itself and its characteristics, while chip tuning is the central control of this part.
I would like to say right away that the firmware of a car’s electronics can be easily combined with conventional tuning, and in some cases it is simply necessary. Having replaced a part and improved its characteristics, it is necessary to adjust its control so that the “brain” sends the correct commands to the unit.
Device for flashing a car
Chip tuning of a car not only improves performance, but also, as a result, saves money for the owner. After upgrading the engine, fuel consumption is significantly reduced, which leads to lower gasoline costs, and also extends the life of all units. Due to this, you can save on constant repair services.
Accurate and competent work of a specialist makes changes that cannot be ignored during the operation of Kalina. She becomes more flexible in management. Inexplicable delays and “pecks” when pressing the gas pedal during acceleration disappear. You can forget about unpleasant twitching while changing speed.
“Luxe” package
Lada Kalina in the maximum “Lux” configuration complies with Euro-3, Euro-4 safety standards and is equipped with a 16-valve 1.6-liter unit with a capacity of 106 hp. There is also a choice of the “NFR” version with an improved 1.6 engine with a capacity of 136 hp:
- Safety: in addition to all the options of the previous trim levels, the car is equipped with ABS systems with reverse locking, ESP (electronic stability control system), TCS (traction control system with electronic control of load distribution on hydraulics), a five-speed manual transmission with a cable shift mechanism or four-speed automatic transmission, heated front mirrors with electric drive, rain sensor.
- Interior: high-quality seat upholstery (velvet, velor) with leather inserts on the doors and dashboard, standard head unit (CD+MP3+two-way audio system) with a touch screen and on-board computer functions, headrests on passenger seats, electric windows on all doors, climate control -control with outside temperature sensor, cruise control, heated front seats.
- Anti-theft system: security system with two-way communication, automatic remote start based on temperature, time, function for raising the windows after locking the doors, central locking, immobilizer, diagnostics of engine systems after the ignition is turned off.
- Exterior: moldings on the arches and front bumper, running lights and fog lights, new grille design.
When the hidden functions of the on-board computer are activated, the luxury version of Kalina has a full set of controls for all systems with the ability to install additional sensors (tire pressure, automatic light control, pre-start engine with diagnostics).
The second generation of Lada Kalina was updated with various types of gearboxes, which became available in all trim levels. Since 2013, the station wagon version has been producing an updated “Cross” modification with a robotic gearbox and increased engine power to 106 hp. The modernization also affected the suspension: in addition to the reinforced anti-roll bar of the front part, the rear axle design received a semi-independent spring type with new shock absorbers and spring mounting. In the “Luxe” configuration, all Lada cars are equipped with front ventilated disc brakes.
Firmware for radio Kalina 2 Lux
Despite all its advantages, Kalina's MMC car also has some disadvantages. However, getting rid of them is not very difficult. You can fix and improve the quality of standard equipment and additionally connected devices (navigation, rear view cameras, etc.) by flashing the OS.
Firmware for radio Lada Kalina 2.
To do this, you will need a five (5) GB SD card edited in FAT. In the future, if necessary, the exFAT format can be used. The sequence of operations performed is as follows:
- Copy the desired firmware version to the flash card. The average size of a version is about four Gigabytes in FAT.
- Transfer the files from the “FirmWare” folder to the root folder of the SD card.
- Remove the flash drive from the USB.
- We install it (SD card) into the USB connector of the car player.
- Reboot the GU by long pressing (at least 15 seconds) the power button. As a result, a reinstallation will occur and the MMS will automatically install itself into the desktop menu mode.
- Without turning off the player, we adjust the screen (by pressing the “Recalibrate” sensor). At the end of the countdown, click on the display.
- We reboot the radio again, but with the flash card inserted. As a result, the updated menu is loaded.
The manufacturer of Kalina installs one of two versions of the operating system on the car radio. 32nd or 35th. You can change them to the hybrid version 38 by registering and downloading this firmware version for free on the website 4pda, widely known among car enthusiasts.
In general world practice, manufacturers, as new operating system updates appear, publish information about them on their official websites.
Unfortunately, AvtoVAZ does not provide such care for the owners of its cars and equipment. Which, in principle, does not cause any surprise among our users of this car brand.
In conclusion, video instructions on how to download the radio firmware for Kalina 2.
The topic is certainly not new, but maybe it will be useful to someone
To continue my first post in BZFinally, I waited for the first parcel from China, the first one was the SD card
so necessary for the firmware, of course you could just buy it in the store, but I decided to save money.
Therefore, on Sunday it was decided to flash the MMS.
Download the files from everything you know on the site. Unpack the SD card. By the way, it should be no more than 4GB.
and
formatted in FAT
, otherwise nothing will happen. A flash drive is not suitable in this case.
We copy everything to the SD card and as a result, in its root you should get something like:
We turn on the MMS, plug the SD card into the connector, you need to make sure that there is nothing in the USB
We cause the MMS to reboot; this is done with the MMS turned on
Long press the power button (15 seconds)
After the blinking dots appear on the screen, you can release it, which means the device has started rebooting (by the way, it helps with MMS “Glitches” in the sense that it freezes or something stops working, such as a touch screen)
Next comes the installation process
After copying, the device will ask you to calibrate the touch screen
after calibration, a 30-second counter will start, you just need to poke any area on the screen to save the calibration settings
After this, the OS will offer to make a backup copy of the old firmware
The process probably takes about 2 minutes. After which the MMS will boot into the standard shell, press the settings menu for a long time and oops we have a new shell
Total: we have a shell that can switch to the WIN CE desktop, the standard shell, Word, a calculator, a program for working with USB Modems, navigation, a program for working with a reverse camera and other goodies of the computer world including a browser.
PS By the way, if you press the info button in the updated shell, the coolant temperature and the amount of fuel in the tank will be displayed at the bottom right of the screen, which can also be very useful
There will be a separate post on navigation when I finally get a GPS receiver and a usb hub with a wi-fi adapter
Installing the tablet in viburnum
Greetings, friends))) Well, that's all. Finally, the radio was installed. A tablet is installed in the screen space. But first things first.
For a long time I couldn’t figure out how to secure the tablet itself to the center console. The entire system must be removable if it suddenly becomes necessary to remove the center console. At first I wanted to secure the tablet using a bracket and a car holder. But then I rejected this idea, and the crossbar above the air ducts got in the way.
Then he is going to make a case for the tablet for standard mounts, according to the dimensions of the standard monitor. Here you need to literally measure the distance from the mounting point to the hole for the monitor in the center console. Textolite comes to the rescue, as always)) I made a case like this. The tablet “slides” into it from the side on a slide.
I soldered wires for the power button and from the battery for feedback for the charger. More on this below.
Now we need to think about organizing food. There are two options for me here: 1. Charging is always plugged in. The tablet is constantly charging. It is worth removing the integrated battery so as not to destroy it. 2. Charging is turned on only when the ignition is on. There is a possibility that the battery will not have time to charge when driving for a short time. It's a burning issue for me, I don't drive enough. Well, turning the tablet on and off all the time is absolutely not an option)). It's not serious. Both options did not suit me.
Therefore, it was decided to create voltage monitoring for the tablet. Arduino nano comes to the rescue))). A program was written. The method is this: the tablet is charged to 100% percent, then charging is turned off. Then the controller waits for the charge to drop to 50% percent and again charges the tablet to 100%. This eliminates the constant consumption from the on-board network and + the health of the tablet battery itself.
Any Arduino nano input has a resolution of 10 bits, i.e. we have a value on the port from 0 to 1023. Which corresponds to a voltage from 0 volts to 5 volts. To set it up, you need to take two measurements on the port. At 50% charge and at 100%. And yet it is worth focusing not on 100%, but for example on 95% to guarantee the operation of the digital output.
A board like this was made.
1 USB port for “controlled” charging 2 for connecting external storage devices 3 additional. With constant 5 volts.
After options, it’s time to install all this stuff in the machine. Under the climate control unit there are two holes with 6mm threads. This is where I will strengthen the power board.
I made a platform like this. On one side it is attached to the body, and on it is the board itself.
Installing the tablet in the case.
With center console.
And finally the final look
And, in fact, conclusions after all this. 1. Surely you shouldn’t have chosen Arduino for these purposes. She's glitchy. From time to time he does things that are completely inexplicable. Currently still in test mode. Feedback based on the on-board voltage is provided. In the future, I would like to create a shutdown of everything if the voltage drops below 12 volts. Turn off the cigarette lighter after some time after turning off the ignition. 2. I made a slight mistake in choosing the tablet - ASUS Fonepad me371mg. As it turned out later, it does not support the OTG ACA detection operating mode. In other words, it cannot immediately charge and read USB flash drives. The problem is that in OTG mode (if you close pin 4 to 5 microUSB), the tablet itself acts as a PC (Personal computer is a computer intended for use by one user)
. And it supplies 5 volts via the power buses to power the external device. And because charging is supplied through these same buses, the tablet threw up the error “current protection on the usb port.” In general, either the charge or the flash drive. The same Nexus7 from 2012, after updating the kernel firmware, can charge and read flash drives. In principle, this is not critical for me - I won’t listen to music from it anyway. But I would like to have the opportunity to connect something.
Well, that's basically it. Lots of letters, something came out))) If you liked it, like and write comments)) Good luck to everyone!))
Source: remont-avto.uef.ru
Why the ECU on the Lada Kalina does not work - the main reasons
One of the most common problems that Lada Kalina owners encounter is ECU failure. Let's look at the main reasons for controller failure:
- Failure due to a short circuit in the on-board network. Here, you can get by with little effort and solder the main resistors, or it will lead to complete combustion of the element.
- If liquid gets on the unit panel, which will lead to complete failure. Usually the ECU is filled with antifreeze.
- Illegal actions of third parties that will lead to ECU failure.
- Other reasons not previously stated.
All these reasons will serve as a reason for diagnosing and dismantling the car control unit.
Possible faults
If everything is clear with the description, then let’s move on to the malfunctions. Like any other electronic component, the Lada Granta instrument panel is also susceptible to various malfunctions.
What kind of breakdowns can occur in the operation of the control panel:
- The tidy is broken. If the shield fails, there can be quite a lot of symptoms. For example, only some or all of the devices will refuse to work. If this is the case, then the problem in this case may lie either in the power supply of the device or in its board. It is better to entrust repair problems to specialists.
- The tidy is glitchy. For example, all doors are closed and the unlocked door indicator is on, or the optics are not turned on, but the corresponding light on the dashboard is flashing. As a rule, in this case the problem lies precisely in the board (of course, if the sensors are working). If the problem is in the board, then flashing the dashboard firmware can solve it, but this option does not always help. It is possible that the electrical equipment lights are on on the dashboard due to a faulty sensor, so it would be a good idea to check its functionality.
- All devices work, but there is no backlight. If all the backlight bulbs do not work at once, then most likely the problem lies in a blown fuse or a damaged wire or connector. Checking the wiring is done using a multimeter.
- Only part of the light bulbs or one of them does not work. In this case, the malfunction consists of a burnt-out lamp; to eliminate it, the instrument panel in the Lada Granta is dismantled, after which the burnt-out lamps in it are replaced.
- The equipment indicator on the dashboard does not turn on. For example, you turn on the high beams, but the corresponding light does not light up. This may be due either to a failure of the indicator itself (the lamp is changed in the same way), or to a breakdown of the sensor. It is quite possible that there is poor contact between the light bulb and the wiring.
- Speedometer failure. The cause of the malfunction may lie in the board or speed sensor installed on the device. The situation is similar with sensors - fuel level, engine temperature. If they do not work or show incorrect values, then the problem should be looked for in the controllers themselves, wiring or board. It is possible that the devices are not working simply due to poor contact.
Preparing the radio
Connecting a GPS device to a USB port is a proven and so far the only option to get a navigator that will be built into the radio. The software for this “navigator” will consist of two parts – a driver and an application. Let's look at how to install the driver.
While in the main menu, press the "Settings" button and hold it for 10 seconds or more. The LADA screensaver will appear, then the “Desktop” will open. It has a “My Device” icon, corresponding to the “My Computer” folder in standard versions of Windows. Double clicking on the icon will provide access to all connected drives.
Driver request, virtual keyboard, GPS navigator in the glove compartment
To install the driver, follow these steps:
- When the “Desktop” is open, connect the navigator to the USB port (a window asking for a driver will appear);
- Disconnect the navigator, close the request window, connect the USB drive, go to it through “My Device” and double-click on the cab file icon;
- Click “OK” and wait, and then go to the “Windows” folder and find the usbser.dll file;
- Copy the found dll file to the “Static Store” folder (use the “copy” and “paste” buttons located at the top).
After installing the driver, no messages are displayed when the device is connected to the port. After rebooting the radio, the window will appear again, but we will specify the correct path to the file (Static Store\usbser.dll) once, and nothing else will be needed.
What should happen in the end?
You can get navigation in the standard radio using 2 methods: install an altmenu with a navigation program (and void the warranty on the device), or you can install the driver and applications without the help of others. In the 2nd case, it seems like the guarantee remains. In addition, at any time it will be possible to remove all traces of the modernization. Only the GPS receiver driver will be installed in the radio itself, the file of which can be erased if desired.
Kalina-2 radio, GPS navigator, Navitel software
Let's say the designated receiver was purchased, the driver for it was downloaded (from the usglobalsat website), and the functionality of the device was tested. The driver for Windows CE 6 ARM has a “cab” extension; you need to write it to a USB drive. You will also need an SD card on which the navigation software will be installed. The card must be formatted in FAT32 (this is important). The radio menu will not change, but you will have to launch the program by going to the Windows “Desktop”. In fact, the map image appears on the display after two or three clicks, but this is still not very comfortable.
Nuances of multimedia firmware Grants (2190)
It is quite easy to carry out the firmware itself when installing the mms 2190 firmware. To do this, it will be necessary to use an SD card.
Among the common flaws that occur after the dashboard firmware is installed, even if it is the latest version, is the Lada logo freezing on the display of the head unit.
This moment can be provoked by the following factors:
- failure to comply with required formatting principles;
- the presence of an outdated version of the SD card that differs from “SDHC”.
After successfully formatting the card and selecting software (for example, “New Menu V7.391 Nitro”), you will need to acquire the latest firmware and unpack the product onto a previously prepared SD media.
Regarding the “Firm Ware” folder, note: the files located in it will need to be redirected to the root directory of the card itself. Upon completion of the copying process, disconnect the flash card from the PC, not forgetting about the safe removal technique.
Now we confidently insert the SD card with the prepared files present on it directly into the MMC. Then turn on the head unit. We wait for the full download to complete and by long pressing the volume button, we reboot.
The act of rebooting is characterized by four stages, the display of which is implemented in 4 lines of process status. After filling out these lines, the device starts in the usual mode, as evidenced by the appearance of the corresponding original menu. After a few seconds, the device transitions to the altmenu.
The USB splitter “DNS ATH-08” has acquired a significant advantage – multi-polarity. The GPS receiver and other USB modules connected to the “head” are combined with the altmenu, but become inactive.
After the MMS 2190 firmware is completed on a Lada Granta car, its display displays a new type of desktop, namely “Wince”. The 4 files previously mentioned and copied into the depths of the root directory of the map are “responsible” for the presence of the interface on the desktop.
The subsequent manipulation is associated with the need to configure new software in the standard multimedia device of the Lada Granta car. For these purposes, click the “Start” button, after which we follow the following route: “Start\Setting\Control Panel”. Sometimes owners complain about the slowness of the “Control Panel” opening process, but this phenomenon disappears after rebooting the MMC in forced mode.
When the control panel is open, in its interface click on the “Stylus/Calibration” symbol. With this action, the user of the new software gets the opportunity to calibrate the touch screen for response accuracy.
Upon completion of the simple calibration procedure, a timer appears; you should not wait for the completion of the counting process. Feel free to click on the screen.
Now the long-awaited time has come for the forced reboot process. Long and holding pressure on the volume key (10 seconds or more) allows you to implement this process in MMC. At this moment, the removable media, which contains the new software, continues to reside in the connector of the head unit of the Lada Granta car.
Having completed the reboot action, the device will first display the standard menu, and then, similar to the preparation procedure, the altmenu. If you need to return to the “native” menu, you should hold down the “Native” key.
The process of rebooting the device, after the dashboard firmware has been flashed, requires its connection via a USB splitter of the specified model with the Globalsat BU-353S4 GPS wave receiver. If there is none, then upon completion of the process itself the “head” will display the normal menu mode on the display.
Such common settings as sound, as well as audio or video, are present in any multimedia device in the domestic Lada Granta car.
“NewMenu V7.391Nitro” needs a manual way to install the indicated options, which will require:
- log in to the “soft/radio” folder;
- resort to activating the “start.exe” file.
The procedure will agree to associate present files with the extensions “exe” and “ahk”. This manipulation is quite important and allows you to achieve stable functionality of the MMC, which is used to flash the dashboard firmware.
LADA Granta with a navigation system – traveling will become easier
AvtoVAZ masters began work on creating their own navigation five years ago, but recently only Priora has been equipped with such a system on a relatively large scale.
In the very near future, those who want to buy a Lada Granta with navigation will have plenty to choose from. AvtoVAZ showed the first car with a stationary navigation system at the Moscow Motor Show back in 2010.
By the summer of 2011, it was expected that this system would appear as an option on a number of models, including Kalina and Priora (as we know, the Granta sedan was just being prepared for mass production). The car plant's goals were to equip up to 3% of all Kalina and Priora cars with navigation by the end of 2012.
The navigator is built into a multimedia system with a seven-inch screen. The instrument panel is equipped with a “prompter” that schematically indicates the direction of movement.
The plant notes that the built-in GLONASS-GPS system differs from built-in navigators in that the sound of the car radio becomes muffled when the voice prompt is played. Moreover, the manufacturer estimated the total cost of the system, which works with GPS and GLONASS sensors and Navitel maps, at 12 thousand rubles.
Until recently, Priora was the only model that a buyer could purchase with a built-in navigation system - other models were only partially equipped with navigation, as part of the assembly of some batches, and such an addition was not included as an option.
Now it will be possible to purchase both “Kalina” and “Grant” with built-in navigation. Navigation for the Lada Granta has become the same option as electric windows and airbags.
Easy link mms 2190
Description:
Alternative menu (shell) for MMC cars Lada Granta, Kalina, Priora. In NewMenu 9, all functionality is divided into separate applications. The main applications - radio, video player, audio player, BT player, AUX, phone and navigation - are located on the main menu screen. The remaining additional functions of MMC are divided into corresponding applications. For example, application options: Trip computer, Car (displaying a car with doors, indicators, etc.), Climate (for displaying climate status), Motor (for reading and decoding errors, controlling fans), an application for measuring dynamics, an application for street racers (red flash), etc.. You can come up with many applications. Applications can be uninstalled and installed through the Application Manager. Those. You can create your own MMS functionality. Installed applications are displayed and launched in the Applications window. Some applications can be launched as a screensaver (Trip Computer application). Applications can be launched either by a hot button (the Trip Computer is launched by clicking on the Fuel icon in the Kan-panel) or by an event (for example, when check the Motor application is launched).
Possibilities:
- Listening to radio, audio files; watching videos.
- Connection with phone via Bluetooth protocol; Speakerphone; the ability to receive and make calls; phone book with quick contact search; listening to music from your phone via Bluetooth (via BTPlayer).
- Launch a navigation program, simultaneous use with all audio applications.
- Playing navigation prompts when listening to the radio, AUX, music from the phone, during a telephone conversation on the front or rear speakers (mixing).
- AUX input support (hardware modification required).
- Sound settings (balance, equalizer, advanced hardware equalizer settings); screen settings, automatic day/night mode switching; turning on the parking camera.
- Setting up sound alerts, mixing direction and volume, and the ability to immediately do a mixing test.
- Kan-panel with vehicle data readings, voice prompts about the vehicle’s condition.
- Automatic volume adjustment depending on the current speed (auto volume).
- Support for navigation programs, support for USB GPS receivers, support for standard GPS receiver.
- Trip computer application: display of trip data (speed, revolutions, gear, mileage, time, consumption, cost, remaining range, etc.), recording trip data in the log, log viewer with data grouping, adjusting the accuracy of mileage and fuel level in the tank, and etc.
- Motor application: reading, displaying, decoding engine errors, resetting ABS automatic transmission SRS errors, manual and automatic control of engine fans, idle speed control when the car is stationary.
- Other applications: file manager, text viewers, calculator, browser and many others.
- Switch between all running applications using the Mode (Menu) button.
- Ability to change the design style, preview the changes made.
- All main menu settings in one window with tabs.
- Saving all user settings (including design) when switching to a new version.
- Steering column switch support.
Installation, update, removal, disaster recovery:
Installation
1. Unpack the archive into the root of a USB flash drive or SD card (Install folder). 2. Exit to the MMS desktop. Run the file InstallInstall.exe (white label) from a USB flash drive (SD card). When installing on a clean MMC, there will be a reboot, then the installation will continue. 3. To install the MMC to the internal memory, click Install. To install to an SD card, click Cancel, then click Install. 4. Select drivers for the USB devices you are using and click Install. If there is nothing, click Cancel. 5. Select the MMC type. 2190 – MMS standard installed on Granta, 2192 – MMS standard installed on Kalina/Priora. For MMC with standard navigation, select the type with navigation.
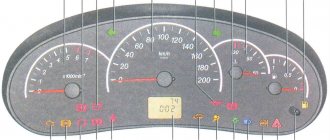
Description and location of indicators and instruments on the panel
Thanks to the tidy, the driver receives information about the condition of the car and the speed of movement.
Tidy Lada Kalina 2
A novice car enthusiast should know about the purpose of warning lights from the very first days.
Below is a description of the device:
1 - tachometer - a device showing at what frequency the crankshaft rotates; 2, 4 — direction indicators, left and right, respectively; 3 — speedometer, displays the actual speed of the vehicle; 5 — coolant temperature indicator; 6 - indicator showing the fuel level in the tank; 7 — fuel reserve warning light; 8 - button with which the daily mileage readings are reset; 9 - a lamp indicating that the emergency lights are on, during which the side lights and turn signals flash, indicating a car malfunction; 10 — electric power steering lamp. Goes off when the ignition is turned on. If it continues to light, then the EUR is faulty; 11 — high beam indicator. The light is on if the high beam is on; 12 — indicator of the applied hand brake; 13 — external lighting indicator; 14 — airbag malfunction indicator; 15 — emergency oil pressure indicator in the car system; 16 — immobilizer warning light; 17 - liquid crystal screen displaying information from the on-board computer; 18 — seat belt malfunction indicator; 19 — battery charging lamp; 20 — emergency brake fluid level indicator; 21 - electronic brake force distribution light, red light indicates a malfunction; 22 — brake pad warning light; 23 — anti-lock braking system (ABS) indicator; 24 - a constantly burning orange light indicates problems with the engine.
After the engine starts, the indicators light up orange. If everything in the system works normally, then they go out after 1-2 seconds.
Tidy Lada Kalina
Chip tuning of the multimedia system
If we talk about the firmware of all electronic systems of the Lada Kalina, then we should not forget about multimedia, which can also be subject to tuning. The Lada Kalina MMC firmware is updated to change the appearance of the menu and expand its capabilities. It differs from working with an engine in that it can be done independently at home.
In this case, you will need an SDHC memory card and special software on your computer, which must be transferred to this flash drive in unzipped form. Then, following the instructions for flashing the MMC (usually they come with the program), perform all the necessary steps in sequence.
What can be obtained as a result of modernization:
- faster responses to commands when pressing buttons, and with touch screens - clearer hits;
- installation of a Bluetooth communication system, which makes it possible to play music not only using a USB port;
- improved performance of USB storage devices—fast search and high-quality playback of recordings;
- embedding a navigation system, if one is not included in the kit. MMS Lada Kalina is adapted for navigation installation.
It is important that all changes made by software settings to the operation of the engine and MMC microcircuits can be easily canceled. To cancel engine firmware during operation, specialists save all initial parameters in a special reserve
If necessary, if the client is not satisfied with the result of the modernization, everything can be returned to its place in the same short time.
Find a trusted chip tuning specialist in Moscow.
The navigator on Grant will be controlled by a joystick
The LADA Granta navigation system is controlled by a joystick, which is located in the right steering column switch
Speaking about the navigator, special attention should be paid to the “voice guide” function, which is built into the system. Voice prompts about a change of route or that the driver has strayed from the laid path will help you fully concentrate on driving the car without constantly being distracted by the display
It is worth noting that the “voice guide” function is built into the audio system with which the LADA Granta is supplied. If necessary, the function will automatically mute the radio so that the driver can hear the navigation system message. The display of the LADA Granta navigator, in addition to the route and location of the car, shows the driver information from the on-board computer, odometer readings and displays the temperature outside.
Characteristics:
- Screen - touch, resistive (capable of working in more difficult conditions than capacitive, but not as convenient);
- Hands Free system - allows you to connect your phone via Bluetooth to make and receive calls, as well as listen to music;
- Video playback - WMV files with a resolution of up to 320x240 pixels;
- Supported audio formats - MP3, WMA, WAV;
- There is an equalizer with presets (Jazz, Rock, Voice, and so on);
- View photos - JPEG, JPG, JPE, BMP, GIF, PNG;
- Processor - SiRF Atlas-V;
- RAM - 128MB;
- Internal memory - 5MB;
- Supported USB file systems - FAT16, FAT32 (the USB connector itself is located on the back of the radio);
- Ability to connect an SD memory card;
- Screen size: 800x480 pixels.
To achieve better sound, it is recommended to replace the standard speakers with more efficient ones and install additional speakers in the rear doors, as well as soundproof the interior.
Note! When ordering, be sure to indicate the car model, “Granta” or “Kalina 2”
These radios are supplied only from cars from official dealers of AvtoVAZ OJSC; the motorring.ru online store guarantees that the radios are tested and correspond to the presentation. And also the online store motorring.ru gives a 6-month warranty on the radio!
Weight, kg: 1.3 Dimensions, cm: 30 x 20 x 18 Volume, m3: 0.01080
Side doors Lada Granta
To open the door from the inside, pull handle 1 towards you. To open or close the window, use handle number 3 Door handle number 2
To lock the door from the inside, press the lock button. To unlock the lock, pull out the button.
The rear door can be locked by pressing the lock button while the door is open and slamming it shut.
The front doors cannot be locked in this way, since the lock button does not go down when the door is open. To prevent children from inadvertently opening the rear doors on the move, press down the child lock lever and slam the door. Now the door can only be opened from the outside
Features of chip tuning
The main thing in firmware (chip tuning) is that the engine resources do not suffer at all, but on the contrary, they are preserved and expanded longer. Indeed, for many car owners this indicator is very significant, because the car, as a rule, is used every day, in an active rhythm, constantly wasting its resources. Because of this, the car ages, its characteristics become worse every year. And chip tuning slows down this process. Eliminating errors in the engine system preserves and extends its life.
In addition to improved engine performance, the firmware also affects the gearbox if it is automatic. Shifting becomes clearer and quicker, and all because in modern Lada Kalina cars the engine and automatic transmission are connected and considered one whole. While the engine is running, all information about its mode (torque, power) is sent to the transmission control unit, and the processor with microcircuits sends the automatic transmission system a command to shift gears higher or lower than the current one. Thus, the easier and faster the engine receives, processes and transmits information, the better the transmission will behave and the more comfortable the ride will be. At the same time, fuel consumption is reduced; it no longer has to be spent on unnecessary actions and commands. The result is money savings.
The procedure increases engine power
Particular attention should be paid to increasing engine power. True, not a single firmware program developer, and especially not a single chip tuning worker, can say with accuracy how much the car’s power will increase or has increased. However, the fact that this happens has been proven by many tests. Before flashing the firmware, the owner of the car is simply told how much the power will improve approximately - up to 15%. But sometimes the settings may not affect this engine performance indicator and only in rare cases reduce it slightly.
Main instrument panel sensors
Standard instrument panel
- Tachometer. Shows the engine crankshaft speed.
- Speedometer. Shows the vehicle speed in real time.
- Fuel level sensor. Indicates the amount of fuel in reserve. If the volume in the gas tank is less than permissible (the arrow is in the red emergency zone), an orange light on the panel lights up, thereby indicating that there is about 5 liters of gasoline left.
- Coolant temperature sensor. It is necessary to follow the arrow of the device. If the liquid overheats, it will end up in the red zone. This means that the coolant temperature is more than 115°C, which is unacceptable.
- Fuel level indicator. Gives an intermittent sound signal indicating the need to refuel.
- Left and right direction indicators. These are arrows that flash green to indicate the direction in which the vehicle is turning.
- Daily mileage reset button.
- Emergency crew. When this mode is selected, the indicator flashes red. At the same time, the side lights also flash. It is used in emergency situations and during various vehicle breakdowns, warning about problems of other road users.
- Electric power steering warning light. Has an orange indicator. The more the wheels are turned when starting the car, the longer it will not go out.
- High beam. Blue light bulb. Lights up when the high beam headlights are turned on.
- Parking brake. When the handbrake is turned off, the red light comes on.
- Emergency oil pressure. This light should come on when the ignition is turned on and go off once the vehicle has started. Color - red.
- Dimensions. The indicator lights up green when the side lights are turned on.
- Airbag alarm. It should light up as soon as the ignition is turned on and go out when the car starts. The indicator color is orange.
- Immobilizer. The indicator is orange. Shows the immobilizer status and vehicle security mode.
Elegant torpedo Kalina 2
LCD computer indicator. The top line displays the daily mileage. At the bottom - outside temperature, time, average gasoline consumption and other indicators.
Seat belt warning light. If the seat belts are not fastened, the red indicator lights up and an intermittent sound signal sounds. Battery warning light. It should light up when the ignition is turned on and go out after the car starts. The indicator color is red. Minimum brake fluid level indicator. It should light up as soon as the ignition is turned on and go out when the car starts. The indicator color is red. Fault indicator for electronic brake force distribution. It should light up red when the ignition is turned on and go out after the car starts. Brake pad wear indicator. Anti-lock wheel system fault indicator. It should light up when the ignition is turned on and go out after the car starts. The indicator color is orange. Engine warning light. Lights up as soon as the ignition is turned on and goes out when the car starts. Orange color.
Stages of dismantling the Kalina radio
Car owners do not always install a radio in an empty place. Often, before installing a new audio system, you have to dismantle the standard one. Many drivers are not satisfied with its quality and characteristics. In addition, according to reviews from car owners, the standard radio very quickly begins to “freeze”, “slow down” and “glitch”. That is why the owner of a Lada Kalina car first has to remove the existing audio system, and only then install a new one, chosen independently.
Stages of removing the original Kalina radio:
- dismantle the top removable panel;
- remove the plastic frame;
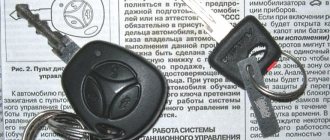
- using the keys included with the standard radio, remove the system from the tunnel: insert the keys into the sides of the radio and pull it towards you;
- disconnect the connectors with wires and the antenna.
You can install the radio with the help of specialists in a specialized center. But it’s realistic to do everything yourself, because there’s nothing complicated about it. The procedure takes no more than two hours, it all depends on skill and experience.
Car enthusiasts can give their stock radio another chance by tuning it. Reflashing the software settings will make the interface more convenient, the performance and service life of the device will increase.
{Instructions} connecting the tablet through an amplifier.
First, you need to remove the standard radio (use the repair manual for your car), then prepare the wiring to connect the amplifier and tablet. They can be connected through the wiring of the cigarette lighter or radio, but this will not be entirely correct and may lead to a short circuit. Therefore, we will pull the wiring for the amplifier from the battery. Fundamentally: Be sure to install a fuse on the cable through which the plus will pass, as close to the battery as possible using a waterproof fuse housing.
To route the cable from the engine compartment, you need to create a small hole in the wall between the passenger compartment and the engine compartment; if such a hole already exists, you should use it. In any case, be sure to use a rubber coupling to prevent the wire insulation from rubbing against the alloy.
I had a hole in the frame near the central tunnel through it, and a cable was pulled through to the amplifier installed under the seat.
To connect the acoustics to the amplifier, I recommend using an adapter, such as in the photo, it will free you from the need to cut and then solder the wires; in order to make it clear where which cable is, use tape and paper with marks. .
We connect two cables from the amplifier to the audio adapter.
To connect the tablet, you need stereo mini cables for RCA (do not buy Chinese ones for two rubles, the sound quality depends on them), it is also recommended to create shielding for the audio circuit
Then find a free connector in the fuse block, which receives voltage only when the key is turned in the ignition switch (to do this, use the prompts on the back cover of the fuse block), so as not to allow the tablet to discharge the battery when you are not using the car. Connect the plus through a fuse, the minus to ground, to these wires we connect the 12V mother connector (cigarette lighter socket), they are sold in radio parts stores and on the radio market, into which the car charging adapter attached to the tablet is connected.
Installing a tablet instead of a radio
The tablet is installed in the standard space of the radio; the frame may have to be cut a little on the sides. The tablet is mounted in a niche using fasteners prepared in advance or fixed with sealant or epoxy glue, after which the frame is installed in its space. You can also attach the tablet on top of the radio using a case, a docking station, or special holders.
The ECU on Kalina is filled with antifreeze - what to do?
After the block filled with antifreeze has been removed, its initial inspection should be carried out. For these purposes, it is necessary to remove 4 screws using a star screwdriver. Then you should slowly remove the control board for a visual inspection. The most common failure is the burnout of the ignition coil output switch. In this case, repair will not help.
As a result of such a malfunction, the Lada Kalina starts working on only 2 cylinders, and sometimes refuses to start at all. You can cope with a similar problem in a stationary workshop. There they will remove the damaged element, wash and dry it. The second most common problem is board burnout. It is not difficult to detect such a defect: the characteristic blackening of the board will leave no doubt.
Is it possible to repair the ECU in this case? The answer to this question can only be given by a service center, but experience shows that repairs will not help here. A complete replacement is required. It happens that sometimes the brain circuitry is slightly damaged. If this happens, then the car owner can get off easy. To restore the car to working order, you will need some minor repairs:
- wipe the block with a dry cloth;
- rinse with WD-40 several times and blow it out with a compressor;
- rinse several times in alcohol and blow again with a compressor;
- dry well, otherwise the Lada Kalina will not move;
- drying takes at least 1-2 hours.
How to open the hood of Lada Granta
In order to open the hood of the Lada Grant, you need to pull the lever located on the left under the instrument panel. Then put your hand under the hood just to the left of the middle, press the safety hook lever from the bottom up and lift the hood. Remove the stop from the clips on the front of the car while holding the hood. Lift the stop and insert its curved end into the hole on the inside of the hood. To close the hood, remove the end of the stop from the hole by lifting the hood slightly. Lower the stop and secure it in the clamps
Carefully lower the hood and the safety hook will engage. Press the hood near the lock until it clicks
Firmware for Lada Kalina
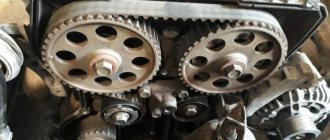
Chip specialist at work
Popularly, the on-board computer responsible for the electronic control of vehicle systems is called the “brains”. The software on different machine models may differ, so the same motors may operate differently.
Special programs for firmware are developed by specialists and produced by well-known companies. Auto repair shops involved in engine tuning usually purchase official software with all license agreements and technical support rights. In addition, the workshop must have special equipment for reprogramming the car.
The firmware software becomes obsolete and is updated, with more advanced versions being released. So, for Kalina cars, version 3 of the firmware only recently appeared. It adds even more dynamics to the car and reduces the loss of engine power when the air conditioning is on.
After flashing the car, the driver of the Lada Kalina feels changes in the operation of the vehicle:
- the car confidently picks up from below and quickly responds to pedal pressure;
- quick speed transition, the ability to accelerate the car by changing gears through one;
- the need for frequent gear changes in urban conditions is reduced, since the traction range in the absence of a gear change increases;
- smoother operation of 5th gear when engine speed decreases;
- the motor runs quieter and smoother.
Equipment according to VIN
The second service that I would like to recommend to you is the Exist auto parts store portal. For information about VIN decoding in this service, read a separate article on the topic How to find out the engine model by VIN.
Theoretically, official dealers should be able to find out the equipment by VIN, so it makes sense to contact them. But doing this is problematic, because you will have to go to the dealer, negotiate with him, but it is still not a fact that the decryption is available to him and he will agree to deal with this issue for free. Yes, and I would like to find out the equipment via the Internet without leaving home.
Below are links to some services for decoding equipment using the VIN code.
- Decoding the configuration according to the Ford VIN
- Official breakdown of the configuration according to the Ford VIN
- Decoding the configuration according to VIN Volkswagen
- Decoding the equipment according to VIN for Mercedes-Benz
- Deciphering the configuration according to VIN for BMW
- Decoding the configuration according to VIN for Peugeot and Citroen
By the way, on the website carinfo.kiev.ua, you can find out the equipment according to the VIN for any make of car. At least I was able to decipher several VINs of different brands. Be sure to try it, it should work for you too.
What does the firmware provide?
Firmware, or chip tuning, is the tuning of microcircuits in the car's control unit by making some adjustments to the data. That is, the car is controlled by programs with certain factory settings, and the firmware changes these parameters in order to improve the quality of the car. The skillful hands and head of a master create real miracles with the engine.
You can adjust the operation of the fuel system
The factory settings in the car, alas, are imperfect. They often produce errors and sometimes outright incorrect information. Poor dynamics, frequent failures and unexpected engine stops are only a small part of the problems that a car owner of a car that has not been reflashed may encounter.
But even the good performance of the car’s computer may not suit the owner, because some characteristics would like to be changed for the better. It happens that simple imperfections lead to frequent breakdowns or failure of individual parts. And in searching for a mechanical fault, the owner forgets about a simple electronic error.
He reverently and with diligent diligence again and again goes through all the parts of the car and does not understand what could be the matter. And when he doesn’t find the cause of the breakdown, he simply replaces the spare part with a new one. But in fact, the part may have been in working order, but due to an error in the system, the car did not obey on the road. To find out, you just had to check the operation of the control program. Moreover, if such problems arise quite often and each time you have to spend money on auto repair shops. Firmware upgrades will be much cheaper.
And another reason why it is better to update the firmware is the discrepancy between the initially installed European standard fuel systems and low-quality domestic fuel.
Comfort is important when driving a car. The firmware eliminates factory errors in the program, improves engine starting in all weather conditions, eliminates stalls and jerks, and reduces fuel consumption. In addition, chip tuning will achieve the following goals:
- increased comfort in driving, soft and smooth engine operation;
- increase in power up to 15%;
- acceleration is improved;
- maximum speed increases;
- adjusting the system to domestic fuel standards - removing Euro 3 and Euro 4 standards;
- improving the operation of the automatic transmission;
- reduction in fuel consumption.
Installing the tablet in viburnum
Have a nice day, forum users =)
I’ve been reading this forum for a long time, and gradually I started my own project. I got the tablet very cheap. I bought one tablet with a broken touchpad for 900 rubles, and the second one was just dead for 1000 rubles. It took a couple of hours to assemble 1 tablet out of 2. The only thing that complicated things was that the first one was WiFi, and the second one was 3G. But our hands are not for boredom =) In the end, we got one working WiFi 16Gb tablet. I made a root, flashed the latest droid 5.1.
For about a month I was just playing around with the tablet, but later I started implementing it. There is no space on the central panel for a tablet, so it was decided to move the heater control downwards. I opened the panel, got a soldering iron in my hands and here is the first option for placing the nexus: After looking at this option a little, I really didn’t like it and I destroyed it =) I wanted to create a removable option. So that you can use the tablet at home, at work, or play around in traffic. Well, it wasn’t so important as the enthusiasm to realize the idea. Evening, home, kitchen, table, epoxy resin, polyethylene, and fiberglass. To be honest, after just a couple of 10 minutes, all this petrified, and I was faced with a problem. I couldn't take the tablet out. After about an hour and a half of digging around with epoxy resin, I took it out. I sharpened the unnecessary edges and began to push the resulting seating space for the tablet into the panel. This is what came out: Putty + sandpaper, then putty again and sandpaper again and we get Putty, sandpaper, a full nose of snow-white dust and this is not coke)))) Let's prime!! I corrected the imperfections and temporarily painted it with dark matte paint. When everything is ready and configured and connected and measured, I will paint it a different color.
Source: www.pccar.ru
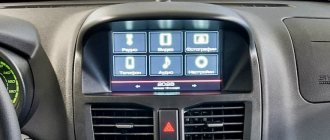
Review of the standard radio (MMC) of Lada Granta, Kalina 2 and Priora (luxury)
Currently, depending on the vehicle configuration, several types of 2 din radio can be installed.
The first is called “2 DIN audio system, without CD drive, without TouchScreen”, the other “multimedia system without CD drive, with a 7-inch display with TouchScreen” (MMC).
In the review we will talk about the MMC with a touch screen (LCD display), which is installed on the Granta (sedan and liftback), as well as on the Lada Kalina 2 and Lada Priora.
Catalog numbers MMS Lada:
Monoblock 2190-7900010-00 - MMC Lada Granta (luxury) and Lada Kalina 2 (standard) The screen is separated from the buttons 2192-7900200 - MMC Lada Kalina 2 (luxury) and Lada Priora (luxury)
MMC runs on the Windows CE 6 operating system. This is specially optimized for devices with a minimum amount of memory, by the way, in our case the memory is only 128MB. Despite this, turning on the radio does not take much time (about 2-3 seconds).
MMS screen
The display on the Granta and Kalina radio is resistive. Unlike a capacitive screen, it is able to work without failures in more severe conditions, for example, frost or heat. The display itself is quite bright and pressure sensitive. Due to the lack of a visor, there is glare in sunny weather, but not critical.
radio cassette player lada granta lux radio cassette player lada kalina 2 lux
Audio, video and photo
The radio supports audio formats: MP3, WMA and WAV. While a tune is playing, the display shows information about the album, artist, and cover art (if any). You can adjust the shades of sound using the equalizer (there are 6 pre-programmed settings for Jazz, Rock, Voice, etc.). The sound quality is not bad, quite clear, without audible cuts in the highs or lows.
MMS supports only one video format: WMV with a resolution of 320*240px. To play video files you will have to use a converter, for example, Xilisoft Video Converter Ultimate. It will not be possible to play a video without conversion, for example, in 720p resolution, the picture will slow down, and the sound will lag behind the video, due to the insufficiently powerful processor.
Review of MMC Lada Granta (luxury) and Lada Kalina 2 (standard)
Review of MMC Lada Kalina 2 (luxury) and Lada Priora (luxury)
It is worth noting that after purchasing a car, the antenna comes as a gift. You will have to install it yourself.
Phone, Hands free
Standard MMS allows you to connect your phone via bluetooth and download the phone book. In addition, it is possible to play music from your phone. There are also disadvantages; if you use several phones, it will be difficult to save settings.
Connecting external data sources
You can connect a USB flash drive to the radio, which must have the FAT16 or FAT32 file system. The radio connector is located on the back of the radio, which you will have to move yourself to a specially designated place in the glove compartment.
You can also connect an SD card to the radio; with a capacity of 32GB there were no problems.
Conclusion
The radio cannot be called a “finished” option.
It copes with the basic functions of the multimedia system, and for advanced capabilities (for example, connecting a rear view camera, playing files of other formats, making the radio display more functional, installing navigation, etc.) the radio will have to be modified by hand. Perhaps if the stock radio ran Android and had a more powerful processor and memory capacity, then the situation would have been much better.
There are also positive aspects. User-friendly interface, support for USB and SD cards, as well as playback of video files (albeit of low quality), which many middle-class foreign cars do not have! Such a multimedia system is the first step in this direction, so we can only hope that the next MMC models will be more productive and functional.
Let us remind you that it is possible to install this radio with an LCD display instead of the standard radio in the “norm” configuration. We discuss all the problems with MMS in another article.
Lada Granta Sedan, 1st generation 2011 technical specifications
Prices and configurations Specifications Photo Video
| Automobile | Lada Granta, 2018- | ||
| Modification name | 1.6 (87 hp) | 1.6 (98 hp) | 1.6 (106 hp) |
| Body type | four-door sedan | ||
| Number of places | 5 | ||
| Length, mm | 4268 | ||
| Width, mm | 1700 | ||
| Height, mm | 1500 | ||
| Wheelbase, mm | 2476 | ||
| Ground clearance (clearance), mm | 145-160 | ||
| Curb weight, kg | 1075 | ||
| engine's type | petrol, with distributed injection VAZ-11186 | petrol, with distributed injection VAZ-21126 | petrol, with distributed injection VAZ-21127 |
| Location | front, transverse | front, transverse | front, transverse |
| Number and arrangement of cylinders | 4, in a row | 4, in a row | 4, in a row |
| Working volume, cubic meters cm. | 1596 | 1596 | 1596 |
| Number of valves | 8 | 16 | 16 |
| Maximum power, l. With. (kW)/rpm | 87 (64) / 5100 | 98 (72) / 5600 | 106 (78) / 5800 |
| Maximum torque, Nm / rpm | 140 / 3800 | 145 / 4000 | 148 / 4200 |
| Transmission | manual, 5-speed | automatic, 4-speed | mechanical, 5-speed (robotic, 5-speed) |
| Drive unit | front | ||
| Tires | 175/65 R14 | ||
| Maximum speed, km/h | 172 | 176 | 184 (184) |
| Acceleration time 0-100 km/h, s | 11,6 | 13,1 | 10,5 (12,0) |
| Fuel consumption in the combined cycle, l/100 km | 6,8 | 7,2 | 6,5 (6,5) |
| Fuel tank capacity, l | 50 | ||
| Fuel type | petrol | ||
| Note | * In brackets – data for cars with a robotic gearbox |
| Automobile | Lada Granta, 2011-2018 | |||||||
| Modification | 1.6 (82 hp) | 1.6 (87 hp) | 1.6 (98 hp) | 1.6 (106 hp) | Sport | 1.6 (87 hp) | 1.6 (106 hp) | 1.6 (98 hp) |
| Body type | 4-door sedan (VAZ-2190) | 5-door liftback (VAZ-2191) | ||||||
| Number of places | 5 | 5 | ||||||
| Length, mm | 4260 | 4280 | 4246 | |||||
| Width, mm | 1700 | 1700 | 1700 | |||||
| Height, mm | 1500 | 1470 | 1500 | |||||
| Wheelbase, mm | 2476 | 2490 | 2476 | |||||
| Ground clearance (clearance), mm | 175 | 175 | ||||||
| Curb weight, kg | 1115 | 1140 | 1025 | |||||
| engine's type | petrol, with distributed injection, VAZ-11183 | petrol, with distributed injection, VAZ-21116 | petrol, with distributed injection, VAZ-21126 | petrol, with distributed injection, VAZ-21126 | petrol, with distributed injection | petrol, with distributed injection, VAZ-21116 | petrol, with distributed injection, VAZ-21126 | petrol, with distributed injection, VAZ-21126 |
| Location | front, transverse | front, transverse | front, transverse | front, transverse | front, transverse | front, transverse | front, transverse | front, transverse |
| Number and arrangement of cylinders | 4, in a row | 4, in a row | 4, in a row | 4, in a row | 4, in a row | 4, in a row | 4, in a row | 4, in a row |
| Working volume, cubic meters cm. | 1596 | 1596 | 1596 | 1596 | 1596 | 1596 | 1596 | 1596 |
| Number of valves | 8 | 8 | 16 | 16 | 16 | 8 | 16 | 16 |
| Maximum power, l. With. / rpm | 82 (60) / 5100 | 87 (64) / 5100 | 98 (72) / 5600 | 106 (78) / 5800 | 118 (87) / 4750 | 87 (64) / 5100 | 106 (78) / 5800 | 98 (72) / 5600 |
| Torque, Nm / rpm | 132 / 3800 | 140 / 3800 | 145 / 4000 | 145 / 4000 | 154 / 4750 | 140 / 3800 | 148 / 4000 | 145 / 4000 |
| Transmission | manual, 5-speed | manual, 5-speed | manual, 5-speed (automatic, 4-speed) | manual, 5-speed | manual, 5-speed | manual, 5-speed | manual, 5-speed | automatic, 4-speed |
| Drive unit | front | front | front | |||||
| Tires | 175/70 R13 | 175/65 R14 | 175/65 R14 | 175/65 R14 | 195/50 R16 | |||
| Maximum speed, km/h | 167 | 172 | 182 (175) | 185 | 197 | 167 | 180 | 167 |
| Acceleration time 0-100 km/h, s | 13,2 | 12,4 | 11,2 (13,1) | 10,9 | 9,5 | 12,2 | 11,0 | 13,7 |
| Fuel consumption in the combined cycle, l/100 km | 7,4 | 7,0 | 6,8 (7,6) | 6,8 | 7,8 | 7,0 | 6,8 | 7,6 |
| Fuel tank capacity, l | 50 | |||||||
| Fuel type | gasoline AI-95 |
The technical characteristics of the Lada Granta Sedan are indicated according to the manufacturer. The table shows the main parameters: dimensions, engines, gearboxes, drive type, fuel consumption, dynamic characteristics, etc. Please check with official dealers for additional technical information.
Ground clearance (clearance) of a Lada Granta Sedan is the minimum distance between the supporting surface and the lowest point of the car, for example, engine protection. Ground clearance may vary depending on the modification and configuration of the vehicle.
• Options and prices
• Car photos