Good morning everybody.
Noticed this problem that when traveling there is visible light illuminating a rich space.
I don’t know how to turn it off on modern models, but on early LADA Grant models the light was regulated through the trunk lock itself without a limit switch, but despite the size or inclusion of low beam headlights.
In the car I noticed that it was also on almost always, which I warned about. In general, I decided to check whether it turns off completely, otherwise it could discharge the battery to “0”.
I will immediately be pleased that “yes - it goes out.” After turning off the engine, 15-17 minutes after idle time, the light goes out both in the trunk and in the cabin.
I noticed that my car only has one limit switch. Once the alarm is installed, it will work.
Tools:
- 10 mm spanner
- Small flathead screwdriver
Spare parts and consumables:
Notes:
Perform work when replacing a lamp or trunk light.
The lamp is installed in the trunk of the car in a hole in the rear parcel shelf.
1. Disconnect the wire terminal from the negative terminal of the battery.
2. Insert a screwdriver into the left side of the cover, press down on the cover and remove the cover from the hole in the rear parcel shelf.
3. To remove the ceiling, disconnect the cable lugs of the two wires from the ceiling terminals.
4. By pressing the diffuser stop (indicated by an arrow in the photo), separate the housing and diffuser from the ceiling.
5. Remove the lamp from the lampshade and replace it with a new C5W lamp.
6. Install the trunk lighting in the reverse order.
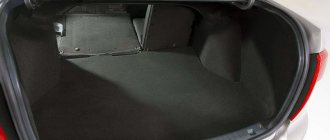
Trunk overview, what is where and where
The basic configuration of the Lada Granta Liftback does not include a remote drive to unlock the doors. In Lux versions, a mechanical button is installed on the key. To unlock the fifth door, just press the button once. Next, lift the lid mechanically by hand. Note that it is not easy, one little finger will not be enough, make an effort. Even when folded, the trunk is spacious and impressive. The perimeter is lined with felt, fleecy material. It serves as both cladding and noise reduction.
Unfortunately, there is no rubber mat on the floor, only fleecy material. If necessary, the owner can independently purchase rubber coating. Lifting the false shelf, in the center we will see a recess for the spare wheel. Moreover, the standard radius of the disks is 14 inches, but you can fit all 16 inches. Convenient and practical, since there is free space. In addition to the full tire, there is a mechanical jack and a wheel wrench. If desired, you can fit a tow rope, which needs to be purchased separately; it is not supplied as standard.
Why the interior light does not work on VAZ 2115 - 2114: main reasons
What to do when the light suddenly goes out in the interior of a VAZ-2114? Many motorists will say - go to an electrician and let him sort it out. But we will try to find the cause and methods of elimination when the interior lighting goes out ourselves.
Why the light in the cabin does not light (main reasons)
Car interior lighting is part of the electrical system, and therefore, in any case, it is worth looking for the problem in this part of the car. Of course, it is recommended to study, at least superficially, technical electrical diagrams in order to be at least a little up to date.
So, what do you need? A detailed diagram of the car's electrical components, a little ingenuity and a minimal set of tools. Let's look at places where the problem may be hiding:
Comparison of trunk size with other brands
| Brand, model | Volume folded/unfolded |
| VolkswagenPassatVariant | 496 / 603 l |
| ŠkodaSuperbCombi | 480 / 605 l |
| SkodaOctaviaCombi | 420 / 588 l |
| MitsubishiPajeroSport | 430 / 590 l |
| Peugeot 408 | 370 / 476 l |
The Grant Liftback's trunk dimensions are not the worst, despite the shortened body. The model successfully competes with many European car brands.
What lamps are installed in the rear lights of Granta Liftback
- Brake light bulb P21W 12V
- Turn signal lamp PY21W 12V
- Tail light - R10W
- Reversing lamp W16W
To replace lamps, we do not need any special knowledge or skills, just “direct hands” and free time.
Instead of conventional lamps, you can install LED ones, but you need to check the functionality of the lamps in the lanterns to see if they will short out due to polarity.
This is interesting: Removing the Lada Granta receiver
Features and disadvantages of the luggage compartment
- To fully fold the rear row of seats into a flat platform, you will need to remove the headrests. Otherwise, they will rest against the back of the front seats. The angle of the seat layout will not exceed 160 - 165°;
- To remotely unlock the rear door lock, you need to press the mechanical key fob button twice;
- Lifting the trunk lid requires a lot of effort; the door is moderately heavy;
- A solid rubber mat on a raised shelf is impractical, since with frequent use of a spare wheel or a mechanical jack, the sides touch the fleecy covering, wearing it out.
How to extend the service life of the door activation sensor using the traditional method
Craftsmen have come up with many ways to resuscitate a rubber cap, prevent it from deforming and freezing. We present the most effective methods:
- insert for the rubber tip of the spring. The diameter of the coil is “6”, the length is 1.0 cm. When the door is opened, the spring pushes the tip to its original position, the contacts close, the interior lighting is activated;
- replacement of standard caps with parts from the second generation Opel Astra. The dimensions are identical, the only difference is in the shape, it is more convex, which contributes to the sensor’s quick response to opening/closing the door;
- systematic application of silicone lubricant to a rubber product to restore elasticity.
What kind of oversized cargo will fit into the trunk of a Liftback?
With the rear row seats folded, the trunk can accommodate four tires with a radius of 14 - 15 inches. Plus, there is space on the sides for storing tools, a tow rope, and a foot pump for inflating wheels.
To transport oversized cargo, within the permissible load, you need to temporarily dismantle the shelf. To do this you need:
- Use a Phillips screwdriver to unscrew two screws on each side at the base.
- Remove the cables from the upper loops.
Owner Tips
- To prevent the false floor covering from wearing out prematurely, buy a composite floor for the luggage compartment. As an alternative, choose Polic from Renault Logan Universal.
- To reduce the noise level from impacts of gravel and stones, install additional sound insulation. The wrapping process is simple and can be done by every car owner. No special equipment is required.
- As standard, the Lada Granta Sedan and Liftback come with two ignition keys: one black, the other black with a red layer. Always keep the latter as it unlocks both the doors and the trunk. If lost, restoration will be quite a troublesome procedure.
Relay block Lada Granta
The relays are located in the same fuse and relay box, located to the left of the steering column under the cover.
K1 - heater fan relay
K2 - power window relay. If they do not work, also check fuse F2, if this does not help, the problem may be in the ECU.
K3 - starter relay. If it does not work (does not spin) and this relay is working, check the battery charge level. It can also be in the winder or ignition switch and its contacts.
K4 - output relay 15 of the ignition switch
K5 - turn signal and hazard warning relay. If the turn signals are on instead of off, this relay may have shorted. Also check fuse F3 (emergency mode").
K6 - windshield wiper relay. Also check fuse F4.
K7 - high beam relay. Also check fuses F14 and F15 and the lamps themselves.
K8 - sound signal relay. Also check fuse F20, steering wheel signal switch contacts.
K9 - low beam relay. Also check fuses F12 and F13 and the lamps themselves.
K10 - rear window heating relay. If the heating does not work, the problem may be with fuse F8.
K11 - engine control unit relay. Also check fuse F1.
K12 - electric fuel pump relay. Also check fuse F21.
Reviews
| № | Positive |
| 1. | Georgy: I bought Grant a Liftback before he retired. Outside the city there is a dacha, a vegetable garden, an orchard. With the onset of spring there is a lot of work, you need to transport equipment and vegetables. In this regard, the machine is simply irreplaceable. My recommendations for gardeners. |
| 2. | Sergey: For our small family of four, the Liftback is just right. Trunk space is good. If necessary, we fold out the back row and transport everything you need. |
| 3. | Vitaly: I’m leaving my positive review about the trunk capacity of the Lada Granta Liftback. By occupation I am engaged in supplying products to retail outlets. The larger the order, the greater the profit. Everything fits. |
| 4. | Georgy: I bought the Lada Granta Liftback not only for the “newness”, but also for the spacious trunk. I often go fishing with my friends, and I can’t do without “good styling.” My recommendations. |
| 5. | Vasily: the family spent a long time deciding whether to buy a Sedan or a Liftback, and ultimately chose the latest modification of the body. |
| 6. | David: I gave preference to the Liftback because of practicality and the ability to transport more things. If necessary, you can spend the night in the cabin by first unfolding the rear row of seats. |
| 7. | Vladislav: I live in a rural area and for me modifying the Sedan body is not practical. You can fit quite a lot in the Liftback, and even more when unfolded. |
| Negative | |
| 1. | Victor: there is nothing special in the trunk, it is too narrow, only 940 cm at the extreme point between the rear glasses. In Renault Logan the dimensions are 15 cm wider. |
| 2. | Vasily: the model is still crude, there are many flaws, poor noise reduction. To eliminate the shortcomings, you need to invest. It’s better to spend a few tens of thousands and buy a Renault Logan. |
| 3. | Igor: I bought a car from a dealership six months ago, there were no complaints. After several tens of thousands of miles, I often visit service stations for every little thing, modifications, and elimination of factory defects. I will sell before it's too late. |
Conclusion The size of the trunk of the Lada Granta Liftback must be given its due. The engineers did a great job, the parameters are higher than a number of European brands: Volkswagen, Skoda, Opel, Seat. Criticism regarding the lack of noise reduction is well deserved; it is a defect of the manufacturer. Considering the low cost of work, you can eliminate the defect yourself.
Trunk light without lights on, blinking additional stop ala F1
Good morning, afternoon, evening or night to everyone who has looked into this BZ!
It so happened that I didn’t really use the trunk (especially in the dark)... And accordingly, there was no need for independent lighting. But yesterday: I was returning from the store late at night, and while unloading bags in a completely dark courtyard, in the rain, the lack of lighting infuriated me so much that measures were already taken today to eliminate this oversight by AvtoVAZ.
I decided to combine 2 innovations and add a blinking additional stop ala F1.
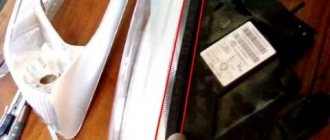
3 clips, and Isofix plugs needed to be removed... well, I also removed the side plastic stands, for convenience.
With the blinking additional stop everything is simple, the connector is installed in the connector.
You can only confuse the polarity with a fool... since the key is used on the plugs.
We've sorted out one device! I can’t show the result in the photo, but I’ll take a video later and add it... I added a video!
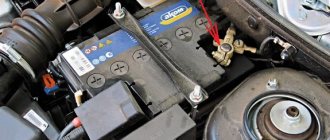
Now trunk lighting! This required a little ingenuity... Using a multimeter, it was determined that +12 appears only with dimensions, and the minus is interrupted by a limit switch when the trunk lid is closed. Conclusion: you need a permanent plus, and you can get it very close, from the power cable of the amplifier for the subwoofer...
Such a product was made. 2 pieces of wire, a 5A fuse, a short end with a tip for the amplifier, a long end for the lampshade (later redone locally and attached to the Wago for additional lighting).
Attention: do not forget about safety precautions and turn off the fuse under the hood!
And the original wire with +12 from the dimensions is insulated with white electrical tape.
Actually, that's all! The light in the trunk now turns on when it is opened, regardless of whether the dimensions are on. The additional stop also now blinks when you press the brake and a little later lights up permanently. Thanks for your attention =)
Source
LED lamps in the rear light
Instead of conventional incandescent lamps, you can also install LED lamps. Their advantages:
- longer service life (subject to the purchase of high-quality lamps)
- brighter light and better visibility in bad weather conditions
- Less current consumption, therefore less load on the generator
Instead of the usual P21W rear brake light, you can install:
P21W Philips X-tremeVision LED lamps or their Chinese equivalents
Instead of the R10W rear marker lamp, you can install this lamp
For reverse, it is better to choose brighter lamps, since the W16W has a socket like the W5W but its power is 16W
How to install 2 din in grant norm or standard
Everything is more complicated here. Need to:
Replacing a single interior lamp
- Pry off the lampshade with a flat-head screwdriver.
- Remove the interior light from the housing.
- Disconnect the wires by squeezing the block.
- Remove the two screws securing the interior lamp housing.
- Remove the housing.
- Installation of the Granta interior light is carried out in the reverse order.
Ignition system wiring harness pinout diagram
1 — oil pressure indicator; 2 — generator unit connector; 3 — throttle valve power supply; 4 — antifreeze temperature sensor; 5 — block of ignition system wire bundles to the block of instrument panel harnesses; 6 — power supply to the adsorber purge valve; 7 — speed sensor (speedometer); 8 — mass air flow sensor; 9 — DPKV; 10 — oxygen saturation sensor; 11 — control controller; 12 — oxygen saturation diagnostic sensor; 13 — ignition coil; 14 — spark plugs; 15 — nozzle control; 16 — blocks of ignition harnesses and injector wire bundles; 17 — detonation control sensor.
How to install 2 din in grant norm or standard
Everything is more complicated here. Need to:
- dismantle the center console trim - unclip the fastenings, move it forward and disconnect the buttons and heater handles;
- cut out a vertical plastic partition that will not allow you to install a 2 din device;
- cut down the plastic casing of the central air duct;
- try on a new acoustic unit, adjust the fastenings if necessary;
- install adapters from the delivery kit on the wiring (if required);
- install the device;
- if we leave the old center console trim: we cut out the partition, try it on, put it in place with the buttons and handles connected, adjust the decorative frame of the control unit, install it;
- if we install a new trim on the console under a 2 din device: we transfer the heater control unit and buttons from the old trim, install them in place, and put a decorative frame on the control unit.
How to maintain ground attachment points
A bad “ground” leads to large-scale failures or “glitches” of the vehicle’s electrical equipment. To prevent this, you should regularly service the attachment points of the “mass”:
- Unscrew the nut and clean the contact surface of the stud with fine sandpaper;
- Check the condition of the wire tips to ensure they are securely crimped and that there is no breakage or oxidation. Clean with sandpaper or replace with new ones;
- Remove dirt with a cloth. Place the wires on the stud, install the washer on top, and then the Grover washer. After this, tighten the nut well (it is better to use new galvanized fasteners);
- Lubricate with Litol or spray with silicone grease.
Let us remind you that we previously published background information for passing the Lada Granta/Kalina maintenance (articles and refueling volumes).