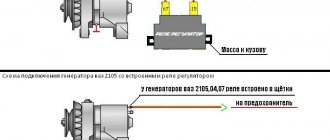
Connection diagram and operating principle
The voltage regulator on most cars is connected to the on-board network according to the diagram below.
The operating principle of a voltage regulator (VR) is the same as that of a relay. In other words, it opens and closes an electrical circuit. That is why the device is also called a relay regulator. It is triggered when a predetermined voltage value coming from the generator changes.
The first regulators had an electromagnetic design. These were real relays. Modern devices are made on the basis of semiconductors. They are small in size, and in addition, they work much more accurately and efficiently. Some of them are even equipped with special alarms that allow the driver to monitor their performance.
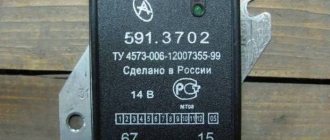
Voltage regulator VAZ-2110
The "tens" launch vehicle also has a semiconductor design. It is integrated into the generator, which allows you to maintain the required voltage directly at the output of the device.
The stock “tens” regulator is available under catalog number 1702.3702. It can also be used in generators of all Samar models.
On new modifications of the VAZ-2110, the voltage regulator may be marked 1702.3702-01. This is a new generation of relays that are manufactured using MOSFET technology, which can significantly reduce output power losses. In addition, these devices are characterized by increased reliability and resistance to overheating.
Technical characteristics of the VAZ-2110 launch vehicle
The voltage regulator relay for the VAZ-2110 generator has the following characteristics.
| Regulation voltage with battery at a temperature of 25°C and a load of up to 3A, V | 14,4±2 |
| Regulation voltage with battery at a temperature of 25°C and a load of more than 3 A, V | 14,4 ± 0,15 |
| Operating temperature range, оС | -45…+100 |
| Maximum output circuit current: standard/agreed with the manufacturer, A | 5/8 |
| Permissible long-term exposure to high voltage, V | 18 |
| Permissible exposure to high voltage for up to 5 minutes, V | 25 |
Signs of LV malfunction
In VAZ-2110 cars, the voltage regulator breaks quite rarely, but if this happens, signs of its malfunction may be:
- Failure of the control panel backlight.
- Exceeding the battery charging voltage.
- Insufficient battery charge voltage.
If the voltage regulator relay of the VAZ-2110 breaks down, the fuses responsible for the safety of the power supply circuit of the instrument panel may blow out. If the backlight lamps do not light up when the ignition is turned on, there is a possibility that the LV is to blame.
The same can be assumed when the voltmeter needle, indicating the battery charge level, deviates from its usual position, i.e., shows higher or lower voltage.
It is this symptom that most often manifests itself when the voltage relay regulator of the VAZ-2110 generator fails. And if in the second case it can only cause the battery to discharge, then in the first it threatens to boil the electrolyte and destroy the battery plates.
How to find out that it is the relay that is broken and not the generator itself
Many people believe that if the battery does not hold a charge, then the problem is in the generator. However, sometimes this can be caused by a faulty relay regulator. To check what exactly is not working, you need to follow these steps:
- Open the hood of the car.
- Start the engine. Put 2 or 3 speed on the gearbox.
- Remove the battery terminal.
Note: this is necessary to ensure that a short circuit does not occur in the system.
- If after this the machine still works, then the relay is faulty. But if the car stalls, then the reason is still in the generator.
Advantages of a three-level relay
The voltage regulator is mounted on board the machine, while the generator brushes and panel are mounted directly into the generator. Thanks to these three levels, the battery will remain charged for a long time, and its service life will increase significantly. These levels are:
Note: this level is required in the summer.
- Level "norm". Allows the machine to operate under normal conditions.
- Level "maximum". Necessary for using the machine even at sub-zero temperatures. At the same time, the car will be able to start even with a discharged battery.
How to check the pH on a VAZ-2110 without removing it
If you find at least one of the listed signs, do not be lazy to check the voltage regulator on your VAZ-2110. This procedure will not take more than 10 minutes. To do this, you will need a voltmeter or multimeter turned on in its mode, as well as an assistant. The verification procedure is as follows:
- We start the car engine and warm it up to operating temperature.
- Without turning off the engine, we connect one voltage probe of the generator, and the second to the “ground” of the device.
- We ask the assistant to turn on the low beam headlights and press the accelerator pedal, keeping the speed at 2000-2500 thousand rpm.
- We measure the voltage with the device.
For the VAZ-2110, the voltage regulator should produce 13.2-14.7 V. This is the norm. If the voltmeter readings differ from those shown, diagnostic measures should be continued.
Checking the generator relay on a car
Replacing the VAZ 2110 generator regulator relay
However, before proceeding with the replacement, you need to check whether the problem is really with a faulty relay. In this case, it will be checked directly on the car. To do this, you must:
- Take a voltmeter with a scale of 15-30.
- Turn on the engine.
- Turn on the headlights (see Replacing headlights on a VAZ 2110: do it yourself).
- The motor must run for at least 15 minutes.
Note: you can turn on speed 2, but it is best to turn on speed 3, since this will use a little less gasoline. And the result will be achieved much faster.
- The voltage must be measured between the “B+” terminal and the generator ground. However, it should not be less than or more than 13.2-14.7 V.
- Replacing the relay is necessary if both undercharging and overcharging are observed.
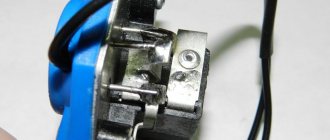
Checking the removed relay
Replacing the regulator relay on a VAZ 2110 generator
It is advisable to check the relay together with the brush holder, since in some cases problems arise due to poor contact between the relay and the brushes. To check the regulator after removing it, you must:
- Turn on a 12 V lamp between its brushes.
- First, connect a power source with a voltage of 12 V to the “D+” relay terminal. If the relay is faulty, the lamp will light up.
- Then you need to take a more powerful current source - 15-16 V. If the relay does not work correctly, the light will go out.
Note: The lamp may be on or off in both cases. If it lights up in both places, it means there are breakdowns in the regulator. At the same time, if the light does not light, then there is no contact between the brushes, which can result from a broken wire.
Capacitor check
Generator relay VAZ 2110
By the way, many people confuse a faulty relay with a faulty capacitor (see Changing the capacitor (VAZ 2110 generator)), since the “symptoms” are quite similar. Thus, if after checking the relay, it is clear that it is fully operational, but the voltage generator is not working well, then you need to check the capacitor. It protects all electronic equipment from voltage surges. To check its operation, you should:
- Turn on the radio. If there is interference in its operation, then all is not well with the capacitor. The engine must also be turned on.
- You can check its serviceability using a megger or tester. When connected to a capacitor, the needle should quickly move to the side and then slowly return to its original position.
Checking the removed voltage regulator
To make sure that it is the LV that has failed, and not the generator itself, it should be checked separately. To do this, you will need to disconnect it from the main device. The procedure is as follows:
- Remove the negative terminal from the battery.
- We find the place where the launch vehicle is attached to the generator. Unscrew the 2 screws that secure it.
- Disconnect the yellow wire going from the regulator to the generator.
- We dismantle the launch vehicle.
To diagnose the device, you will need a power supply with the ability to adjust the output voltage, a light bulb (12 V) with a socket and a pair of wires. The verification algorithm is as follows:
- We assemble a “control” from a lamp and wires and connect it to the regulator brushes.
- Set the voltage on the power supply to 12 V.
- We connect the “plus” from the power supply to the “D+” terminal of the regulator, and the “minus” to its “ground”.
- We look at the lamp: it should be lit.
- We increase the voltage on the power supply to 15-16 V. If the regulator is working properly, the lamp should go out. If this does not happen, the LV must be replaced.
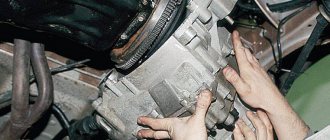
Dismantling
To disassemble, remove and repair or replace the generator, you will need to do the following.
- Drive onto an inspection hole or overpass to have access to the bottom and engine compartment.
- Remove the battery, otherwise it will not allow you to get to the nut that holds the generator you are looking for.
- Next, the same nut and adjustment bar are removed. Here you will need a 17 mm wrench. Use an extension cord. This will make the task easier; you will have to apply less force to unscrew the fastener.
- In the engine compartment, remove the shield that performs dirt protection functions.
- Now the drive belt is removed and the wires are disconnected.
- Be sure to remove the protective cap and use a 10mm wrench to unscrew the nut that holds the tip and positive cable of your battery.
- There is another nut on the fixing bracket, which will also have to be unscrewed.
- That's it, you can remove the generator. Just remember to pull out the long bolt first.
- When removing, keep an eye on the buffer sleeve. It won't be good if you lose it.
Dismantling works
This completes the procedure for removing the generator. You can proceed with partial repairs or complete replacement of the unit.
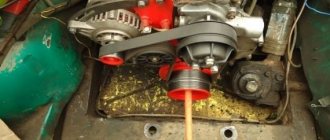
Belt
Often, the solution to a poorly functioning alternator is simply adjusting the belt.
Belt
- For the device to work effectively, it is necessary to ensure normal deflection of the belt;
- The deflection size should be 6-10 millimeters with a force of 98 N or 10 kgf;
- To adjust or replace the belt, you need to move the generator slightly to the side, towards the cylinder block;
- By rotating the adjusting bolt, you can adjust the belt tension.
Three-level voltage regulator VAZ-2110
Now let's go back a little. If you discover a faulty LV and decide to replace it, do not rush to buy a stock device. There is a good alternative to it - a three-level regulator. How is it different from the usual one? It allows you to regulate the output voltage depending on the air temperature, thereby optimizing the load on the battery.
Modes are switched using a toggle switch in the following ranges:
- 13.6 V (minimum) – for operation at temperatures above +20°C;
- 14.2 V (normal) – from 0°C to +20°C;
- 14.7 V (maximum) – for operation at temperatures below 0°C.
The three-level voltage regulator VAZ-2110 consists of two parts: the pH itself and the brush holder. The latter is installed directly on the generator and is connected to the former using a wire. The regulator, equipped with a toggle switch, is attached to the car body in the engine compartment in a convenient place. You can install the launcher yourself using the instructions that come with it.
How the device works
Three-level regulators are able to fulfill almost any conditions that are necessary for a battery to charge efficiently, and the overall network voltage does not drop, but only stabilizes. There is nothing complicated in its design, since it is the same regulator, only three pieces, with a special electronic control mechanism that can take into account very important things:
- Battery condition.
- Its charge level.
- Load on the battery.
- Ambient temperature.
- Number of engine revolutions.
Based on this data, the device can independently set the optimal charging voltage for the battery without depriving other consumers, which is very important in winter and in the dark.