- Basic rules for checking
- Pour oil into the variator
- Changing the oil in the jf015e variator (prices, articles, volumes)
- Changing the oil in the gearbox (manual and robotic gearbox) of the Lada Vesta (lada vesta)
- Replacing the fine filter
- Why do you need to know the amount of oil?
- How to check the oil level in a variator - step-by-step instructions
- When to change the oil in the variator
- Underfilling or overfilling of oil in the variator - consequences
- Is it necessary to flush the Lada Vesta gearbox?
- Features of checking the oil level in the variator for different car brands
- Preparation
- Consequences of overfilling and underfilling oil
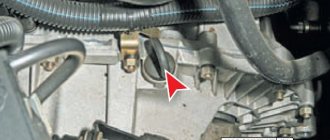
- Drain hole in the crankcase
- Factors that increase lubrication levels
Basic rules for checking
Where should you start? First of all, you need to familiarize yourself with three simple rules, without which the results will be false.
- The engine oil level is checked using a special engine oil dipstick, which is available on any car. It is impossible to measure liquid with homemade probes or other devices not intended for this purpose: firstly, wooden or plastic materials may break in the engine compartment, and getting them out of there will be very problematic, and secondly, the marks on such a probe may not be in the correct location.
- Correct checking of the engine oil level is carried out only on a level area where the car will not stand at an angle. This could be the floor of a garage, workshop, or just asphalt next to the house. The main thing is that the car is not tilted.
- Checking the engine oil in the engine must be done while wearing work clothes and gloves. If you don’t want to leave dirty marks on your favorite things or get a skin burn, then it’s better not to neglect this rule.
Finishing stage
After filling the oil, you need to tighten the filler cap and start the engine, allowing it to idle for about 2 minutes.
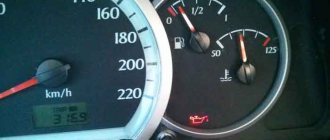
Finally, the oil level in the Lada Vesta engine is checked with a dipstick.
At this moment, you need to monitor the dashboard - the emergency oil pressure indicator should go out and there should be no drops in the area of the drain hole. If everything is normal, the engine should be turned off and left for 5-10 minutes so that the oil has time to drain into the crankcase.
The correct oil level is to the end of the grille on the dipstick.
Then you need to check its level with a dipstick - if it is not enough (the oil should reach the top of the network area on the dipstick), you will need to top it up to the specified level.
This completes the procedure for changing the oil in the Lada Vesta engine.
The presented videos clearly demonstrate the process of changing the engine oil and oil filter in a Lada Vesta on an overpass and in a garage pit. In addition, in all cases there is an extremely inconvenient position of the oil filter, which is difficult to remove even with a special tool.
>
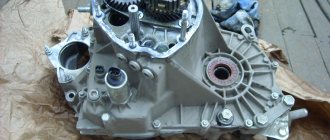
Pour oil into the variator
Reassembly first:
1. Install a new gasket on the pan, install the pan with the gasket on the gearbox and tighten the fastening bolts without tightening. Before installation, lubricate the threaded part of the bolts with transmission oil (ELFMATIC CVT transmission oil, consumption rate 1 g, replaceable head 10 knobs).
2. Finally tighten the pan mounting bolts in the sequence shown in Figure 17-4. Bolt tightening torque 5…7 N.m (0.5…0.7 kgf.m) (replaceable head 10, extension, torque wrench).
3. Install the engine splash guard.
4. Connect the earth wire terminal to the battery.
Add oil:
1. Lower the vehicle.
2. Remove the oil level indicator from the gearbox and fill approximately 2.6 liters of transmission oil through the indicator hole (corresponds to the “Cold” control area on the oil level indicator at an oil temperature of 20º...30ºС) (filling unit S-223-1 for transmission oils, transmission oil ELFMATIC CVT).
3. Connect the earth wire terminal to the battery.
4. Bring the oil level in the gearbox to normal in accordance with the requirements of the section “Checking the oil level in the gearbox.”
5. Check the condition of the oil. If the oil is still dirty, you need to change the oil again.
6. Inspect the gearbox for signs of oil leakage and, if necessary, correct the comments.
Have you ever had to change the oil and filters in the variator yourself?
Flushing the gearbox
Not all car enthusiasts share the opinion that it is necessary to flush the transmission when changing the fluid. The manufacturer does not directly indicate the need in the operating instructions, but implies this procedure.
Service station technicians advise flushing the transmission constantly, especially if maintenance deadlines are not met or if there is long-term operation. The transmission oil changes color to dark, metal particles and waste products appear in the composition.
The flushing process is similar to replacing fluid in a manual transmission:
- We place the machine on a hydraulic lift and drain the waste.
- Through the control hole, fill in a volume of 1.5 liters of flushing, no more.
- We start the engine, engage first and second gear for 10 - 15 minutes.
- We drain the waste and fill in new oil.
Changing the oil in the jf015e variator (prices, articles, volumes)
September 11, 2022 Lada.Online 22,075
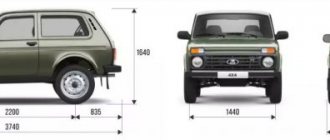
Currently, the continuously variable automatic transmission (CVT or CVT) JF015E is installed on the Lada Vesta and Lada XRAY family of cars. It is also used on some models of Mitsubishi, Nissan, Renault, Suzuki, Chevrolet. The manufacturer indicates that this variator does not require special scheduled maintenance and the gear oil is designed for the entire period of operation (120,000 km or 8 years of operation). However, to extend its service life, experts recommend changing the oil in the variator every 40,000 km. We find out what is needed to change the oil in the variator and how much this procedure costs.
Types of oil changes in the variator:
- Partial oil change. The pan is removed, the magnets are cleaned, the coarse and fine filters are replaced, as well as the oil (about 4 liters). It is recommended to carry out every 40 thousand km. mileage
- Complete replacement. Performed after rebuilding the variator. You will need about 7 liters of oil.
- Hardware oil change in the variator. This cannot be done without removing the tray and cleaning the magnets. Otherwise, metal shavings (the main problem) will scatter throughout the entire unit.
Note: Prices in the table are from electronic catalogs. It is worth considering that the cost of materials may vary. For example, the cost of 1 liter of NS-3 oil at the LADA dealership is about 2,200 rubles.
For example: A partial oil change in a variator at the official LADA Tekhinkom dealership in Khimki will cost:
- 4 liters of oil – 8800 rub.
- work – 990 rubles
Total: 9790 rub.
The cost of filters is for some reason not included (watch from 11:27):
How much did you spend on changing the oil and filters in the variator on a LADA car?
DBP and DTV
Absolute pressure sensor and air temperature sensor (article 21150382821003). Informs the ECU about the amount of air consumed in order to adjust the enrichment of the combustible mixture in the combustion chamber.
Installed on the air pipe manifold. Resource – 90-100 thousand km. Cannot be repaired.
- the engine is unstable at idle speed;
- passive acceleration dynamics.
Changing the oil in the gearbox (manual and robotic gearbox) of the Lada Vesta (lada vesta)
The procedures for changing oil in manual and robotic gearboxes are almost identical.
A manual transmission, as well as a robotic one (AMT), is filled with transmission oil, which is designed for a service life of 180,000 km of vehicle mileage or 5 years of vehicle operation (depending on which comes first). Also, replacing or draining the oil may be required during various repair operations.
Note: Behind the Wheel magazine, referring to the operating conditions of the car in Russian conditions, advises changing the oil every 60 thousand km.
If there are signs of a malfunction (oil leakage, non-functional noise, etc.), you must immediately contact your LADA dealer to identify its causes and, if necessary, eliminate it. Operating a vehicle with a faulty gearbox is not allowed.
Fill the manual transmission and AMT with gear oil of the API GL-4 group. Oils with viscosity SAE 75W-80, 75W-85, 75W-90 can be used at ambient temperatures not lower than -40°C, with viscosity SAE 80W-85, 80W-90 - at temperatures not lower than -26°C.
for gearbox 21827 – 2.25 l
Volume of oil to be filled: in manual transmission and AMT (VAZ) - about 2.2-2.3 liters; in JH3 gearbox (Renault) - about - 2.8 liters. (the reference value is indicated. In fact, the level should be along the lower edge - see below)
See also Operating fluids
Side view of a VAZ gearbox: 1 – filler plug; 2 – drain plug
Transmission oil level dipstick
It is known that previously VAZ gearboxes were not equipped with a dipstick to measure the oil level, but a plug was installed in its place, and even earlier, a speed sensor was installed.
Stub
However, starting from 2022, an oil dipstick began to be installed at the gearbox, which can be purchased separately and installed instead of the plug.
Gearbox dipstick article number – 8450038501
Change of oil
1. Remove the engine splash guard.
2. To check the oil level and add oil, unscrew the filler plug, placing a container in case of oil leakage.
Renault gearbox filler hole
About the replacement process
The first engine oil change should be carried out every 1.5–2 thousand kilometers. The lubricant filled at the factory is intended only for the engine break-in period. The second and subsequent replacements offered by AvtoVAZ should be made every 15,000 km. However, experience and expert advice boil down to the fact that it is better to add new lubricant after 8-10 thousand. The savings here are insignificant, but the engine will always be grateful to its owner for this.
Changing the oil in a Lada Vesta engine should ideally be carried out by car service professionals. But this procedure can also be done by an ordinary motorist. Follow the step-by-step instructions and you will succeed:
- Open the hood and unscrew the tank cap;
- Unscrew the drain plug on the engine casing;
Change of oil - Drain the contents into a previously prepared container;
- We disassemble the old oil filter to replace it with a new one;
Important! The Lada Vesta oil filter is installed in a rather inaccessible place. In this regard, it is recommended to replace it with a special key. Before installing a new filter, it is recommended to lubricate the O-ring (a new one is suitable for filling into Vesta or already used oil).
According to the manufacturer, the oil volume in the Vesta engine is 4.4 liters (with a manual gearbox) and 3.2 liters (with a robotic gearbox).
Under normal operating conditions and in the absence of force majeure situations, changing the oil in a Lada Vesta car is the most frequent and very important part of maintenance.
The first oil change in the Vesta manual transmission, according to AVTOVAZ recommendations, should be done after 75,000 km or five years of operation (whichever comes first).
The correct choice of oil and accurate execution of the operation itself is a guarantee that the machine will serve you for a long time and will not bring unpleasant surprises. I hope this article did not leave any open questions, and therefore was useful.
Every car enthusiast should be able to monitor the oil level and know how to check it, especially in cases where a long trip is planned. With the required amount of oil in the engine, friction between parts decreases, so questions about what level should be on the dipstick remain very relevant. After all, regular and properly performed oil checks will help keep important car parts in good condition for a longer period.
Replacing the fine filter
Removal:
1. Remove the left front wheel.
2. Remove the left side mudguard of the front fender.
3. Disconnect block 1, Figure 17-8, of the wiring harness from the gearbox control connector and install a technological plug on the connector. To disconnect the block from the connector, you must turn the locking ring of the block counterclockwise until it stops (technological plug).
4. Unscrew bolt 3, turn filter housing 2 counterclockwise, and remove the fine oil filter housing (replaceable head 10, extension and knob).
Figure 17-8 – Removing the fine oil filter: 1 – wiring harness block; 2 – fine oil filter housing; 3 – bolt
5. Remove filter element 1, Figure 17-9.
Figure 17-9 – Removing the fine oil filter: 1 – filter element; 2 – fine oil filter housing; 3 – sealing ring
Installation:
1. Install a new filter element 1 into the gearbox, Figure 17-9.
2. Install a new sealing ring 3 on the filter housing 2 and lubricate the ring with transmission oil (ELFMATIC CVT transmission oil, consumption rate 1 g).
3. Install the filter housing into the mounting hole, turn it clockwise until it stops and tighten the fastening bolt. Bolt tightening torque 6…8 N.m (0.6…0.8 kgf.m) (replaceable head 10, extension, wrench, torque wrench).
4. Remove the technological plug from the gearbox control connector and attach block 1, Figure 17-8, of the wiring harness to the connector.
5. Install the left side mudguard of the front fender.
6. Install the left front wheel.
Why do you need to know the amount of oil?
Checking the engine oil level should be carried out 1-2 times a week. But why is this being done? The thing is that during operation, the car engine experiences heavy overloads: all the mechanisms inside it move at enormous speed and rub against each other.
The contact of metal elements increases the temperature of the working unit and has a destructive effect on it. In order to soften friction and lower temperature, oil is poured into the engine compartment. Thanks to its unique composition, it provides all working components with a thin protective film that protects them from deformation and wear.
Over time, gaskets and seals can fail and allow lubricant to leak from the engine compartment. A decrease in its level will cause a shortage of material to provide the film of the required thickness. Some of the mechanisms will remain “unprotected”, and, therefore, will begin to be subjected to high friction forces.
How to properly replace the oil filter?
It is not difficult to replace the MF correctly in the Lada Vesta SV Cross, following simple rules. Before installing a new MF, it is necessary to check the pressure of the bypass valve. This information is written on the body of the equipment.
Oil filters for many cars are compatible in terms of mounting threads, but the pressure varies. If you put an MF with a pressure of 1.5 bar into the system, where the valve should open at 1.7 bar, then the efficiency of the filtration process will be sharply reduced. As a result, oil will constantly flow.
It is also worthwhile to inspect the landing surface under the MF. There should be no burrs on it. If they are, you should remove all defects using sandpaper. Otherwise, the oil will flow as well as in the previous case.
The third recommendation is that the filter needs to be firmly screwed into place.
It should not be unscrewed under any circumstances. But you shouldn’t squeeze with all your might either. So there is a possibility of damage to the gasket or breakage of the threads from the MF.
Recommendations for choosing a new filter
The new oil filter must meet the temperature conditions of the engine, a high level of purification of oils with different viscosities, and the ability to retain solid particles with different structures. It must also have chemical resistance to aggressive environments.
The product body must have sufficient strength, a high-quality sealing edge and valve. It must be certified. Have appropriate tightness and quality workmanship of parts.
Preparing tools and supplies
To install a new oil filter, you need to take:
- chain puller;
- head at “10”;
- hexagon on “8” and “17”;
- new oil cleaner;
- a rag;
- an empty container for draining waste material;
- synthetic motor oil;
- flashlight (if necessary).
You may also need step-by-step filter replacement instructions.
Step-by-step change process
To install a new MF, you must perform the following steps:
- Secure the rear wheels with wheel chocks for safety purposes;
- Warm up the car engine to operating temperature and turn it off;
- Remove the metal protection from under the bottom of the car, unscrew thirteen screws along the car perimeter;
- Clean the bottom plate from dirt and oil;
- Unscrew the drain plug using an "8" hexagon, drain the waste oil into a prepared container (4 liters in total for manual transmissions and 3 liters for automatic transmissions), screw in the plug;
- Using a chain puller, twist the cleaner, wipe the perimeter from oil and dirt;
- Pour 120 milliliters of oil into the new MF, put the cleaner in the place where it was;
- Tighten gently, with moderation;
- Pour oil into the part of the filler neck of the valve cover, depending on the type of gearbox (the quantity indicated above);
- Start the engine and look at the dashboard indicator (there should be no symbols).
Note! At the end, be sure to check if there are any smudges or lubricant leaks. Carry out a control measurement of the oil level.
[pp_youtube src=»https://www.youtube.com/embed/wo7RiqcErvA» ]
How to check the oil level in a variator - step-by-step instructions
Below is a test method without a dipstick. It is suitable for cars that do not have this part. For models from different manufacturers, the sequence of actions is the same.
First, place the car on a flat surface without a slope and start the engine.
Then you will need to run the gearbox in all modes. It is recommended to hold the selector for 5 seconds in each mode - in reverse, neutral and drive. As a result, the liquid will be driven through all channels of the box. Next, the lever is switched to neutral mode and the brake is pressed.
The fan should operate at least twice. When the box warms up to operating temperature, it will be possible to check. You need to make sure that the liquid is heated to 35-45 degrees.
A pan is placed under the car into which the oil will drain. The variator plug is unscrewed with the engine running and warm. It is important to wait for the liquid to drain.
Only drops should remain. Then the level will be set.
Then the plug is tightened again. If you pour the liquid from the container into a canister, you should get from 3.2 to 4 liters. When more than 4.5 liters remain after draining, this means that the quantity has been exceeded.
Checking the level using the dipstick is even easier. Manipulations are carried out with the engine warmed up after the trip. The temperature of the variator in this case will be about 74 degrees.
Then you need to open the engine compartment and find the dipstick.
Now you can pull it out and wipe it with a dry cloth or gauze.
Next, the dipstick is put in place and after a few seconds it is pulled out. You need to see to what level it is colored with liquid.
It is important to pay attention to the tip of the probe; marks are applied to it. There should be marks on the relief part in the form of a mesh. They will allow you to understand at what level the oil should be.
If the substance is dark in color, it will not be difficult to see to what point it has colored the dipstick. When the liquid is clear, you have to do it by touch. If you run a cloth over the surface, it will begin to become saturated with oil in the place where it is applied.
At the end of the procedure, turn off the engine and put the selector in parking.
There is a third method in which you need to turn off the engine, which is warm after driving. According to the instructions for Honda Airwave cars, measurement is carried out 1-1.5 minutes after stopping the engine.
After the specified period of time has passed, you can pull out the dipstick. Wipe it dry with a cloth and put it back. Next, they are taken out again and the amount of liquid is determined by the holes made. The oil should reach the level between the middle and top holes.
The third option for determining the level yourself is to check it cold. In this case, with the engine turned off, take out the dipstick and check. On a cold engine, the level should be above the lower mark, but slightly below the middle mark. However, this method is not usually used. This is due to the fact that the measurements will have a large error.
Reviews
| № | Positive |
| 1. | Peter , 33 years old (drive2.ru) Sverdlovsk: the car is three years old, I bought it from scratch, I drive it with the original oil. The instructions recommend replacement at 75,000 km. I won’t keep it up, I’ll update it at 60,000 km. |
| 2. | Mikhailovich , 45 years old (prom.ua), Krasnodar: the car is a year and a half old, at the next maintenance they opened the manual transmission plug and checked the oil. The liquid is clean, there is no need for “renewal”. |
| 3. | Alexander , 35 years old (autotoday.com), Omsk: I heard a lot of negative reviews about the quality of transmission oil and the timing of replacement on Lada Vesta. My mileage is 60,000 km, the condition is good, of course the cloudiness is visible, but not so critical. |
| 4. | Kirillovich , 46 years old (rozetka.ua), Rostov-on-Don: the first time I filled in new fluid only at 70,000 km. It was a little dirty, there were shavings in the sediment. I filled it up with Lukoil, I’m thinking of driving 60-70 thousand km. |
| 5. | Vladimir Vyacheslavovich , 45 years old, Kursk (avtoflit.com): at every scheduled maintenance I check the fluid level in the transmission, the condition and quantity are normal. I hope to drive at least 75,000 km before replacement. |
| 6. | Gennady , 34 years old, Voronezh (autotoday.com): I read that a resource of 75,000 km is too large for domestic transport, so I updated it to 50,000 km. I am sure that I did the right thing and did not violate anything. |
| 7. | Petr Vasilievich , 47 years old, Ufa (drive2.ru): I took the car second-hand, in perfect condition from the previous owner. Despite the low mileage, only 50,000 km, I immediately changed the oil, including the transmission oil. |
| 8. | Sergeevich , 48 years old, Bashkortostan (drive2.ru): the car is three years old, has not carried out any work, only scheduled technical inspections. After winter I plan to replace the fluid in the box, better before the deadline, I think it won’t do any harm. |
| Negative | |
| 9. | Alexey Dmitrievich , 51 years old (prom.ua), Saratov: The Lada Vesta disappointed me a little, the oil in the box darkened already at 7000 km. I don’t know what caused this; the service station did not find an explanation. I plan to replace it myself. |
| 10. | Peter , 47 years old, Moscow (avtoflit.com): after buying a car from the dealership, he refused domestic oil, drained it, and filled it with Shell. The quality of our manufacturer is still far from perfect, so I use global brands. |
| 11. | Boris Valerievich , 49 years old, Voronezh (drive2.ru): I bought a car with a robotic gearbox, the replacement interval is not indicated in the instructions at all. This is not correct, since each mechanism, each liquid is designed for a specific service life. |
| 12. | Georgy Semenovich , 47 years old, Pskov (autotoday.com): drove 3000 km on factory oil, after which he drained it to replace it with a new one. Despite the short mileage, the liquid was already contaminated with sediment. |
When to change the oil in the variator
When topping up, the selected liquid must be compatible with the old one. If an incompatible composition is used, a replacement must be made as soon as possible. Even the product recommended by the manufacturer cannot last forever. Replacement must be carried out every 20-30 thousand kilometers.
There are other data as well. Some experts advise changing the oil after 45,000 miles. This is approximately equal to three years of operation of the machine. However, it is worth taking into account the frequency and intensity of the car’s operation - frequent long-distance trips, rough driving style, driving on bad roads, etc.
Over time, the oil becomes contaminated and loses its properties. But the car owner can determine the purity of the poured composition on his own. To carry out the manipulations you will need the following tools:
- dropper;
- ordinary household scissors;
- twenty cc syringe.
The probe is applied to the dropper hose and its length is measured. Usually it is about 70 centimeters. You need to cut the hose with scissors. It is important that it is slightly longer than the probe. The hose must be straightened and placed on the syringe without a needle. After this, it is lowered into the hole from the probe.
Liquid is drawn into the syringe.
If the old oil is heavily contaminated, it will be much darker than when filled. To verify this, you need to compare the old product with a new one of the same brand.
Service station specialists recommend that before purchasing a used car with a CVT, you must check the condition of the oil. In a car, even without special diagnostics, you can detect symptoms of a lack of fluid:
- The car does not accelerate or cannot move at all.
- At idle, strong vibrations emanating from the engine are felt.
- In the first seconds of the journey, the car makes a jerk.
Sometimes it turns out that a larger amount is filled. In this case, it becomes difficult to change gears. When the lever is in neutral, the machine can move. If there are concerns that the cause of the problem is an incorrect fluid level, it is better to make a diagnosis.
Overview, control diagram, articles
Control over the operation of the vehicle, its components and assemblies is carried out by sensors. The devices transmit readings online to the electronic control unit for interpretation and response. If a discrepancy is detected by the latter, the “Check Engine” indicator appears on the dashboard. The driver makes a decision based on the data received.
Underfilling or overfilling of oil in the variator - consequences
Operating a CVT with insufficient oil level can lead to serious damage. Of course, if there is a lack of fluid, the transmission can automatically go into neutral mode. But in any case, metal particles will pass through the oil pump.
In the future, the pump may become unusable, followed by the variator. And it is unknown when the breakdown was discovered. It happens that the pump breaks down after just a few months, and the box is replaced under warranty. But quite often the mechanism is damaged after a few years, when the warranty period expires.
After checking, it may turn out that the fluid does not reach the required level. In this case, it is necessary to add oil and not operate the gearbox in this condition. Otherwise, it may require repairs or fail in the future. When replaced, the cost of a new CVT will be more than 100 thousand rubles. It is necessary to top up even with the slightest deviation of 2-3 millimeters.
With a warmed-up variator, the acceptable parameter is a level 1 millimeter above the upper mark. If the amount of liquid is greatly exceeded, it will begin to foam. In this case, when checking, foam will be detected on the dipstick. It is better to drain the excess, otherwise the problems described below in the operation of the car are possible.
When standing with the brake on in mode D, a sharp drop in revolutions is observed. Then, after the click, the speed increases again. Then they fall again, and everything starts again. When trying to move, there will be a strong jerk forward. Only draining the excess oil will completely get rid of the problem.
The reason for exceeding the normal level by several centimeters may be the ingress of antifreeze. This problem occurs when the radiator is damaged. With this breakdown, the liquid is often colored, and slipping may occur when the speed increases.
Don't be alarmed if there is too much oil, the problem is easy to solve. It is enough to take the hose from the dropper and connect it to the syringe. Using this device it will be easy to pump out excess. It is also important to ensure that no dirt gets on the dipstick. The slightest speck will act as an abrasive and gradually destroy the mechanism.
Is it necessary to flush the Lada Vesta gearbox?
If you follow all the rules for operating the car, flushing the Lada Vesta gearbox will not be required. This procedure may only be required in the following cases:
- After running in the gearbox. You can remove the effects of break-in by simply replacing the lubricant. But if you do additional flushing, the crankcase will be much cleaner and, if not 100%, then 90% clear of old oil and chips.
- It is also a good idea to flush when changing the brand of engine oil. The fact is that different manufacturers use their own set of additives, which can enter into a chemical reaction with additives in other brands of oils. The result of this reaction is a residue that interferes with the normal functioning of the lubricant.
- The last and most appropriate use for flushing is the accidental use of counterfeit oil. If unsuitable or low-quality oil was poured into the box, flushing may be required.
You cannot use aggressive washes again. The fact is that they lift old dirt from the parts, which is not removed through the drain plug.
As a result, contamination or deposits, which could have stood in one place until the transmission was repaired, will circulate through the mechanism and cause harm in every possible way, scratching parts.
A world of friction-reducing
The most popular groups of oils used for passenger car engines:
- Mineral;
- Semi-synthetic;
- Synthetic.
The difference between them is their origin. The former are obtained directly from oil. The latter are an intermediate link between a set of artificially obtained and natural and improved additives. Still others are the result of a complex synthesis of additives and plasticizers to reduce friction at any temperature.
Synthetic lubricants have a viscosity that mineral lubricants cannot impart to an engine. In addition, it is better to fill a 16-valve engine with “non-mineral water”, since it is more stable in chemical composition, which allows you to increase the period between replacements. Synthetics are also supported by their high isothermal properties. Therefore, the temperature range for using synthetic lubricant can vary from minus forty to plus fifty. Mineral products at extreme temperatures in this range will freeze or become hazardous motor fluids.
Features of checking the oil level in the variator for different car brands
A CVT usually has a dipstick that can be used to determine the amount of oil. It has a twisted shape, with marks under the lower curl. Often the risks are round slits. But some manufacturers use letter designations indicating the minimum and maximum permissible levels.
The dipsticks of most cars, such as Mitsubishi or Honda, have Hot and Cold marks. They are often located next to round slots. When checking on a hot engine, the oil should be at about. If the level is measured with a cold engine, then the liquid should reach the “Cold” mark.
If there is no dipstick, checking is still possible. When diagnosing boxes of this type, it is necessary to unscrew the liquid level button. It should not be confused with the second plug used for filling. To accurately interpret the results of determining the amount of fluid in the CVT, you can use the table:
| Determining the oil level in the variator using a dipstick and without a dipstick | |||||||
| Verification method | Type of marks on the dipstick* | ||||||
| By dipstick | Hot and Cold marks | Two round slots | Three round slots | Hatching | Min and max marks | ||
| Normal level | Normal level | Normal level | Normal level with warm engine | Normal level with warm engine | |||
| with warm engine | oil at HOT mark | with warm engine (hot zone) | the oil is in the shaded area, slightly above the top slot | with warm engine (hot zone) | the oil is located in the shaded area - from the middle to the top slot | oil on shading | oil between min and max marks |
| with cold engine | oil at Cold mark | with cold engine (cold zone) | oil is between the slots | with cold engine (cold zone) | the oil is between the lower and middle slots | ||
| Exceeding level | Exceeding level | Exceeding level | Exceeding level | Exceeding level | |||
| with warm engine | liquid is 1-2 cm or more above the mark | with warm engine (hot zone) | oil above the hatch and well above the second slot | with warm engine (hot zone) | liquid above the top slot | liquid above hatching | oil above max mark |
| with cold engine | with cold engine (cold zone) | liquid above the top slot | with cold engine (cold zone) | oil above middle slot | |||
| Low level | Low level | Low level | Low level | Low level | |||
| with warm engine | liquid below the mark by 1-2 cm or more | with warm engine (hot zone) | oil near the bottom slot or below | with warm engine (hot zone) | oil below middle slot | oil below shading | oil below min mark |
| with cold engine | with cold engine (cold zone) | liquid below the bottom slot | with cold engine (cold zone) | liquid below the bottom slot | |||
| Without dipstick (oil drain through plug) | Normal quantity | Exceeding the norm | Lack of oil | ||||
| 3.2-4 liters | more than 4-4.5 liters | less than 3.2 liters | |||||
Other VAZ cars
Let's look at how to check the oil level on VAZ series cars using the example of the VAZ 2112 and Lada Priora 16 valves.
Level measurements on these vehicles are carried out only on a warm engine. The probes here have a special appearance - a corrugated area with marks along the edges without letters.
Therefore, if the engine is cold, you will have to start it and warm it up until the fan turns on.
Then turn off the engine, wait 3-5 minutes until the oil drains into the crankcase and take measurements, see the algorithm above.
Since the dipstick itself between the marks has a corrugated shape, this causes a problem for many drivers.
Everything is simple here - the working fluid must be in the grooved zone, then the level is considered normal. But where this place should be, opinions differ.
Experienced drivers recommend proceeding from the operating conditions of the vehicle.
If the VAZ 2112 and Lada Priora are operated under normal conditions on flat terrain, then it is considered normal if the oil level is in the middle in the corrugated zone.
If cars are driven on moderately rough terrain, then the normal level may be 2/3 from the bottom mark in the corrugated zone, and if in mountainous terrain, then 3/4.
Also, many experienced car owners rely on the number of engine revolutions.
If during driving the number of crankshaft revolutions does not exceed 3000 rpm, then the oil level can be kept in the middle, if more than 4000 - at 3/4 of the lower mark. Filling 1 liter means raising the level from the lower to the upper marks.
Preparation
The machine must be placed on a flat, non-sloping surface. It is recommended to check the engine after it has cooled down. One of the arguments in favor of this is that the probes that come with Russian cars are designed specifically for “cold” measurements, in contrast to foreign-made cars, where measuring strips are applied on both sides of the probe for “cold” and “hot” testing .
Before the “hot” measurement, wait 5-10 minutes after the engine has stopped.
The dipstick, ideally located somewhere at hand, should be in a clean state, since the liquid remaining after previous measurements may interfere with obtaining correct data. The material used to wipe the dipstick should not leave traces on it in the form of threads or fibers, in order to prevent foreign bodies from entering the crankcase cavity.
Don't forget to check the technical condition of the motor. Correctly calculating the required volume of fluid will be a very difficult task in the event of leaks or increased oil consumption for other reasons. Such an incorrect assessment leads to the fact that the driver begins to pour it over the permissible limit.
Phase sensor
Camshaft position sensor (part number A2C90920400). Informs the electronic engine control unit when the piston reaches top and bottom dead centers during the compression stroke.
Installed on the engine, below the valve covers. Resource – 90-100 thousand km. Cannot be repaired.
- The ECU goes into emergency mode;
- The engine is unstable at idle speed.
Consequences of overfilling and underfilling oil
Excess fluid affects not only the technical characteristics of the engine, but also the cost of subsequent repairs. The emerging changes are dangerous due to their gradualness and imperceptibility in the early stages. Overfilling can result in the following:
- If the level is excessively high, there is a possibility that the crankshaft counterweights will become immersed in oil and foaming may occur. Possible problems in this case cannot be predicted.
- At a critically high level, splashes fall on the spark plugs and, as a result, the engine power decreases and the ignition system is disrupted.
- Grease may settle on the air filter.
Consequences of oil overflow
- Due to the increased pressure, the crankshaft oil seal may begin to squeeze out, which will also increase the cost of subsequent repairs.
- Low ambient temperatures begin to make it difficult to start the engine.
- Difficulty in rotating the crankshaft due to overflow leads to poor speed acceleration. The driver, seeing an insufficient response to pressing the gas, begins to press the pedal harder, which leads to increased fuel consumption.
In addition, reducing the amount of lubricant exposes parts to faster wear due to increased friction between them. The consequences themselves may be as follows:
- Wear of parts leads to increased consumption of lubricating fluid.
- Rotating bearings cause damage to the drive structure.
- Possible engine wedge.
- Without lubrication, scratches appear on the cylinder walls. And boring, as a result, threatens the need for major repairs.
- The oil pump elements may become jammed. In this case, there is only one correct way out - its complete replacement.
- Metal shavings enter the cylinder head, which entails wear and tear of the entire engine.
These reasons are a reliable argument in favor of regular inspections.
Review of Manufacturer Prices
| Name | Price in rubles |
| Controller (KSUD) | From 1200 |
| Coolant temperature sensor (DTOZH) | From 450 |
| Knock sensor (DS) | From 450 |
| Crankshaft position sensor (CPS) | From 450 |
| Camshaft position sensor (phase sensor) | From 650 |
| Absolute pressure sensor (ABP) and air temperature sensor (ATS) | From 500 |
| Oxygen sensor (absorber) | From 350 |
| Mass air flow sensor (MAF) | From 350 |
| Vehicle speed sensor (VS) | From 350 |
| Oil pressure sensor | From 350 |
| Clutch and brake sensors | From 350 |
| *prices are as of April 15, 2019 | |
Use the specified list of sensor part numbers when purchasing spare parts or new components. Despite the simplicity of the design, install the equipment in certified workshops, where they provide a quality guarantee for the work performed. If any difficulties arise, please contact the managers of the official representative offices of the car brand for advice.
Source
Drain hole in the crankcase
Excess motor fluid in the system can be eliminated by draining the engine. To carry out this operation, you need to have unnecessary rags and a free, clean container. The container can be a basin or half of an old canister. The operating principle of ridding the system of excess drops of engine oil is constructed as follows:
- secure the car under an inspection hole or on an overpass;
- turn off the car, all operations are carried out on a cold engine. This is done to avoid accidental burns when draining a hot consumable;
- remove the drain plug;
- a pre-prepared oil tank must be placed under the drain;
- draining is carried out until all excess lubricant is removed;
- the drain plug is fixed back into the engine crankcase;
- lubricant is added to the required value.
If the engine oil level is higher, this threatens the vehicle's powertrain with malfunction in the future. If the volume is exceeded even by a small amount, the consequences will not be long in coming. Therefore, in order for a car to serve its owner faithfully for a long time, it is necessary to observe a number of simple factors, and constantly.
The optimal level of the lubricating component is set by the machine manufacturer - these are the minimum and maximum value marks. The main thing is to keep the lubricant level between these indicators. Everything is in the hands of the driver.