When to change the sedative
- metallic knocking of the chain under variable loads - you can hear ringing and clanging;
- knocking sound in the front upper part of the engine during operation;
- loss of engine power, which is especially felt when you press the accelerator pedal.
Don't wait until the motor jams - replace the damper immediately after alarming symptoms appear. These symptoms appear because the chain without this support element becomes unstable, it dangles and does not have enough tension. If the breakdown is left unattended, the chain may break and the motor may jam due to bending of the valve pins.
How to choose a spare part
To work, you will need to buy a new damper, which for the Chevrolet Niva is available from different materials:
- Car enthusiasts choose traditional metal parts for their resistance to stress and wear. The best option among components made of durable metals is one in which the working surface is made of polymers. When choosing, please note that the layer of vulcanized rubber must fit tightly to the metal so that it cannot be removed with a sharp object. The disadvantage of this option is that if it breaks, the heavy metal parts of the damper can fly apart and damage the engine.
- Plastic components have only one drawback - they need to be changed more often than metal ones. It is less resistant to wear. This option has clear advantages: when broken, the plastic crumbles into small pieces and does not damage the engine due to their low weight; this damper is slightly larger in size than metal, which increases the area of its contact with the chain. The design features of the plastic component make it possible to reduce chain vibrations and reduce shock loads, so it will serve no less than a classic one.
As for the manufacturer, it is worth paying attention to RUSMASH products. This company supplies spare parts to the Gorky and Volzhsky automobile plants. Please note that you only need to buy the part for the Chevrolet Niva. The components from other VAZ models will not fit - they are different in shape and area of contact with the chain.
Location and Replacement
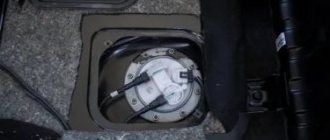
This part is located on the passenger side in the engine compartment under the cooling system pipes.
In case of large stretching, it must be replaced with a new one; to do this, you need to carry out the following procedure:
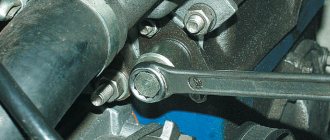
- We take a key for ten and unscrew the tube thanks to which liquid enters the tensioner
- Then use the same key to unscrew a couple of nuts that secure this part to the engine housing
- After this, the device must be pulled out along with the gasket, which must also be replaced with a new one.
The old Niva Chevrolet hydraulic chain tensioner cannot be repaired, so it will have to be replaced with a new one.
Assembly
To perform reassembly we perform the following steps:
- We take a new part and put it in its place
- Take two bolts and screw the device to the engine
- We connect the tube through which the liquid is supplied
Closer to one hundred thousand mileage, even if there is no extraneous noise in the engine area, then in any case the part must be checked for stretching and damage.
Replacing the Niva Chevrolet camshaft drive chain guide
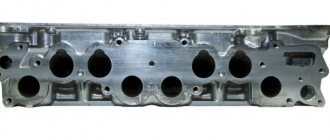
The damper is located inside the front part of the cylinder head on the left and is attached to it from the outside with two bolts.
If the damper is worn or damaged in some engine operating modes, resonant oscillations of the drive chain may occur, which can lead to the chain jumping on the teeth of the camshaft sprocket and causing serious damage
engine. You will need: a screwdriver, a wrench (preferably a socket) “10”.
Remove the camshaft drive chain tensioner (see “Replacing the camshaft drive chain tensioner”).
Using a chisel, bend the edge of the lock washer of the camshaft sprocket mounting bolt (for clarity, the hoses of the cooling jacket outlet pipe are disconnected).
VESKO-TRANS.RU
AutoNews / Reviews / Tests
Replacing the Chain Guider Niva Chevrolet Video
Replacing the Chevrolet Niva shock absorber
The sedative on the Chevrolet Niva is located in the cylinder cover, in the front. Replacement of Chevrolet Aveo generator brushes. Replacing the Chevrolet Niva generator brush. Fastened with 2 bolts. Replacing the Niva damper is very simple. YouTube. If the damper fails, it can cause a resonant effect on the system, the chain will weaken, vibrate very strongly and eventually the teeth may slip on the camshaft gears during operation. Niva. Club / Niva videos replace the hydraulic lift and chain stabilizer replacement card. The article describes in detail the process of removing a chain damper replacing a Chevrolet Niva chain. This in turn can lead to complex dilemmas in motor performance. The article describes in detail the process of removing and replacing the camshaft damper on a Chevrolet Niva. Because it is a suitable replacement chain stabilizer
Chevrolet Niva can help get rid of many problems in the future.
The chain tension system itself consists of several parts that can be changed in the event of a malfunction:
- Train Valve Circuit
- Loader
- Pipe feeder, option 2
- 1st phone option
- tube mounting bolt
- chain tensioner block
- Gear camshaft
- damper circuit
- transition element
- pipe fastening
- control connection sensor oil lamp under pressure
- oil pump drive
- crankshaft drive
Replacing the chain tensioner
Replacing the chain tensioner requires a small set of tools, including a screwdriver and a 10-key wrench.
Replacement shoe chain tensioner Niva Chevrolet camshaft
replacement
hydraulic
chain
, as well as
replacement
shoes for
Chevrolet Niva
are their property.
Replacing the Niva damper is quite simple
Replacement Niva Damper
Just.
Deliver all at once video
Creator IMHO! The creator is not responsible for your actions!
Replacement is carried out in several stages:
- The cover has been removed from the cylinder head. Replacing the Niva damper is quite simple. Everything in the video is IMHO! The author is not responsible for your actions. Before doing this, it is better to carefully study the engine management. without charging Chevrolet Niva. Chevrolet Niva generator replacement repair. Because the cylinder head gasket may be damaged during operation and may need to be replaced.
- The next step is to remove the tensioner from the camshaft drive chain.
- the sprocket is then disconnected from the camshaft flange. 5 Replacing Chevrolet Niva brushes Fuel consumption Miscellaneous. All this should not be completely disconnected from the circuit
- Remove the bolts soothingly
. Replacing the VAZ 21214 chain tensioner Watch this video, Replacing the Niva damper. You need to start from the bottom. - To make further work easier, you should connect the gear to the chain as shown in the picture below. You can then unscrew the top mounting bolt and remove the damper completely.
- Warning! When removing the throttle body, hold it firmly with your hand to prevent it from falling into the oil pan. Replacing the timing chain on a Chevrolet Niva. Replacing a chain damper on a VAZ 2101-VAZ 2107 car. Video of replacing a damper replaces a chain damper on a classic Chevrolet Niva repair. Otherwise, removing it will be a big problem, since additional analysis of the engine will be required.
- After the damper has been completely removed, it must be inspected. If there are strong signs of development on its surface, they will appear in the form of chips and visible cracks or other damage to the case. This component needs to be completely replaced.
- It is important to remember that the damper on the Chevrolet Niva engine has a slightly different shape than the one previously used on VAZ engines. Therefore, you should buy a device designed for installation on this car model.
- After installation, you must reassemble all system components in reverse order.
Replacing the chain tensioner
To carry out work on replacing the chain tensioner, you will need a small set of tools, including a screwdriver and a 10mm socket wrench.
Replacement is carried out in several stages:
- The cover is removed from the cylinder head. Before doing this, it is better to carefully study the engine manual. Because during operation, the cylinder head cover gasket may be damaged and may need to be replaced.
- The next step is to remove the tensioner from the camshaft drive chain.
- then the sprocket is disconnected from the camshaft flange. However, you should not completely disconnect it from the circuit.
- The damper mounting bolts are unscrewed. You need to start working from the bottom.
- To make further work more convenient, you need to connect the gear together with the chain, as shown in the figure below. After this, you can unscrew the upper mounting bolt and completely remove the damper.
- Attention! When removing the damper, you must hold it firmly with your hand so that it does not fall into the oil pan. Otherwise, its removal will become a big problem, since additional disassembly of the engine will be required.
- After the damper has been completely removed, it is necessary to inspect it. If its surface has strong signs of wear, chips have appeared on it, and cracks or other damage are noticeable on the body, a complete replacement of this component is necessary.
- It is important to remember that the damper on the Chevrolet Niva engine has a slightly different shape compared to the one previously used on VAZ engines. Therefore, it is worth purchasing a device designed for installation on this car model.
- After installation, you must reassemble all system components in the reverse order.
How to replace a part
Prepare a new part and a set of tools (a long flat screwdriver, a 25 cm piece of wire, a set of open-end and socket wrenches). Place the car in a bright place and open the hood. Replacing the damper is carried out according to the instructions:
- First you need to remove the screen from the engine and remove the cover from the cylinder block. In the process of this work, the gasket is almost always damaged, so it is best to buy a new one in advance. There is no point in trying to keep the old one, because it will not seal the block sufficiently.
- Then remove the tension roller. To do this you need to unscrew its mount. Make sure that the washer does not fall into the pan.
- Remove the camshaft gear without completely removing the chain.
- You have gained access to the damper, start unscrewing its fastenings from the bottom. Pay attention to the position of the bolts; they will need to be screwed back into the same places.
- To unscrew the top mount, connect the gear to the chain using a plastic tie. Unscrew the bolt and remove the damper.
- Hold the part firmly so you don't drop it into the oil pan, then inspect and set it aside. If you do not hold the component, you will have to disassemble the engine almost completely to get it out of the pan.
After you have removed the sedative, pay attention to its condition. If damage is visible, this unit must be replaced. Don't wait until the part fails completely. Reassembling the engine after installing a new spare part is done in the reverse order. Treat the places for screwing in the damper bolts with sealant. Please note that during assembly, the levers (crankshaft and timing gear) must be aligned so that the marks on them coincide, and the chain must be tensioned evenly from one gear to another.
Quick replacement of the timing chain on a Chevrolet Niva
Recently, an old friend of mine came to see me in his old Chevrolet Niva with the characteristic sound of an extended chain.
In addition to the timing kit, I had the foresight to purchase even a front cover gasket, a crankshaft oil seal and a kilo of marinated meat. I could not refuse such an offer. So, Niva Chevrolet replaced the timing chain and front crankshaft oil seal.
First, let the engine cool to an acceptable temperature. Remove the pipe by unscrewing the bolt by 10 and loosening the clamps.
Next, we unscrew the eight nuts by 10 and move aside the throttle cable and all the pipes that will interfere with us, remove the valve cover.
Remove the air conditioner belt by unscrewing the bolt 13 of the tension roller.
Then loosen three 13mm nuts and one bolt of the generator belt tension roller and remove it.
Now comes the fun part. To unscrew the pulley nut, we need a 38mm socket. Since the elongated head does not fit under a regular wrench (the radiator is in the way, but we don’t want to remove it), we use a pry bar, carefully sawed off from the hub key of some large car.
Everything fits perfectly. Unscrew the nut and remove the crankshaft pulley.
Unscrew the deflection roller.
We dismantle the reinforcing plate.
Symptoms of a problem
It is almost impossible to say exactly when replacement is required, and to understand that it has stretched, you can only disassemble the engine, but this is not an easy task. Therefore, you can understand that the chain is stretched by the operation of the engine; during operation, if stretched, a ringing sound will be heard, it may resemble the operation of a diesel unit. As a rule, it needs to be replaced at a mileage of about 100-150 thousand kilometers. In case of wear, not only the chain changes, but also:
And if they are not changed, this can lead to it breaking during movement. Only replacing all elements of the system will guarantee its high-quality and long-term operation, and it is somehow impractical to disassemble the engine floor to replace one part.
Changing a chain on a Chevrolet Niva is much more difficult than replacing a belt. To do this, you should do the following:
- We drive the car into a pit or overpass
- For ease of work, remove the engine protection with boot, this will also help remove the timing belt mounts
- We fix the car with the handbrake, put supports under the wheels
- Drain the antifreeze and remove the radiator with fan
- From the air duct pipes and from the valve covers, disconnect the accelerator cable that goes to the air filter.
- We remove the crankshaft sensor, and then loosen the bolt that secures the generator
- We move the generator and loosen the belt tension.
- We remove the belt, unscrew the bolts that secure the water pump to remove it.
- Unscrew and remove the belt bypass and tension roller.
- We remove all pipes that interfere.
- To prevent debris from getting into the cylinder head, it is advisable to cover it with something.
- We unscrew the bolts that secure the gear and camshaft, and after removing the cover, remove it.
- We remove the hydraulic tensioner with the shoe, having first removed the oil pipe.
- Together with the chain, we remove all the gears, oil pump, camshaft and crankshaft.
- We install a new oil seal on the timing cover
After removing all elements of the system, you need to carry out proper installation and configuration, for this you need to do the following:
- Install the mounting bolt on the shoe.
- We check that the shoe does not move on the axis, tighten the bolt
- We install new gears, they must clearly coincide with the existing marks
- We install the clamp, if it does not sit in its place, you can file it a little
Before installing the chain, take engine oil and lubricate it, then put it on the new elements as follows:
- We put it on the crankshaft gear
- Then to the oil pump
- Then to the camshaft
After replacement, the tensioner is installed in place, the marks of which must coincide with the chain tension; after checking, we tighten all the bolts. Lubricate the gasket with sealant located on the timing cover and install it in place. We install the pulley and two belt rollers in place and tighten the bolts that secure them. Engage 4th gear and tighten the pulley nut. We install all existing pipes, hoses, radiator, fan in their place, and fill in antifreeze. We start the engine for a couple of minutes and check how it works; if everything works properly, we install the protection with the boot in place.
VAZ specialists answer
VAZ SPECIALISTS ANSWER
EVGENY BAIBORIN - engine development department
ALEXEY KLIMENKO – transmission development department
YURY PROKHOROV – after-sales service department
ALEXANDER GUSEV – transmission development department
On my Niva VAZ-21214, the plastic chain guide broke more than once, once every 10-12 thousand km. I changed the chain, sprockets, tensioner shoe and the hydraulic chain tensioner itself, the oil line - I can’t find the reason!
The dampers used in the factory configuration, produced by JSC "Plastik" from Chelyabinsk, have proven to be quite reliable. In your case, the reasons for the breakdown of the original, factory damper could be factors such as an error in the initial installation, a deviation in the location of the damper mounting on the cylinder head, or the dimensions of the damper itself from the requirements of the drawing. In these cases, the damper may become distorted, ultimately leading to its destruction.
A serious threat of breakage of the damper also arises when shock loads are applied to it due to insufficient tension of the operating chain - usually this is due to a malfunction of the hydraulic tensioner, but in some cases the cause of this is excessive wear of the sprockets and chain, its significant elongation and sagging.
Calcifiers bought in a store may be inferior in strength to the original ones due to the low quality of their material - plastic.
I want to remake the VAZ-21214 timing drive according to the 21213 model. What is the difference between sprockets, chains, etc.?
The 21213 engine has a 21213 camshaft, which is driven by the long-established traditional double-row bushing chain 2103 (116 links). Here is the original kit - tensioner, shoe, chain guide. The stars are, accordingly, double-row. The number of teeth for all engine options is the same: 19 on the crankshaft nose, 38 on the camshaft and oil pump drive. Valve lever supports are mechanical. These details are well known to many from VAZ classic cars.
On the 21214 engine, to reduce noise and at the same time increase reliability, they used a single-row, but bush-roller chain 21214 (116 links), single-row sprockets, a camshaft 21214, hydraulic supports for valve levers, an original set - a hydraulic tensioner, a shoe, and a damper.
Conversion of the timing drive 21214 to 21213 is possible provided that the above parts are completely replaced, but the meaning of the event is questionable.
Is it true that in the 21124 engine (1.6 l, 16 valves), in the event of a timing belt break, the collision of the valves with the pistons is completely excluded?
Theoretically, the probability of valves contacting the pistons on the 21124 engine still exists, but compared to its predecessor 2112, it is small. For such an event to occur, the following factors must confluence:
— unfavorable combination of the true dimensions of parts within tolerances;
— high engine operating temperature;
- camshaft stop when the valve is fully open.
Neither during factory tests nor in operation (starting from October 2004) were there any cases of contact of valves with pistons on VAZ-21124 engines.
Is it true that you should end your trip by “blowing through” the engine at high speeds (about 3000 rpm) for one minute so that there is no carbon left on the spark plugs?
In the summer this makes no sense. In winter, at frosts of 20 degrees and below, if before this the engine was slightly warmed up or was idling, the “operation” can be useful. At the same time, such techniques do not eliminate problems caused by low-quality gasoline, malfunctions of the power supply and ignition systems. Difficulty starting the engine - and not only in winter conditions - is often explained by precisely these reasons.
Replacing the Chevrolet Niva chain guide
The damper on the Niva Chevrolet is located inside the cylinder head, in the front part. Attaches with two bolts. If the damper is out of order, this can lead to a resonance effect in the system, the chain will be weakened, begin to vibrate strongly and, as a result, teeth on the camshaft gears may slip during operation. This in turn can lead to serious problems in the operation of the engine. Therefore, timely replacement of the Niva Chevrolet chain guide can help get rid of a lot of problems in the future.
The chain tension system itself consists of several elements that can be replaced if problems arise:
- Valve train chain
- Tensioner shoe
- Tube supplying oil to the tensioner, second option
- Tube, first option
- bolt securing the tube
- chain tensioner block
- Camshaft gear
- chain damper
- transition element
- tube fastening
- sensor for connecting to the oil pressure warning lamp
- oil pump drive
- crankshaft drive
Consequences of untimely shift
When using a car for a long time with a stretched chain, a moment is inevitable when it slips over the teeth of the drive gears onto one or more links. In this case, the valve timing is disrupted and the minimal consequence will be a sudden stop of the engine. If the chain slips a few links, the valve plates will meet the piston crown. In this case, the motor receives severe damage, which can only be corrected by overhauling it. For a belt drive, the situation is more dangerous, since the belt simply breaks and the valves and pistons meet. Opel engines have 4 valves installed in each cylinder, so repairing such an engine will be even more expensive. To prevent such a problem, it is necessary to strictly follow the timing drive replacement regulations.
Valve train chain
If during engine operation there is a ringing sound that resembles the operation of a diesel engine, then most likely the Niva Chevrolet timing chain needs to be replaced.
Replacement
If you do not replace it in time, it may break while driving. To replace, do the following:
- Installing the car in the pit
- The motor protection with boot is dismantled
- We raise the handbrake; it is advisable to place special supports under the wheels
- Drain the antifreeze and remove the radiator and fan
- Carefully disconnect the accelerator cable going to the air filter from the valve covers and pipes
- We remove the crankshaft sensor, loosen the bolts that secure the generator
- Move the generator aside and remove the belt.
- We unscrew several bolts that secure the water pump, and then remove it
- We dismantle the tension and bypass roller of the belt
- Remove all interfering pipes
- Cover the cylinder head to prevent debris from getting into it.
- After unscrewing the mounting bolts, remove the camshaft gear
- Remove the oil pipe along with the hydraulic tensioner
- We remove the chain and all gears of the oil pump, crankshaft and camshaft
- We take a new oil seal and install it on the timing cover
Installation
When the Niva Sherole timing chain and all necessary system elements have been removed, you need to correctly install and configure the new parts, for this you need:
- Take the fastening bolt and install it on the shoe
- We check that the shoe is stationary and then tighten the bolt
- We install the new gears in their place so that they coincide with the existing marks
- We install the clamp, if for some reason it does not sit in its place, we file it
Before installing the chain, it must be lubricated with engine oil, after which it can be put in place as follows:
- First on the crankshaft gear
- After that, to the oil pump
- And finally on the camshaft
To ensure better operation and fixation of this mechanism, it contains special Niva Chevrolet timing marks.
If they are not taken into account when installing the chain, this can lead to the gas distribution system becoming out of synchronization and increased wear of parts. Adjustment by marks is carried out in several stages:
- All necessary tools are prepared
- The car is installed on the pit
- The fan is turned off and the radiator mount is unscrewed
- Removing the valve cover
When all the preparatory steps have been completed, the following adjustments are made:
- Rotate the crankshaft until the bearing and camshaft marks match. If the chain is installed correctly, the existing marks on the chain cover and crankshaft will match. If they do not coincide, we adjust the position of the phases
- To make this adjustment, loosen the fastening at the lock washer, then use a 13 key to remove the washer along with the camshaft sprocket
- We set the first gear so that the bolt that secures the crankshaft gear does not turn. Unscrew the fastening bolt and lock washer
- We remove the tensioner.
- Pull the chain towards you and remove it from the sprocket
- To adjust it, move it one tooth
- We begin to turn the crankshaft until the notches coincide
- Install the lock washer. We place the bolt in the place for fastening, but do not tighten it
- Rotate the crankshaft and check if the marks match. If they match, then the work can be considered completed
It is important that the marks match as accurately as possible, since the correctness and stability of the engine will depend on this.
How to install a hydraulic tensioner on a 409 engine
The engine has two hydraulic tensioners of the same design - for the upper and lower chains
Since hydraulic tensioners constantly keep the chains in tension, regardless of chain stretch and shoe wear, there is no need to adjust chain tension during operation.
The hydraulic chain tensioner device is shown in Figure 1.
Plunger 4 is installed in housing 5. A spring 6 is inserted into the plunger, which is compressed by a screw plug 1.
A check ball valve 2 is installed in the plug.
The plunger is fitted with locking ring 3 and retaining ring 7. In the figure, the hydraulic chain tensioner is shown in an inoperative (“charged”) state, when the locking ring keeps the plunger from moving.
In order to bring the hydraulic tensioner into working condition (“discharge” it), you need to press the end of the plunger so that the locking ring moves into the groove of a smaller diameter on the plunger, then under the action of the spring the plunger will move out of the body.
The hydraulic tensioner is installed on the engine in a “charged” state.
Under the action of the spring and oil flowing through the valve from the engine lubrication system, the plunger presses on the tensioner shoe and maintains the chain in tension.
As the chain stretches and the tensioner shoe wears, the plunger moves further out of the body, the locking ring moves into the next annular groove on the body, preventing the plunger from moving in the opposite direction.
When the chain hits the tensioner shoe (for example, when the engine operating mode changes), the plunger moves back into the body to the width of the groove under the locking ring. At the same time, it compresses the spring.
In addition, the valve closes and additional damping occurs due to the fact that oil is squeezed out through the gap between the plunger and the body.
You will need: a 12mm wrench, a screwdriver.
1. Holding the hydraulic tensioner cover (it is pressed from the inside by the tensioner), use a 12mm wrench to unscrew the two bolts.
2. Remove the cover and take out the hydraulic tensioner.
We install the hydraulic tensioner in a “charged” state, lubricating the channel in the cylinder head and, if necessary, replacing the torn gasket.
After installation, we bring the hydraulic tensioner into working condition - “discharge”.
“Charging” the hydraulic tensioner
If there is no mandrel for assembling the hydraulic tensioner or it is not possible to make one, you can assemble the tensioner as follows.
1. We bring the jaws of the vice together, leaving a gap of 19 mm between them.
Do not clamp the tensioner body in a vice.
When disassembling two hydraulic tensioners at once, do not confuse their plunger pairs, since they are selected with a certain clearance.
2. Install the tensioner body in a vice, like in a wrench, using a screwdriver with a wide blade.
3. turn out the valve.
4. Remove the spring from the housing
5. Remove the plunger.
We wash all parts in gasoline or kerosene, blow with compressed air and lubricate with engine oil.
6. From a steel sheet 0.8-1.0 mm thick, cut out a strip (10-15 mm wide and 25 mm long).
Using round-nose pliers or a mandrel, bend it into a ring with a diameter similar to that of a plunger.
7. Using the manufactured mandrel, we press the spring in the hydraulic tensioner housing.
8. Install the plunger into the body.
9. If necessary, use a thin screwdriver to guide the locking ring.
10. Use a screwdriver to press the bottom of the plunger until it stops.
11. We install a spring in the plunger, and the body itself in a vice.
12. Overcoming the resistance of the spring, we wrap the valve into the hydraulic tensioner housing.
13. For a correctly charged tensioner, the plunger should be completely inserted into the body.
Use a screwdriver to tighten the valve, holding the body in a vice (as during disassembly).
Do not press on the protruding end of the plunger, and after installing it in the channel of the block head, do not press on the tensioner itself.
Discharging the hydraulic tensioner
After installing the hydraulic tensioner on the engine, it must be brought into working condition - discharged. For this:
1. Using a 12mm wrench, unscrew the plug from the hydraulic tensioner cover.
2. Using a screwdriver through the hole, press the tensioner, which, when “discharged,” will push it out.
3. Put the plug in place.
This is what an “undischarged” hydraulic tensioner looks like.
Source
Tranquilizer
Another important element in this system is the Niva Chevrolet chain damper, which prevents the resonance effect from occurring. This system consists of the following elements:
The damper is located inside the cylinder head on the front side and is attached to it with two bolts. If it is damaged or worn out, vibrations appear, which can lead to the chain jumping and thereby damaging the motor.
Replacement
To replace, you will need a ten-size socket wrench and a screwdriver. When the tool is ready, we go through the following steps:
- Remove the cover from the cylinder head
- Remove the camshaft drive chain tensioner
- Without disconnecting from the chain, remove the sprocket from the camshaft flange
- Starting from the bottom bolt, unscrew the two fastening bolts
- We fix the chain together with the sprocket and remove the damper. During removal, it is advisable to hold it so that it does not fall into the oil pan.
- We inspect it and if there is damage, we replace it with a new damper.
- We take a new part and install it in reverse order.
It is necessary to purchase a new element exactly the same as the one that was installed previously, since models that were produced earlier may have a damper of a different shape.
Timing belt with chain drive on VAZ 2101
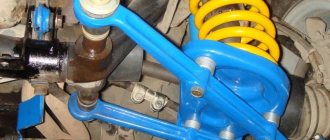
The “kopek”, like all other “classic” models, has a timing chain drive. The mechanism consists of a double-row metal chain and additional elements that ensure its tension and prevent vibrations. The well-coordinated operation of the motor directly depends on the integrity and serviceability of each part of the mechanism. The chain drive connects the crankshaft and camshaft and ensures their synchronous operation. When the shafts rotate, the pistons in the engine cylinders are set in motion, and the valves in the cylinder head (cylinder head) open and close in a timely manner.
The main elements of the VAZ 2101 timing drive are a chain, a damper, a shoe, a tensioner and sprockets
Tranquilizer
The damper performs the function of damping circuit vibrations. Without it, the chain may jump or fly off the sprockets of the timing mechanism. If the damper breaks down, the drive may simply break off. Such a nuisance is possible at high engine speeds. If the chain breaks, the pistons and valves are damaged, requiring expensive repairs. Therefore, the condition of the damper must be monitored and replaced in a timely manner. The part is a durable metal plate with special holes for fastening.
The chain damper dampens its vibrations when the engine is running.
Opposite the damper there is a shoe, which is also responsible for calming and tensioning the chain. It is made of a special polymer material, which gives the part high wear resistance.
The tensioner shoe is responsible for tensioning the chain and damping vibrations together with the damper
Tensioner
The “penny” chain drive tensioner prevents the chain from loosening when the motor is running. The element comes in several types:
- auto;
- mechanical;
- hydraulic.
Automatic tensioners began to be produced recently, but with regard to this part, it is already possible to note the pros and cons. The main positive point is that there is no need to make periodic adjustments, i.e. the drive is constantly in tension. The disadvantages include fairly quick failure and high cost of the part. In addition, based on reviews from car enthusiasts, the auto tensioner does not tension the chain very well.
The operation of hydraulic devices is based on the supply of oil under pressure from the engine lubrication system. With this design, the driver does not need to worry about periodically tightening the chain. However, over time, the part may malfunction, which manifests itself in the form of jamming of the mechanism.
The VAZ classic uses a mechanical tensioner. The part has a significant drawback: over time, it becomes clogged with small particles, the plunger jams and the device loses its ability to produce tension.
The chain tensioner is designed to keep the chain taut at all times.
Chain
One of the key elements of the timing chain drive is the chain itself, made of metal and having a certain number of links: on the VAZ 2101 there are 114 of them. Compared to a belt drive, the chain is more reliable and has a longer service life.
The chain is considered a more reliable element compared to the belt
Depending on the quality of the chain and the operating conditions of the vehicle, it is replaced every 60–100 thousand km. There are cases that a part lasts for 200 thousand km, but it’s hardly worth the risk, because a broken chain will result in a much more expensive repair than its timely replacement.
Choosing a timing chain
The service life of a timing chain is an order of magnitude longer than that of a belt. Replacement should be carried out after 150 thousand km or once every 5 years. A broken circuit is a rare occurrence. But it is advisable to prevent such situations from arising.
Since this can lead to serious problems and engine repair costs. Both original components and parts are available for sale, as well as analogues from manufacturers from China and Taiwan.
Optimal options in terms of price/quality ratio:
| Name | vendor code | Cost, rubles |
| VPM | 12616609 0636246 | From 2.2 thousand rubles |
| SAT | TKOP001 | From 2.7 thousand rubles |
| Skf | VKML82000 | From 5.6 thousand rubles including rollers |
Parameters of the original part:
| Name, manufacturer | vendor code | Cost, rubles |
| General Motors | 21214100604003; | From 5 thousand rubles |
Replacing the Niva Chevrolet chain guide with your own hands
Replacing the timing chain guide for Niva Chevrolet
Remove the cylinder head cover (see “Replacing the cylinder head cover gasket”, p. 99).
Remove the sprocket together with the chain from the camshaft toe (see “Removing the camshaft
The bolts have cylindrical shanks for alignment in the holes of the damper.
We take out the sedative. Install the damper in reverse order.
Replacing hydraulic mounts for Niva Chevrolet valve drive levers
We replace the hydraulic bearings of the valve drive levers when a characteristic knocking sound appears in the valve mechanism. The knocking of valves during one and a half to two minutes of engine idling, and at low negative temperatures - for three to four minutes, is not a rejection sign and a reason for replacing hydraulic mounts. Remove the cylinder head cover (see “Replacing the cylinder head cover gasket”, p. 99).
To assess the condition of the hydraulic support, insert a screwdriver between the edge of the camshaft bearing housing and the valve drive lever.
In this case, the camshaft cam acting on this lever should be facing it with the “back of the head” (the valve is closed). Using a screwdriver to rest on the bearing housing, we press through the lever onto the hydraulic support. In normal condition, the hydraulic support should be pressed with considerable force. If the force is small (noticeably less than that of other hydraulic mounts), the hydraulic mount must be replaced. To do this, remove the camshaft and valve drive levers (see “Removing the camshaft and valve drive levers,” page 103).
Remove the bushing with hydraulic support and spacer.
Similarly, we remove the spacers of other hydraulic supports.
We install the hydraulic supports in the reverse order.
FakeHeader
Comments 30
Ha, mine is empty too (((((I’ll put it in tomorrow, and at the same time I’ll wash the wetsuits.
how to understand empty? I have it below there. turns out the top broke off? I've been traveling for so long. And I knew how it should be
Yes, the top, it bears all the shock load.
Tell me, I have turned the bushing in the damper, how can I now unscrew the bolt that secures it? Break it into pieces and hold the notches on the bushing with a wrench?
I held it with a medical clamp and it unscrewed easily.
This misfortune has befallen many) On my old field, I changed three dampers)) On the current one, after losing the first damper, I installed a Pilot automatic tensioner. I'm happy)
does it break and fall down?
When I started, the chain rattled so loudly that people turned around, for 5-7 seconds. The damper was intact. I’d rather change the chain at 50,000 km than have the cylinder head repaired sooner or later.
Today I opened the valve cover, the damper is intact, but somehow it moves a little. That's how it should be. (Niva 214m)
Check the tightness of the bolts on the outside of the block. It should move a little, about 3-5 mm. There is a nut in the damper housing, the top one, it has a small stroke. I believe this is a design calculation by the designers; a small stroke seems to reduce the shock load on the damper.
And the damper has threads or bushings. Somehow it works like a diesel when cold. It rattles or grinds, I don’t understand.
Threaded bushings are inserted into the damper body. Hydraulic compensators can make noise. If the chain tension is poor, a sharp, rattling sound is heard when starting the engine, which usually goes away after a few seconds. Look at the valve cover for signs of scuffing in the area of the chain; it often hits the body. Also look at the block from the back side of the damper. If there are scuffs, then the chain is not tensioned when starting, this can lead to unpleasant consequences. If the mileage is more than 80k. It’s better to change the chain and check the tensioner at the same time, maybe it’s no longer working.
Mileage 50. How to check the tensioner. Why is everyone putting on a pilot? Before this, I had the same Niva, sold 130 miles, never climbed into the engine.
I don’t know how to check, mine looked like it was working. Changed due to chain noise when starting the engine. Try starting the engine when cold, ask someone to listen to the noise, have them put their hand on the valve cover, if the chain is moving, it will be immediately clear. On the other hand, if you went into the engine to find out the cause of the noise, then why not change the tensioner to Pilot or Asai. Access there is better than on Shnivy. And with a sinking heart, no one wants to start the engine every day. If the noise disappears and a uniform tapping remains, then these are hydraulics. If they make a lot of noise, then replacement is necessary.
Replacing the Chevrolet Niva camshaft drive chain guide
Tools:
- Screwdriver
- Key for 10
- Socket wrench
- Head for socket wrench 10
Parts and consumables:
- Camshaft drive chain damper
Notes: The damper is located inside the front part of the cylinder head on the left and is attached to it from the outside with two bolts. If the damper is worn or damaged in some engine operating modes, resonant oscillations of the drive chain may occur, which can lead to the chain jumping on the camshaft sprocket teeth and serious engine damage.
1. Remove the cylinder head cover as described here.
ORDER CHIP TUNING OF YOUR CAR RIGHT NOW!
Leave an online request for the service and we will contact you to clarify details
general information
It has long been known that the quality of car parts produced at the AvtoVAZ plant is not of a high level. And timing parts are no exception. The chain has to be constantly tightened, almost every thousand kilometers. A hydraulic chain tensioner will help get rid of this problem. It is this device that we will talk about in this article. Let's look in detail at the operation scheme and replacement of the device.
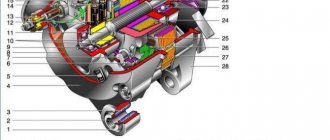
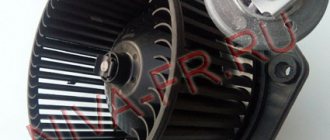
Scheme of work
The figure below shows a diagram of the operation of the spring-hydraulic chain tensioner of the VAZ 21214 car. 1 – camshaft star; 2 – timing chain; 3 – chain damper; 4 – auxiliary device drive star; 5 – crankshaft star; 6 – tensioner “shoe”; 7 – hydraulic chain tensioner; 8 – line fitting; 9 – oil line; 10 – adapter fitting; 11 – oil pressure sensor (emergency).
Replacing the drive chain hydraulic tensioner
Detailed instructions with photos for replacing the hydraulic chain tensioner: The hydraulic tensioner is located under the cooling pipes in the front of the cylinder head. Using a “10” wrench, which has five edges, we unscrew the tube fitting that supplies oil to the hydraulic tensioner.
we take out the phone.
Using a 10mm socket, unscrew the two nuts that press the tensioner to the cylinder block.
Then remove the hydraulic tensioner.
At the same time as replacing the tensioner, it is recommended to replace the sealing gasket.
Assembly is carried out in reverse order. If after all the manipulations you start the engine and still do not hear the rattle of the chain, then everything has been done correctly.
Prices for hydraulic tensioner VAZ 21214 range from 400 rubles. up to 900 rub. Depending on the region. But there is no shortage of this device on store shelves.
Hydraulic chain tensioner. The genuine pain of the domestic auto industry
Without changing the position, carefully remove the oil pump drive gear along with the chain. Return to contents Installing new parts First, we change the crankshaft front seal.
We remove the old one and clear the space for the new one. Lubricate the new oil seal with engine oil and install it using a mandrel.
Replacing the chain tensioner
You can use an old oil seal as a mandrel. The fastening bolt on the shoe is hammered with light blows of a hammer.
It is not recommended to adjust it so that it is inserted by hand - there will be a slight backlash, which will cause the shoe to move on the axis. Place the bolt in place and tighten. Install the new crankshaft, camshaft and oil pump gears in place so that the marks match.
Tensioner assembly The lock washer retainer can be processed with a file, but it must fit tightly into the groove.
The clamp is bent at an angle of 90°. Moisten the chain with engine oil and put on the crankshaft gears first, and then the oil pump and camshaft.
It is necessary to tension the chain from sprocket to sprocket and observe the position of the shafts according to the marks.
Step-by-step instruction
Before starting work on tensioning the chain, the car must be placed in a comfortable position. Place the gearshift knob in the neutral position and secure the wheels so that the car does not roll during the procedure.
Tools
To carry out the work, the following tools are required:
- set of socket wrenches;
- set of heads;
- pliers;
- screwdriver;
- hammer.
Before starting work, you should make a visual inspection of the chain drive. If mechanical damage is found to the tension roller, shoe, guide, sprockets or chain, the defective parts must be replaced.
Stages
The sequence of work when tensioning the chain both in an engine with an injector and with a carburetor consists of the following steps:
- To access the timing chain, it is necessary to remove the protective cover by unscrewing the mounting bolts that hold it in place.
If they are not set correctly, the valve timing will be disrupted. As soon as you need to exert a lot of force, you need to stop and hold the shaft from turning with a key. It is in this position that the tension will be sufficient.
Sometimes tensioning is impossible because the chain stretches over time and the plunger is no longer long enough to make the adjustment. If you do not plan to change the product, then for temporary driving you can increase the tensioner rod, for example, by attaching a bushing to the end of the rod, with which the air filter is attached. But still, a worn-out product must be replaced in the near future.
Replacement cost
The cost of replacing the chain will be 2,600 rubles when purchasing a ready-made kit. When purchasing parts separately, the cost of the parts will be 800 rubles for a chain, 1500 rubles for a set of gears, 240 rubles for a damper and tensioner, and 550 rubles for a tensioner. When purchasing a set separately, the owner must have an amount of at least 3,100 rubles. To this you need to add about 300 rubles for a new oil seal, about 1 thousand rubles for cooling fluid and up to 3 thousand rubles for refilling the air conditioner (if it is present and there is a need).
Buying a belt for Opel engines will lighten the owner’s wallet in the amount of 3,300 to 4 thousand rubles. The price of the pump ranges from 2800 to 6300 rubles. To this it is necessary to add about 1 thousand rubles for replacing the coolant and about 2-3 thousand rubles for refilling the air conditioning system in the cabin. The final price will be at least 10 thousand rubles. Purchasing a set of clamps for camshafts will cost another 2,500 rubles.
The cost of performing work at a specialized service depends on the city. In Moscow and other large cities, the price tag for work reaches 7,000 rubles. At the same time, in small regional centers the cost of replacement is more humane and does not exceed 2500-3000 rubles.