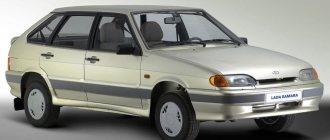
Every car owner wants his personal equipment to be the most noticeable and vibrant. Updating the design, replacing classic factory spare parts with modern ones is a long-standing occupation of men. The fourteenth is recognized as one of the popular models of the domestic automobile industry. This technique is similar to foreign models. The most common action is tuning the headlights on a VAZ 2115. It is worth noting that the light fixtures of the 14th and 15th models are identical.
Advantages of tuning lighting elements
When producing equipment, many companies want to make their products as affordable as possible; they try to save on expensive spare parts by equipping models with cheap components. This also applies to lighting structures installed at the Volzhsky enterprise. Independent modification of the optics of the iron horse gives it an attractive appearance. If there is a desire to distinguish equipment from the same type, then a simple modernization of the lights on the VAZ 2114 and tuning the headlights of the VAZ 2115 are allowed. By upgrading these devices and other parts of the car, you will transform the car, getting a unique, interesting car.
Lighting devices are an important part of any car; when modernizing, you need to preserve the functions assigned to them. This will ensure the safety of road users.
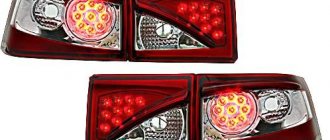
Modernization of rear lights of VAZ 2115
Recently I was puzzled by the operation of the rear lights on my 15. They all lit up in unison, then blinked away. After scouring the Internet and reading various articles on upgrading the rear light wiring, I decided to get down to business. I went to the store to look for the necessary parts. But there were no cartridges worth a penny in our stores. After some thought, I decided to see what the local car dismantling shop had to offer.
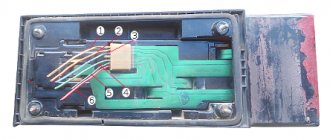
The most easily accessible ones turned out to be the rear sockets from the old Gazelle (the new sockets are slightly different and the light bulbs do not have quite standard sockets). Next, take out the rear light board and use a screwdriver to pry out the plastic sockets. Having taken out the cartridges, we carefully cut the tape, leaving the contacts to which we will solder the wires.
We don’t throw away the tape. We mark and then drill holes for the cartridges in the same places where they were installed earlier.
For a better fit and reduction in size, it is better to process “Gazelle” cartridges by cutting off the excess with a hacksaw. It is better to drill holes up to 10 mm with a drill. Further, if you have drills of a larger diameter, then to avoid tearing the plastic, it is better to drill by hand and then finish it with a regular knife, cutting off all the excess.
We glue the cartridges in and check the contact of the central part. If the contact is in doubt, then it is better to re-solder.
We solder the wires to the minuses and insulate them. I insulate with heat shrink tube, heating it from different sides with the untinned part of the soldering iron tip. We drill a hole for the wires and bring everything out to the inside.
We make the total mass by combining all the cartridges.
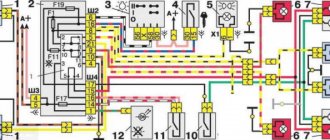
Having combined the electrical tape and the scrap, we find the minus along its tracks. We are looking for a plus for the turn signals. Using the diagram, we also determine the contact between the side light lamp and the brake light. Using a sharp knife, carefully peel off the green varnish down to the copper base, and then quickly tin the ends of the stripped track. If you heat a section of a track with a soldering iron for a long time, the track seems to creep apart. After soldering the wires to the track, cover them with varnish or sealant.
We fix the wires with thermal glue. We put everything back and check its functionality. As a result; there is nothing hanging from the outside. The pads remain original. Lamps (21w by 12 W) are ordinary with one spiral, they work no worse than 2 spirals. Nothing is buggy.
PS: There are almost no costs for this modernization. Cartridges are free at a car dismantling point (they throw them away in the same place as the light bulbs). I used “window” glue for gluing plastic (RUB 150). Also on the second headlight I used cartridges from a new type of Gazelle (for rear corners, diameter 20 mm, old type 16 mm).
Author: Victor Golunov
Types of tuning
There are a certain number of ways to change the appearance of lighting structures that look quite attractive. This is both internal and external tuning. The most commonly used option is angel eyes on the VAZ 2114. Tuning significantly improves the appearance and attracts the attention of others. Carrying out the production process yourself will provide valuable experience.
Tuning VAZ 2114 headlights and tuning VAZ 2115 optics involves replacing classic factory-installed parts with more powerful ones, or tinting with film. Many people install xenon. This improves lighting performance at night, but is contrary to traffic regulations, so installation of such bulbs is possible only on rear lighting devices. Installation of bixeon lighting structures is allowed.
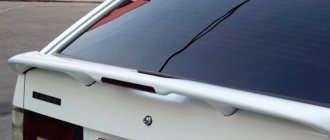
Tinting headlights on VAZ 2113—2115 cars
Tinting is the simplest tuning with which you can change the lights of your car with your own hands. This is not difficult to do. The film will fit well on both the front and rear lights.
You can tint your windows yourself using a special film or aerosol varnish. The step-by-step process is as follows:
- select the color and buy film or varnish;
- wash and dry the headlights thoroughly. If you plan to use varnish, it would be better to remove them. All areas that you want to protect from varnish should be covered with masking tape;
- degrease the surface of the headlight;
- if using varnish, apply it from a can from a distance of about 30 cm, make sure the coverage is even;
- after drying, polish it - it will make the coating matte;
- if you use film, first try it on and cut it to the shape of the surface;
- spray the lanterns with soapy water, remove the backing from the film and apply it to the surface to be pasted;
- use a rubber spatula to expel air and moisture, smoothing the film until you are sure that it lies flat.
This is how you treat the front and rear lights of your car. This process is quite simple, and you can perfectly perform such tuning yourself.
Covering headlights with film
Tinting methods
I quite often see how the rear optics are tinted on domestic cars like Lada Priora, Grant, Vesta, Kalina, more classic VAZ 2114, 2110, etc.
But tinting also looks good on foreign cars such as Mazda 3, Hyundai Solaris, Ford Focus. The question here is rather what material to use and how well the work itself is done.
Since we have already decided whether such tinting is allowed, we can move on to the topic of creating such a tuning element. It is definitely not prohibited, although it is carried out within certain restrictions. St. Petersburg, Moscow and many other cities offer a wide list of tuning studios where you can tint your optics.
Before you make a decision, think about how exactly you will do it. Be sure to look at the photos of the finished options and evaluate the proposed methods. There are three methods in total.
- Varnish. The use of varnish is quite common, although it is not considered ideal. It has its nuances and shortcomings;
- Liquid rubber. A relatively new method, characterized by an exquisite visual effect after application. In my personal ranking, liquid rubber takes second place;
- Special films. Everyone recognizes that film tinting is the most profitable, spectacular and effective. Even if the price is slightly higher compared to varnish.
Now we will consider each method separately to bring some clarity.
Until films became widespread, everyone used varnish. But even in our time there are car enthusiasts who prefer this option.
To tint the taillights, you need to buy a can of special varnish. It is applied in several layers after the previous one has dried. The number of layers determines the degree of darkening of the headlights.
If you want to do this with a spray can yourself, you will need:
- thoroughly clean the surface to be treated;
- cover the paint layer of the car around the lights with paper or polyethylene;
- or dismantle the optics completely so that the paint does not get on other parts of the body;
- apply the first layer and wait until completely dry;
- apply a second layer and also wait until the paint dries;
- Carry out a similar procedure on both sides of the car until the desired darkening is achieved.
Remember that it will be impossible to restore the lights after applying varnish. You'll have to buy new optics.
Liquid rubber
A relatively new method based on the use of liquid rubber. Moreover, in Russia, PlastiDip products are the most popular.
Liquid rubber is sold in the form of spray cans or in cans, the contents of which are poured into the spray gun. To tint the headlights, special transparent rubber is used.
When a layer of material is applied, the optics acquire a matte and slightly darkened structure. Rubber can be used to quickly and easily improve the appearance of your lights. The material dries quickly and is removed from the surface.
If you need to remove this layer, the procedure will only take a few minutes
The lighting fixtures themselves will not be damaged, which gives liquid rubber another important advantage
The composition is applied in a similar way to varnish. Therefore, I will not go into details.
Film
Objectively, the best material for tuning taillights is special high-quality films. They are made specifically for rear lights. Additionally, they have a damage protection function.
Its advantages include:
- adequate price;
- high quality;
- long service life;
- ease of application;
- protecting the headlight housing from damage;
- possibility of dismantling;
- good light transmittance;
- minimum complaints from traffic police officers;
- wide choose.
But it is still important to understand that tinting in the case of rear optics is used purely as a tuning element. It has no significant practical side
Now briefly about the application procedure itself.
If you decide to tint the taillights with film yourself, you can do it something like this:
- headlights are thoroughly washed;
- a film is applied and the required piece is cut out with a small margin;
- the headlight is sprayed with soapy water from a spray bottle;
- the protective layer is removed from the film and placed on the surface of the optics, avoiding folds;
- using a squeegee and heating the film with a regular household hairdryer, it spreads over the surface;
- Finally, the excess is trimmed off.
Nothing complicated. But the effect amazes many. And no one needs to pay for the work if you are more careful and attentive.
Share your opinion regarding tinting the rear lights of cars and your experience in such matters. It will be interesting to listen to you
Thank you all for your attention! Subscribe, leave comments and ask relevant questions!
54,80