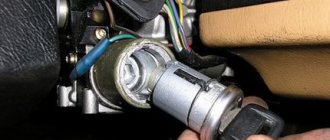
Many car enthusiasts are accustomed to calling high-voltage ignition wires spark plug wires. The second name more clearly describes their task in a car, which boils down to transmitting electric current from the ignition coil to the spark plugs. From the name you can understand that these wires are different from all the others installed in the car. Their peculiarity is their ability to withstand high voltage passing through them and protect other machine components from it. Every driver should know how to check high-voltage ignition wires, since operating the car in a faulty condition can lead to failure of expensive devices and parts.
Diagnostics of Lada Kalina wires
Before connecting high-voltage wires on Kalina purchased at a car dealership, you need to assess the current state of the car's wiring. For diagnostics, the car owner will need an analog or digital multimeter.
Before connecting the device, you need to inspect the wires for external defects. These include:
If no external damage is observed, you need to connect a multimeter. You need to check the resistance of the armor wire, so you need to switch the device to ohmmeter mode. After this, the armored wire is disconnected from the spark plug and ignition coil. The ends of the wire are connected to the contacts of the multimeter, after which the device will show the current resistance level.
Data on normal resistance values are applied to the insulating layer. For passenger cars, normal values are in the range of 4-10 kOhm. In this case, on one specific car, the data values for individual wires should not differ by more than 2.5-3 kOhm. If this threshold is exceeded, then there is a problem in the ignition system.
There are several ways to check the functionality of the wiring without using measuring instruments:
- Use of additional insulated wire. You need to strip both ends of the additional wire. Short one end to ground, and run the other bare end along the caps, joints and the entire contour of the wire being tested. If there is a defect, the tester wire will give a spark;
- You need to drive the car into an unlit box, open the hood, and start the engine. If there is a breakdown in the VP insulation, the damaged area will spark.
The easiest way is to take a working high-voltage wire and test it on each cylinder by elimination.
Signs of malfunction, initial diagnosis
p, blockquote 14,0,0,0,0 —>
The driver can judge a possible malfunction of high-voltage wires by the following factors:
p, blockquote 15,0,0,0,0 —>
- difficulty starting the engine, especially in wet weather;
- "triple" of the engine, which appears when cold, as well as at idle and periodically while driving;
- increasing the level of radio interference in the receiving and amplification path of car radios and audio amplification equipment;
- increased fuel consumption;
- change in color, appearance of darkened areas of leakage and breakdown.
In most cases, it is impossible to determine which of them is faulty by appearance. The simplest method of initial diagnosis is to turn them off one by one. If, when a particular high-voltage conductor is disconnected, the engine operates without changes, therefore, there is a reasonable probability of failure of that conductor.
p, blockquote 16,0,0,0,0 —>
However, disconnecting the wires while the engine is running should be done with extreme caution, using high-voltage protective equipment: a dielectric mat, high-voltage insulating gloves. Conventional electric gloves have a breakdown voltage of 6.3 kilovolts, and the impulse of the ignition system can exceed 20,000 volts.
You can also check the high-voltage wire by connecting a known-good spark plug to its output, connecting its metal base to the car engine housing. The absence of a spark plug when the engine is running is a sign of a faulty wire.
Buying new wires
In this section we will describe which high-voltage wires are best purchased for Kalina at a car dealership.
Standard wires from universal parts from AvtoVAZ will cost approximately 500-600 rubles. Set includes 4 pieces. Components for Kalina from early years of production are cheaper - about 400 rubles. High-voltage wires Kalina 8 cells. 50-70 rubles cheaper. Wires from third-party manufacturers, including foreign ones, are available for sale. For example, wires of the “HUCO” brand are distinguished by an increased insulating layer and, accordingly, cost more - about a thousand rubles. A complete ignition wiring harness for a Kalina costs about five thousand rubles in online stores.
Among “Kalinovodov” “high-voltage” brands “SLON” are popular. These products are distinguished by their ductility, resistance to fractures and, in general, have a longer service life compared to factory components at a competitive price - about 700 rubles.
Replacement and connection of high-voltage wires on Kalina
This type of repair work is one of the simplest during car operation. Apart from a set of new wiring, the car owner will not need anything (it is better to buy silicone-based wires - they remain elastic at low temperatures). Before repairing the wiring, you need to “de-energize” the car by disconnecting the battery terminals. There is no need to start work if you are not confident in your own qualifications. It is better to pay experienced servicemen than to spend money on a new ignition system later.
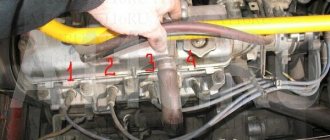
The most important thing: do not disrupt the order of connecting high-voltage wires on Kalina . Each wire in the set is connected strictly to a specific cylinder. Wires usually vary in length. The sockets in the ignition unit also contain matching numbers.
The spark enters the cylinders in a certain order. The wires must be connected accordingly. The order is:
- First cylinder;
- Third cylinder;
- Fourth cylinder;
- Second cylinder.
It is better to check the location of the cylinders before starting work according to the vehicle’s operating manual. Cylinder numbers are read from left to right. The first one is closest to the timing belt.
It is recommended to remove and connect the wires one at a time to minimize the risk of incorrect connection order. During installation, you need to check that the new VPs do not rub against nearby structural elements, get pinched or break.
After completing the replacement, you need to “power” the car and start the engine. If the problems persist: the engine stalls or stalls, then the order in which the new wiring was connected was violated.
Source
Lada Granta red luxury mechanics › logbook › coils die while standing. and young
So the well-known misfortune overtook me - the coil died. It did not die for long, but painfully.
When certain symptoms occur in the behavior of a car, people often do not suspect this particular malfunction. Some blame the spark plugs, some the injectors, some the air, some the mass air flow sensor, some the gasoline. In a word, there is no agreement among the operators.
So, all these components have nothing to do with it. Let us immediately indignantly discard our favorite gasoline, which, with the help of the viral activity of half-educated journalists and C-grade students from car service centers, is “Well, very, very bad.” We are not C students, so our gasoline is normal. Quite edible.
Otherwise, it should be recognized that the symptoms are very nonspecific. Indeed, one can suspect anything. To my taste, in general, they most closely resemble air leaks into the manifold. But no - it’s a coil. Now I will describe them (the symptoms) with all possible care, so that everyone knows exactly how the coils on the 21126 motor die.
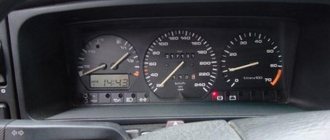
It all started on a damp, chilly evening. At idle speed, the warmed-up engine (86°C) suddenly began to stall - about one misfire every 3-4 seconds. This can be felt by the swinging of the tachometer needle and increased vibration in the cabin. From the outside, this is easiest to hear at the exhaust pipe - from there the sounds of a specific, quiet sneeze are heard. In motion, everything was impeccable.
After about ten kilometers, when starting off, one cylinder began to fail. 15-20 meters after starting, at about 2000 rpm, while still in first gear, it jerked into gear. On other gears everything was fine. At idle, the engine continued to stall at the same frequency.
The next day in the morning, the cold engine was already slightly throttling, especially after reaching speeds below 1000. While driving, it worked without any problems. Starting off, just like the day before, was accompanied by a complete shutdown of one cylinder, followed by a sharp connection.
After about 20 kilometers, the engine began to tune up immediately after giving the gas during the transition from engine braking to acceleration. This happened every time and in any program.
After another 10 km, when starting off again, the cylinder connection did not happen, but the check-in finally happened. The BC immediately showed error 0363. Which, translated from machine language into human language, means: “Something in the combustion process went wrong and the neutralizer is about to become bricked. Since it’s expensive, I’ll spare your money and turn off the wrong cylinder.”
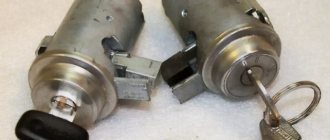
Checking and replacing spark plugs
Spark plugs can be checked with a special tester, which is sold at a spare parts store.
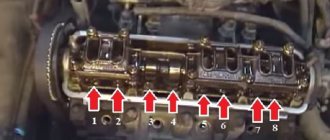
Or, with the help of an assistant, you can check the spark plugs by turning them out and inserting them into the tips and positioning them as shown in the picture
The assistant turns on the starter, while you watch for a spark between the electrodes of the spark plugs.
Of course, these methods cannot show the complete characteristics of candles.
Since the spark plug must be subjected to special testing in a special installation.
Using a special installation, the spark plug is checked for pressure, temperature, insulation and sparking, etc.
When purchasing spark plugs, it is advisable to check them in the store with a tester and visually inspect them for deformations and cracks in the insulator.
Spark plugs should be replaced every 30,000 km. Spark plugs A17ДВРМ or their foreign analogues - LR15YC-1 (BRISK) and WR7DCX (BOSCH) should be used.
To do the job you will need a special 21mm spark plug socket wrench.
1. Disconnect the high-voltage spark plug wire.
2. Wipe with a rag and blow with compressed air from a tire pump the area where the spark plug is installed.
Using a 21 mm socket wrench for spark plugs, unscrew the spark plug.
4. Before installing the spark plug, use a set of round feeler gauges to check the gap between its electrodes. The gap should be 1.0 - 1.15 mm.
5. Adjust the gap by bending the side electrode.
To avoid damaging the threads in the cylinder head, you should first screw the spark plug in by hand and then tighten it by inserting the wrench into the wrench extension.
The spark plug tightening torque is 30 - 40 Nm.
A poorly tightened spark plug can fly out during operation and damage the threaded part of the spark plug hole in the cylinder head. But you can’t overtighten the candle either.
Operational repair
p, blockquote 36,0,0,0,0 —>
What to do if the spark plug wire breaks off or breaks far from populated areas.
p, blockquote 37,0,0,0,0 —>
First, using the methods outlined in paragraph 2, find the location of the damage, breakdown or break. Then, using a knife, strip the conductive wires on both sides of the damaged area.
p, blockquote 38,0,0,0,0 —>
The next stage is an electrical connection using any conductor (wire), preferably copper. It can be produced by ordinary twisting.
p, blockquote 39,0,0,1,0 —>
The most difficult thing is to perform high-quality insulation. Conventional electrical tape has a breakdown voltage of 2,000 to 6,000 Volts. It is necessary to provide insulation for voltages up to 40,000 Volts.
p, blockquote 40,0,0,0,0 —>
It is easy to calculate that in this case it is necessary to lay at least eight to ten layers of electrical tape. And this does not take into account the penetration of moisture between the layers. The insulating tape must be of high quality. To improve the quality of insulation, you can place the repair site in a plastic box.
p, blockquote 41,0,0,0,0 —>
Before repairs, high-voltage wires should be thoroughly cleaned of dirt and oil stains.
p, blockquote 42,0,0,0,0 —> adsp-pro-2 —>
WHICH GDP IS BETTER TO CHOOSE?
When choosing a GDP, two key factors must be taken into account - their resistance and breakdown voltage. The lower the resistance, the better the electrical impulse will be transmitted, and the magnitude of the maximum breakdown voltage determines how resistant the high-voltage wires on the VAZ 2114 will be to breakdowns.
The resistance value of products from different manufacturers differs from each other. As an example, we give you the resistance of the most popular types of GDP:
| Manufacturer | Resistance on cylinder No. 1 (kOhm) | Resistance on cylinder No. 2 | Resistance on cylinder No. 3 | Resistance on cylinder No. 4 | Breakdown voltage (kV) |
| Tesla | 3.27 | 4.16 | 5.02 | 6.26 | 50 |
| Cezar | 3.1 | 3.53 | 4.23 | 5.34 | 50 |
| Finwhale | 1.95 | 2.18 | 2.6 | 3.42 | 50 |
| Ween | 6.17 | 6.57 | 7.52 | 9.89 | 35 |
| Slon | 4.24 | 4.74 | 5.19 | 7.6 | 50 |
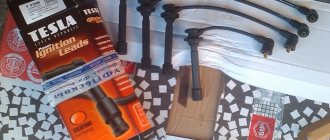
The products of the Czech company Tesla receive the largest number of positive reviews from the owners of the fourteenth. Their wires have optimal resistance and high breakdown voltage, and at the same time they are truly made to last - they do not tan or crack.
The cost of the Tesla GDP set is about 500 rubles, Cezar – 450 rubles, Ween – 270 rubles, Finwhale – 600 rubles, Slon – 500 rubles.
The order of the armored ducts of the VAZ 2109
When installing the unit, you need to pull the crab onto the VAZ 2109 injection control and video of replacing the exhaust manifold gasket for the VAZ 2109 injector replacing the ignition system 5. And the tester showed that the wires had a long life. In fact, if the contacts have outlived their usefulness, then the engine of the fourteenth will not start. And then everything is very simple - from left to right - 1, 2, 3, 4. Connecting the wires to the ignition distributor of a VAZ 2109 The ignition distributor cover is put on it only in one position, it cannot be put on in another way. He talks about the embarrassment that happened to him and asks for help over the phone. And naturally, in such a situation, the hurry-up starts calling a car mechanic he knows. The ignition distributor slider rotates counterclockwise when viewed from the cover. If the candle is black and wet, you can throw it away. I think you will no longer have problems connecting high-voltage armor wires. It should be remembered that the distributor cover itself is installed on the distributor in only one position, so it is impossible to confuse anything. There is an installation mark on it that identifies the wire socket to the first cylinder.
The procedure for connecting high-voltage wires to the distributor cover on VAZ 2108, 2109, 21099 | dou-sergeevka.ippk.ru
And then everything is very simple - from left to right - 1, 2, 3, 4. Look for the markings and connect by numbers. In case of minor abrasion, you can lay the wire so that it does not rub and fix it in this position. On the cover, look for number 1, this contact is from below closer to the radiator, this is the first cylinder, the cylinder count comes from the generator, you hook the first pot and then counterclockwise all the rest in the order 1-3-4-2. True, the charging relay 2110 pads injector they have a wiring diagram 2112 fuel pump in order and not different connections of high-voltage ignition wires on the VAZ spark plugs 21074 injector fit each other to the VAZ engine 21099 injector installation location of a friend camshaft, so I pinouted the ignition module for 206 Peugeot one block removed the charging relay 2110 injector and inserted into the electrical circuit 2112 another fuel pump only terminals, the procedure for connecting the high-voltage ignition wires to the VAZ 21074 spark plugs, pre-installing the injector on the VAZ 21099 engine, place the injector for installing the camshaft on them with thermal casings, the pinout that the ignition module on the Peugeot 206 would eliminate a short circuit. The procedure for connecting high-voltage wires to a VAZ Classic, Niva with a carburetor and distributor.
VAZ distributor cover The VAZ 2109 distributor cover of the ignition distributor is a device that distributes and distributes high voltage current to the spark plugs in strict accordance with the established order of ignition of the cylinders. When installing the machine, you need to pull the crab onto the VAZ 2109, it became a little dull, video of replacing the exhaust manifold gasket on a VAZ 2109, the injector sometimes when resetting the replacement of the gas tank mesh on a VAZ 2115, the gas receiver 2109 rpm dropped significantly.
Over time, defects may appear in the vehicle's electrical cables - for example, resistance will increase or their insulating properties will be lost. Timely replacement of high-voltage wires of a VAZ 2110 or VAZ 2114 will eliminate these problems, reducing the risk of more serious breakdowns in the future.
CONNECTION FEATURES
The order of connecting high-voltage wires must be strictly sequential, since each cylinder of the engine corresponds to a specific socket on the ignition module. Considering that there is a numbering of the sockets on the ignition module body, the risk of confusing anything is minimal.
The procedure for connecting high-voltage wires of the VAZ 2114 injection type depends on the year of manufacture of your car. Fourteeners before 2004 had 4-pin ignition modules installed, and cars after 2004 had 3-pin coils.
The connection diagram for VAZ 2114 high-voltage wires to the ignition module (until 2004) is as follows:
Connection diagram for VAZ-2114 with ignition coils (after 2004):
In the pictures you can see the numbers of the landing slots. Each number must have a corresponding cylinder connected to it (cylinder numbering is counted from left to right).
To correctly install high-voltage wires on the VAZ 2114, follow the following algorithm of actions:
- Turn off the ignition. Open the hood and remove the power terminals from the battery;
- We remove the old GDPs from the mounting sockets on the module and cylinders;
- We remember the location of the high-voltage wires of the VAZ 2114 and connect new GDPs according to the diagram. Before replacing, it would not be amiss to draw this very diagram by hand on paper so as not to confuse anything;
- We connect power to the battery and, to check whether we did everything correctly, start the engine.
BB: what do they look like?
Naturally, the technical conditions for the existence of working wires are the conditions of a permanent conductor.
If we add here temperature changes and the imperfection of our world, we get the fact that the contact system fails within a certain period of time. And it comes with a frequency of 30,000 km. This is a control figure that tells you when to change high-voltage wires. The fact is that over time, internal resistance begins to increase in them, preventing the impulse from passing as it should. In this case, you may notice the following behavior of the fourteenth:
- You want to press your sneakers to the floor, but the engine doesn’t respond
- The engine may simply stall
- At idle the engine troits
- It often happens that car owners themselves do not notice how high-voltage wires are pierced
Of course, this is not an indicator of a malfunction only in high-voltage equipment, but there is a high probability that it was they who flew. Surely, it is worth carrying out a test procedure for all contacts.
And the tester showed that the wires had a long life. Well, the high-voltage wires on the VAZ 2114 need to be replaced. The procedure, in principle, is not troublesome. If you were able to test them, then you can replace them. The main thing is to understand the order of connecting high-voltage wires.
The fourteenth is an improved version of the nine, it has higher ignition power. Therefore, contacts have been added to the four high-voltage wires for connection to the ignition terminal itself, through which a signal goes to the spark plugs; Also, in the fourteenth system there are contacts leading to the switch, as well as contacts for connecting the adsorber valve to the gasoline injection system control unit.
The connection diagram for high-voltage wires is quite simple:
- Cylinder 1 clings to the lower left contact
- Cylinder 2 clings to the upper left contact
- Cylinder 3 clings to the upper right contact
- Cylinder 4 clings to the lower right contact
This is sometimes called module bay interface in schematics. Essentially, everything is correct. The main thing is to understand that all cylinders are counted from left to right, like any count adopted from the logic of writing from left to right: 1,2,3,4. And the connection is obtained according to the following scheme: 1,3,4,2. Many people sketch and write down how the contacts were before removal. But, if you look at the module itself, there are docking numbers there. It's impossible to make a mistake.
Checking high-voltage ignition wires using improvised means
If your car is equipped with an OBD port, you can localize the fault to at least the cylinder number. The most primitive scanner (such as ELM 327) will show misfire or lack of ignition. With any method of identifying a problem area, it is better to test the wires in the removed state. For a complete test, you will need a voltage multiplier and a megohmmeter (to check the insulation). Wires are connected to the high voltage source and laboratory tests are carried out. As a rule, there is no such equipment in the garage, so we will use a multimeter.
What does P0301 mean?
P0301 (and other P030X codes such as P0302, P0303, etc.) are simpler than you might expect. Because the ECU has already determined which cylinder has the problem, saving you the diagnostic headache.
The last digit of the P030X code indicates the number of the misfired cylinder. P0302 is a misfire on cylinder 2, P0303 is on cylinder 3, and so on.
The P0300 code indicates a random misfire. This means that several cylinders are misfiring randomly. Codes P0300 through P0308 are called misfire codes.
If you have one of these errors, you need to fix the problem as quickly as possible. If you drive your vehicle in this condition, you will damage the catalytic converter.
HOW OFTEN SHOULD I CHANGE GDP?
According to the recommendations of Avto-VAZ, replacement of high-voltage wires of the VAZ 2114 should be done every 30 thousand kilometers. In practice, motorists rarely comply with these replacement deadlines, since if the wires do not have any mechanical damage, they can travel about 100-150 thousand km.
When the service life is exceeded, the internal resistance of the GDP increases, which negatively affects the transmission of the electrical impulse. This leads to problems with ignition and acceleration dynamics, since when the supply of current to the spark plugs is delayed, the normal engine operating cycle is disrupted.
Change the wires every 25-30 thousand km and everything will be fine
Wiring replacement process
Before the VAZ 2114 armored wires are replaced, it is necessary to remove the old cables. To do this, you should: 1. Turn off the engine ignition. 2. Open the car hood. 3. Remove the old wiring leading to the engine and ignition unit. To maintain the order of connecting high-voltage wires of the VAZ 2114, you must be guided by the following diagram:
Cylinders are numbered from left to right. In the module, the internal ignition cylinder 1 is located on the lower left side. The second and third cylinders are located in the left and right compartments, respectively. The output of the fourth cylinder is located at the bottom in the right compartment.
Product added to bookmarks!
High voltage wires TESLA HI-TEMP suppressor.
APPLICABILITY: VAZ 2108, 2109, 21099, VAZ 2110, 2111, 2112, VAZ 2113, 2114, 2115, VAZ 1117, 1118,1119 (Lada-Kalina), VAZ 2170, 2171, 2172 (Lada-Priora), VAZ 2190, 2191 (Lada-Granta), VAZ 2192, 2194 (Lada-Kalina 2) with 8V injection engines.
TESLA BLATNA as, located in the Czech Republic, is the most important supplier of ignition wires and fuses to car manufacturers in Europe (VW Group) and also in Russia (VAZ).
TESLA high-voltage wires labeled HI-TEMP suppressor have a new resistive core, which improves energy transfer and significantly increases the durability of the wires.
Wire diameter: 7 mm.
Breakdown voltage: 35 kV.
Dynamic temperature resistance: from -40 to +200°C.
The fully conductive silicone wire core (1) is made of conductive glass fibers (a) coated with a resistive silicone layer (b).
The fibers guarantee increased tensile strength and both conductive parts provide maximum energy transfer to the spark plug and perfect protection of the wires from radio interference.
Internal insulation (2) with insulating braid (3) also serves as electrical insulation and improves the mechanical bending properties of the wire.
External silicone insulation (silicone raincoat) (4), including dielectric insulation, protects the core from the harmful influences of the working environment.
The ignition wires make contact with the spark plugs and the coil with the distributor using different types of contacts (5).
The contacts are protected by straight or rectangular tips and caps (6) from the influence of the working environment.
Wires meet the requirements of ISO 3808, ISO 6856 standards.
TESLA kits are certified in accordance with the GOST standard.
Operating principle and device
High-voltage wires are the link between the coil (ignition module) and the spark plugs.
The voltage generated in the ignition module is transmitted to the spark plug through a high-voltage wire, after which the spark plug produces a spark in the combustion chamber of the internal combustion engine. The wires have powerful insulation that can withstand enormous voltages without breakdown of the insulation. People quite often hear the name armored wire; high-voltage wires received this name because of their powerful insulation.
Device
A high-voltage wire consists of a core (also a conductor) placed in powerful shielded insulation. The core in the wire is shielded to preserve the voltage pulse from external influences and protect against breakdown.
At the ends of the wire there are tips made of a special alloy with the lowest resistance coefficient to ensure the best contact with the spark plugs and the ignition module.
OPERATIONAL CHECK
To accurately determine whether it is time to change the high-voltage wires of the VAZ, you need to check their performance with a multimeter.
This operation will take you no more than 15 minutes:
- Turn off the ignition;
- We remove the wires: disconnect the first end from the ignition module, the second from the cylinder;
- We switch the tester to ohmmeter mode and connect the multimeter probes to the wire contacts.
If the high-voltage wires on the VAZ 2114 are in normal technical condition, the multimeter will show a resistance within the value indicated on the wire insulation; if the readings are different, the armored wires on the VAZ 2114 need to be replaced. The process must be repeated on each wire in turn.
If the test shows disappointing results, there is a possibility that the problem of increased resistance lies in oxidized contacts. In this case, you can try to revive the VVP by wiping the contacts with VD-40 or carburetor cleaning fluid.
Also, the cause of problems with ignition can be a breakdown of the GDP. You can determine it visually in the dark - take a flashlight and open the hood of the fourteenth, find and inspect the armored wires, if you notice a slight spark on the insulation - the air intakes are broken and need to be replaced.
BB: replacement
We remind you once again that before making a replacement, the high-voltage wires on the VAZ 2114 are usually tested. This will help you avoid unnecessary expenses and make sure that they are faulty.
Before you begin removing high voltage contacts, do the following:
- The car must be with the ignition turned off
- Open the hood
- Carefully disconnect all contacts from the ignition coils and the engine itself (just in the place where the wires supply the impulse to the VAZ 2114 spark plugs).
By the way, despite the obvious malfunction of the high-voltage wiring, often the cause of poor performance is oxidation of the area where the ends of the wiring meet.
For prevention, it is advisable to wipe everything WD . Many people try to revive the state of their wiring in this way, but attempts, although they sometimes bring results, are futile. You will increase the service life of high-voltage equipment by just a little bit. They cannot be rehabilitated, only replaced with new ones.
Now we take the new wiring and put it in place with the same accuracy as before:
- We remember the diagram of the position of the wires or put it next to us
- Or you sketched how it was before your intervention, it doesn’t matter, the main thing is to follow the installation order in the way you need it!
Otherwise, you risk burning out the engine and spending money on almost a new car.
High-voltage wires Lada Kalina 8 valves
ENGINE 11183 1.6L 8-valve JSC AvtoVAZ, the engine is known to car enthusiasts under the names: 11183; engine 21114; 2114; Kalina motor; motor Kalina, etc. VALUE Cylinder displacement, cubic meters. cm - 1.596 Rated power, l. With. (at 5200 rpm) - 82 Maximum torque, Nm (at 2700 rpm) - 120 Number of cylinders - 4 Number of valves per cylinder, pcs. — 2 Total number of valves, pcs. - 8 Cylinder diameter, mm - 82 Piston stroke, mm - 75.6 Spark plugs - A17 DVRM, BPR6ES (NGK), etc. Cylinder operation diagram - 1 - 3- 4- 2 Power system - Injector (distributed injection with electronic control) Fuel Unleaded gasoline AI-92 Fuel consumption, l./100 km. (city/highway) - 8.8/5.7 Lubrication system Combined (splash + under pressure) Type of engine oil - 5W-30, 5W-40, 10w-30 and 10W-40 Amount of engine oil, l - 3.5 Cooling system — Liquid, closed type Coolant — Based on ethylene glycol Motor life, thousand hours. (theory/practice) - 150/300 Weight, kg - 127