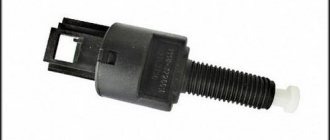
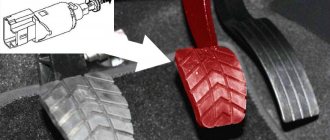
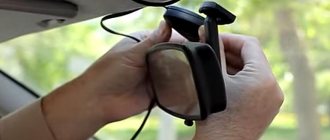
Description of the brake pedal sensor
Below we will find out how it works and how to replace it.
Purpose, location and operating principle
The essence of the system is that when you press on the brake, the piston in the cylinder begins to move. After this manipulation, fluid enters the brake system from the intake valve. It passes through the pipelines towards the main wheel mechanism, thus creating a suitable situation for the pads to move towards the wheel discs and drums. As a result, contact and subsequent braking occur. The controller itself turns on the brake lights.
Brake end piece
Typical malfunctions and methods for their elimination
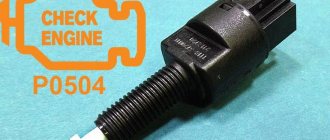
When “communicating” with a car, you can encounter various problems, but there is the most common and annoying problem. This problem is called error P0504, or otherwise “Brake pedal sensor mismatch.”
This malfunction often slows down the car. To solve this issue, you need to release the brake pedal and adjust the gap in the position sensor.
The adjustment is quite simple:
- It is necessary to hang a small but weighty weight in the area of the rubber brake pad.
- Unscrew the sensor nut a little and bring the white part to the brake pedal so that there is a gap of 0.2-0.5 mm between the body thread and the white tip. The sensor must be fixed in this position.
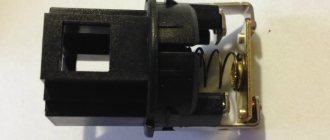
New replacement part
Lada Kalina Station wagon just space › Logbook › 05. Brake light switch
The check light came on with my favorite tester elm327, I see error p0504 (mismatch of brake pedal sensors). In general, no changes were noticed in the behavior of the car. I cleared the error. But soon, after a couple of weeks, the error began to appear constantly, resetting helped for 5 minutes. My lazy ass self decided to take up this issue. A sensor was purchased at a nearby store and replaced in literally 15 minutes.
The old sensor rang quite well, but there was a lot of free play at the rod.
But my joy did not last long, check again. Yeah, you need to read what smart, experienced people write. It turns out that the gap there is important. On Drive I found a mention of 0.5mm between the body and the rod cap. On the LadaKalinaClub forum there is a quote from the official documentation about a gap of 0.2-0.5 mm. Hmm, is that really the whole point... LKForum LKForum
I set the gap to 0.3-0.4mm using a feeler gauge for adjusting the valves. Oh, miracle! Everything works perfect! Tighten carefully while holding the sensor
Instructions for replacing the brake controller
- Pump out the liquid.
- Place the vehicle on a support stand and remove the wheel.
- Use a wrench to unscrew the two wheel pins.
- Remove the brake drum.
- Then, using a screwdriver, pull out the hook of the upper tension spring and remove the part. Perform the same manipulation with the lower tension spring.
- Then remove the front pad and spacer bar, while disconnecting the pressure spring and lower the pad.
- Remove the shoe lever from the parking brake hole, straighten the cotter pin and remove it from the parking brake drive.
- Remove the washer and lever.
- Install a new block and assemble the part in the reverse order.
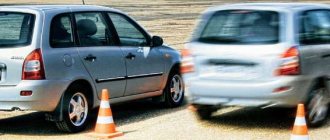
Rear disc brakes on Lada Kalina
If it doesn't help
Usually, a slight tightening of the inner nut on the block is enough for a long time, but if you set it to 4 clicks, and then, after checking, you are convinced that this is still not enough, you should think about replacing the brake pads. Such a replacement is a slightly more complicated operation, so novice car enthusiasts who are unsure of themselves should contact a service station. For more experienced people, replacement of labor will also not be an issue.
The hand brake on a car is a lever to the right of the driver, which additionally secures the car during long-term parking. Over time, it weakens, and for a strong fixation it is necessary to tighten it more. At the same time, even a novice car enthusiast can adjust it independently.
- mammut
- christening set
- embroidery machines
- shell helix ultra
Description of the clutch pedal sensor
What kind of device is this and how to replace it is below.
Purpose, location and operating principle
The clutch sensor is installed directly on the clutch pedal. It influences engine control with an electronic gas pedal and provides a convenient and flexible control scheme for machine modes. On its own, it looks like a nondescript switch that has on and off modes.
Typical malfunctions and methods for their elimination
If the controller does not detect signals from the clutch, then there is a risk of error 0830. The occurrence of this problem is usually a malfunction of the clutch sensor or a short circuit or open circuit. To correct this state of affairs, it is necessary to identify the reasons. That is, inspect the contacts for breaks or corrosion.
Video “eliminating squeaks”
You can learn how to solve one of the problems associated with the clutch in a car from the video from the author Konstantin Biyanov.
Replacing the Priora clutch sensor
Clutch sensor on Prior
Priora clutch sensor
Clutch sensor or Error P0830 on Lada Granta
Lada Granta - Error p0830 Clutch sensor malfunction
Clutch sensor or Error P0830 on Niva 21214
PRIORA clutch cable
Installing clutch sensor, 6Q0 927 189
CLUTCH PEDAL LIMIT ON NIVA. Repair or replacement #AutoFormula 4x4
Clutch pedal clicking PROBLEM SOLVED
The widespread computerization of cars, adapting to consumer demand, non-stop pushes the best engineering minds to new discoveries. Every year, driving cars becomes more comfortable and safer - and all this thanks to all these innovations. Today we will talk about such an element as the clutch pedal sensor.
There are two versions of the clutch sensor, which are not fundamentally different from each other - one is used in a robotic gearbox, the other in a manual one. What does the clutch sensor do? The answer is quite simple - the electronics send a signal to the control unit so that it, in turn, synchronizes the rotation of the engine crankshaft and the gearbox input shaft.
Sensors on the brake pedal - what do they affect?
In general, I once again connected the computer to the car - I climbed in the “01 engine” section
I found this indicator there - I don’t remember exactly what it’s called - something about brake sensors in the three-zero field - when I press the brake pedal I get this picture: 000 pedal released 010 first 5-10 mm 011 after another 10 mm
The first zero never changes to one. I think I read somewhere that if the brake pedal sensors are not synchronized, then . in general, everything is bad - the car starts working not according to the fact, but according to a pattern, the first “0” is what kind of sensor is it - where is it, how does it change?
Phaeton
Registration 09/03/2007 Address Russia, Moscow, South-Western Administrative District Age 87 Messages 4,901
| Thank you: |
| Received: 116 Sent: 51 |
There is one sensor, for all zeros. Search for “Frog”, there is a detailed description of the replacement. But why change it if you don’t have any errors? My reason for replacement was burnt contacts and, as a result, a sporadic error in the stop sensor.
Added after 10 minutes 33 seconds:
It’s strange, contacts are transferred, but ones are only added? Of course, you may have a sensor from a different system.
Polo
Registration 11/27/2007 Address Russia, Yaroslavl Age 41 Messages 428 Diary entries 1
| Thank you: |
| Received: 0 Sent: 1 |
here is group 006 second field Brake pedal F/F47/F36
I read somewhere about “all trade wind sensors”; it described all the sensors that are on the car and what they affect; I definitely didn’t dream about it; for example, there was a paragraph about the crankshaft sensor and a description of what would happen if.
The brake pedal sensors were described in a similar way - there are three of them, one is a frog - turns on the light and two more - these two should work synchronously - if not, then the computer switched something to emergency mode and worked according to the factory template, and not in fact.
Phaeton
Registration 09/03/2007 Address Russia, Moscow, South-Western Administrative District Age 87 Messages 4,901
| Thank you: |
| Received: 116 Sent: 51 |
Everything is correct, but this is about the accelerator pedal sensor. [-X
Recommendations
Comments 5
The simplest thing, if you have already disassembled the limit switch, is to turn over the contact (triangular, silver washer), which I did about a year ago. And a couple of days ago, when it was -20 below zero, the limit switch didn’t work again, I clicked it (pressed it and quickly released it) and... piuuuuu, the button flew out of the case. Accordingly, the handbrake light is always on. I went to the store and bought a new one for 65 RR, the replacement took 5-10 minutes.
It doesn't work for me at all!)))
My device is already pretty tired of the glitch of this limit switch. Still can't get around to changing it. You put the car on the handbrake, the indicator on the panel does not light up, you move the limit switch and lo and behold, a contact appears) everything would be fine, but it’s very annoying since it’s autostart. So I arrived where I needed to go, put the car on the handbrake, moved the limit switch, the light came on, I left happy, I think now I’ll press the button on the key fob and the car will stall and set to autostart, so what the heck, at this time the contact goes away and the car stalls by itself, I have to sit down again, start it up and move it again) just such a hemorrhoid due to laziness to dig around for an hour)
It seems like a small thing, but it’s annoying! =)
I also have a blinking indicator, but I’m too lazy to take it apart))
Causes of sensor malfunction and their symptoms
In most cases, the above error occurs because the sensor has not been adjusted properly. It is for this reason that the car owner notes the emergence of such problems as:
- instability of the engine: it starts poorly or stalls immediately;
- instability of speed.
The sensor combines two functions: it is both an element of the brake pedal position and a brake light switch. Most often, the malfunction is caused by the sensor misalignment already mentioned above, or by a broken spring. The problem that has arisen manifests itself by the “check” icon lighting up and error P0504 (implying a mismatch in the operation of this part).
STOP LIGHT SWITCH LADA KALINA1118 1118 SEDAN
To identify the car and reliably select the brake light switch for Lada Kalina1118 1118 Sedan, you should carefully select the vehicle modification. To do this, use clarifying information with data containing: power, measured in horsepower (example 103 hp), engine size (example 1.6 liters), type (example gasoline) and model + engine code, as a rule, this parameter rarely used, but you can only find it in the vehicle title, you can also pay attention to the drive axle (there are rear, front or all-wheel drive), and a mandatory parameter is the release date, which divides the vehicle model into restyling, pre-restyling, first and last year production.
This data serves to uniquely install spare parts during a certain production period, as manufacturers are constantly upgrading cars off the assembly line.
Carrying out pre-installation diagnostics
Before purchasing and installing a new sensor to replace a broken one, it is recommended to diagnose the old sensor and, if there is a breakdown, fix it yourself. There are two nuts on the sensor body, the first of which is located at the bottom, and the second at the top. The nut located at the top should adjust the clearance of the part (sometimes it is set incorrectly). This leads to disruption of the normal functioning of the button, therefore, you will need to set the gap so that there are no obstacles to its normal movement.
After the adjustment, the ECU error is reset, then you need to start the engine and wait about fifteen minutes, since errors are not recorded immediately. If error P0504 is not marked, it means that the cause of the engine malfunction was an incorrect sensor setting. If it appears again, you will need to replace this element with a new one.
Select the vehicle modification to search for the brake light switch
In the next step, for an expanded selection, you can enter the vehicle's Vin code to go to illustrated catalogs, where you can find the layout of parts down to the bolt and duplicates that are not in the catalog of analogues.
Source
Carrying out work on dismantling and repairing the sensor
In most cases, repairing a sensor does not take a significant amount of time and does not require the car owner to have either specific knowledge or the use of complex tools. You can do it yourself without going to a repair shop.
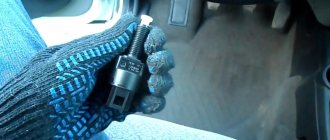
First you need to disconnect the negative terminal from the battery, and then move to the driver’s seat in the car. Move the front seats back as far as possible and remove the interior carpet. The sensor is located next to the brake pedal; to remove it, you will need to disconnect the clamp and the block with wires from its connector.
Carefully loosen the fastening nut and carefully unscrew the body of the part, then disassemble it. This element is a two-piece element, and both parts are held in place with latches.
There is a spring in the inside of the sensor, which is often what causes problems. Replacing a faulty spring with a new one, having the same number of turns and suitable dimensions, most often helps to eliminate the problem.
Having completed the repair, reassemble the element by performing the manipulations you performed to disassemble it in the opposite sequence, and then install it in its original place, and if necessary, adjust it. The part is tightened until the brake pedal goes down, after which it is turned 90 degrees clockwise and secured with a lock nut. As a result, with the brake pedal lowered, the switch rod will be in a recessed position, and when you press it, it will go beyond the boundaries of the switch body.
Next, start the engine and wait at least ten minutes; if the error does not appear, you have correctly identified the cause of the problem. If error P0504 appears again, adjust the sensor; if this error continues to appear, the part will need to be replaced.
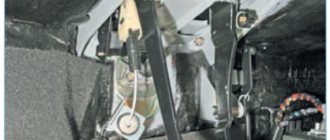
How to tighten up
- Since the handbrake system is located under the bottom, it is covered with an outer casing to protect it from dirt and dust. But its fastenings - 4 nuts - will be stuck. To unscrew them, wet each one with WD-40 and wait a couple of minutes. The nuts are unscrewed with a 10mm wrench.
Protective cover - The casing is held in place by a rubber ring that holds the front of the muffler. This ring is also removed.
- Slide the casing forward towards the engine, then remove it completely.
- On the opened block (bar with two cables), use a 13mm wrench to turn the inner nut, periodically checking the number of clicks, periodically turning the wheels
It is this pair of nuts that controls the tension of the handbrake cables - Having adjusted, fix the position with the outer nut (key 13).
- Check the operation of the handbrake for both wheels, turning them in turn.
The pad may be skewed, and one wheel will need fewer clicks - this is not critical.
The studs on which the casing is attached are quite weak, so when tightening the nuts, you don’t need to apply much effort.
Video on lifting
Checking the brake fluid level
The brake fluid level is checked periodically: daily during vehicle operation, during each maintenance, after operations to pump the brake system hydraulic drive and replace the brake fluid, when a warning lamp lights up on the instrument panel, indicating an insufficient level of brake fluid in the master cylinder reservoir.
1. We prepare the car for work.
2. Use a rag to remove dirt from the master brake cylinder reservoir.
3. Visually check the brake fluid level in the reservoir. It should be between the MIN and MAX marks on the tank body.
4. Check the degree of wear of the brake pad linings of the front and rear brake mechanisms.
5. If the wear of the brake pads is within normal limits, and the fluid level in the reservoir is below the MIN mark, then disconnect the tip of the wiring harness from the emergency brake fluid level drop sensor, unscrew and remove the reservoir cap.
6. Add new brake fluid to the reservoir up to the MAX mark (when installing the reservoir cap, the sensor float will be immersed in the liquid and its level will increase).
7. Close the tank lid tightly.
8. Connect the wiring harness block to the sensor connector.
9. Check the operation of the emergency brake fluid level sensor: with the ignition on, press the rubber lining of the reservoir lid from above. If the sensor is working properly, the warning lamp on the instrument panel will light up.
Checking brake pad wear
We check the degree of wear of the brake pads of the front brake mechanisms in the following sequence.
1. Place the car on the inspection ditch.
2. Remove the front wheels.
3. When checking the pads of the left brake mechanism, turn the steering wheel completely to the left, and when checking the pads of the right brake mechanism, turn it to the right.
4. Through the inspection hole in the movable caliper bracket, we visually determine the thickness of the brake pads.
If the thickness of the lining of at least one pad is less than 1.5 mm, we change all the brake pads of the brake mechanisms of the right and left wheels.
5. At the same time, we check the mobility of the brake cylinder pistons. If the piston becomes sour, replace the cylinder.
To check the degree of wear of the rear brake pads, you will need a flashlight.
1. We prepare the car for work.
2. Using a slotted screwdriver, remove the rubber plug for the inspection hole in the support shield of the rear wheel brake mechanism.
3. Light the inspection hole with a flashlight. If the thickness of the brake pad lining “ A ” is less than 1.5 mm, change all the brake pads of the brake mechanisms of the right and left wheels.
4. Install the plug in place.