Where is the coolant temperature sensor located?
If installing an ambient air temperature sensor is not a priority, as is regularly checking its functionality, monitoring the coolant temperature is extremely important.
To do this, the car is equipped with a special device that helps the driver constantly monitor the situation and prevent the engine from overheating. A working sensor will allow you to turn off the vehicle’s engine in time, if there are prerequisites for overheating - this will prevent the onset of serious consequences associated with this. The location of the device itself may differ on different car models, but it will always “stand” on the path of fluid from the engine to the radiator:
It helps not only to avoid overheating. For example, at negative temperatures outside, this device will allow the driver to judge how warm the engine is. Naturally, you should not start driving on a supercooled engine, since this not only leads to a sharp increase in fuel consumption, but also seriously increases the percentage of engine wear. Information from the coolant temperature sensor will help you choose the “correct” engine warm-up mode, “telling” the driver whether to increase the idle speed.
How to extend the service life of a recreation center
To extend the service life of the sensor, you will need to follow the following recommendations:
- Conduct a technical inspection of the vehicle on time;
- use only original spare parts for the car;
- do not allow the use of low-quality fuel mixture;
- Contact a car service if you find problems with engine operation.
You can change the oxygen sensor on a VAZ-2112 yourself without going to a car service center. Only original components must be used. If there are problems starting the engine, you should check the correct operation of the lambda probe.
External air temperature sensor VAZ 2114 how it works
The mass of sensors in the vehicle operating system facilitates monitoring of various processes, and also supports the correct functioning and proper distribution of resources between various systems.
Over the years, the inside of a car becomes more and more functional and more and more controllers are required to maintain its functionality.
For example, the outside temperature sensor was not used at all in early car models. In truth, these types of detectors began to be introduced everywhere not so long ago. This is evidenced by the fact that a good part of car enthusiasts to this day are sincerely perplexed when the statement is made that the use of such devices is convenient and even necessary.
The operation of the DTVV is similar in principle to a duct air temperature sensor. The DTVC measures the air in the duct based on readings sent to the head unit from the sensing element. In general, the car device works almost the same. Both of these devices are thermistors - they convert temperature level data into resistance readings.
Outside air temperature sensor VAZ 2114
The model of the temperature sensor that is installed on this VAZ car is 2115-3828210 and its modifications 02 and 03. Some of them are marked VDO - there is an opinion that devices with such markings are more accurate, faster and more modern.
In the most modern car models, the system for measuring the external air temperature allows the owner to start auto-warming of the engine in case of frost.
It is worth noting that early Lada models were not equipped with such devices. Over time, the situation began to improve for the better. For example, VAZ 2110, VAZ 2112 have so-called trip computers, which may not be as informative as the devices of more modern cars such as Samara-2, but could also show the level of air heating outside the car.
The best choice would be the space allocated by the manufacturer for the detector. Or - a place near the towing area under the bumper
It is important to install the device under the front bumper, since under the rear bumper, due to warm air from the engine, the readings may be distorted. Not much, but it won’t have the required accuracy
It is located in the front of the vehicle - between the bumper and radiator.
Like any other sensor in domestic cars, this one can be changed on your own, the main thing is to read the instructions and safety instructions and strictly follow them. You can, of course, take the car to a service station and entrust it to professionals, but if you have some skills, it will be easier and cheaper to change the device yourself.
It is worth noting that the DTVV cannot be repaired - only replaced, but this is not so scary, since the cost of the spare part is very low.
Operating principle of the liquid temperature sensor
What should you know about a device malfunction?
First, you need to understand when you should pay attention to this particular detail. The main sign of a breakdown is a discrepancy between the sensor readings and the actual level of air heating outside the car
This is not so easy to notice if the difference is small. But, as a rule, if the temperature readings do not coincide by less than seven degrees, this is not even considered a breakdown. But a difference of about 10 is easier to recognize.
It is also common for the sensor to loop at minus forty even in the warm season.
As for owners of modern cars, in particular foreign cars (Ford, Chevrolet, BMW, etc.), the on-board computer itself will indicate the malfunction by providing an error code on the screen.
Secondly, before changing the thermistor itself, it is worth checking the contacts and wiring - if the fault lies in them, then replacing the thermal detector will not save the situation.
Reasons why the VAZ 2114 air temperature sensor may fail:
- mechanical damage that compromised the integrity of the device (being hit by a heavy object during a trip - crushed stone or something similar);
- the influence of harsh climates - in particular, very low temperatures outside can lead to malfunction of the device;
- oxidation of contacts and disruption of wiring can be both independent breakdowns and the cause of failure of the DTVV.
Bottom line
The models and brands of cars that today are equipped with DTVV can be listed endlessly - Lada Kalina, Niva, Gazelle, Volkswagen Passat, Ford Focus 2 and Focus 3, Daewoo Nexia and BMW E 39.
Another SURPRISE from Opel!! Opel ASTRA J 2012. Replacing the TEMPERATURE SENSOR.
Grant engine temperature sensor. We install it ourselves
Every owner of a Lada Granta car has encountered its main drawback - the absence of an engine temperature sensor on the panel. The task of the AvtoVAZ management was to make Grant accessible, the engineers did it “excellently”, saving even on this device. The emphasis was on cheapness, so we tried.
Soon, however, everything was corrected - on models of a higher price and advanced configuration of the Lada Granta liftback 21911, 21912, 21917, an engine temperature sensor has already appeared and helps monitor the condition of the internal combustion engine.
However, what should owners of earlier models do? The overheating indicator lamp installed on cars is not informative enough.
The thermostat is the weak point of Lada Granta cars, and it would be much more effective to determine its malfunction at a very early stage by assessing the behavior of the TD sensor needle, but...
It was these problems that prompted some motorists to look for answers to the question: “How to install an engine temperature sensor on a Grant?” You can, of course, contact dealers. For a fee, specialists will equip everything you need. But there's no need to rush. It is not at all difficult to equip your car with this device yourself. To make sure of this, let's look at the whole process step by step.
How to equip your Grant with an engine temperature sensor
- temperature indicator,
- plastic case for it,
- the sensor itself;
- fastening clamps.
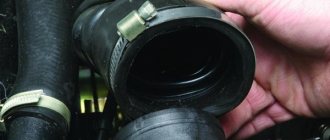
Once you have the kit in your hands, it's time to head to the car. To see the place where the Grant engine temperature sensor will be attached, the negative terminal is removed from the car battery, and behind it the air filter is disconnected and removed.
This will open an overview of the pipe that leads from the thermostat. Coolant circulates through it during operation.
It is necessary to carefully cut the pipe and insert the temperature sensor inside along with the adapter (buy at a car store), then securely tighten it with clamps.
An indicator with an arrow for the temperature sensor can be installed on the dashboard near the windshield next to the instrument panel. Visually this is very convenient, because...
It is located close to eye level, and a quick glance will be enough to control the temperature level.
But what should you do if you may need to fix the navigator in approximately this place? The second option for mounting the sensor indicator is even more aesthetically pleasing.
Many motorists install the device in a cup holder next to the gearbox, but the panel itself will need to be slightly modified.
Of course, in this case you will have to look for a place for a glass of coffee, but this will be a huge plus: the sensor indicator in your cabin looks very harmonious. Now you can fully control the engine temperature and monitor how the thermostat behaves.
Diagnostics and indication
Connect it to a special connector and download to your smartphone a program that interfaces with the adapter, for example hobdrive, torque or opendiag.
In addition to temperature, other sensor parameters can be displayed on the display, such as air suction temperature, volume and many other functions.
You can place your smartphone on a special delivery or just on the panel. Here's what it looks like in practice.
Diagnosis and consequences
It would seem that it could be difficult to determine a malfunction of a temperature sensor. In practice, it is possible to see the discrepancy between the measured temperature and the real one only in the case of a large difference. And for an engine, a faulty intake air temperature sensor means either excessive fuel consumption or difficult starting in the cold season.
The most reliable diagnosis is made using a multimeter. First, the resistance without influence is measured on the removed sensor, and then the element is heated. If the resistance changes at specified intervals, everything is fine. If the changes are not recorded, this is an obvious malfunction.
Every modern car has a lot of installed sensors that constantly measure the temperature of the ambient air, coolant or intake air.
It is quite important to constantly monitor these indicators, since they directly affect the efficiency of the engine, its stable and stable idle operation, as well as fuel consumption
In addition, a working outside air temperature controller will allow you to automatically start the engine in winter, when the car is parked, and will facilitate “morning” starting. As a rule, all cars leaving the manufacturer's assembly line already have a full set of temperature sensors. But some domestically produced models do not have an ambient temperature sensor, which brings some inconvenience to the car owner. Fortunately, the device itself is inexpensive, and the process of installing it yourself is not difficult at all.
Triple
If the engine is shaking, even just a little, it is worth measuring the compression in each of the cylinders using a special device. If there is none, then you will need a vacuum compression gauge and an assistant who will start the engine. But it’s still better to contact a qualified specialist at the nearest service center and carry out computer diagnostics. This way the fault can be found faster and with greater accuracy.
If you measured the compression yourself and it turned out to be normal, then you should pay attention to the ignition coil, high-voltage wires and spark plugs. And in case of malfunction, replace them
It is worth noting that it is better to change the spark plugs as a complete set, and change the wires to silicone ones.
Automotive temperature sensors
Every car owner knows how complex the electrical component of his car can sometimes be. Each element of such a system is an important link, and its failure can bring varying amounts of trouble. Where is the air temperature sensor in a car and what is it intended for?
Since air no longer entered the fuel mixture through a simple air duct, but began to be calculated correctly without human intervention, temperature sensors have become firmly established in the car. There are two main areas where thermostats with an air temperature sensor are present.
1. System for creating a fuel-air mixture for the engine. A simple thermistor is used as a sensor here. When the temperature changes, changes in electrical resistance are recorded. This is necessary in order to understand how much fuel to supply with the intake air. Colder air has greater density and requires more gasoline or diesel fuel for the same volume of mixture.
2. Air conditioning system of the car. For full operation of the system, it is necessary to have several detectors at once. But to estimate the street temperature, you can get by with one.
Types of sensors that monitor coolant temperature
All sensors installed on modern cars are divided into magnetic and bimetallic. You can independently determine the specific type installed on your personal car by the speed of its reaction after starting the engine. The magnetic one has an instant response, and after starting the motor it immediately shows the current temperature. The bimetallic version does not differ in such “efficiency”, showing the correct temperature after a short pause.
The operating principle of a bimetallic (tape) sensor is quite simple. The existing control unit changes the current depending on the current temperature of the circulating fluid, which leads to heating of the coil on the metal strip. It is able to change its length according to the temperature, and rotate the arrow attached to it, showing the current temperature of the liquid.
The design of the magnetic sensor is also not complicated. It consists of an armature with an arrow attached to it, on the sides of which there are two coils powered from the on-board electrical network. The resistance of the coils changes depending on the passing current, and it is determined by the current temperature of the engine. There is another type of sensor - capillary. Currently, it is practically not used due to the inconvenience of the design.
Crankshaft regulator
New crankshaft controller for the “ten” Depending on the type of car, on a 16- and 8-valve engine, the location of all controllers may be different.
However, all of these devices combine into one functioning system, and the crankshaft adjuster is no exception. Thanks to this controller, the electronic engine management system of the “tens” can independently determine at what point to supply gasoline and a spark through the spark plugs in order to ignite the combustible mixture. In fact, the design of the device is a magnet, as well as a coil of thin wire. The crankshaft sensor has certain advantages:
- As practice shows, at “tens” this regulator can work for quite a long time. Its service life does not decrease even as a result of using the vehicle’s power unit under increased loads.
- The crankshaft adjuster works in conjunction with the crankshaft pulley.
- If the device fails, the engine may not be able to start. Or, if the regulator breaks down, the speed parameters will be reduced to 3.5 thousand per minute.
This controller is installed on the oil pump, actually at the very top of the shaft teeth. Or rather, one millimeter from the cloves. You can learn more about how to replace this controller yourself from the video below (the author of the video is the channel In Sandro’s Garage).
Self-installation of outside air temperature sensor
Many VAZ car models do not have an air temperature sensor, so to increase comfort, many car enthusiasts install it themselves. This does not require any special skills, but first you should determine whether the dashboard is able to identify the readings of the new device. This is not difficult to do, and, for example, on Grant it is done as follows:
If the version supports the ability to connect a temperature sensor, you can go to the auto store to purchase it and begin the installation process. Initially, you should correctly determine the location of the outside air sensor - it should not be influenced by temperature flows from the engine. The optimal place is considered to be the space close to the radiator - it can be seen when the hood is open, there is a pin welded to the frame. It is convenient to “throw” the mass from the device onto it.
After securing the device itself, you will need to run a “plus” wire into the interior. To do this, you can use the clutch cable plug or another convenient place. After this, you will need to remove the instrument panel; you need to find the 25th contact, intended specifically for the temperature “controller” of the ambient air. The “outboard” temperature readings appear automatically in the menu. If this does not happen, the positive terminal is removed from the battery for 10 minutes. After power is restored, the temperature will appear. The installation process can be seen in the video:
We check the mass air flow sensor on a VAZ-2110 with a multimeter
The sensor block, the first wire may not be there - this is normal.
To do this, we need to understand the pinout and the sensor connection diagram. As you can see, the block has only five wires:
- + 12 Volt.
- + 5 Volts.
- Total ground (green wire).
- Air temperature output signal.
- Air flow signal output (yellow wire).
Electrical diagram for connecting the mass air flow sensor.
The pinout may differ in different firmware versions and on different sensors. Everything is clear with the first two contacts - take a multimeter and check the presence of voltage when the ignition is on. If there is no signal, we look for the cause either in broken wires or in poor contact. Now we check the main indicator - the accuracy and magnitude of the air flow signal. By the way, this can be checked without a multimeter, using the on-board computer, if one is installed:
- We go to the menu, look for sensor parameters.
- Find the voltage Udmrv.
- The rating for all of the above modifications is from 0.996 to 1.01 V.
What is the purpose of the inlet air temperature sensor?
Another temperature sensor that any vehicle is equipped with is the intake air temperature sensor. At first glance, its role is quite insignificant, and most motorists may not even be aware of its existence. In fact, the uninterrupted operation of the car engine largely depends on the performance of this unit. Most modern temperature sensors are designed based on a semiconductor thermistor, so there are practically no problems during operation.
If difficulties arise, as a rule, they are as follows. During long-term operation, there is a discrepancy between the temperature readings on the sensor body and its electrical resistance. This leads to a smaller error in calculating the actual temperature of the incoming air. As a result, the computer, which calculates the parameters of the fuel mixture, sharply reduces the air supply and at the same time increases the “portion” of fuel. The resulting mixture entering the cylinders is “incomplete,” which makes its combustion process difficult. This results in unstable engine operation; in addition, an overly enriched mixture easily causes spark plugs to flood, which makes starting the engine impossible.
There are no recommendations regarding the frequency of checking this sensor, and each car owner decides for himself
To independently check the functionality of this important incoming air temperature sensor, you will need an ohmmeter and a table with normal resistance values, which is included in the instructions for the car itself. The test starts with the engine cold and continues with the engine running until the cooling fan starts.
If there is reason to believe that the sensor is faulty, it makes sense to replace it with a new one. The cost of the device is low, and all replacement work is completed in a matter of minutes and does not require special skills or experience.
An external air temperature sensor (ATS) is installed on cars to ensure driver comfort.
AvtoVAZ specialists began to include an external air temperature sensor in the car’s on-board computer. It is included in the standard equipment of the VAZ-2110. The fifteenth model already has a VDO dashboard with two windows and a temperature display on the display.
Various options for installing DTVV on a VAZ-2110 car are widely used. The most suitable sensor for this model is the one with catalog number 2115-3828210-03 and the cost is around 250 rubles. Its serviceability is usually checked using a test: when the part is cooled and heated, the current resistance indicators change.
DTVV must be insulated from moisture, and direct sunlight must also be prevented. The sensor must be protected from heat coming from the vehicle's engine compartment. Therefore, the most suitable location for mounting the device is at the front of the vehicle or in the immediate vicinity of the towing eye.
The sensor itself is equipped with a pair of contacts: one of them is directed to ground, and the second gives a signal about a change in temperature. The last contact is made into the car interior through a hole next to the fuse box. The VAZ-2110 is equipped with on-board computers in two versions: MK-212 or AMK-211001.
In such on-board computers, the second contact of the sensor must be connected to C4 on the MK block. In this case, I take out the outgoing free wire and then carefully insulate it.
If the DTVV is not connected correctly or there is an open circuit, the following will be displayed on the on-board computer display: “- -”.
It is quite easy to connect DTVV to a VAZ-2115, since this car is equipped with a VDO panel with two displays.
The sensor wire is attached to the red block X2 in socket No. 1 on the car’s dashboard.
What to do if the device fails
If tests show that the sensor is faulty, then you should first try to restore it. To do this you need to follow the instructions:
- Remove the negative terminal from the battery.
- Get to the air filter and remove the sensor from it.
- Disassemble the controller, being careful not to touch the platinum wire. It is forbidden to touch it, as this will disrupt the operation of the sensor.
- Wipe the remaining parts of the mass air flow sensor with battery cleaning fluid.
- Reassemble the sensor and reinstall it.
Firmware for instrument cluster on Kalina2Granta
Since the USBDM programmer had already tested it at home (CAN recovery) and found out that it can also flash instrument clusters (gearboxes), I decided to flash it myself.
My gearbox costs 219240 and came with firmware 007 and did not display engine temperature readings. I decided to upgrade to version 009. But as always, the first thing is lumpy, an error popped up during the firmware and the result was a brick. Again, study the internet and figure out what’s wrong. I found my mistake, reflashed it with a new one - everything worked.
But the mileage readings became “000” and the IMMO was lost. There were no problems with retraining the keys (IMMO), the Internet is full of information, and I’ve already done it myself. But it was not easy to restore the mileage; the car is under warranty and also needs mileage. MrRararai for help
, he helped restore my mileage, for which I thank him very much.
Now I have firmware 012 on my gearbox.
Now I have also learned to change the mileage.
I surfed the Internet and this is what I found about instrument clusters:
how to view the CP firmware
- press the mileage switch button, then turn on the ignition without releasing the button (without starting the engine), the test will begin, press the button again - we see the software version (top line) and equipment (bottom line).
There are two firmware options:
1) with mileage and IMMO reset (it will be necessary to retrain the keys)
2) with preservation of mileage and IMMO.
— The gearbox seal is broken (warranty).
— When flashing the firmware, there must be a training key nearby, if something goes wrong and the IMMO is jammed, the car will not start, you need to train the keys (IMMO)
015
- on the old board, there is not a single temperature.
029 — 040
- updated board. there is no temperature.
All panels from the standard have a different display installed; to flash the firmware, you need to change it to a display from the standard. And add a bunch more elements. The old and new versions are different, each has its own improvements.
053, 060, 076, 087
- there is no temperature.
090, 091
– it is possible to connect an ambient temperature sensor (TOS), but there is no coolant temperature (TOZH)
092-095
– there is TOZ and TOS
053, 060, 076
– Old boards, to flash them you need to modify the board with a soldering iron or sew adapted 092 firmware
087-095
– New boards. Sewn without any modifications.
046
– has everything (same as 009 from Kalina)
009
– has everything (same as 046)
012
– everything is there, the latest version. It differs from 009 in the presence of a gear shift prompt.
Hardware PCs of configuration 40 (Lux) from configuration 20 (Normal) differ in the presence of an LED for indicating PPTF and the color of the glasses
— 219220(40)-007 and higher, there will be software: 009 or 012 — BC of the “Lux” configuration + engine temperature + removed the glitch with the outside air temperature + corrected the clock
On the 012 firmware of the gearbox and the firmware “i427ge05”, “i427GKA1” of the ECU, only on the luxury PC (219240), only on the manual (127 engine) - a hint about gear shifting appeared.
— 219020-060, 076 will be software: adapted 092, TOS and TOZH will be added
— 219020-087 and higher, there will be software: 092 or 046 (unlike 092, it will additionally show the engine operating time, fuel consumed and average speed. All parameters are resettable) or 009 from Kalina (in addition to 046, the squeak of the turn signals).
— 219040-032 and higher, there will be software: 046 — BC of the “Lux” configuration + engine temperature + removed the glitch with the outside air temperature + corrected the clock
Some data on firmware versions was taken from Goffka