In connection with the adoption of the law that, starting November 20, 2010, all moving vehicles must have either daytime running lights, low beam headlights, or fog lights on, regardless of the time of day and visibility conditions. And also after 3 warnings from the traffic police (by the way, the fine for not turning on the lights is 500 rubles), it was decided to install daytime running lights.
Briefly about DRL and a brief report on the work done. Daytime running lights, or DRLs for short, appeared relatively recently with the advent of new models of foreign cars. DRL has nothing to do with side lights; installation of DRL is optional (i.e. optional, if desired), but daytime running lights are installed subject to certain parameters.
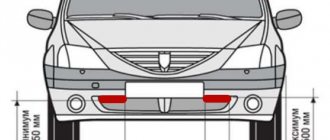
“State standard of the Russian Federation GOST R 41.48-2004”: 6.19.1 Installation Optional on cars. Prohibited on trailers. 6.19.2 Number Two. 6.19.3 Installation diagram There are no special requirements. 6.19.4 Placement 6.19.4.1 Width - the point of the surface visible in the direction of the reference axis that is furthest from the median longitudinal plane of the vehicle must be no more than 400 mm from the edge of the overall width of the vehicle. The distance between the inner edges of two visible surfaces must be at least 600 mm. This distance may be reduced to 400 mm if the overall width of the vehicle is less than 1300 mm. 6.19.4.2 In height - at a distance from 250 to 1500 mm above ground level. 6.19.4.3 Lengthwise – on the front of the vehicle. This requirement is considered to be satisfied if the emitted light does not interfere with the driver directly or indirectly as a result of reflection from rear-view mirrors and other reflective surfaces of the vehicle. 6.19.5 Geometric visibility Horizontal angle beta = 20 outward and inward. Vertical angle alpha = 10 up and down from horizontal. 6.19.6 Direction Forward. 6.19.7 Functional electrical diagram If installed, daytime running lights must turn on automatically when the engine start/stop control is turned to the “on” position. It must be possible to activate and deactivate the automatic activation of daytime running lamps without the aid of a tool. Daytime running lights must turn off automatically when the headlights are turned on, except when the headlights are turned on for a short period of time to signal road users. 6.19.8 Pilot signal Optionally in closed loop form. 6.19.9 Other requirements None.
After talking with Google and Uncle Yasha, a lot of unnecessary information appeared, all kinds of connection diagrams, etc. I decided to look at the connection diagram that came with the running lights and, having picked up the diagram of my car, everything became clear and simple. How to install DRLs directly on a car is an individual matter, since there are many models of running lights and their mounts are different. But with the connection, you had to do this: 1. When you turn on the ignition, the DRLs should turn on, and when you turn off they should turn off. 2. Must light up together with the side lights turned on. 3. When you turn on the low or high beam headlights, they should turn off (for DRLs with three wires). Yes, DRLs come with 2 and 3 wires. With 2 it is clear + (red) and – (black), but the third wire (usually white) serves to turn off the running lights when voltage is applied to it.
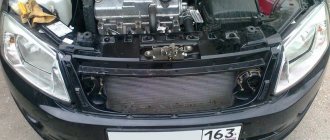
Connecting DRL to a Lada Kalina car. After I removed the battery and air vent, it became clear that you couldn’t just push the wiring into the cabin and you would have to remove the left fender liner.
After that, a two-core wire for daytime running lights was installed next to the harness.
And so the wire is in the cabin.
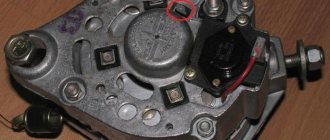
Now you need to connect the wires to the exterior light control unit block. To do this, connect the + (red) to the (thick blue with black stripe) wire. This wire will supply voltage when the ignition is turned on. And white (if available) to gray, it will be responsible for turning off the DRLs when the low or high beam headlights are turned on. The connection points must be soldered and carefully insulated.
Which lamps are best to use in Kalina
To find out which lamps are installed in Kalina during assembly, you need to remove the cover and pull out the part. The name, model and type of spare part are printed on the case. AvtoVAZ uses products from Philips as the main light. However, some models contain parts from Osram.
When searching for light bulbs in Kalina, you should be guided by proven options:
- number on the Kalina body or in the vehicle passport;
- a burnt-out sample previously removed from the lantern.
The body number is entered into a special window that pops up when you visit online resources with catalogues. Such systems independently determine the year of production, configuration and type of lighting equipment and offer a list of original spare parts and replacements for Kalina.
The number is provided to the seller in the store to accurately determine the part code. A simple and reliable way is to remove the lamp from the base and buy a new one based on the sample. In this case, you avoid purchasing the wrong part and having to go back to the store for an exchange.
The Kalina hatchback and sedan use the same lighting devices. The type of spare parts is no different for the station wagon.
When choosing a light bulb, it is important to adhere to the recommended parameters from the Kalina manufacturer. Installing a light with a higher power will lead to melting of the internal parts of the optics and damage to the contact group. After installing cheap substitutes, damage may occur due to poor quality assembly of the part and even explosion of the bulb
After installing cheap substitutes, damage is possible due to poor quality assembly of the part and even explosion of the bulb.
20 liter canister for gasoline: which one is better to buy
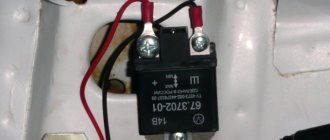
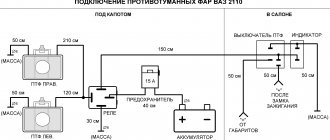
These are two more methods worth considering. A 4-pin relay, a generator and an oil pressure sensor will be used here. But not in a single chain.
Both schemes assume that the DRLs will turn on only when the engine starts. The system is powered by a generator and is based on switching a 4-pin switch and a reed switch.
The connection of the relay contacts looks like this:
- Pin 30 goes to the plus of the LED module;
- Contact 85 goes to the plus of the wire to the dimensions;
- Contact 86 is required for any output from the reed switch;
- 87 contact to the positive terminal from the battery;
- Also, the second terminal from the reed switch goes to the battery plus.
After connection, configuration must be carried out. Here you need to start the engine and start moving the reed switch near the generator in order to get the movement and stable operation of the movers. Then the reed switch should be removed into a special thermal tube and fixed.
If there is no reed switch, then power for the DRL can be supplied through the oil pressure sensor. Then contact 86 goes to the pressure lamp, but otherwise the circuit remains in its original form.
The schemes are excellent in many ways. But they cannot be used in situations where the dimensions are based on LEDs. This is the only significant drawback.
Basic criteria for choosing headlights
The popularity and demand for running lights is increasing over time. The various types of such lamps offered by manufacturers can not only ensure traffic safety, but also diversify the appearance of the vehicle. When choosing, you should carefully read the markings on the lamps.
Automotive lighting devices must be marked to permit their use on the territory of the Russian Federation. You should not choose devices based on the lowest cost. In addition to their low operational reliability, such lighting devices may be rejected during the next technical inspection. Then the car will be unusable until the causes are eliminated.
Parts manufactured by Hella, Philips, and Osram meet these requirements. Many of them can be installed on Lada Kalina. The cost of the kit ranges from 2,000 to 15,000 rubles. and depends on the manufacturer, design, performance characteristics and completeness.
To study the variety of shapes and lighting options when selecting daytime running lights for Kalina and preliminary evaluate design solutions, you can view photos presented in sufficient quantities in specialized magazines and on the Internet. Kits designed for self-installation are available for sale. These sets include:
- mounting brackets;
- connecting cable;
- connector;
- set of fasteners, bolts, nuts, latches;
- set of lighting fixtures.
The kit may contain a special device that, according to the rules, turns on and off the running lights when starting and stopping the engine. When purchasing such a kit, a connection diagram must be available. When installed on Kalina, running lights designed for foreign cars must be adapted to specific operating conditions.
Classic, option No. 1
The Chinese inexpensively sell COB LED bars with a length of 15 to 25 cm, passing them off as full-fledged DRLs. Naturally, they cannot be running lights; they have a beam angle of 120 degrees. There is no body or lens; in frosty and salty Russia they will quickly fail. They are more suitable for illuminating doors and trunk.
To make decent daytime running lights from them with your own hands, you need a housing and a long lens. The focusing optics can be replaced with a reflector. There is usually double-sided tape on the back, which holds them in place. Their power, as always, is overestimated, in reality it is from 3W to 6W, a cooling system is not required. But if you stand in hot weather in the sun in a traffic jam, you may overheat. Their quality is low, so temperatures above 60 degrees are contraindicated.
Extended optics for COB
From the point of view of traffic rules
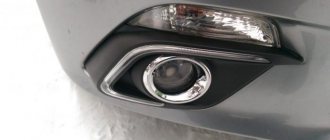
Clause 19.6. reads: “The fog lights turn on when the side lights are on, regardless of whether the high beam and (or) low beam headlights are on.”
First you need to understand what a fog light is in general. This is an additional light source that produces a flat and wide horizontal beam that extends directly above the road. Any deviation from this (let’s say it shines with a directed beam) turns the PTF into an additional light headlight, which, by the way, is installed on this Niva. The installation of additional headlights on the Niva is permitted by the manufacturer.
Requirements for DRL according to GOST
Functional electrical diagram:
- DRLs should turn on automatically when the engine start/stop control is turned to the “on” position.
- It must be possible to activate and deactivate the automatic DRL operation without the aid of a tool.
- DRLs must turn off automatically when the headlights are turned on, except when the headlights are turned on for a short period of time to signal road users.
DRL emitters must occupy an area of at least 40 cm and emit light with an intensity of 400 to 800 cd. Moreover, the light should be white, the number of emitters should be 2 pcs.
Self-installation of DRLs is considered as making a change to the design of the car. If the vehicle is not equipped with DRLs, either low beam headlights or fog lights should be used instead during the daytime.
LED lamps for VAZ (Lada) Kalina 1st generation 1118 sedan (2004-2013)
| Description | |
| Voltage consumption | 12 Volt |
| Water permeability class | IP68 |
| Life time | more than 50 thousand hours |
| Material | Aluminium alloy |
| Base type | Selected by Autozs.ru employee |
| Light flow | 3000/4000/5000 lumens |
| Compatibility | Universal |
| Installation | Standard mounts |
| Compatibility | Universal |
| Equipment | |
| Lamp | 2 pcs. |
| Controller | 2 pcs. |
The main purpose of LED lamps is to provide high luminous characteristics of the vehicle's headlights. At the same time, they are an excellent alternative to halogen lamps and xenon lighting. In contrast, LED lamps provide a high degree of lighting brightness - 1800 lm for one lamp and fully comply with traffic regulations. Their long service life (50 thousand hours) guarantees operation without frequent replacement due to failure.
The main advantages of LED lamps for VAZ (Lada) Kalina 1st generation 1118 sedan (2004-2013):
- emit undispersed light, do not blind oncoming drivers and at the same time provide a large radius of illumination;
- their heating temperature does not exceed 80°C;
- thanks to instant switching on, they are able to work with maximum power almost instantly;
- Made from a solid-state crystal structure, the LED is not sensitive even to vibrations over a wide frequency range;
- excellent visibility while the car is moving, which contributes to maximum safety;
- easy installation without intervention in the structure due to the full compliance of the base with incandescent lamp standards;
- the presence of a built-in chip, which makes it possible to use them on any vehicle with an on-board computer.
From an aesthetic point of view, their advantage is a noticeable improvement in the appearance of the car; when looking at the optics, it is more noticeable among vehicles.
Main characteristics
Thanks to a luminous temperature of approximately 5000 K, corresponding to sunny weather, LED lamps create a direct stream of light and ensure excellent visibility even in adverse weather conditions.
Having low power (25 W for each lamp), LED lamps correspond to incandescent lamps with a power of 150 W, but are also significantly economical.
LED lamps consume a voltage of 12/24 Volts, which makes them suitable for use in truck optics.
LED lamps are waterproof, protected from dust and dirt, and insensitive to sudden temperature changes. The delivery set includes 2 lamps with control units
The nuances of turning on running lights
The basic requirements regarding installation, technical parameters and connection of navigation lights are listed in paragraph 6.19 of GOST R 41.48-2004. In particular, the electrical functional circuit of the DRL must be assembled in such a way that the running lights turn on automatically when the ignition key is turned (the engine starts). In this case, they should automatically turn off if the headlights are turned on.
Clause 5.12 of this standard states that headlights (FGS) should be turned on only after the lights are turned on, with the exception of short-term warning signals. When connecting DRLs yourself, this feature must be taken into account.
Correct connection of DRLs is not limited to a well-thought-out functional diagram. It's time to think about the stabilization unit for LEDs. In the running lights themselves, resistors act as a current limiter; however, due to voltage drops, resistors cannot limit the current to the same level. That is why a voltage stabilizer in the running lights connection circuit is extremely necessary. Otherwise, the service life of LED DRL modules is significantly reduced due to constant changes in on-board voltage. Some car enthusiasts claim that it is possible to connect running lights without a stabilizer.
However, this statement is easy to dispute. The fact is that with each voltage surge, more than 12 V appears on the LED module, the forward current through the LEDs exceeds the nominal value, which leads to overheating of the emitting crystal. The brightness of the LEDs decreases, such DRLs will no longer be able to fulfill their immediate task - to warn oncoming drivers from afar, and over time they will begin to flicker and fail.
For ease of understanding, the circuits below are shown without using a stabilizer.
Low beam lamp Kalina 2
How to replace a lamp on a Lada Kalina
During the daytime, every car owner relies on daylight, vision and reaction. But with the coming of darkness everything changes
Particular care should be taken at this time, as tragedies often occur due to negligence when visibility is poor. To prevent this, the headlights must be in good working order
If they don't work, no movement can be made. Even if you want, it won't work as the visibility will be zero
So, it is very important to make sure that the light is flawless and shines brightly
How to replace the Kalinin neighborhood light bulb on a hatchback, sedan, station wagon
Change is not easy. You do not need to have special knowledge or abilities. Even an inexperienced motorist can cope with this task. The only thing. act consistently and correctly. Therefore, replacing a lamp consists of the following steps:
- First you need
- Then turn off the power by disconnecting the battery terminal.
- The washer reservoir should also be removed for convenience.
- Then the rubber cover is removed.
- Later, the light bulb must be removed by squeezing the retainer with your fingers.
- Then the lamp is pulled out and the terminal is disconnected from it.
READ Which brand to choose battery for a car
This ends the procedure
It is very important to understand how the lamp was installed and what wires were connected to it
Video summary about replacing a low beam
right headlight on Kalina 2
, a similar replacement is carried out.
replacing the light bulb, the light (H7) flashed in viburnum 2.
Change low beam
winter lights in the cold. C. there is not enough time for both the mat and the flask
we are surprised. Despite.
Otherwise, you will not be able to connect the last headlight correctly, so you should contact a specialist. If you feel that this is not your job, the best thing to do is to immediately get your car repaired by a technician, where all the procedures will be carried out for you. Of course, you have to pay for it, but the result will be the greatest.
Install new: sequential instruction
The procedure for removing and installing a headlight on the right or left side is not much different from each other
It is only important to act correctly in accordance with the instructions. When installing the last light bulb, you only need to hold it by the base, you cannot touch it with your hands
Once removed, it can be removed completely.
READ What low beam lamps are installed on Kalina
Please note that for Lada Kalina (16 valve engine) the lamp has an H7 socket. Install the latter as follows:
- It is determined at the landing point so that the protrusion at the base aligns with the groove on the headlight. This needs to be firmly fixed. Only then will it become clear that the protrusion has fallen into the groove;
- press the clamp onto the lamp so that the center of the base is between the antenna antennas;
- lock the latch in place;
- Attach both wires to the latch and close the lid tightly.
After completing this procedure, you should turn on the lights at close range and check their operation. If everything is good, this means that the installation was completed correctly. In case of an unpleasant event, you need to take the car to the dealership and pay for it. Lamps should be purchased only in specialized stores. I prefer the most famous manufacturers and models with a guarantee. Osram H7 12V 55W headlights for Kalina Cross are very popular now.
Poor quality headlights should not be retained or stored as they will not last long and will require frequent adjustments or replacements.
It is important to understand that not only your safety, but also the safety of the pedestrian depends on these light bulbs. It is especially important that lighting is of good quality at night to avoid catastrophic consequences.
READ How to Install Radio on Priora 2
There is a special offer on our website. You can get a free consultation with our corporate lawyer by simply submitting your own question in the form below.
How not to do DRL
On the Internet I looked through many options for making DRLs with my own hands, but found only a couple of the right ones. For every light device in a car there are rules and technical regulations that are written in the blood of victims of road accidents. Such home-made people do not even understand the very purpose of navigation lights and make them without knowing the necessary standards.
For maximum savings, they are made from available materials, usually from LED strip or LEDs. As a result, they get decorative lighting from the tape with a brightness slightly higher than that of the dimensions, which is not noticeable during the day. To make things not so sad, they check homemade daytime running lights at night from close range. Although you need to check it during the day in sunny weather from a distance of 100 meters. After all, they are used during daylight hours. Then they boast about their poor and incorrect creation and advise others to do it.
There is no need to place the LED strip anywhere on the front of the car. A weak one does not shine, but a powerful one requires good cooling. As a result, you will get the result as in the photo below. Everyone takes photos at night, when they are visible, and they are used during the day.
How to replace a headlight bulb on a viburnum
Replacing the front marker lamp in the left headlamp was simply not a real pleasure
!
It is no secret to Kalinovods that replacing any of the light bulbs will require iron patience and strong nerves
, but they change, and in principle, no longer than 5 minutes, but the size made you sweat, in the literal sense of the word.
It was not difficult to remove the rubber casing, but pulling out the socket with the light bulb was comparable to sheer hell. The cartridge simply doesn’t come out and that’s it!
How to solve the problem according to my version:
- remove the air filter housing from all the fasteners - remove both pipes and the plug to the sensor - remove the housing - remove the rubber housing of the headlamp - the cartridge rotates, so rest it with a screwdriver and turn it to the most convenient angle - remove the cartridge using thin pliers without squeezing it strongly - we take out the lamp, change it and reassemble it.
The removed filter housing will allow pliers to get through with ease!
pull the wires? as described in the instructions - risky, in my opinion. At least I tried to replace it in this way on a new car, it is extremely unpleasant and difficult.
The finger suffered, bleeding, and now there is a swollen callus
Parts and consumables:
- Cotton gloves without rubber coating
- Side light lamp
- Napkin
- Alcohol
Note:
Do not touch lamp bulbs with your fingers. Work in clean cotton gloves without rubber coating. Greasy fingerprints left on the lamp bulb will shorten its service life several times. If your fingers accidentally touch the lamp bulb, wipe the bulb with a clean cloth moistened with alcohol.
1. Turn off the outside lighting.
2. Remove the rubber plug from the high beam section.
3. Without disconnecting the wires, remove the side light lamp socket from the reflector.
4. Remove the faulty lamp from the socket.
5. Insert the new lamp into the socket and install the socket into the reflector.
6. Place the rubber plug on the headlight unit.
The article is missing:
- Photos of parts and consumables
- High-quality photos of repairs
The Kalina and Kalina 2 models have different headlights, so replacing the lamps in them has certain differences, and we will describe which ones in this article. Replacing the lamps yourself will not cause you any problems. Therefore, there is no point in turning to the service for help.
DRL control unit
The most reliable and simplest option is to connect DRLs without a relay, but using a special running lights control unit. It ensures that the DRL turns on after starting the engine, guarantees safe operation, protects against overloads and can be installed on cars with any type of lamps, including LEDs.
Unfortunately, among the variety of industrially manufactured DRL units, the vast majority do not comply with GOST and have mediocre build quality.
This applies, first of all, to products from AliExpress, which do not meet the requirements in almost all respects.
Among all the diversity, only 2 options can be noted: the Russian DayLight+ DRL control unit and German products from Philips and Osram. The DayLight+ control unit was developed by Russian radio engineer Fedor Isachenkov, taking into account all the features of the vehicle’s on-board network and has a number of positive aspects:
- there is built-in voltage stabilization;
- full compliance with GOST;
- the maximum long-term load power is 36 Watts (significantly less is required for DRLs);
- simplest connection diagram.
In addition to the points described above, the DayLight+ unit is universal and is suitable for all cars with an on-board 12-volt network, and also has good build quality and a high degree of protection from moisture and dust. German products from Philips and Osram also have all the above-described advantages of the DayLight+ unit, however, German control units are supplied only together with daytime running lights and are more expensive.
The daytime running light bulbs have burned out. They served for 2.5 years, I think this is a good period. For comparison, I have already changed the low beam several times. It so happened that 2 lamps burned out with an interval of a week. So, I bought 2 Philips W21/5W W3x16d (12V 21/5W) light bulbs for 115 rubles each. The right lamp is much easier to change than the left one, since the ABS control unit does not interfere there.
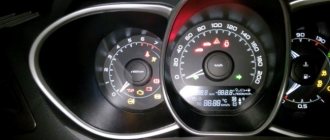
We turn off the engine and remove the ignition keys. We put our hand in here, as shown in the picture, and rotate the lamp counterclockwise (top towards the motor) 45 degrees. Since I changed it in the cold (most likely because of this), the base was difficult to turn.
Replacing the right DRL Kalina 2
We insert the light bulb, carefully study the pins immediately so as not to think about why the lamp does not stick in