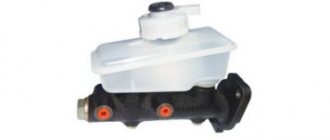
Normal operation of the braking system is the most important component of safe movement in any vehicle. The design of the VAZ 2114 includes front disc and rear drum brakes. To ensure their operation, the design includes a brake master cylinder. Over time, it begins to deteriorate, which affects braking performance. In the article we will look at how to replace the master brake cylinder of a VAZ 2114.
Useful video:
Symptoms of a problem
With a calm driving style and regular maintenance of the brake system, the GTZ will serve without interruption for many years. Cylinder output increases with frequent vehicle use in city traffic.
Useful : Replacing brake hoses on a VAZ 2114
Frequent and prolonged stops accelerate the wear process of the turbocharger, which is reflected in the manifestation of the following symptoms:
- When you press the brake pedal, the car stops slowly, although the fluid level and the condition of the discs and pads are normal;
- To effectively brake, you have to press the pedal with serious force;
- Short brake pedal travel is another sign of a worn cylinder;
- Sudden failure of the pedal and “grabbing” of the brake at the end of pressing;
- Incomplete disengagement of the calipers, which leads to friction of the pads on the discs.
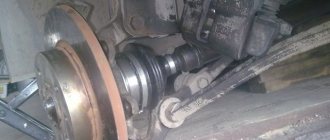
The listed symptoms of a faulty master cylinder manifest themselves in different ways, but always mean there are problems with the braking system. The braking system in your car requires regular maintenance. Despite the simplicity of the design and reliability, diagnostics of the design should be carried out every maintenance. Regular replacement of pads, installation of new brake discs, replacement of fluid, elimination of leaks from pipes - all this ensures the smooth operation of the system as a whole. The GTZ plays a crucial role in this design, because Braking efficiency directly depends on the correct operation of the cylinder. In addition to the GTZ located under the hood of the car, there are other elements in the system that are responsible for stopping the car. Often, in addition to the main brake cylinder, it is necessary to replace the front brake cylinder on a VAZ 2114. It is located on each caliper and is responsible for actuating the pads.
A faulty front brake cylinder on a VAZ 2114 leads to a wedge in the mechanism and friction of structural parts. If the front TC fails, the car begins to move to the side when braking, and extraneous noise comes from the wheel.
Setting up the VAZ clutch
There are not so many symptoms of air in the clutch hydraulic drive - difficult gear shifting, crunching of gear teeth when shifting, especially when engaging reverse gear, weakening of the effort to depress the clutch pedal.
Often the cause of airing is a drop in the working fluid level below the minimum value; in this case, air enters the main cylinder through the fitting.
There may even be an option when the hole in the tank lid is clogged. This hole is needed to equalize the pressure in the tank.
And if it becomes clogged inside the system, a vacuum occurs during operation, causing air to penetrate through the sealing rings.
To restore the drive's functionality and remove air bubbles, the system should be bled.
This operation is in many ways similar to bleeding the brake system. But before starting work, the cause of airing should be identified.
Therefore, before starting work, you should carefully inspect all drive elements for leaks. If any are found, they must first be eliminated.
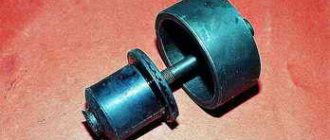
The RCS is the final link of the clutch hydraulic drive. Its more frequent failure compared to other components of the mechanism is associated with increased loads resulting from high fluid pressure.
The slave cylinder is subjected to constant loads and fails more often than other elements of the clutch mechanism.
To make the adjustment, you will need two keys, and you will not have to spend a lot of time on all operations. The pedal travel for VAZ cars should be from 120 to 130 millimeters. The stroke is adjusted by turning the adjusting nut. The distance from the pusher rod to the end of the release fork should be within 5 mm.
Fluid replacement
It is also recommended to replace the working fluid before bleeding. Remove the cap and place a pre-prepared hose on the fitting, the other end of which must be lowered into the drain container. Using a size 8 wrench, turn the fitting 3/4 of a full turn. Now you can remove the liquid.
Changing the brake fluid can be done gradually. To do this, liquid must be added to the tank in small doses in the intervals between pressing the pedal. When clean liquid flows from the working cylinder (WC), tighten the fitting and fill the barrel to a level no lower than 1.5-2 cm from the top edge. This is a fairly effective method, since the old medium, due to impurities and contaminants, settles and leaves the system first.
There are not so many symptoms of air in the clutch hydraulic drive - difficult gear shifting, crunching of gear teeth when shifting, especially when engaging reverse gear, weakening of the effort to depress the clutch pedal.
Often the prerequisite for airing is a drop in the working water level below a small value; the air here enters through the fitting into the main cylinder.
Necessary tools and spare parts
Repairing your car yourself allows you to save money and gain experience in car maintenance. Having a minimum set of tools allows you to repair most components and parts of the “four”. To replace the GTZ you will need the following tools:
- Keys at 10, 13, 17;
- Pliers;
- Rags and brush to remove dirt;
- Device for unscrewing fittings;
- Brake fluid and syringe for pumping it out;
- New GTZ.
If there are problems with this element, it is recommended to change the assembly mechanism, because Repair kits when installed in an old cylinder body will not give the desired result, because development inside it will not allow the new part to return to efficiency.
Air removal procedure
Bleeding the ABS brake system begins by treating all fittings on the working cylinders with WD-40 lubricant. During operation, they manage to rust and often break when trying to loosen them with a wrench. Then proceed according to the instructions:
- Open the expansion tank and add brake fluid to the MAX mark. During operation, monitor the level and constantly replenish the container so as not to fill the lines with new air.
- With the ignition off, disconnect the wires from the expansion tank cap.
- Place the transparent tube onto the front wheel cylinder fitting and unscrew it 1 turn.
- Press the brake pedal to the floor and do not release, which will cause fluid to leak out with air bubbles.
- When clean brake fluid comes out, tighten the fitting and release the pedal. Refill the reservoir and repeat the operation on the second front wheel.
As you might have guessed, the contours of the front wheels are de-aired due to the gravitational flow of liquid. So, if desired, the operation can be performed without outside help. But it is much more difficult for one person to pump up the rear circuits. The gravity method will not work here - the tubes are too long and are not always inclined towards the working cylinder. Pumping starts from the right rear part and is carried out according to the following algorithm:
- Place the hose back on the fitting and turn it 1 turn with the wrench.
- Press the brake pedal all the way down. Keep it pressed and turn on the ignition.
- The automation will start the return pump, which will begin to squeeze out the liquid through the open fitting.
- As soon as you notice that there are no bubbles in the tube, tighten the fitting and release the brake.
The rear left cylinder is pumped differently.
The pedal is not depressed at first, the ignition remains on, and the fitting with the hose on is immediately unscrewed. The pump will start again and force fluid through the hole. When the air stops escaping, depress the brake halfway and close the fitting. When the pump raises the pressure in the system and stops, add fluid to the tank one last time, tighten the cap and connect the connector. There is an opinion that bleeding the brakes on an automatic is much more difficult than on a car with a conventional manual transmission. Such statements are groundless, since the brake circuits are in no way connected with the gear shift mechanism in the car. The air removal technology in both cases is absolutely the same.
At the end of the work, make sure that the working cylinders do not leak and the level in the expansion tank does not decrease. Install the fuse in the socket, and then test the car while driving, trying to brake with different effectiveness.
Thanks to the presence of an electric pump in the ABS system, you can try to bleed the brakes yourself if you don’t have anyone to call for help. In this case, you should not press the pedal, but only unscrew the fittings and turn on the ignition. The success of the operation will be indicated to you by an extinguished light on the instrument panel.
During the repair process, air often gets into the brake system (this happens when the structure loses its tightness, brake fluid is replaced, etc.). You can tell that there is excess air by the soft and increased pedal travel. Bleeding the brakes will help get rid of it.
Many cars are equipped with an ABS system: bleeding such a system will have certain features.
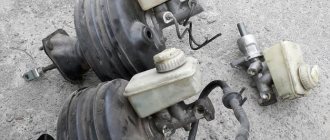
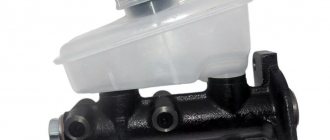
Replacing the main brake cylinder on a VAZ 2114
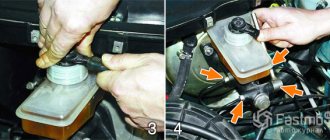
The process of removing a faulty part is carried out in several stages. Having prepared the necessary tools and disconnected the battery terminal, you can begin dismantling the gas turbine unit:
- Disconnect the wires going to the fluid level sensor in the tank.
- Use a metal brush to clean the sensor contacts from oxides.
- After removing the cap from the tank, use a medical syringe or bulb to remove the liquid.
- Unscrew all the tubes and move them aside to gain access to the cylinder itself.
- Armed with a key set to “17”, unscrew the nuts securing the GTZ to the vacuum booster and remove the cylinder body from the seat.
The process of assembling the structure and installing a new part should be carried out in reverse order.
Important ! Upon completion of the work, you should bleed the brake system and make sure that the fluid does not leave the reservoir.
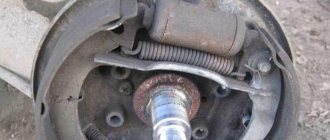
If there are signs of system malfunction after replacing the turbocharger, you should make sure whether the front brake cylinders need to be replaced. Their condition can be checked visually by removing the wheel and checking the movement of the piston. Symptoms of worn pistons and their jamming appear as follows: the rolling of the car has noticeably worsened; the car pulls to the side when driving on a flat road; fast heating of the disk; smell of burnt pads.
Expert advice
Before installing the parts, it is advisable to wipe them with alcohol and wipe them with a rag.- It is undesirable to allow parts to come into contact with fuels and lubricants, as they corrode the seals.
- After replacing the turbocharger, it is imperative to bleed the hydraulic brakes, since without bleeding the system, air will remain in it, which will negatively affect the operation of the car.
- If the O-rings are in good condition, they should still be replaced during removal.
Which brake cylinder should I choose?
Before starting work to replace a worn part, you should decide on the choice of replacement. In addition to the original GTZ, there are other analogue parts.
Most often, 2114 owners prefer to buy factory spare parts, so first let’s look at the advantages of parts from LADA:
- Reasonable price – about 1700 rubles;
- Good quality. The factory version of the GTZ runs for 70-100 thousand kilometers.
The disadvantage is the large number of fakes. We recommend purchasing parts in packaging.
When choosing which brake cylinder to choose for the VAZ 2114, you should consider the option from HOFER. The German analogue differs from the factory version in the quality of the material and lower price. The part number is HF 244102. The price of the spare part is about 1200-1400 rubles. Reviews from owners of cars with an installed HOFER GTZ do not highlight the disadvantages of the spare part, so the option can be safely considered for purchase. Replacing a part is easy, so any of the GTZ options can always be replaced with a factory one. The abundance of analogue spare parts for VAZ allows you to choose parts in different price segments. For stock fans, we recommend taking the factory version from LADA.
Examination
You should make sure that the master cylinder is the culprit for the malfunction of the brake system. This is easy to do; you don’t even have to go to a service center and spend money on it.
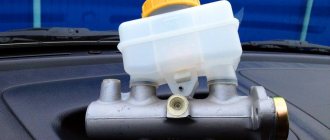
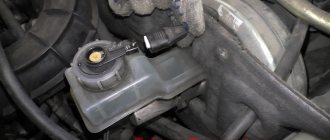
Unit location
- Press the brake pedal with the power unit off.
- Start the engine without taking your foot off the gas pedal.
- During normal operation, the gas turbine engine fails under the influence of vacuum.
- If the pedal does not fail, you will need to conduct more thorough diagnostics and restore the device to functionality.
Most likely, you will need to restore the tightness of the return regulator connection. It is located on the intake manifold amplifier housing.
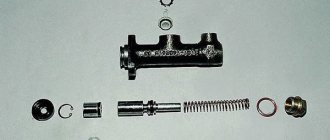
Repair kit or new GTZ?
Many car owners face a question when the brake master cylinder fails: how exactly to repair the brake master cylinder. After all, there are two main options:
- Purchase a new GTZ;
- Use repair kit.
First, let's take a look at the price tags.
| Element | Price |
| New GTZ entry-level quality | from 800 rubles |
| New high quality GTZ | 4000 rubles |
| Repair kit | from 350 rubles |
Purchasing a repair kit and using it to restore the functionality of the brake cylinder entails uneven wear of old and new elements, breakage of rings and a number of other problems. In this regard, we advise you to eliminate the breakdown by completely replacing the gas turbine engine, and not by using a repair kit.
The process of replacing the turbocharger and brake fluid
When the tools, new mechanism and fluid are prepared, you can begin dismantling the old VAZ 2114 spare part:
- The first step is to disconnect the negative terminal from the battery. Replacing the master cylinder involves completely removing the old brake fluid - this is best done with a syringe;
Advice! When assembling the system, motorists often confuse brake pipes. To make your work easier, it is recommended to sign them with a marker. This applies to any parts in the VAZ 2114 car.
- Once the threads have been removed, dismantling the main unit can begin. Using the “18” socket, you need to remove the nuts that attach the main cylinder to the amplifier;
The vacuum booster may also need to be replaced. In this case, remove the fitting and turn the main unit to the side. After this, you need to unscrew the hose and go into the interior of the VAZ 2114 car, where the pin locking bracket is located. After removing all the fasteners, you can install a new fluid pressure booster.