Signs and causes of wheel bearing failure
Regardless of the location of the ball bearings, the front or rear wheel bearings, according to diagnostics, do not differ either in the testing methods, or in the characteristic signs of malfunctions, or in the type of wheel drive.
Wheel bearing fault table
| N p/p | Symptoms of a problem | Causes of malfunction | |
| Front | Rear | ||
| 1 | The appearance of extraneous noise (low-frequency hum) in the car interior. | lack of lubrication or incorrect choice, long service life, unqualified replacement, extreme driving, the state of our roads, impacts with potholes. | |
| 2 | When driving, vibration is felt in the steering wheel or brake pedal. | Vibration only in the brake pedal. | Possible wear on the tie rod end, wear on the wheel bearing or brake disc. |
| 3 | The appearance of grease leaks on the protective cap or oil seal. | Excessive lubricant, oil seal destruction. | |
| 4 | Excessive hub heating | Insufficient lubrication, incorrect tightening torque of the hub nut. Possible depressurization of seals. | |
| 5 | Grinding and knocking noise when the suspended wheels rotate. | The ball joint, brake discs, and car suspension parts may wear out. Diagnosis is necessary. | |
| 6 | When changing speed or entering a turn, the nature of the noise changes. | Worn wheel bearings. Other unpleasant noises may change: rattling of the exhaust pipe, gearbox transfer mechanism, tire noise. | |
| 7 | Axial play of suspended wheel | The CV joint or wheel bearings fail, the wheel bolts or wheel nut are insufficiently fastened. | |
| 8 | The ABS warning light is on. | The sensor is faulty, perhaps the magnetic ring is turned the other way, probably the number of teeth on the abs ring does not correspond to the original number for this car model. | |
| 9 | Loss of controllability, the car pulls to the side. | It is possible that the tires are unevenly inflated, the wheel alignment is incorrectly adjusted, or the hub is not pressed onto the axle shaft in a coaxial manner. Drives to the right - the problem is the right wheel, to the left - vice versa. The front wheels need to be checked. | |
It is important to know:
If you haven’t found the source of the unhealthy noise, contact experienced drivers or service station mechanics. Professional diagnostics will not be superfluous.
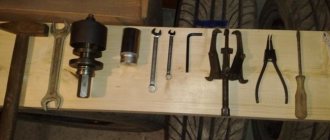
Wheel bearing damage due to brake disc replacement
Strong blows from a hammer when changing stuck brake discs can break the seal of the bearing.
The use of impact tools during work can not only negatively affect the suspension elements, but also cause damage to the bearing. Wheel bearings also do not withstand strong side impacts. As a result, a damaged bearing will make itself known only after a few months. And the real reason - changing a rusty disk - will be forgotten.
Tip: If light taps are not enough to remove the brake rotor, you will need patience and a rust remover. If you knock down an old brake disc that has served its purpose, then only by gently tapping, and not by hammering with all your heart.
How to check a wheel bearing while driving
While the car is moving, if there is extraneous noise in the cabin, it becomes a hearing irritant for the driver. Finding the source of noise is sometimes difficult, because many components and parts of a machine can produce sound. Try to accelerate the car. Some tires can create a hum at high speeds, thereby misleading the driver.
On-the-go check video:
You can find out which side the fault is on by maneuvering:
- Turn left, the load on the left axle will decrease, if the sound disappears or weakens, then the problem is on the left side.
- Turn to the right, the load on the left side will increase, a hum will appear, which means the assumption that the fault is on the left side is correct.
- Try varying your speed and alternating turns left and right.
- Listen to how the frequency and tone of the sound changes. It can decrease, increase, and sometimes disappear altogether.
Unbend the car on a flat road, release the gas, and move by inertia. Let the passenger listen to where the hum is coming from. Test your assumptions. Perform diagnostics on the car's wheels hanging up using a jack.
Video 1: “Which side is it buzzing from?”
Video 2: “Which side is it buzzing from?”
Symptoms of failure
This is where the most interesting thing is - how to determine a malfunction; there are several hundred percent methods.
1) “Dry” crunch . When a wheel bearing fails, a crunching sound appears when driving. These are spherical elements rolling. They broke the clip they were in and are now not evenly distributed. You won’t confuse this sound with anything else; believe me, this sound is perfectly audible in the cabin. This is the very first symptom - as soon as such a sound appears, we immediately go to the service station.
2) Vibration . If the bearing is already well worn, then vibration should appear in both the steering wheel and the body. This suggests that the spherical elements have already worn out the bearing race well, a little more and a “wedge” may occur. We change it urgently.
3) The car is pulled to the side . It is also possible that the part with the faulty element does not work normally - so to speak, it is stuck a little, and therefore the car will pull in one direction or another, as if the wheel alignment .
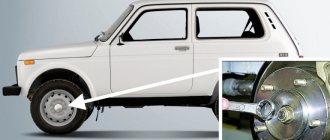
How to check the front wheel bearing when the car is stationary
You can also perform diagnostics of the hub assemblies while the car is standing still. To do this, follow these steps:
- Drive the car into the garage or park it on a level surface.
- Place wheel chocks under the rear wheels.
- Raise the left or right side with a jack.
- Check the wheel play by rocking in the axial direction. A breakdown will be detected if there is noticeable play.
- If it is not possible to determine the malfunction by the play, you need to spin the wheel and determine it by the noise, comparing the sound of the right or left wheel.
- If the car is front-wheel drive, then lift the front end, and starting the engine, accelerate to 30-40 km/h on the speedometer. Sometimes the hum only appears at certain speeds.
Video “How to check front wheel bearings”
Pay attention to which planes you need to “stagger”. Take the lower part at six o'clock and the opposite upper part, look at the displacement relative to the axis. Start with non-drive wheels. They will turn by hand. The front wheel wheel bearings are checked with the engine running.
The front right or left side of the car is placed on a stop under the suspension arm so that the CV joint is in a horizontal position. Then the noise from both sides is compared.
Determination of malfunction by wheel play:
What is the part used for?
Let's look at what this part is, what are the features of its design, how its malfunctions can be diagnosed and how repair work should be carried out. This part secures the vehicle wheel to the following elements:
- to the hub;
- to the steering knuckle combined into a common structure with the hub.
Since the hub is an important component of the chassis of any vehicle, providing a connection between the axle and the vehicle wheels, and wheel bearings serve as the connecting element between the hub and the axle, the rotational resistance of the vehicle wheels when using them becomes minimal.
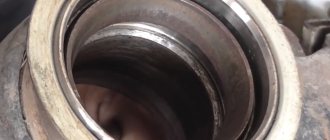
How to check the rear wheel hub bearing when the car is stationary
There is no significant difference in inspection compared to the front suspension. On front-wheel drive cars, the suspended rear wheels are turned manually, as described above. Try to grab the suspension spring with your hand, and then the vibrations will be transmitted to your hand.
Similarly, the presence of play is checked by shaking in the vertical and horizontal planes. Distinguish between the sound of brake pads rubbing and what a faulty brake pad sounds like. If the balls work together, you will hear them rolling.
A rear-wheel drive vehicle is checked by rotating the drive axle:
- The “backside” is slightly raised;
- put the car on the handbrake;
- start the engine and accelerate to a speed of 30-40 km/h on the speedometer, which corresponds to 60-80 km/h;
- listen to one side, then do the same actions on the other side.
Video “How to check rear wheel hub bearings”
In these videos, the inspection takes place in a garage or on a site. Serviced hub components require adjustment of play, tightening of the nut to the required torque, and cotter pins.
Rear bearing diagnostics:
Example of adjustment without using a torque wrench:
We determine the problem ourselves (at home)
In general, in addition to the crunching noise that you will constantly hear when moving. You can determine by the signs yourself literally around the house.
1) Place the car on a flat, preferably paved area.
2) You need to check the play along the vertical axis. To do this, we take the wheel at the top point and try to swing it with all our might. If you hear clicks and there is play, then this is definitely “hub”.
3) To be completely sure, you can lift the wheel on a jack and rotate it. If you hear a crunching sound, there is a malfunction.
4) There is another method (works only on front-wheel drive), but it is advisable to do it on a lift. You need to lift the car, start it, put it in gear and accelerate the wheels, then turn off the engine and listen. The side that makes noise, crunches and vibrates is faulty.
Now a short video version of the article
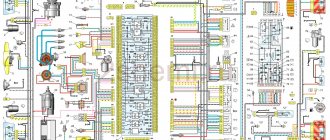
How to check wheel bearings on a VAZ and other cars
The testing and diagnostic technology, as it turned out earlier, does not depend on the location and type of drive; accordingly, when checking a particular brand of car, it is also performed in the same way.
The only difference is in maintenance and operation, since the hub units of cars differ in design.
- The axis may contain single-row conical roller rolling elements. 2 pairs are installed on one axis. They must be periodically checked and the play adjusted within acceptable limits.
- New VAZ models, as well as foreign cars, have bearings on the front axle of the 1st-3rd generation, for which adjustment and maintenance are not required for the entire service life of the bearing, about 100,000 km.
You can find specific inspection and operating instructions for a specific car model on our website. Further in the navigation table, you can find and go to instructions for diagnosing and replacing wheel and other bearings for your car.
| CHEVROLET: | NIVA |
| LANOS | |
| AVEO | |
| LACETTI | |
| CRUZE | |
| VAZ (LADA): | 2109 |
| 2108 | |
| 2110 | |
| 2114 | |
| GRANTA | |
| KALINA | |
| PRIORA | |
| FORD: | FUSION |
| FOCUS 1 | |
| FOCUS 2 | |
| TRANSIT | |
| DAEWOO: | NEXIA |
| MATIZ | |
| RENAULT: | LOGAN |
| DUSTER | |
| PEUGEOT: | 206 |
| GAS: | GAZELLE |
| HYUNDAI: | ACCENT |
| KIA: | SPORTAGE |
| RIO | |
| MITSUBISHI: | LANCER 9 |
| LANCER 10 | |
| OPEL: | ASTRA H |
| NISSAN: | ALMERA |
| QASHQAI | |
| MAZDA: | MAZDA 6 |
| MAZDA 3 | |
| TOYOTA: | COROLLA |
| AUDI: | A80 B4/B3 |
Navigation by instructions
Rear wheel bearing
- Chevrolet:
- Lanos
- Aveo
- Lacetti
- Fusion
- Nexia
- Logan
- 206
- Gazelle
- Accent
- Sportage
Front wheel bearing
- Chevrolet:
- Niva
- Aveo
- Lanos
- Lacetti
- Cruze
- Focus 2
- Nexia
- Logan
- Accent
- Lancer 9
- Astra H
- Rio
- Gazelle
- Almera
- Mazda 6
- Corolla
- A80 B4/B3
Attention:
If your car is not on the list, choose by brand; in 90% of cases, the instructions will be suitable for your model.
Conclusion
The wheel bearing is a very important part of the car; if faults are identified, it is better to immediately replace it with a new one. Moreover, identifying the damaged one will not be difficult even without experience in this.
Sources
- https://barahola.ru/interesnoe/kak-opredelit-kakoy-podshipnik-gudit-na-stupice-i-kak-ego-proverit/
- https://themechanic.ru/kakie-osnovnye-priznaki-polomki-stupichnogo-podshipnika/
- https://life-with-cars.ru/ekspluatatsiya-avtomobilya/sovety-voditelej/vse-priznaki-neispravnosti-stupichnogo-podshipnika-foto-i-video/
- https://lada-xray2.ru/sovet/kak-opredelit-kakoy-podshipnik-gudit
- https://ProAutoMarki.ru/kak-samostoiatelno-proverit-stypichnyi-podshipnik-2-nadejnyh-sposoba/
- https://topgears.com.ua/stati/sovetyi/kak-proverit-stupichnyiy-podshipnik
- https://autogrm.ru/blog/gudit-podshipnik-stupicy.html
[collapse]
Other methods for diagnosing wheel bearings and hubs
Sometimes it is not enough to open the boot, check the presence of lubricant and the tightening torque of the hub nut. If the problem is resolved, then carry out a more in-depth inspection of the hub assembly.
How to check the axial clearance and adjust it
The ability to adjust the gap is provided by the special design of the front wheel hub on some cars, including the classic VAZ, which rotates on an axle shaft on two tapered (cone) bearings.
Precise adjustment of the axial clearance is possible with special tools and equipment. Measuring equipment was previously mandatory for service stations that serviced VAZ brands of cars. An accurate micrometer determines the axial clearance. The maximum permissible value is 0.15 mm.
Adjustments are also made using a torque wrench. The tightening torque for each car can be found in the instructions on the website or read the article.
1 – dial indicator; 2.3 – tripod with mount; 4 – hub unit.
- To check the gap, raise the front or rear of the car;
- Install a special device under the wheel mounting bolt;
- Place the indicator leg against the end of the steering knuckle axis with the arrow in the zero position and, moving the hub along the steering knuckle axis, measure the amount of movement (clearance) along the indicator.
If the gap is greater than 0.15 mm, adjust it in the following order:
- Unscrew the adjusting nut from the steering knuckle axle;
- install a new or used, but on a different car, nut and tighten it to a torque of 19.6 N. m (2 kgf. m), while simultaneously turning the hub in both directions two or three times to self-install the rollers in the cages;
- loosen the adjusting nut and tighten it again with a tightening torque of 6.8 N • m (0.7 kgf • m);
- make mark B on the washer (Fig. 3.5.), then loosen the nut 20-25° so that edge A slightly does not reach mark B;
- lock the nut in this position by pressing the holes on the neck of the nut into the grooves at the end of the steering knuckle axle;
- after adjustment, the gap should be within 0.02-0.08 mm.
It is important to know:
When adjusting the gap, it should be taken into account that the direction of the thread on the left axle of the steering knuckle is right, and on the right axle it is left. Also read how to make adjustments without a torque wrench here.
The device also controls the axial and radial runout of the hub flange after replacement.
Video “How to adjust the roller bearings of a VAZ wheel hub”
How to check hub runout
Some axle nuts are designed to be used only once. Repair kits come with a new nut in the box. Repeated use may cause the nut to loosen during vehicle operation.
1,2 — indicator with a magnetic stand; 3 – brake disc or hub flange.
Always measure the runout in the flange after installation. A deformed flange will have runout, cause vibration, change the thickness of the brake disc, and will require replacement. A wobbly brake pedal is sometimes associated with a wobbly brake rotor. Often this is the problem, but not always. If in doubt, replace the disc and move it from the opposite wheel.
If the beating disappears, then the problem is in the disk. If not, then you should check the hub flange as shown in the video.
Checking Nissan hub runout:
The permissible deviation of the pointer from the zero value should not exceed 0.038 mm. If the deviation is greater, it is possible that the problem is in the hub.
Checking and adjusting the tightening torque
The vehicle operating manual specifies the frequency of mileage, after which it is necessary to check the axial play of the hub using the tightening torque of the locknut.
- Place the car on a lift or use a jack.
- We check the play in two planes.
- Unscrew the central nut.
- Take a new nut from the repair kit.
- Tighten by hand without effort.
- Tighten the nut to the torque recommended by the manufacturer using a torque wrench.
- We rotate the wheel left, right, several times, you can even tap the tire with your fist.
- Unscrew the nut half a turn, rotate the wheel and tighten again.
- We check the play and tighten the nut.
Video “Adjustment with a torque wrench”
Do not confuse a wheel bearing failure with other failures.
- Serviced bearings may not emit a hum if there is lubrication, but a violation of the adjustment can affect the vehicle's handling.
- More often, there are suspicions of uneven tire inflation, steering system, CV joint malfunction, or wheel alignment adjustment.
- The European standard for noise emitted by new tires is within 80 dB. Above this threshold, tire noise can be heard in the cabin. Often vibration of the brake pedal is associated with runout of the brake disc, but this is not always due to incorrect installation of the disc or its defect.
- Sometimes hub runout within exceeded limits provokes runout of the brake disc.