A vacuum brake booster, or VUT for short, is one of the main operating mechanisms of a car’s braking system. The effectiveness of braking, and therefore your safety, largely depends on its serviceability. Therefore, the VUT must be regularly checked to promptly detect its malfunctions or malfunctions.
In this article you will learn about malfunctions of the vacuum booster, signs indicating problems in the operation of the VUT, as well as how to check and replace the VUT on a VAZ 2114 at home.
Design and principle of operation of the vacuum amplifier
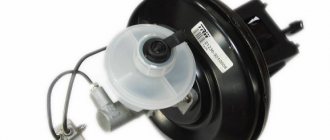
A vacuum booster (or VUT) is the most common type of brake booster mechanism. It operates on the principle of reducing pressure or simply vacuuming. Structurally, it forms a single whole with the main cylinder and includes several important components:
- a housing divided by a diaphragm into 2 parts - a vacuum and an atmospheric chamber;
- a valve that closes the bridge between the parts of the vacuum chamber;
- a mechanical (or electric) pump necessary to ensure uninterrupted operation as the main or additional source of vacuum (may not be present on some gasoline cars);
- return type spring - needed to move the diaphragm to its initial position after pressing the brake pedal.
Some VUT models are also equipped with an electromagnetic drive. This is an additional element for emergency braking.
The operation of a vacuum unit is based on the vacuum or difference in air pressure in both chambers. In the initial position it is the same, but after pressing the brake, the channel connecting both halves of the VUT is blocked. In this case, air begins to flow into the atmospheric section, where the vacuum decreases. This creates a force on the diaphragm, which moves the master cylinder piston against the spring force.
Brake force animation
A modern car is in most cases equipped with two intermediate systems that work as converters of pressure on the brake pedal into the force of pressing the pads against the discs: hydraulic and vacuum. The fluid circuit performs several functions simultaneously.
Its heart is the brake master cylinder (MBC), whose tasks include:
- Creating high braking force on the calipers by multiplying the pressure on the pedals and transferring it to the place of application.
- Reducing frictional wear of moving parts by replacing mechanical components with hydraulic ones.
- Distribution of braking force between the front and rear wheels.
- Providing design flexibility by creating work circuits that are independent from each other. This reduces the likelihood of brake failure.
- Providing technical simplicity compared to mechanical solutions.
- Simplify maintenance.
However, the speeds and masses of vehicles are so high that the hydraulic system's capabilities are insufficient for the force on the cylinder rod to be considered negligible.
https://youtube.com/watch?v=06Jj1Cy_KxQ
Why does the VUT fail?
If the VUT breaks down, the brake system remains operational, but it is difficult to depress the pedal. There are two typical reasons for mechanism failure: loss of tightness of chambers/tubes and damage to the check valve.
A special hose connects the vacuum unit to the vehicle’s intake manifold, from which in most cases it receives a vacuum. Some amplifier models are equipped with an additional pump. But still, the VUT takes the main part of its energy from the collector. Therefore, if the tube breaks or its connections become loose, the mechanism stops working.
How to change it yourself
Let's look at how to change the VUT using the example of the VAZ 2110, 2111, 2112. The design of the system is quite monotonous, therefore, after watching the video, you can replace the vacuum brake booster of the VAZ 2114 and many other cars.
- Remove the low brake fluid level sensor connector.
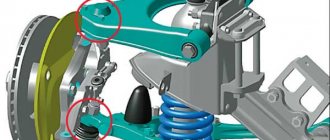
- Unscrew the 2 bolts 17 securing the brake cylinder to the VUT body. There is no need to unscrew the lines, just move the cylinder with the tank a little to the side.
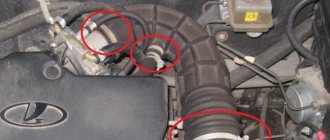
- Disconnect the vacuum hose from the check valve. Check the condition of the valve and install it on the new brake booster.
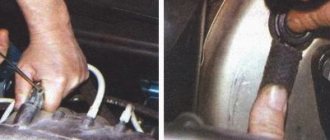
- Unscrew the 4 bolts securing the VUT to the engine shield. The working space in the area of the pedal assembly on the interior side is limited, so an extended socket, extension and ratchet are best suited for unscrewing.
- Disconnect the brake sensor connector.
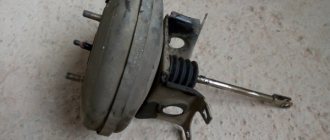
- Pull out the VUT along with the mounting bracket and the brake pedal.
- Using pliers, remove the locking plate of the brake pedal lever rotation axis.
- Pull out the “finger” that secures the VUT pusher in the lever.
- Unscrew the 2 nuts securing the vacuum body to the bracket.
Signs of VUT malfunction
The main symptom is the hissing sound made by the amplifier after pressing the brake pedal, which in turn becomes incredibly tight. But there is another typical sign - unstable engine operation caused by a lean fuel mixture. This happens due to air being sucked into the intake manifold. By the way, the whistle can also be caused by wear of the vacuum valve seals.
In particularly severe cases, when the mechanism completely fails, the brake pedal cannot be fully pressed at all. And when the engine is running, its speed can drop to a complete stop or, on the contrary, unexpectedly increase. There may also be an increase in fuel consumption, engine tripping, loss of acceleration dynamics, and difficulty starting the engine.
A sign of damage to a mechanical amplifier is a knocking sound. It is produced by the drive rod. As for the electric pump, if there is a problem, it starts to get very hot.
How to repair or replace parts
Hisses when braking (with video example)
In the following video you can hear this characteristic sound:
By the way, according to the instructions, the standard “vacuum unit” of the VAZ-2110 cannot be repaired, only replaced, but we “do it ourselves.” And judging by the number of different instructions for self-repairing cars posted on the Internet, it can be argued that any domestic car enthusiast with more than five years of experience can safely be awarded the title of design engineer in absentia. Therefore, we will consider the repair procedure, especially since the difference in cost between the repair kit and the vacuum booster itself is disproportionately high.
In any case, first we will have to dismantle the VUT; for this we will need a minimum of available tools.
Tools
- Open-end and socket wrenches in sizes “10”, “13”, “17”;
- Powerful flat screwdriver;
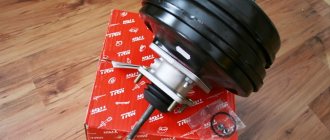
- Repair kit or VUT assembled;
- Sealant and a little desire to do it yourself.
Checking the vacuum booster: all methods
There are several effective ways to check VUT. The procedures are simple, you can do it yourself, you don’t need to dismantle anything from the car.
First way
The simplest option:
- start the engine and let it run for about 10 minutes;
- turn off the engine;
- depress the brake completely, creating a vacuum in the booster;
- release the pedal and press it again.
A decrease or heavier pedal stroke when pressed again will indicate problems in the operation of the vacuum pump. On the contrary, if the second pressing occurs without any differences from the first, one can judge the serviceability of the VUT and successful discharge.
Second way
This time, during diagnostics, you should press the pedal several times - 6 or 8. For the last time, press it to the limit and start the engine. If everything is fine with the vacuum system, the pedal should drop even lower - almost halfway. If it does not move, there is a problem with the valve.
Third way
This checks the tightness of the housing. You need to start the engine, squeeze the brake all the way and turn off the engine. If the pedal begins to press on your foot, trying to return to its original position, this will indicate a malfunction. When there is an air leak in the amplifier, the pressure inside the chamber increases.
Fourth method
Here's what else you can do:
- disconnect the hose from the intake manifold;
- plug the fitting with a rubber plug - you don’t have to remove the tube, but simply squeeze it with your hand;
- start the engine, let it run for 10 minutes;
- release the brake.
If the engine speed changes - increases or decreases - the amplifier poisons air and needs to be repaired. First of all, you should check the pinched hose - maybe there are cracks in it. When testing, it is better to remove it and close the fitting securely.
Damage to the vacuum seal requires urgent repair. If you need to dismantle the device, be careful not to damage the tube connecting the amplifier to the collector!
History of appearance
The automobile industry began to gain momentum at the end of the 19th century. At the dawn of the evolution of self-running crews, little attention was paid to brakes - they were simply not needed. The friction in the transmissions was so great that the vehicles slowed down sufficiently in the absence of traction. However, the power and weight of engines grew, and already at the beginning of the 20th century, many devices designed to stop vehicles were patented.
Some innovations of that period were ahead of their time. For example, four years after the appearance of Karl Benz's car, British engineer Frederick Lanchester patented a disc brake. It took several decades for this invention to become widely accepted.
The first use of air for braking was demonstrated on its model by the Chicago manufacturer Tincher. Pressure was generated by a small pump and could be used for braking, inflating tires, or sounding a horn. The 1928 Pierce-Arrow was the pioneer of vehicles equipped with a modern vacuum brake booster.
However, despite their effectiveness, until the mid-20th century, such systems were offered by automakers only as an option. The fact is that to operate the drum brakes, the force of the foot on the pedal was sufficient. It was only with the spread of a more efficient method of braking using a disc-pad pair that servos became standard equipment. The main dates in the history of the modern vacuum pump can be considered:
- 1920s - Several inventors work on actuators for aviation using vacuum in the intake manifold.
- 1927 - Belgian engineer Albert Devandre invented a vacuum brake servo.
- 1928 - the first production car with VUT.
- Second half of the 20th century - the system becomes commonplace for production models.
Symptoms of problems encountered at work
There are several “symptoms” that indicate that the device’s mechanism is at risk. A competent driver should recognize the signs immediately.
These symptoms include:
When pressing the brake pedal, the driver has to exert a lot of force.
The stop pedal has become “heavier”, that is, its amplitude has been halved.
Suspicious sounds are heard while braking.
The driver releases the pedal, but the vehicle continues to slow down.
The engine speed is now uneven due to air leaks in the conductor.
The instability of the engine is especially felt at idle.
You can feel the strong force when pressing the brake yourself. To do this, press the stop pedal several times in a row. In this case, the internal combustion engine must be turned off. The force on the last squeeze will increase significantly.
As for “suspicious” noises, the driver hears a hissing sound. This sound means that depressurization has occurred. Loss of tightness in the “vacuum tank” occurs due to a diaphragm rupture. The same sound can be heard when the seals are worn excessively.
Symptoms of a faulty vacuum brake booster also appear in the form of knocking noises. Shocks occur during sudden braking. This indicates a weakening of the membrane fastening. The mechanical pump also makes a knocking sound. Sometimes this is indicated by error p1479.
Bleeding the system
After carrying out any work related to the replacement or repair of brake system parts, the brakes should be bled. This will remove air from the line and equalize the pressure.
Tools and tools:
- jack and wheel wrench;
- key to "8";
- rubber or silicone hose with a diameter of 6 mm;
- a small, clean, dry container (preferably transparent);
- brake fluid (to top up).
In addition to all this, you will definitely need an assistant to bleed the system.
Work order:
- Place the car on a horizontally flat surface. Loosen the nuts securing the front right wheel.
- Raise the car body with a jack. Unscrew the nuts completely and remove the wheel.
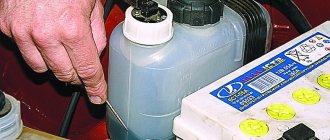
- Remove the cap from the fitting of the working brake cylinder.
The bleeder fitting is closed with a cap. - We put one end of the hose on the fitting. We insert the second end into the container.
- We give the command to the assistant to sit in the passenger compartment and depress the brake pedal 4–6 times, and then hold it in the depressed position.
- When the pedal is depressed after a series of pressures, use a key set to “8” (in some modifications to “10”) and unscrew the fitting three-quarters of a turn. At this time, liquid will flow from the fitting into the hose and further into the container, and the brake pedal will lower. After the pedal hits the floor, you need to tighten the fitting and ask an assistant to release the pedal.
Pumping must be continued until liquid flows from the hose without air. - We pump until brake fluid without air begins to flow from the system. Then you can tighten the fitting, put the cap on it and install the wheel in place.
- By analogy, we bleed the brakes for the front left wheel.
- We pump the rear brakes according to the same scheme: first the right one, then the left one.
- Upon completion of pumping, add brake fluid to the level in the reservoir and check the brakes on a section of the road with low traffic.
The level of hissing when you press the pedal - which is normal and which is not
There is a category of drivers who listen very carefully to every slightest squeak or sound and try to hear signs of a breakdown. A car is a mechanical vehicle that contains a sufficient number of components and mechanisms that can create a small permissible noise level. You shouldn’t listen too much to this and go straight to the service center, where, with a lot of persistence, they will definitely find the problem and offer to fix it. The brake pedal, when pressed, in most cases emits a slight hiss.
Softness of the brake pedal
As the brake booster control valve malfunction worsens, air begins to enter the brake system lines. In this case, the air that should be removed from the system using the control valve enters the master cylinder and then into the brake system pipes. This causes a drop in brake pressure and a soft brake pedal. In addition to the feeling of softness on the pedal, this entails an increase in the brake response time.
In such a situation, you should immediately diagnose the brake system. Once air enters the brake system, it becomes “locked in.” To remove it, the brake system must be bled. If you observe the described symptoms, immediately stop driving and have your brake system professionally diagnosed.
How to check the performance of VUT
If, based on characteristic signs, it has been revealed that the operation of the VUT is impaired, it is necessary to perform a check and determine what exactly the malfunction is. To diagnose the brake booster, there is no need to dismantle it.
Checking the amplifier for leaks
The essence of the process consists of the following steps:
- We put the car on the handbrake.
- With the engine off, press the brake pedal several times and, with the final pressure, fix it in the middle position.
- Take your foot off the pedal and start the engine. If the amplifier is working properly, the pedal should move down a little.
- If no displacement has occurred, then turn off the power unit and inspect the flange of the check valve of the amplifier, as well as the connecting hose itself. If damage is detected, we replace worn parts.
- Check the rubber hose on the manifold side. If necessary, tighten the clamp.
- If the car brakes spontaneously, we check the seal of the tail of the follower valve, for which we move the floor carpet near the pedal assembly and find the place where the amplifier is fixed. Visually inspect the condition of the protective element. If the latter is sucked in, then the amplifier does not function.
- We move the cap as high as possible, providing access to the shank.
- We start the engine and swing the shank to the right and left horizontally, while listening for any extraneous sounds. If hissing appears, it means that the VUT is depressurized and requires repair or replacement.
Check valve
Diagnostics of the check valve is carried out using a rubber bulb and a slotted screwdriver. The procedure boils down to the following steps:
- Loosen the clamp and pull the supply hose off the valve.
- We remove the valve from the amplifier housing.
- We put a bulb on the valve fitting and squeeze it. With the valve working, the bulb will remain compressed. Otherwise, the element being tested needs to be replaced.
Video: checking the vacuum brake booster on a “classic”
The brakes stopped working
In the worst case scenario, the brake booster control valve fails completely, resulting in complete inoperability of the brake system. Fortunately, such an outcome is unlikely. But if suddenly it does occur, carefully stop the car, tow it home and contact a qualified specialist in the diagnosis and repair of brake systems. Depending on the severity of the case, the matter may be limited to only replacing the valve, but serious repairs of the entire brake system may be required.
The brake booster control valve is an important element of the braking system, ensuring driving safety. That is why the presence of the described symptoms should not be ignored or postponed “for later”. Contact a qualified mechanic who can professionally diagnose and repair your vehicle's brake system.
Source