Dimensions of standard wheels
A peculiarity of domestic car models, including the Chevrolet Niva, is the lack of individual wheels for a specific year of manufacture of the car.
Common wheel sizes for Niva Chevrolet:
- rim width 8 inches;
- rim diameter 15 inches;
- offset ET40 – distance between the plane of fastening and symmetry.
Failure to comply with these parameters may result in:
- rapid wear of mechanical parts and components of the vehicle chassis;
- Excessive load on the wheel arches of a car and their breakdown, for example, the use of wheels with a dimension greater than R16 and a high rubber profile, will negatively affect the condition of the fender liner. Its surface will be erased. On the Internet you can see a large number of photos devoted to this topic.
Another important parameter is the bolt pattern or drilling of the disk. It is designated by the Latin letters PCD. For Niva Chevrolet it is installed by the manufacturer with dimensions 5x139.7. The number 5 means that the disk is fixed to the hub with five bolts, which are located on a circle, and the distance between adjacent fastening bolts corresponds to 139.7 mm.
The center hole (DIA) of the rim is 98.5mm
Therefore, when choosing a wheel, you need to pay special attention to this parameter, since a discrepancy from the standard even by 1 mm will certainly affect the quality of the disk fastening to the hub. After some time, due to a loose fit, the hub will simply wear off
And the last no less important parameter is the ET offset, which should not exceed a value of 40. Otherwise, this will lead to failure of the internal bearing. The most acceptable offset for the Niva Chevrolet is ET35.
Diagnosis of gasket condition on a Chevrolet Lacetti
The service life of the valve cover gasket on a Chevrolet Lacetti, as a rule, barely reaches 15–20 thousand.
An oil leak can occur as a result of engine overheating , then the cover becomes deformed and loses its seal. This is rare, but mostly oil oozes from under the cap and penetrates into the spark plug wells simply due to the gasket losing its elasticity and the sealant losing its properties.
Oil leakage occurs as a result of loss of elasticity of the valve cover gasket.
At the first appearance of traces of oil, and even more so when oil appears in the spark plug wells, you should not wait, but look for a new gasket as soon as possible.
Huge variety of articles
The market offers about a dozen gaskets for the cover of Lacetti engines; they are the same for 1.4 and 1.6-liter engines .
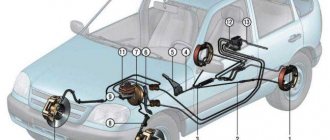
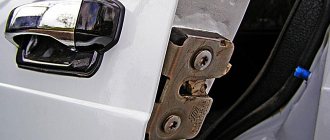
How do you understand that the rubber cuff of the rear axle gearbox of the “seven” needs to be replaced?
Recognizing the wear of the rear axle gearbox seal can, by and large, be done only visually and tactilely - by smudges (precisely smudges, not fogging) of oil on the gearbox in the place where the rubber cuff is located. However, as practice shows, a fairly small number of car owners notice such a breakdown in a timely manner (before the oil completely drains out of the gearbox), therefore, most likely, minor vibrations and/or a strong hum in the VAZ 2107 rear axle gearbox will need to be replaced. rear of the car while driving.
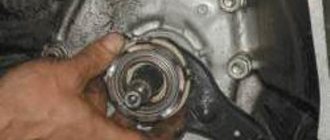
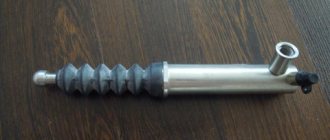
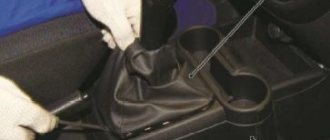
Be that as it may, if you find oil leaks on the gearbox, do not rush to immediately go to the oil seal; in addition, a poorly tightened drain plug can lead to oil leakage, so first of all you should check its condition, and a clogged breather. You will be alerted to the latest breakdown by replacing the rubber seal of the rear axle gearbox too often. However, in order not to wait for these replacements and, accordingly, waste money, we recommend checking the breather for functionality even before starting to deal with the oil seal, so that if necessary, clean or replace it at the same time as the cuff.
This is quite simple to do: grab the breather, or rather its cover, as shown in the photo, press and rotate it in different directions. This should come out easily, without any jamming, otherwise the breather also needs to be replaced. If the cover moves easily, but oil in the oil seal area still oozes, remove the breather (to do this, twist the thread indicated by the arrow in photo 2 with a wrench) and thoroughly rinse it with carburetor cleaning liquid or gasoline, and then blow it with compressed air. Reinstall the removed element, run the repair for 30 kilometers, and then check the rear axle gearbox again for leaks. If it occurs, change the oil seal, and if such a replacement happens again soon, change the breather.
Causes of cylinder head gasket failure
A crack or burnout of the gasket is a fairly common occurrence on the Niva Chevrolet . The vehicle is operated in extreme conditions; the engine runs at high speeds or with poor cooling off-road. The temperature in the combustion chambers reaches 1000°C, so the appearance of the slightest crack leads to rapid burnout of the gasket in this place.
A damaged node can be easily identified by the following symptoms:
- white steam from the exhaust pipe of the car (antifreeze enters the cylinders);
- drop in coolant level in the expansion tank;
- bubbling of antifreeze in the expansion tank;
- the appearance of an emulsion on the oil dipstick and timing components under the valve cover;
- increase in oil level due to antifreeze entering the crankcase;
- oil leaks from under the gasket outside the engine;
- the engine begins to stall and run intermittently;
- low compression in the cylinders.
Attention! The main reason for cylinder head gasket burnout is severe overheating of the engine, which leads to bending of the light-alloy cylinder head and the formation of cracks between the cylinder block.
The manufacturer does not regulate gasket replacement on a Chevrolet Niva . It is designed for the entire service life of the engine - 125 thousand km. This part is disposable and is replaced with a new one every time the cylinder head is removed. Dismantling the engine head may be necessary to repair valves and their seats, replace pistons and piston rings.
Possible faults
The need to adjust the elements of the front axle is assessed by the presence of noise and vibrations that occur in various operating modes of the VAZ 21214. Thus, conditionally acoustic signs can be divided into two groups: • Constantly recorded; • Fixed during braking with the help of an internal combustion engine or acceleration.
The nature of the sounds may resemble: • Howling (wear of the main pair); • Crunching, “trolleybus” hum (destruction or overtightening of the shank bearings, unscrewed drive shaft nut, axle bearings, incorrect adjustment of the gearbox gears); • Intermittent “shuffling” (differential bearing). The difficulty of diagnosis lies in the abundance of extraneous noise produced by other components of the car.
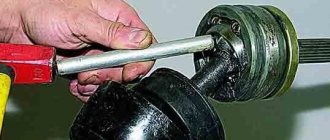
Block plane and gasket penetration
Distributors of a contactless ignition system of a new type.
To say that on Niva and Shnivy this is a birth defect is to say nothing. At some point they just drove off en masse. At a mileage of 15-25 thousand, the cylinder head gasket was punctured, and so on down the list.....What do they do in the Papuan service center, they buy a "Fritex" metal package, tighten it, and after 10 thousand the client comes back with a new one, with the same question. Or rather, with two. How long? And the classic “what should I do?” It is not the gaskets or bolts that are to blame, it is the factory quality of processing of the block plane and the cylinder head plane that is to blame. Below I publish a photo of one of the blocks. I personally changed the gasket on it twice until I found the optimal set, which I now recommend.
block plane
The metal bag does not help, but rather hinders. It cannot be crimped and does not fill uneven spots. You need a shrink gasket that will completely accept the topography of the block surface and the bolts that will constantly press it. This is the reason why hardened bolts are not rolled here. Of course, there is an option with subsequent broaching, as was the case in all Soviet times, but this is too labor-intensive. For a long time, the plant installed the Yaroslavl metal package “Fritex”, and now they have switched again to shrink gaskets. In normal production, it would probably be easier to update the milling equipment, but with us it’s easier to go back ten steps on the technical line.
How does the Cylinder Head work on a Chevrolet Niva?
- When the engine starts, the rod begins to move due to the camshaft
- The rod comes into contact with the hydraulic compensator, and then with the rocker arm
- After which the rocker begins to act on the opened valve
- When this valve opens, the air-fuel mixture begins to flow into the combustion chamber itself, where ignition occurs.
- Plugs provide a spark, causing combustion to occur.
- Thanks to the exhaust valve, the forming gases are removed into the exhaust manifold. After which the entire cycle is repeated zonally.
- On Chevrolet Niva cars, the cylinder head system has four pistons and four combustion chambers.
It also happens with this design that problems arise that require immediate elimination. Below is a table with the most common problems and how they can be resolved.
Tags
Useful tips (564)Tuning (329)Traffic police (307)Traffic rules (193)Pickup (163)crossover (156)Bus (151)Fines (149)Transportation (148)GAS (120)Rating (117)Truck (112)SUV (104)Trucks (98)UAZ (98)Bus (94)Car (89)Electric car (88)MOTORHOME (87)Toyota (86)CAMPER (86)History (86)KAMAZ (84)Prices (81)Volkswagen (79) )FORD (78)BMW (74)MAZ (71)Gasoline (71)Mercedes (67)Tesla (65)Van (63)Hyundai (62)Mercedes-Benz (58)Soviet (58)Minivan (58)Cars (57 )Tires (55)Porsche (53)Scania (52)hybrid (52)OSAGO (51)Technology (51)traffic police (49)Renault (48)ELECTRIC BUSES (47)Dump truck (45)Deception (45)Fine (45)MAN (44)Volvo (43)roads (43)Law (43)Repair (42)Electric car (42)Supercar (42)Lamborghini (41)Tractors (41)Ferrari (41)KIA (40)USSR (40)VANS (38 )Driver (38)Nissan (38)coupe (37)GAZELLE NEXT (37)Sedan (37)ELECTRIC VEHICLES (37)Cargo (37)DRONES (36)ZIL (36)VAZ (35)Accident (34)Engine (34) Public transport (34)Inspection (34)Convertible (33)Fuel (33)station wagon (33)Speed (32)ELECTRIC TRUCKS (32)Lexus (31)tractor (31)Hypercar (29)Safety (29)Lada (28)Taxi (27)UAV (27)All-terrain vehicle (27)Chevrolet (27)MOV HOMES (26)Dump trucks (26)Trucking (25)Car service (25)Licenses (25)Mitsubishi (25)Recording cameras (25)Minibus (25)Bugatti ( 24)Ford Mustang (24)
The cylinder head device in a Chevrolet Niva car
The Chevrolet Niva engine traces its origins to the 1.7 liter VAZ 21213 engine . It has the same cylinder diameter of 82 mm and a piston stroke of 80 mm. The differences lie in the design of the cylinder head (cylinder head). Hydraulic compensators and a single-row chain with a hydraulic tensioner appeared. The cylinder head itself is cast from aluminum alloy and is designed to attach the gas distribution mechanism, valves, spark plugs and form an optimal combustion chamber in the cylinders. This head received the index 21214, it has been produced since 2003.
Important! The cylinder head, camshaft, tensioner mechanism in VAZ 21214 engines differ from modifications 21213 and 2121 and are not interchangeable.
The gasket between the head and the engine block performs the following functions:
- sealing of engine cooling channels;
- sealing the oil supply channel to the block head;
- creating optimal gas pressure in the combustion chambers and preventing them from escaping into the block.
To ensure reliable connection, the cylinder head gasket is made of a composite with a metal base or all-metal. The mating surfaces must be smooth, without scratches or cavities; surface curvature of no more than 0.1 mm is allowed.
Camshaft replacement process
Don't forget to apply the handbrake and engage fourth or fifth gear. The initial step for removing the target unit is to release the air filter pipe from the 4 bolts and the latch.
To carry out the work successfully, you cannot do without a torque wrench.
Next, the candle tips are removed, after which the elements themselves are removed. The vacuum hose and crankcase exhaust pipe are also dismantled. For convenience, they are retracted to the side.
The valve cover is then cleaned of dirt to prevent particles from accidentally getting inside. The throttle assembly is disconnected (located at the end). Use a wrench to unscrew the 8 studs holding the valve cover.
When disassembling, it is useful to additionally replace old gaskets and treat them with sealant.
The car should be jacked up at the front so that it is convenient to turn the wheel. Then the mark on the back of the gear is aligned with the camshaft mark.
The machine is lowered to the ground, the chain is attached to the gear in a convenient way (using a wire or tie).
Device design
This element in the design is responsible for such basic functions as:
- Supplies the hot mixture into the cylinder
- Based on the gas distribution mechanism
- Removes exhaust gases
- It burns flammable mixtures and compacts
- Oil is drained and supplied, which normalizes the normal operation of the timing belt.
One of the important functions is compliance with standards for environmental characteristics of substances emitted into the atmosphere. Therefore, the head block is a very important element in the operation of the entire system.
This design is made of aluminum alloy, and is presented in the form of a rectangular shape. It includes:
Independent Wheel Bearing Clearance Repair
If you feel or feel vibration in the steering column while driving, then most likely the clearance on the front wheels in the bearings of the hub itself has increased, so their service life will be reduced, and the tires will begin to wear unevenly. And if there is no gap at all, then the hub will rotate tightly, which will also lead to a decrease in service life, so its gap should be greater than zero fifteen ml. Adjustment of the front bearings is carried out using a wheelbrace wrench, a twenty-seven wrench and a hammer.
- A wheel that is in a suspended state should be rocked; if there is play, the gap must be adjusted. After this, press the brake pedal and rock the wheel; if there is no play, then there is a gap in the bearings.
- It is necessary to dismantle the decorative cap and unscrew the lock nut from the hub, and hold it with a wrench to prevent it from turning. When repairing the chassis while adjusting the hub, it is advisable to install new hub nuts, since even after adjustment there is a high probability that the old ones will take their original place, which will not allow them to be properly locked. If this is not possible, then you can take the nut from Drugov’s car.
- Then you need to twist the hub nut so that the torque is 19.6 Nm. turning the hub several times, ninety degrees in two directions, will install the bearing itself. After this, loosen the adjusting nut and tighten it to 6.8 Nm. Having done all this, simply unscrew the nut twenty-five degrees.
- After everything is done, change the collar of the nut on the pin of the external drive joint.
- After the adjustment is made, check how the wheels rotate; if they rotate easily, then everything is fine. The final check can be made only after driving several kilometers without braking, assessing how the hub heats up.
Also interesting: Niva Nadezhda engine
Niva cylinder head bolts, installation
To work with bolts, a special tool is required. E16 head, which is not always included in universal tool kits, and a torque wrench. To make the process logically complete, the price list includes an E16 head (Sata or Force) and a torque wrench ( JTK) .
I won’t invent anything about the installation technology, just completely follow the factory manual.
- Submerge the bolts in a container of engine oil.
- Let it drain. Exposure for at least 30 minutes.
- Wrap and tighten according to the diagram.
Tightening force:
Stage 1 – tightening torque (12…20) N.m [(1.2…2.0) kgf.m];
Stage 2 – tightening with torque (50…70) N.m [(5.0…7.0) kgf.m];
Stage 3 – turning the bolts by 90-110 degrees;
Stage 4 – turning the bolts 90-110 degrees.
Tightening torque of bolt 11 (at the cylinder head tail): preliminary – (14…16) N.m [(1.4…1.6) kgf.m]; final – (32…40) N.m [(3.2…4.0) kgf.m].