Hello subscribers. Autumn has arrived, and with it came cold nights, winds, rains and dampness. Car heaters are being used more and more often. I have an old and “good” relationship with the stove, for a long time. No matter how we agreed)) but in fact she fried.
And it didn’t just heat, it actually fried, so sometimes in the cold winter I had to turn it off so as not to sweat. Then there was only one serious drawback: the stove chirped like a cricket, which was very annoying. I checked the casing, it doesn’t touch it, I cleaned it of debris, no effect.
Well, that means the heater motor was tired, and then I planned to change it in the spring or summer, but as expected, I screwed everything up and changed it in the fall. Actually, the replacement will be discussed, but first, as always, a little of the past, plans and thoughts.
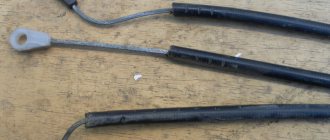
When I was changing the heater panel with the levers (these are the ones we use to control where to blow and what kind of air) I broke the cable to the heater tap, I did it. But from that moment on, the stove no longer blew as before, the tap seemed to be opened all the way, it became better. A friend took a look and said the damper doesn’t fit, doesn’t fit and doesn’t close properly.
Today I pressed it as much as I could and achieved a consistently hot air flow. But it’s still not the same... but this is nonsense, next spring it means there will be a complete revision of the heater, with sizing, I’ll also get rid of the tap and change the thermostat. In short, I planned to do such things well.
- Let's return to the engine, the heater motor whistles, a replacement has arrived. Electric heater fan 2108
Full size
Actually, here he is in the box and what is written on it.
There are a couple of spaces missing in the address (an eternal problem) but that’s okay)))) I always pay attention to such things, out of professional duty. That's why it's written - el. mail, not e-mail, this is real respect. But I got carried away again. Packed simply in the coolest way.
Full size
namely like this)))
- There is no doubt about the integrity.
Full size
Inside is the motor itself, a passport, and fasteners.
Full size
I looked at the soldering, everything seems to be of good quality, nothing is loose or loose. Wires with good cross-section.
- Everything inspires confidence.
Full size
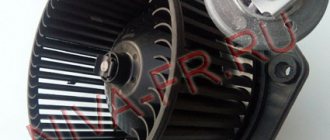
It's just a sight.
Full size
On the right is Luzar, he looks a little different.
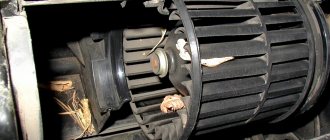
About the old motor, when removing it, it was discovered that its brushes were running low, and there was difficulty in rotating. Namely, the course of rotation is not smooth, but jerky. Let him rest, well deserved. In general, about removing the heater motor.
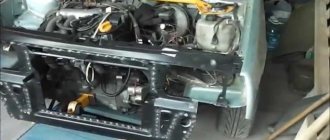
First we remove the frill, the seal, the cabin filter housing in my case, and unscrew the heater motor housing, as it is called - the snail. It’s better to halve it (the snail) there, remove the latches and pull it out in parts.
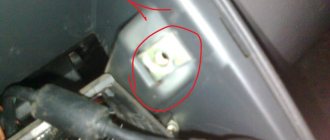
But, someone manages to remove it entirely) Yes, but before removing it, you need to disconnect the connector in the cabin and unscrew the ground. The ground and the connector itself are under the dashboard, next to the stove and steering column.
Full size
The mass is where the arrow is, there, in the depths)
In general, this is very inconvenient, but a tubular wrench of 10 came to my rescue. Now the motor can be pulled out. Everything is assembled naturally in the reverse order, assemble the “snail” directly in the place where it stands, pull the wires through the round seal and everything is under the panel connect.
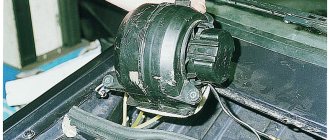
My adventures did not end there and I will continue my recording. When I replaced the motor and assembled it into the housing to check, it turned out that the new motor was touching the casing.
Full size
The blades (impeller) touch the casing, there is only one solution, grind them off.
However! Craftsmen wrote on the Internet that they grind the blades themselves, which I don’t see the point in. The point is the same, but what to do with the imbalance of the blades and vibration is not clear)) so it’s better to grind off the casing. Naturally, I didn’t have a tool for this case, I had to take a utility knife to trim it.
Full size
Marked in red where the plastic had to be cut
Well, by the way, you can do it with a grinding wheel in 10 seconds)) After that, the blades rotated freely and didn’t hit anything. The case has a seal in the form of foam rubber, it also had to be changed because it was completely unsuitable.
Full size
Like that.
Foam rubber is, of course, good. But still, I did it wrong; it would have been better to use a rubber seal. Well, after that I installed everything, as I wrote above.
There were a lot of negative reviews about this motor. Allegedly, it creaks, barely blows, and burns out. Of course, I can’t verify the latter yet.
But in fact I will say that nothing creaks, it blows perfectly
, works smoothly, against my old motor, which seemed to rattle at low speeds, and sang like a cricket at high speeds.) T.
While the engine is working great and blowing well, I haven’t found anything that was written on the Internet. Which I’m glad about myself) I hope I didn’t forget to write and show anything. Here’s a post, now in winter I’ll be quiet and almost warm))
Like, subscribe, there will be more little things coming soon) Bye everyone!
Warm and lamp photo goodbye)
Source: https://www.drive2.ru/l/454374555641709516/
Replacing the stove fan (motor)
I think that many owners of not only the VAZ 2109-2108, but also other domestic cars encountered a problem when, when the heater was turned on, the motor began to howl like a pig.
So, you can, of course, lubricate the whole thing, but practice shows that this is not enough for a long time and a terrible squeal or creaking, call it what you want, appears again.
In this case, it is necessary to replace the fan, or more precisely, the motor assembly itself.
To carry out this repair procedure, we will need the following tools:
- crosshead screwdriver
- Head for 10
- Ratchet handle
The procedure for removing and installing the heater motor on a VAZ 2109-2108
First of all, you need to open the car hood and unscrew the 5 bolts securing the plastic trim, as shown in the photo:
And remove it so that it doesn’t get in the way in the future:
Now you need to remove the hood seal:
To then easily pull off the protective cover, under which the heater motor on the VAZ 2109-2108 is located:
After which access to the fan is open:
As you can see from the picture above, you need to unscrew the two mounting bolts that are located on the sides of the motor:
Well, then you will have to suffer a little. The fact is that on the VAZ 2109-2108 the power wires are soldered directly to the motor, and the terminals are connected to the electrical wiring inside the car. To put it mildly, the decision is simply idiotic. Now, in the cabin, by putting your hand under the panel on the driver’s side, we find the positive wire plug and disconnect it:
In the same area there is a negative wire, and there are even more problems with it, since it is secured with a nut, and in order to unscrew it, you must first feel it with your hand, and then use a socket and a ratchet to do this work. Immediately from the passenger compartment, you can insert these wires through the rubber seal in the hole in the body - it is visible in the top photo - from there two wires enter the passenger compartment.
And now, from the outside, turning the heater motor at different angles, we find the most convenient position, and remove it through the right side (in the direction of travel of the car):
And finally remove it from the engine compartment, as shown in the photo below:
If the part needs to be replaced, you need to buy a new stove fan, the price of which for a VAZ 2109-2108 is about 500 rubles for one motor. And if you buy it complete with the case, the price will be about 1000 rubles. We carry out the installation in reverse order.
Source: https://remont-vaz2109.ru/zamena-ventilyatora-motorchika-pechki/
Important points
In order for the stove repair to proceed as quickly as possible, and its results not to disappoint the car owner, you should adhere to the rules below:
- When removing the old motor, be sure to turn it. If this is not done, part of its fastening may break and get stuck in the torpedo, or more precisely, in the mounting bracket. And getting to the stuck fragment will not be so easy.
- When tightening the mounting screws with a Phillips screwdriver, you should not use too much force: they are small, so the threads in their sockets can easily be stripped.
As practice shows, replacing an engine is not particularly difficult even for a novice car enthusiast if he has held a wrench and a screwdriver in his hands at least once in his life. The whole procedure takes 40–50 minutes maximum. The main thing is not to overdo it with tightening the fasteners, and everything will be fine.
Replacing the heater motor on a VAZ-2108-2109
The fan (motor) of the heater provides airflow to the car and increases the efficiency of the heater. If it malfunctions, the quality of interior heating deteriorates significantly. Extraneous sounds may appear that distract you from the road and are very annoying. The only way out is to repair or replace the failed unit. As a rule, car enthusiasts immediately go to a service station and shell out considerable sums for performing such work. For what? As a rule, changing the heater motor on a VAZ-2108-2109 is a matter of 30-40 minutes.
Basic faults
The first thing to do is figure out the reason. Start the car, switch the heater to different speed settings and listen to the sounds of the motor. If after turning on the blower no action occurs and no sound appears, then the fan simply does not work.
If the motor starts only at third speed, the cause of the malfunction may be the resistor installed in the switch (such a malfunction occurs quite often on VAZ cars).
Let's figure out what could be the reasons for the stove failure. There are several of them:
- The fuse has failed. The first thing you should do is check the integrity of the fuse that powers the heater fan. The cause of the device failure may be a small short circuit. Please note that one fuse link can power not only the motor, but also the clutter lighting, heated mirrors and other devices. Therefore, if the stove fails, check the functionality of other devices.
- Poor contact in the mounting block. This problem is common both in domestic cars and among foreign cars. The problem can be corrected by simply cleaning the contact group or pulling the contact.
- Ignition relay malfunction. The control device tends to stick. In this case, the heating system fan will turn on only when the engine is warm. If the malfunction manifests itself in this way, then it is advisable to immediately check the relay and, if necessary, install a new one.
- The airflow turns on only when you switch to third speed. Here you need to know the design of the device. The bottom line is that the first and second positions involve connecting additional resistance. At the third speed, switching occurs directly. Therefore, the fault can be eliminated by simply replacing the resistor.
- The switch is broken. Often the switch itself can be the cause of problems. To check it, you should use a regular 12-volt light bulb with wires soldered to it. Proceed in the following sequence:
— turn off the central part of the console to gain access to the switch (nothing should stop you from performing the check);
- start the car and connect one of the wires to the negative (car body). Use the second wire to alternately touch the output of the first, second and third speeds.
Now take stock. If the lamp lights up in all cases, then the switch is operational. If the light does not light, then move the wire to the “plus” of the switch. If the lamp does not light up here, we can conclude that there is a break in the motor circuits or a failed fuse;
- fan failure. If the switch is working properly (voltage is supplied) and the motor itself does not show any signs of “life”, then the cause of the problems may be the poor quality of the contact connection at the “minus”. The second option is to flood the engine brush.
Operating principle and causes of malfunction
Let's take a quick look at how the heating system generally works. To adjust the temperature, you open or close the tap of the heating device. After this, well-heated coolant begins to flow into the radiator, which is a source of heat (on a warm engine, the coolant temperature can be 90-95 degrees Celsius).
By switching the speed modes of the fan motor, you can set the speed of its operation. The volume of warm (cold) air entering the cabin directly depends on this. It all depends on the position of the tap - whether it is open or closed. In the future, using panel dampers, you can regulate the air supply and direct it throughout the cabin - to the windshield, legs and into the cabin, and so on.
Features of replacing the stove on a VAZ-2108-2109
So, if strong squeaks, squeals or complete failure of the fan appears, it needs to be replaced. This is done in the following sequence:
- Prepare the necessary tools - a 10mm socket, a Phillips screwdriver and a handle with a ratchet.
- Open the hood of the car and unscrew the five screws that secure the plastic trim to the windshield. Remove it completely and set it aside.
- Pull out the hood seal (it will also interfere with operation).
- Pull out the protective casing, behind which the fan motor itself is located.
- Unscrew the two mounting bolts that secure the motor to the car body.
- Get into the passenger compartment and under the instrument panel on the driver's side, find the positive fan wire and discard it. Here you will find the “minus”, which is fixed with a nut - unscrew it using a ratchet handle and a suitable socket on “10”. There is no other way to turn off the voltage from the motor, because the power wires are directly soldered to the device.
- Remove the engine (to do this you will have to twist it a little to choose the optimal position).
- Make repairs if possible. If you don’t have the time and the necessary knowledge, just replace it.
- Install a new motor and return all parts in reverse order.
Conclusion
Thus, if the stove motor fails or unnecessary sounds appear, you should not endure and freeze - take some personal time, carry out a small diagnostic of the malfunction and fix the problem by repair or replacement. Good luck.
Source: https://ru.megasos.com/wiki/zamena-motorchika-pechki-na-vaz-2108-2109
Typical faults
As with any mechanism, problems can occur in the heating system (video author - Andrey Kuzemsky).
If the VAZ 2108 heater motor is broken, you can understand this by comparing some symptoms:
- If the motor does not work when switching operating modes, the cause of the breakdown may be hidden in the resistor. When repairing, you need to replace the resistor with a new one, because it cannot be repaired.
- If the fuse is blown, you need to check the insulation of the armature located on ground. There may be a short circuit.
- If, when switching modes, the VAZ 2108 heater fan rotates at the same speed, this may be a consequence of contamination or oxidation of the collector. In case of repair, it is worth cleaning the collector and, if nothing has changed and the fan continues to act up, you can replace the bearings.
If the VAZ 2108 stove motor does not even show signs of life, then the reason is not in its design, but in a broken circuit. To find out if this is true, you can use a voltmeter.
The device of the stove on the VAZ 2109
Heating of the VAZ 2109 interior is provided by the operation of the heater radiator, connected in parallel to the main radiator, which is part of the engine cooling system.
Appearance of the device
Heater diagram
The heater is mounted in the cabin under the dashboard using nuts on bolts that are welded to the air supply box. The air heated in the heater through channels (air ducts) enters the interior of the cabin.
The air ducts are located at the bottom of the dashboard and have sealing gaskets.
- If you plan to carry out repair and maintenance work, or replace failed components yourself, you definitely need to study the design of the stove and become familiar with the location of the components.
- Based on the diagram below, we will introduce you to the design of the VAZ 2109 stove.
Scheme
| Item number | What is this |
| 1. | Bracket for fixing stove casings |
| 2. | Heater control damper |
| 3. | Left heater casing |
| 4. | Flap rod for heating the foot area |
| 5. | Radiator gasket |
| 6. | Radiator |
| 7. | Gasket sealing stove |
| 8. | Electric stove motor |
| 9. | Heater fan shrouds |
| 10. | Fan impeller |
| 11. | Heating damper |
| 12. | Air duct for heated windshield |
| 13. | Side nozzle duct |
| 14. | Side nozzle |
| 15. | Center nozzle flap |
| 16. | Pusher (blades); |
| 17. | Blade axis |
| 18. | The blade itself |
| 19. | Center nozzle closing lever |
| 20. | Heated windshield damper rod |
| 21. | Lever for changing air flow directions |
| 22. | Air heating control knob |
| 23. | Windshield air handle |
| 24. | Leg air handle |
| 25. | Bracket for control levers |
| 26. | Rod sheath fixation bracket |
| 27. | Stove valve control rod |
| 28. | Stove control damper rod |
| 29. | Heated footwell flap |
| 30. | Air control lever axis |
| 31. | Screw clamp |
| 32. | Stove valve |
| 33. | Heater valve body |
| 34. | Valve lever |
| 35. | Hoses connecting the faucet to the heater radiator |
| 36. | Internal ventilation duct |
| 37. | Heated windows for rear footwells |
| 38. | Stove tap |
| 39. | Window for heating the driver's foot area |
| 40. | B-pillar trim |
| 41. | Inner cavity of the central pillar |
| 42. | Exhaust ventilation duct |
| 43. | B-pillar trim |
| 44. | Hood deflector lining |
| 45. | Rubber valve |
| 46. | Deflector housing |
| 47. | Exhaust ventilation deflector |
| I | Heater |
| II | Stove operation diagrams |
| III | Stove tap |
| IV | Interior exhaust ventilation |
Replace without removing the panel
But no matter what method is used, you will first have to drain the coolant from the system. Therefore, you will have to stock up on antifreeze in the required quantity in advance.
First, let's look at the replacement method without removing the panel. As already mentioned, this will require making cuts in some places.
To complete the work you will need:
- Set of screwdrivers of different lengths;
- Hacksaw blade for metal;
- Flat container for draining residual coolant from the radiator;
- Rags.
Having prepared everything and drained the coolant from the cooling system, you can begin work:
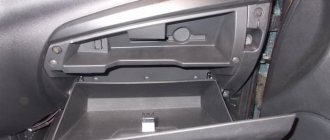
- We remove the storage box (glove compartment) from the panel, for which it is necessary to unscrew 6 screws securing it;
- Remove the side trims on the center console;
- Using a metal blade, we make the necessary cuts: The first cut is vertical
, we make it on the inner wall of the panel near the center console (behind the metal strip of the glove compartment).
Moreover, here you will have to make two cuts. The second cut is horizontal
, running in the upper part along the rear wall of the opening under the glove compartment.
The third is also vertical
, but not end-to-end. It is done on the right on the rear wall of the lower storage shelf of the panel; - After all the cuts, part of the panel together with the wall can be bent down, which will provide access to the radiator. We bend this part and fix it;
- Unscrew the near bracket for fastening the heating system flap control cable and move the cable to the side;
- Loosen the clamps of the coolant supply pipes to the radiator. In this case, you should place a prepared container under the connection points, since liquid will flow out of the heat exchanger. Remove the pipes;
- We unscrew the three screws securing the radiator, remove it and immediately inspect it.
Afterwards we replace the heat exchanger, fix it in the seat, connect the pipes to it and clamp it with clamps. To make the pipes fit easily, lubricate them with soap.
At this stage of work, you should fill the cooling system with liquid and run it to remove air pockets.
Next, it remains to make sure that the connections between the pipes and the radiator are not leaking, and that the damper and faucet are connected without errors.
After this, all that remains is to return the cut part of the panel to its place and fix it. To do this, you can use screws and plates.
The main thing is to fix it in several places so that in the future the cut off part does not rattle when moving. Use sealant or silicone.
This method is convenient because if you replace the radiator again (which is quite possible), all the work will be very simple - you just need to remove the storage box and unscrew a few screws.
In addition, all cuts are made in such places that after assembling the panel and installing the glove compartment they will not be noticeable.
The heater blows poorly into the legs and side windows
The heating system of the VAZ-2114 is not reliable. Over time, the stove stops heating the legs and side windows normally. Moreover, the problem is not in the temperature of the air (on the contrary, it can be hot), but in the strength of the flow with which it comes from the nozzles. In this case, you will have to modify the air flow channels. To do this, remove the front panel so that there is access to the nozzles.
Next, a new corrugated hose is installed (just plastic tubes come from the factory). Additionally, we treat the joints with the heat-insulating material “Spleen”. All cracks between the top and bottom of the panel are also covered with it. Next, you should modify the stove damper, which directs the flow to the desired area. Often it does not fit well against the body. Because of this, a large percentage of hot air is simply lost in the panel and “walks” in the cracks. So, we remove the damper and remove the old yellow factory seal. We seal all the cracks with modelin. Instead of a sponge, we glue “Bitoplast”. It is advisable to apply it in several layers.