In winter, each driver uses a heating system to create a comfortable microclimate and interior ventilation. Air enters it from the street through holes and grilles in the hood. However, in some models the stoves are so poorly made that it is easier to replace them. Most often, the VAZ-2107 stove is replaced with a VAZ-2108 stove.
Also check out
- Use silicone sealant or a similar sealing substance to fill the cracks and joints of the structure.
- The most difficult step in the entire process is working with the channels that bring air flow to the openings of the air ducts. In our example, collapsible and made from the same material options were chosen.
- To reduce resistance and eliminate vortices, make smooth turns from duralumin.
- Make slits with flaps for airflow to the legs.
- If desired, you can install a variable resistor that regulates the speed of the cochlea, replacing the backlight brightness resistor with it.
The results of improving the VAZ 2107 stove
At low speeds, the stove operates silently, the air flow from the side slots is quite strong, and in other directions it is also uniform, quickly warming up the entire cabin. In addition, upgrading the stove eliminates the previously occurring glass fogging.
What did you improve?
The modernized stove has a number of advantages:
- Quiet, and at 1st speed silent.
- Productive, at speed 1 it blows at the level of speed 2 of the old fan. At maximum speed, dust will fly out of the air ducts.
Such tuning of the heating system is mandatory for drivers of northern cities. Have you improved the Lada 4×4 stove in this way? Write reviews and additions on this modernization, take part in the survey. Let us remind you that other modifications to the SUV are published in this category.
Photo: Flea in-flight magazine
Keywords: stove 4x4 | 4x4 air ducts
Found an error? Select it and press Ctrl+Enter..
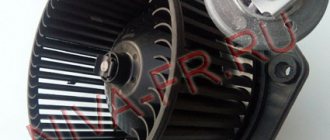
Snail VAZ 2108 classic
So, today we will tell you how to install a snail from a VAZ-2108 stove into a classic one using the VAZ-2107 stove as an example. In principle, without any adjustments, this instruction is suitable for a VAZ-2104 and VAZ-2105 and with minor adjustments for any other classic stove. The main nuances in air ducts are different. After all, I think that any owner of a classic car dreams of a stove that will blow evenly from all nozzles and immediately heat up the interior and defrost the windows. The classic stove has a lot of shortcomings in this regard, both in terms of power and performance, I’m generally silent about the rear passengers, no one took care of them, but for the front driver and passenger, not everything is so smooth, the side front windows (especially the driver’s) are almost not blown and in some places, on the contrary, it is even very hot, I would say unnecessarily. So, we will solve this problem radically - we will install a snail (stove motor with housing) from a VAZ-2108 (eight) in a classic. To do this, we will need the snail itself from the eight or nine assembled, with the body, material for making the lower part of the body of a classic stove, plexiglass or polycarbonate will do, various screws, sealant, tape, a grinder, a knife or a hacksaw, straight hands, drawings and patience . We dismantle the lower part of the standard stove from the car and saw off the entire lower part from it with a grinder - it will be reassembled under the snail from the figure eight:
Then we begin to cut out and place in place new walls for our stove made of polycarbonate or other material of your choice, focusing on the dimensions shown in the diagram below, but before final assembly and sealing, we recommend checking in place, just in case.
In general, we cut out the first wall and screw it on as in the photo:
We cut out a diffuser from the middle part of the stove; we no longer need it.
Look closely at the two protrusions on the sides that I didn't cut off. These are stops for the radiator - and under no circumstances should they be cut off. Next, we put the middle part on the lower one and try on the snail; the snail should be as high as possible but not go beyond the radiator stops; we mark where the bottom should be. Next we cut out and try on the bottom of the stove. It is worth considering that the back of the stove is our narrowest place, we try to make it as small as possible.
Now we make an internal partition that will actually divide our snail stove - it sucks air from one part and blows into the other:
The hole where the snail nozzle is inserted must be placed exactly in the center so that the airflow is uniform.
Let's try the design in its place in the car:
If everything is fine, install and secure the snail as in the photo:
Please note that in the last photo I have already drilled holes for the output of future air ducts. There is simply no room for imagination here, they can be made from anything - corrugations, pipes of suitable diameter, etc.
Our final design looked like this:
Chronicles of a Freelancer – TavroBlog
A simple way to modify a tavropechka. If you are already sick of her buzzing, then don’t pass by.
The turbines are mounted on the axles disgustingly - there is misalignment due to this runout of up to 5 mm and there is a lot of noise during operation. The fan itself, without load, blows just right - the cap flies off, but as soon as you switch it to winter mode, the pressure drops significantly. Moreover, it blows through the stove radiator with good pressure. But it completely refuses to blow into the outlet pipe of the stove.
If anyone has a desire, you can try to cut off the lower part of the stove with the damper for the legs and make it with a smoother turning of the air flow. Otherwise, in the stock version, the air blows into the bottom almost at a right angle. Now about my modifications. To start, we purchased a used snail from a VAZ 08, which was mounted on sealed bearings. The modification is very simple: I didn’t fill the bearings with epoxy resin, but simply wound it tightly with polymer electrical tape to the required diameter (I had to wind somewhere from 2-3.5 mm of electrical tape along the radius), cut off the excess tape flush with the holder.
By the way, there are two types of bearings with different outer diameters suitable for the shaft on the market. Those with a larger outer diameter (in my opinion, No. 2008) were used. Brass inserts are dug out from their sockets along with the clips that hold them; all burrs are smoothed out with a file and bearings with electrical tape are tightly inserted into this place. Everything came together like it was originally, I had more hemorrhoids when dismantling the brush mechanism (it was riveted) I had to drill out the rivets and cut threads for the screws. By the way, it is better to take thinner electrical tape so that it stretches well and then there will be no protrusion at the place where it is cut. Next, we try on the snail in the stove for installation using standard technology, but move it to the left when viewed from the side of the stove outlet (see the figure, top view). Now about organizing recycling. To do this, you will need the shortest piece of sewer plastic pipe with a diameter of 100 mm and a plug for it, some aluminum rivets and strips of tin.
We prepare the plug by cutting off the part that is inserted into the socket by almost half the diameter and cutting a window at the end (see Fig. plug). On the air intake side of the snail, we attach a piece of plastic pipe with self-tapping screws, select the length according to the location so that the plug inserted into it rests against the stove body . I used the part of the pipe that has a socket, having previously thrown out the sealing rubber. A window is pre-cut in this pipe for almost half the diameter of the pipe (see Fig. pipe).
Now if you insert the plug into the pipe, then turning it inside relative to the cut window in the pipe, it will either close the window or open it. Next, you need to first assemble the structure, mark and cut a window in the stove body so that when the window in the pipe is closed, the windows at the end of the plug and the stove body coincide. (see Fig. recirculation and air intake from outside).
After this, we make a handle with which we will turn the plug. For me, its role is currently played by a long screw inserted into a hole drilled in the plug and passed through the window in the stove, so that the windows in the stove and the plug completely coincide; the stove body is slightly trimmed in places where the screw moves.
By the way, the plug turned out to be a little short because I cut the window in the pipe to the maximum, so I had to lengthen it by riveting a strip of tin from the inside. That's all. Now we assemble the entire structure with rivets and install it in the stove. During assembly, it is better to place a sealant made of foil insulation under the end of the plug, otherwise engine noise will be heard from under the torpedo. Advantages : low noise during operation, good air pressure, quick warm-up. Disadvantages : the need to dive deeply under the torpedo to switch modes. I plan to get rid of this by installing an electromechanical drive for the plug (but already in the summer)
Flushing the heater radiator
Along with installing an electric fan from a VAZ 2108, I would recommend that you flush the heater radiator. This will greatly improve its heat transfer.
Over time, the popularity of VAZs does not decrease. Some people resign themselves to the shortcomings these cars have, while others independently improve their car.
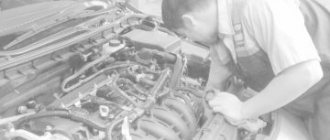
If you don’t want to put up with imperfections, you can modify the VAZ. Now we will talk about how to improve the VAZ 2107 stove (increase the air flow, reduce the noise of the stove fan, install heating for the feet).
Required tools:
- “snail” from the VAZ 2108, which will reduce noise and increase air flow;
- three-millimeter plexiglass from which the stove body can be made;
- industrial hair dryer for bending plexiglass;
- set of screws;
- aluminum (any other possible) corners that will be needed for mounting the stove body.
Instructions for installing a new heater
When they talk about replacing the stove from a VAZ-2108 with a VAZ-2107, they first of all mean reinstalling the snail.
In order to replace the snail, you will need some things:
- Snail from VAZ-2108.
- Screwdriver with 4mm drill bit.
- File (you can use any file).
- Fasteners - metal angles with two bolts, bolts, washers and nuts.
- To build the frame or box of the stove for 2107 from 2108, the following material is used: plexiglass, up to 4 mm thick, or ABS plastic (a more expensive option).
To make a stove, you will need about a meter per meter of material, taking into account some errors. The dimensions given on some resources are not always accurate, and each driver who decides to reinstall the heater comes to his own dimensions.
Replacing the electric motor of the heater VAZ 2107 – 2105
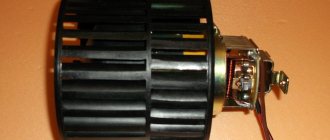
The first step is to drill a hole in the impeller, diameter 7 mm. Then carefully press the impeller onto the shaft of the “eighth” engine and, through experiments, achieve minimal vibration and noise
Important! Before installation, you must perform a test run, then proceed with installation.
You may have a question, why change the mode switching resistor? It was replaced after testing, with a standard resistor there is quite a lot of air flow.
It will also be important to replace the heater fan rotation mode switch, since it is not designed for high current and simply melts. It is connected according to the circuit from the VAZ 2108, that is, we end up with a three-speed fan that turns on only when the ignition is on
Creating a box
The first thing that needs to be done when replacing a VAZ-2107 stove with a VAZ-2108 is to work on the top of the heating system cover, that is, on the place where the original fan stood. It is necessary to completely cut out the fan, leaving only the frame. You can cut it with a regular stationery knife, leaving space on the sides for fastening.
Next we are working on the second part of the heater. Here we also remove everything unnecessary, leaving only the latches for attaching the box to the top.
Next, we proceed to build a frame made of plexiglass or plastic. This is where corners and other consumables will come in handy. The main thing when creating a frame is to measure and mark everything correctly. And then all that remains is to cut and assemble the frame itself. We start by creating the base (26 cm X 17.5 cm), then we make the side walls and holes for the air duct. When cutting out windows, it is better to take your time so that everything is done carefully.
After securing the sides to the base with the corners, we proceed to fitting the sawn cover. To make the stove from 2108 fit on 2107, we cut out a window in the lower part for air to escape.
Installing a VAZ-2108 stove on a VAZ-2107 involves placing a new snail in the frame. We cut out a hole and air ducts in the front wall to size. We try on the partition in the stove and set the angle between the side and front walls so that air flows into the cut hole. When the angle is set, install the motor in the partition.
The air ducts should have a width of 3 to 4 cm and a length of 15.5 cm. The height of the air duct is 7.5 cm. If there are gaps, they must be sealed with a heat gun or sealant. We also seal all the resulting gaps in the box.
So, in order for the stove from the VAZ-2108 to fit into the VAZ-2107, we install a snail in the box; for this we need to remove the cover. To make the snail fit like a glove, we place emphasis on the back and fasten it on the sides. We put on the top part of the box.
We insert the back wall into the yew, heat it, bend it, measure it and install it. The stove on 2107 from 2108 will be installed correctly if you adhere to the dimensions. Next, a damper and side nozzles are installed, to which the pipes go.
You can cover the box with sound insulation, cover it with some material, or paint it. You can install a heater switch from Kalina on a VAZ-2107.
Processing the engine compartment
But one more problem remains - the long time it takes to warm up the interior. And to eliminate it, you need to insulate the engine. This will allow the engine to reach operating temperature faster and cool down more slowly.
But it is not possible to insulate the motor itself; there are a significant number of moving elements on it that cannot be covered. But insulation of the engine compartment is allowed.
We recommend: Checking and repairing the xenon ignition unit: 4 signs of a device malfunction
First you need to insulate the hood of the VAZ-2107. To do this, you can purchase a special cover from the auto store that is attached to the cover from the inside of the hood.
But many car enthusiasts prefer to do this with improvised materials. But when deciding to treat the hood, you should choose the right insulating materials. They must be non-flammable and not absorb oil. Therefore, it is not recommended to use ordinary fabrics.
The engine compartment can be better insulated by gluing insulating materials onto the shield separating the engine from the passenger compartment. But this can only be done by removing the engine from the car.
In addition to the hood, the radiator also needs to be insulated. For this purpose, masks are used that are attached to the radiator grille.
Instead of a mask, you can use a regular cardboard sheet placed between the radiator and the grille. But it is worth considering that you cannot completely close the radiator; heat exchange must still occur. Therefore, a sheet of cardboard should not cover more than 2/3 of the radiator area.
There is no need to take this into account with a mask, since in addition to the grille, there are enough holes in the front end for the air flow to pass to the radiator.
Stove design
The stove consists of the following parts:
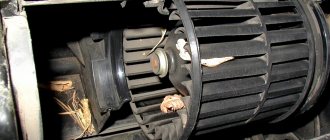
- Heater, a stove radiator is installed in it (indicated by the number 5 in the figure), it heats the air penetrating from outside;
- The stove fan, or motor (indicated by the number 14 in the figure), it pumps a flow of warm air into the cabin, it is mounted in a special casing (indicated by the number 16 in the figure) on elastic cushions that dampen its vibration;
- The stove control system is a fan button (indicated by the number 18 in the figure), three control knobs for heating modes - blowing onto the windows, taking air from the cabin or from the street, and opening and closing the stove tap.
1, 9 – air ducts for heating the side windows on the left and right; 2 — air duct for heating the windshield; 3 — radiator casing; 4 — air intake cover; 5 — heater radiator; 6 — radiator valve; 7, 8 radiator hoses for supplying and discharging hot fluid from the cooling system; 10 — rotary deflectors; 11 — air duct damper; 12 — air distribution cover; 13 — fan guide casing; 15 — lever of the air distribution cover; 17 — control rods; 19 - central air duct.
The heating system works in the following order:
- Air for heating comes from outside, through air intakes on the hood.
- Under the hood there is a special box, insulated with a rubber seal, for air flow.
- From it the air flow is directed to the stove.
- Next, the air is heated by a radiator, which is fed with antifreeze and antifreeze. The degree of heating is regulated by the heater tap. The faucet is controlled by a flexible rod using a control lever.
- At high vehicle speeds, air can enter the passenger compartment without the fan being turned on. Therefore, at high speed you can use the stove without additional load on the car’s electrical network. The interior heater is turned on by a fan switch that has three positions - neutral and two speeds: low and high. Speeds are provided by a resistor; it increases the resistance of the circuit and reduces the speed of the fan.
- The fan accelerates the warm air flow through the air ducts to the sides, onto the side windows for good visibility of the rear-view mirrors, and into the grille deflectors, which can change the direction of the air flow for better airflow. There is also a flow of warm air through the air duct to blow on the windshield.
Above in the figure, blue shows the circulation diagram of cold air flows, and orange shows the movement diagram of warm air flows. Main parts of the heating system:
1 — air distribution cover; 2 – fan electric motor; 3 – fan, impeller housing; 4 – heater tap; 15 – radiator.
The stove is controlled:
- Changing the position of the lower cover of the fan casing using a lever (down-up);
- Changing the position of the control unit levers (heating flaps of the side windows and windshield, air supply covers).
What breakdowns most often occur in the heating system?
- Leaking radiator tap, pipes, radiator housing;
- Malfunction of electrical equipment (fuse, mode switch, oxidation of wires, motor). The fan fuse is located in the mounting fuse block numbered F1 with a rating of 10A; below is a diagram of the mounting block.
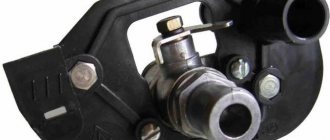
Replacing the stove faucet
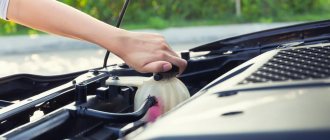
On a VAZ 2107 car, sometimes the faucet may leak or even become sour. They have to be used intensively and therefore often fail. Before you start replacing the faucet, purchase a set of gaskets for it. The tap is changed when the engine has cooled down.
Replacement sequence:
- Loosen the clamp of the inlet pipe (lower) and remove it from the tap;
- Use the lower lever in the control unit to close the dampers;
- Remove the glove compartment;
- We dismantle the air duct behind the glove compartment - to do this, disconnect it from the side deflector and remove it from the heater housing. Now, using a 7 key, loosen the crane rod and remove it.
Using a 10mm wrench, unscrew the valve from the radiator;
- We disconnect the pipe and remove the heater valve; antifreeze may leak, it should be collected in a container;
- Using a 10mm wrench, unscrew the pipe from the faucet;
We disconnect the tap and the pipe. That's all, the removal of the tap is completed.
Muffler tuning
The exhaust system of VAZ cars of the “classic” series (2101–2107) consists of three parts: the exhaust pipe (“pants”), a resonator and a muffler.
Direct-flow muffler: device, advantages, installation
Many owners of “kopecks” do not leave the exhaust system of their cars without improvements, replacing the standard muffler with a direct-flow muffler, or simply adding it to an existing one, achieving the “double exhaust” effect and the characteristic low roar that accompanies it.
What is the difference between a straight-through muffler and a regular muffler? A standard muffler consists of numerous sharply curved baffles and tubes. Passing through them, exhaust gases are forced to change directions, which is why the pressure drops, the sound becomes quieter, and toxicity decreases.
In a direct-flow muffler, the pipes, as the name suggests, are straight, the bends are smoothed, there are no partitions, and there are fewer welds. This allows exhaust gases to move freely.
In a direct-flow muffler, exhaust gases encounter almost no resistance on their way out, which means they do not lose pressure, etc.
A ready-made ramjet engine can be purchased at a spare parts store; This pleasure will cost one and a half to three thousand rubles. Most models can be installed without welding. However, some craftsmen make direct-flow mufflers on their own, using old undamaged mufflers and pipes, or limiting themselves to only the latter.
The stove blows slightly warm air
Every owner of a VAZ classic has probably encountered this phenomenon, because all big problems begin with small ones.
However, even with diagnostics, things are not so simple here, because there can be many reasons why warm or cold air is blowing from the VAZ 2101-2104 stove.
For example, due to the fact that the heater fan motor rotates much slower than the nominal operating mode. This malfunction is a consequence of oxidation/contamination of the collector. Cleaning the commutator brushes or completely replacing the electric motor are possible repair options.
Bearing jamming usually leads to the same results - it is diagnosed by the appearance of creaks from the side of the stove, which intensify over time, up to the jamming of the armature shaft.
The second common reason why the VAZ-2101 stove heats poorly is insufficient warming up of the engine. If the temperature gauge needle does not rise to the required 90 degrees, it can be assumed that the thermostat is jammed, and in a position where coolant is constantly circulating through a large circuit. In this case, you will need to replace the thermostat, which can be done independently on a penny:
- you need to work with a cooled power unit installed on a level surface;
- unscrew the plugs of the main radiator and expansion tank;
- pour the antifreeze into a previously prepared container of suitable volume (about 3 liters);
- tighten the drain plug;
- Using a flat-tip screwdriver, loosen the clamps of the pipes connected to the thermostat;
- dismantle the thermostat;
- We replace it with a known working one;
- We carry out all other work in reverse order.
After the coolant is added to the norm, we start the engine and monitor how the thermostat behaves by feeling its pipes - the lower one should remain cold until the engine warms up to 85-90 degrees.
Heater air duct VAZ-2101
Another common reason why the VAZ-2101 stove does not heat is contamination of the stove radiator. As a result, the heat transfer of the device is sharply reduced (which is facilitated by both the deterioration of antifreeze circulation and the decrease in heat transfer due to the adhesion of scale and other contaminants on the external and internal walls of the tubes).
How do you know if a clogged radiator is to blame for the lack of heat? It’s very simple: with the engine warm, check the inlet and outlet hoses by touch. If the first one is hot, and the second one is much colder, it is obvious that heat loss occurs precisely in the stove radiator.
It can be revised, but it is better to replace it with a new one - the decision is made after its dismantling based on the results of the inspection.
Here is the algorithm for dismantling the “kopek” stove:
the user instructions recommend draining the antifreeze, but in this case, due to the loss of a small volume of liquid, this may not be done (no more than a liter of antifreeze will spill out); from the engine compartment side, loosen the clamps on the radiator flanges and pull off the pipes
You need to work carefully - the hoses usually stick, and it will take a lot of effort to remove them; unscrew the cover of the rubber seal and dismantle it; go to the interior, unscrew the screws holding the car radio panel (if any); loosen the fasteners for the heater faucet drive, disconnect the cable; unscrew the brackets securing the fan casing; we move the casing down and to the left - it will not be possible to completely dismantle it due to the electrical wiring; we take out the stove radiator from the casing.. VAZ-2101 stove fan
Heater fan VAZ-2101
Now you can begin a thorough inspection of the radiator, as well as the stove faucet. If the tubes have traces of through or almost through corrosion, further inspection can be stopped - it will not be possible to repair such a radiator.
If the condition of the radiator is more or less tolerable, you can try to clean it using store-bought or “folk” remedies.
We also check whether the faucet handle is stuck - this usually happens if the stove has not been used for a long time (it has not been turned on throughout the warm season). We replace the faucet if traces of leakage are also found on its surface.
When installing a new or restored radiator, do not forget to install new gaskets, which can be pre-lubricated with silicone - this will prevent possible leaks. We perform the same operation in relation to the rubber pipes connected to the radiator. Add the required amount of antifreeze and check the operation of the stove, as well as the tightness of all connections.
Do-it-yourself options for improving the VAZ-2107 stove
Let's look at how to improve the operation of the domestic seven heating system exclusively on our own.
We begin the modernization of heating elements by replacing the standard faucet with a more reliable product. The tap is located in the front part of the car in the passenger foot area. Sometimes, car owners find out about its location only in the event of a coolant leak. Leakage causes a lot of trouble for the owner, especially in cold weather. Antifreeze leaks out under the passenger's feet, and not only the carpets, but also the upholstery of the car has to be dried. Coolant also contains substances that adversely affect human health.
It is important to fix the leak as soon as possible
Replacing a conventional faucet with a similar new product helps solve the issue only for a short period of time. Experts advise several options for solving this problem. Alternatively, you can replace the standard tap of the machine with a curved sealed tube. Thus, leaks are eliminated, however, another inconvenience arises. The absence of a tap does not make it possible to shut off the supply of coolant to the heater radiator. In summer it will be very hot inside the car. A more acceptable solution to the issue is to install a conventional water tap to supply antifreeze to the heater radiator in the engine compartment of the car. The only inconvenience with such an upgrade will be the need to open the hood of the car to manipulate the tap.
Another drawback in the operation of the VAZ-2107 heating system is the poor quality of the deflector, which is located on the driver’s side. This causes the glass to fog up, which impairs the driver’s visibility and can cause an accident. To improve the performance of the deflector, it will be improved by installing a small fan in it. Most often, spare parts from computer equipment are used for this. For installation, you need to remove the deflector and prepare a place in it for installing the fan. It is better to connect the fan power supply to a separate button, which will be more practical to use.
The next stage of tuning is troubleshooting the radiator. On the VAZ-2107, oversized copper or aluminum radiators were most often installed. The reason for their poor performance can most often be the occurrence of blockages in the heating system. To improve heating of the vehicle interior, it is necessary to completely clean the radiator and parts of the cooling and heating system.
It is important to use high-quality coolants for the car and not to use water instead of antifreeze. This way, you can protect your heating system from leaks and blockages.
The most radical and effective way to modify the VAZ-2107 stove with your own hands is to replace the standard fan with a similar product from the domestic eight. This option will increase the heat supplied to the vehicle interior by the radiator and improve its heating. Figure 8 fans are characterized by a higher rotation speed and low energy consumption. To install a new product, you need to disassemble the lower part of the stove to get to the fan and dismantle it. It will no longer be needed in the future. To install a figure-of-eight fan, you need to trim the ridge that is responsible for supplying air to the floor of the car. A more powerful figure-of-eight fan with five blades is installed in place of the standard product.
It is very important to secure it securely. For correct operation of the fan, it is advisable to also replace the resistor and regulators with similar products from the VAZ-2108
And also the fan switch button must be replaced with a button from the VAZ-2108. The standard seven button can quickly burn out due to the difference in the current supply.
At this point, the modernization of the stove can be considered successfully completed.
Advantages of an aluminum radiator
To find out which heater radiator is better to install on the seven, let’s make a comparative comparison. To do this, you need to find out all the advantages and disadvantages of the two types of stove heat exchangers. First, let's figure out what the pros and cons of aluminum units that are installed on classics from the factory.
The advantages of aluminum devices include the following factors:
- Cost is one of the main advantages of such devices, since it is precisely because of the low price that many choose models made of aluminum alloy. The price difference between copper (brass) and aluminum devices can be up to two times.
- Large selection - these models are more popular, despite some of their disadvantages. The reason for this popularity is their price, but you often have to make sure that it is better to buy a copper unit for the stove.
Among the advantages, heat transfer should also be noted, however, practice shows that heat transfer rates are significantly inferior to brass devices. For the seven, manufacturers do not produce three-row heat exchangers made of aluminum, which actually causes low heat transfer. Only two-row ones are produced.
Minuses
Before buying copper heater radiators for the seven, you need to find out the disadvantages of aluminum units. These include:
- Thermal conductivity - the heat conductivity indicators of the models under consideration are low, so if the owner does not want to have problems with heating the interior, then heat exchangers made of aluminum alloy are not worth buying.
- Unsuitable for repair - some craftsmen, if the device is damaged, try to solder it, but soldering aluminum can cost almost the same as a new radiator. Considering the difficulty of replacing it, then if the aluminum heat exchanger of the stove on the seven leaks, it is better to immediately replace it with a new one.
- Corrosive effects - aluminum alloy is also not resistant to rust formation, so it is possible that the device will not last long if water gets into the system.
The presence of so many shortcomings leads to the fact that owners of sevens are increasingly inclined to switch to brass units. However, there is no need to rush, and first let’s find out all the advantages and disadvantages of our main competitors.
Advantages of copper stove radiators
Now let’s find out why a copper stove radiator is better than an aluminum one. The advantages of these units include:
- Thermal conductivity - even if we take into account the fact that copper ones are only called such, since they contain much more brass than copper, they have high thermal conductivity. It is this indicator that is fundamental when choosing a heat exchanger from which you can get more heat to heat the interior.
- Easy to repair - even the slightest mechanical damage can be repaired at home. Moreover, after soldering work, the unit can last a long period of time (which also depends on the quality of the soldering).
- The entire radiator is made entirely of plastic without the use of plastic. Not only are the plates made of copper, or rather a brass alloy, but the body itself is also made of a similar material. This is a big advantage, because due to this design, operational parameters are increased.
- Three-row versions of radiators are produced. This brings more heat into the cabin.
With so many advantages, one wonders if these devices have any disadvantages.
Minuses
It is necessary to note some disadvantages of the copper heat exchangers under consideration. They also exist, and sometimes play a decisive role in choosing the appropriate units. The main disadvantage is the cost, which is 2 times higher than the price of aluminum analogues. It is precisely because of the big difference in price that most car owners give preference to aluminum competitors, having never experienced copper heater radiators on a VAZ 2107 in action.
What is better to put on a VAZ 2107
Having made a comparative analysis, we can summarize which heater radiator to choose for the interior of a VAZ 2107 car. Practical experience and reviews from car owners indicate that aluminum devices cope with their task perfectly. However, this is appropriate when operating a car in urban conditions. As soon as you leave the city at temperatures below -10 degrees, you immediately realize that the stove is not up to the task. The problem is in the double-row heat exchanger, which does not have time to heat the interior even when the heater fan is switched to maximum speed.
This is interesting! The main reason that the aluminum radiator does not have time to heat the interior is that the cold air that enters through the air intake, at high vehicle speeds, quickly cools the heat exchanger, which is reflected in the form of problems with the operation of the stove.
If you install a three-row copper radiator, then it copes with its task much better, as evidenced not only by the reviews of the owners, but also by the advantages of these units. Therefore, if you often have to travel outside the city in winter, then it is better to install a copper three-row radiator instead of an aluminum two-row one, with which you can forget about the discomfort and chilliness in the cabin of the 7 when the heater is running.
Repair of VAZ 2107 stove
First of all, it is important to immediately identify the breakdown. If the problem is a leaking pipe, faucet or air lock, this problem can be solved quickly
If the cause is the heater radiator or other hard-to-reach elements, then a larger amount of work is expected, that is, you need to separately study the instructions on how to remove the VAZ 2107 heater and how to replace the VAZ 2107 heater. Let's look at methods for eliminating common faults.
If the problem is with the faucet, it is optimal to immediately replace it with a new one. To do this, a pipe is disconnected under the hood that goes to the tap. To prevent some of the coolant from pouring into the engine compartment after removal, a container is placed under the pipe. Then the storage shelf is removed, then, using wrench 10, the nuts securing the faucet to the stove body are unscrewed. Now the tap can be removed from the studs and a new one installed.
As a rule, the heater tap needs to be changed if it gets stuck, etc. In this case, it is better to install a ceramic faucet instead of a standard metal one. Such a faucet, unlike its factory counterpart, does not become sour, scale does not accumulate on the ceramics, and corrosion does not occur. As a result, even if the tap is closed for a long time (for example, from spring to autumn), after opening it, full functionality remains.
Radiator malfunctions are more serious failures. If the heater radiator is leaking or clogged, it must be removed. The same can be said about the stove fan, motor, etc. To carry out such repairs, you need to know how to remove the 2107 stove.
In short, to get to the radiator, you need to unscrew the radiator pipes. Taking into account the leaking antifreeze, you will need to replace the container. If you need to remove the stove fan, you do not need to touch the cooling system itself. In fact, removing the VAZ 2107 stove can be divided into two stages:
- dismantling elements in the cabin;
- removing elements under the hood;
Now, using a 10mm wrench, unscrew the 2 mounting bolts, remove the pipe from the radiator, and simultaneously dismantle the tap
Please note that there are rubber seals between the pipe and the radiator. So, they need to be replaced with new ones when reassembling
If the radiator is clogged, flushing the stove radiator involves removing it, cleaning it from the outside, washing it from the inside, and blowing it with a compressor. The previously removed pipes, heater valve and other system elements are also cleaned.
The inside of the pipe can be cleaned with a brush. The radiator is washed out by Karcher under a pressure of about 5 atmospheres. You need to wash until clean water free of dirt and impurities flows out of the radiator.
If there is no Karcher, you can flush the radiator with caustic soda. It is enough to prepare a solution of soda, pour it into the radiator and leave for 60 minutes. Then the solution must be drained and the degree of contamination of the drained liquid must be assessed. The washing is repeated until the drained solution becomes clean. At the end, the stove radiator must be dried by blowing it with a compressor.
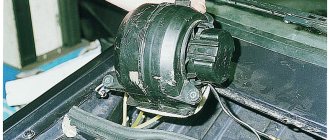
As practice shows, the VAZ 2107 stove heats poorly not only due to leaks or problems with the radiator or tap. You can also highlight malfunctions in the operation of the fan mode switch, failure of the wiring of the control unit, oxidation of contacts, etc. For example, the motor of the VAZ 2107 stove may be problematic. As mentioned above, if a whistle appears, then the electric motor needs to be cleaned and lubricated (a temporary solution) or replaced with a new one, and it is better to install a more reliable option with bearings.
Let's move on. The control unit for the VAZ 2107 stove is controlled by levers on the instrument panel, which are connected to the actuators using flexible rods. Moreover, it is thanks to this solution that the degree of opening of the air dampers is regulated, the heater valve opens and closes, air flows are redistributed and blowing zones are selected.
There is also a lower damper called the air distribution cover. This damper is controlled by a special lever, which is located on the driver's side under the dashboard.
So, the rods mentioned above are a metal wire, which over time can stretch, burst, jump off, etc. It is not difficult to guess that broken heater cables and other problems with the dampers also cause the heater to not work correctly. In this case, the stove also needs to be disassembled and repaired.
Improvement of the heating system
The design of the VAZ 2107 stove is far from perfect. Therefore, car owners modify it in a variety of ways. First of all, attempts are being made to improve the tightness of air ducts, especially at joints. This allows you to slightly increase the efficiency of heating the interior.
VAZ 2107 owners modify the heating system in a variety of ways
Fan replacement
Often, to improve the operation of the stove, car enthusiasts replace their original fan with a more powerful one, used in other VAZ models (for example, VAZ 2108). The factory fan motor is mounted on plastic bushings, which wear out quickly. As a result, shaft play appears, and a whistling noise becomes audible in the cabin when the fan is operating. Repair and lubrication of bushings in this case, as a rule, do not bring the expected effect. The VAZ 2108 fan electric motor is mounted on bearings. Therefore, installing it in the VAZ 2107 stove will not only increase the efficiency of heating the interior, but will also make the operation of the fan more reliable.
Usually, along with the fan electric motor, a number of other elements of the stove control unit are also changed . The rotation speed of the VAZ 2107 factory fan at a current of 4.5A is 3000 rpm. The VAZ 2108 electric motor consumes 14A at a frequency of 4100 rpm. Therefore, when replacing, you should install the appropriate fuse, resistor (usually from a Niva) and speed switch (for example, from a Kalina).
Video: modification of the VAZ 2107 stove
To dismantle the fan you will need:
- flat and Phillips screwdrivers;
- keys for 7 and 10;
- round nose pliers.
The fan is removed in the following order.
- The instrument panel, shelf and glove box are dismantled.
- Use a 7 key to loosen the casing of the air damper control cable. The cable loop is removed from the lever.
- Use a 10mm wrench to unscrew the nut securing the heater housing.
- Use a flat screwdriver to remove the left and right air ducts from the heater body.
- Use a flat-head screwdriver to remove the latches that secure the fan to the stove.
- The wire terminals are disconnected.
- The fan is removed from the stove body.
- The impeller is removed. If necessary, use pliers.
The size of the new fan (from VAZ 2108) is slightly larger. Therefore, its installation will require some changes in the design of the stove. If only the motor is changed, it will be necessary to make an additional hole in the grille through which warm air enters the lower part of the cabin. If this is not done, the motor housing will rest against the grille.
Replacing the stove body
When installing a fan from a VAZ 2108, you will need to make a new frame, usually from plexiglass. This is quite labor-intensive and will require certain skills.
The material for a homemade frame when modifying the stove can be plexiglass
When making a new frame, all dimensions must be strictly observed. The slightest inaccuracies can lead to vibration or failure of the new fan. Having assembled the structure, you should lubricate the joints with sealant and install the new housing in place. After this, the noise level in the cabin usually decreases, and the stove begins to heat the air better.
The air intake should ALWAYS be from the street, especially in winter, otherwise the windows will sweat (and freeze in winter). Air intake from the cabin is done only when the air conditioning is turned on (in the seven this issue does not arise). The fact that one “sleeve” is not blowing is possible: a) when tampering with the stove, the sleeve did not fit into the right place and the stove is blowing somewhere under the panel, b) some kind of crap got into the nozzle (foam rubber or something like that ).
When making a new frame for the motor, all dimensions must be strictly observed.
Other stove tuning options
Sometimes the design of the air ducts is modified. Additional holes are made in the stove body into which plumbing hoses are inserted. Through these hoses, connected to the side and bottom air ducts, when the engine is running, an additional flow of warm air is created onto the windows and into the legs.
Often the cause of poor interior heating is a clogged heater radiator. The coolant begins to circulate more slowly or completely stops circulating through the heating system, and the efficiency of air heating decreases noticeably. Usually in these cases the radiator is replaced with a new one.
A clogged heater radiator leads to a decrease in the efficiency of heating the interior.
What did you improve?
The modernized stove has a number of advantages:
- Quiet, and at 1st speed silent.
- Productive, at speed 1 it blows at the level of speed 2 of the old fan. At maximum speed, dust will fly out of the air ducts.
Such tuning of the heating system is mandatory for drivers of northern cities. Have you improved the Lada 4×4 stove in this way? Write reviews and additions on this modernization, take part in the survey. Let us remind you that other modifications to the SUV are published in this category.
Photo: Flea in-flight magazine
Keywords: stove 4x4 | 4x4 air ducts
Found an error? Select it and press Ctrl+Enter..
Types of additional heaters
There are three types of additional heaters for the VAZ-2107, and each of them has its own characteristics. The interior of this car can be equipped with:
- electric heater;
- autonomous heater;
- additional stove radiator.
Which one to give preference is up to the car owner to decide, and here consider the positive and negative sides of each option. Electric heaters are a heater with a fan, adjusted to operate from a 12 V network. The main advantage is ease of installation, since they just need to be connected to the on-board network through the cigarette lighter or run the wiring directly to the battery.
The negative qualities of electric heaters include low power and heavy load on the on-board network. You should not expect a significant increase in the temperature in the cabin; it is suitable for intensive heating of glass, since it is not recommended to use it for a long time.
Self-contained stoves include an internal combustion engine and a fan installed in a housing. The essence of its work is that the internal combustion engine (ICE) heats up during operation, and the generated heat is supplied to the passenger compartment by a fan. And since the heating of the internal combustion engine is strong, such an additional stove is effective. The positive qualities of such a heater include autonomy; it works even when the car’s engine is turned off. The negative side of an autonomous stove is increased noise and additional fuel consumption.
One of the best options is to use an additional radiator installed inside the car, which is connected to the engine cooling system. Such an additional stove does not require fuel and creates a slight load on the on-board network, while installing another heat exchanger allows you to increase the temperature in the cabin. The disadvantage is the complexity of installation.
How the heater of the VAZ “Seven” is modified
It is enough to cut pieces of plastic to the size of the “snail” and connect them together and, after adjusting to size, fix it on the lower part of the stove body. If you have a plastic container or similar polycarbonate container the size of the snail, you can use that, but first make sure it can withstand the heat. The snail should fit firmly into the manufactured housing, without protruding too much beyond the radiator stops.
It is very important to maintain the proportions of the new part in the heater, because
with an increased size of the snail body, the stove may not return to its proper place, and you will have to start all over again. Once you're sure you've got the proportions right and the body size is the right size, you can seal the joints of the new body with sealant.
The device of the VAZ-2107 stove
Let's look at how the stove on the VAZ-2107 works, because only after understanding its structure can we talk about replacement.
There is an air intake box under the hood; you can find it in the rear of the engine compartment. The box is isolated from the engine using rubber. It serves to separate moisture and remove it outside.
Air enters the radiator and moves through the air duct to the central air diffusers. The heater itself is located on the panel, through the holes in which air enters the cabin. It is fixed to the compartment partition with 4 studs.
The heater of this model has long had a bad reputation among car enthusiasts. Not only does it poorly heat and ventilate the interior, but it is also loud. That is why this element of the car is often subject to modernization or tuning. However, modifications do not always bring the desired effect, and then the only way out is to replace the heater with a more modern model. The question of which stove can be installed on a VAZ-2107 is solved very simply - parts from another car are used.
The most common option is the heating system from model 2110, but a stove from a foreign car can also be installed in a VAZ-2107.
We are taking on the modification of the air ducts of the seven stove
To do this, you will need standard hoses and cuffs, which you can buy at any hardware or plumbing store, in quantities of four to seven hoses and a similar number of cuffs. Before installing them, it is necessary to cut holes corresponding to the diameter of the hoses on both sides and on the bottom of the heater housing.
Cuffs and hoses are inserted into them, the side ones are connected respectively to the side air ducts, and the bottom ones are designed to remove excess heat from the legs in order to protect them from overheating by a direct flow of heated air. To warm the feet of rear seat passengers, you can take longer hoses and direct them, respectively, from the stove towards the rear of the car.
Stove modernization
To upgrade the stove on your Niva, we suggest that you borrow, first of all, a VAZ-2108 stove fan. We do not recommend installing it instead of what is already installed on your Niva; by the way, you are unlikely to succeed, since it is located inside the car. It will be problematic to introduce a fan from 2108 into the cabin, so they find a more suitable space for it in the engine compartment. Upgrading the stove involves installing an additional fan, which is what we suggest you do.
We also recommend that you immediately decide whether you only want to install an additional fan or additionally borrow its speed switch and heater resistor from the G8.
Fan replacement algorithm
Initially, we suggest that you remove the air intake box, which in the driver’s environment also has another popular name: “boot”. It is not very convenient to remove it yourself, so we recommend that you involve your friend in performing this procedure. The inconvenience is that the nuts need to be unscrewed while in the cabin, and the bolts themselves must be held from the engine compartment. Your free hand will certainly not reach the engine compartment. After all the nuts are unscrewed, remove the air intake.
Now you have to perform some manipulations to remake the removed air intake, and then install a figure-of-eight fan into it. Otherwise, you will not be able to close the hood because the fan will interfere with the lock.
So, you need to cut off the plastic on the side of the air intake, and on the fan itself - the fastening parts protruding to the sides. Once the fan is perfectly located in the internal space of the air intake, secure it with sealant. Place suitable material around the fan nozzle. This will allow you to eliminate loss of air outflow. Now install your upgraded fan shroud and try closing the hood.
How much does a new heater motor cost?
Motors are usually sold assembled with or without an impeller. In the Moscow region (Moscow city and region), the price for a new heater motor on a bearing with an impeller for VAZ 2101-07, OKA, VAZ 2121 NIVA cars is about 500-600 rubles. Without an impeller - 100 rubles cheaper.
Characteristics of the stove fan electric motor:
- Nominal voltage 12 V
- Rated power 20 W
- Maximum current 5.0 A
- Rated speed 3000 min -1
- Weight 0.85 kg.
Used on the following cars: VAZ 2101. 2107, 2121 Niva, 1111 Oka.
A few more tips:
It is advisable to check the operation of the motor directly in the store. Be sure to keep your receipt after purchase.
There were even funny cases of selling defective products, when the stove motor turned in the opposite direction, and people complained about poor fan operation, and all the wires (ground and other terminals) were connected correctly.
The problem was that the assemblers at the factory had mixed up the wires by soldering them to other brushes. Therefore, nowadays you shouldn’t be surprised by anything, not even by a stove motor with a fan that blows in the other direction!
It is quite simple to understand that the heater fan on a VAZ 2107 does not work: you need to start the car and turn the switch responsible for the operation of the cabin heater. If the characteristic sounds from the fan operation do not appear, it means that the spare part needs to be repaired or replaced. Many owners of this car model face this problem. As a rule, you can find the cause of the breakdown and fix it yourself. It happens that the heater fan on a VAZ 2110 does not work only at some speeds. In this case, it is worth checking the functionality of the additional resistor or heating intensity toggle switch.
Reasons for fan failure
If the stove fan does not work on a VAZ 2107, you will have to check six elements that could have failed. Most often, this part stops functioning due to a blown fuse. This type of malfunction is considered the simplest, but it is quite problematic to fix. The fact is that replacing a blown fuse is not difficult: even a novice car enthusiast can cope with this task. However, the failure of the fuse is often caused by a short circuit, which is difficult to detect, because you will have to check the entire electrical circuit responsible for the operation of the car's interior heater. On the VAZ 2107, the fuse marked F7 is responsible for the operation of the stove. This element has a power of thirty amperes. If this fuse fails, you will notice that the glove compartment light and the cigarette lighter have stopped working along with the stove.
vaz-lada-2107-1439.jpg
Details of the ventilation and heating system of the VAZ 21071 car - left air duct for heating the side window; 2 — air duct for heating the windshield; 3 — heater radiator casing; 4 — air supply cover; 5 — heater radiator; 6 — heater tap; 7 — radiator outlet pipe; 8 — radiator inlet pipe; 9 — right air duct for heating the side window; 10 — deflector; 11 — air duct damper; 12 — air distribution cover; 13 — fan guide casing; 14 — heater fan; 15 — air distribution cover lever; 16 — heater fan casing; 17 — control rods; 18 — bracket for control levers; 19 - central air duct
Among the main malfunctions of the VAZ 2107 heating system:
- leakage of the radiator, tap, pipes or connections between them;
- malfunction of the switch for the available operating modes of the electric fan,
- damage to the device wires or oxidation of their connections;
- electric fan failure.
In case of more complex malfunctions, it may be necessary to replace the VAZ 2107 stove.
Applicability
| Brand | Model | Name according to auto catalog | Drawing |
| VAZ | VAZ-2101 | Heater radiator | Body / Ventilation and heating |
| VAZ | VAZ-2102 | Heater radiator | Body / Ventilation and heating |
| VAZ | VAZ-2103 | Heater radiator | Body / Ventilation and heating |
| VAZ | VAZ-2104 | Heater radiator | Body / Ventilation and heating |
| VAZ | VAZ-2105 | Heater radiator | Body / Ventilation and heating |
| VAZ | VAZ-2106 | Heater radiator | Body / Ventilation and heating |
| VAZ | VAZ-2107 | Heater radiator | Body / Ventilation and heating |
| VAZ | VAZ-1111 "OKA" | Heater radiator | Body / Ventilation and heating |
| VAZ | VAZ-1111 "OKA" | Heater radiator | Body / Ventilation and heating |
| VAZ | VAZ-2105 | Heater radiator | Body / Ventilation and heating |
Where else is the spare part used?
The parts data presented on this page is for informational purposes only.
Let's sum it up
As you can see, even taking into account the simplicity of the design, repairing the VAZ 2107 stove can be a labor-intensive procedure due to difficult access to certain elements of the heating system.
Moreover, if such a need arises, modification and tuning of the VAZ stove, as well as maintenance and replacement of the VAZ 2107 heater with your own hands can be done independently in the conditions of an ordinary garage.
There is air in the engine cooling system: symptoms of airing, reasons for the formation of an air lock. How to bleed the engine cooling system.
Antifreeze boils and bubbles in the expansion tank. Causes of antifreeze or antifreeze boiling, main faults, troubleshooting, recommendations.
Reasons why coolant starts to leak. How to find the location of an antifreeze or antifreeze leak yourself. Useful tips and tricks.
Causes of air in the car engine cooling system and symptoms. How to remove an air lock from the cooling system, tips and tricks.
Why does the engine overheat or boil while the cooling radiator is cold? Signs of engine overheating, how to prevent serious consequences.
The VAZ 2110 heater does not work: the main reasons why the VAZ 2110 stove does not heat well. Diagnostics, replacement of VAZ 2110 heater radiator, modification.
Basic malfunctions and ways to eliminate them
The most typical malfunctions of the VAZ 2107 stove include:
- Air entering the cooling system. This usually happens after the system has been filled with antifreeze. Removing the airlock normalizes the heating process of the interior.
- When the heater tap is open, coolant does not flow into the radiator. This most often occurs when water is used as antifreeze. Scale forms in the system, clogging the faucet and impeding the passage of coolant. The problem is eliminated by dismantling the tap and then cleaning or replacing it.
- Poorly functioning or failed water pump. If the pump does not pump coolant, this can lead not only to a lack of heating of the interior, but also to more serious problems, such as engine overheating. The water pump does not work, as a rule, when the generator belt breaks, as well as when it jams as a result of wear on the bearings.
- Clogged stove radiator honeycomb. In this case, the supply pipe will be warm and the outgoing pipe will be cold. The radiator often becomes clogged when water is used as a coolant, as well as when oil or additive particles enter the system to eliminate leaks. Cleaning or replacing the radiator will help restore normal operation of the stove.
- Displacement of the partition in the radiator. If both radiator hoses are hot, but warm air does not enter the cabin, then most likely the partition in the radiator has shifted. The only solution to the problem is to replace the radiator with a new one.