The principle of operation of a four-stroke power plant
You can understand why it is important to connect high-voltage wires correctly if you study the principle of operation of the power plant. The carburetor or injector of the VAZ-2109 operates on approximately the same principle, since both power plants are four-stroke.
- First, the cylinder volume is filled with the fuel mixture and exhaust gases. This process is called "inlet".
- The engine then goes into compression. With it, the valves are closed, and the crankshaft and connecting rod move the piston upward. The mixture of fuel and air is transferred to the combustion chamber.
- During the expansion stage, the ignition is switched on and a spark appears. It ignites the fuel mixture, resulting in the formation of gases. They put pressure on the piston, causing it to move down. This force is transmitted through the connecting rod to the crankshaft.
- The process is completed by the “release” of exhaust gases through the exhaust system.
In order for the engine to operate smoothly and without jerking, the processes must take place in a certain order. This, first of all, concerns the order in which the cylinders are put into operation.
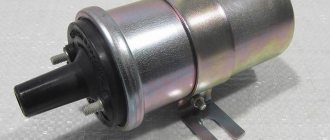
Coil overheating
Regardless of the make of the car, be it a VAZ or a BMW, the symptoms are usually the same.
A clear example of this is heating the coil. This happens most often due to melting of the winding inside. Consequently, the device loses its primary characteristics and is unstable. This also affects the behavior of the motor. Usually all this is accompanied by dips in dynamics at speeds above 50 kilometers per hour.
But the cause of a malfunction is not always in the coil. There may well be a short circuit in the circuit, or the problem lies in the fuse box. In this case, you first need to check everything and only then replace the coil with a new one.
Engine workflow through cylinders
The cylinders are activated as follows:
- In the first there is an upward movement. The gases expand and the mixture of air and fuel burns.
- In the third, to carry out the compression procedure, the piston rises.
- In the fourth, “injection” occurs - the piston moves down and at the same time a mixture of air and gasoline enters the cylinder.
- In the second cylinder, the piston rises and takes the upper position so that gases escape through the valve system. After which the exhaust gases are removed from the power unit.
Based on the principle of operation of the cylinders, their activation diagram looks like this: 1-3-4-2. It is important to connect them correctly so that the cylinders work in that order.
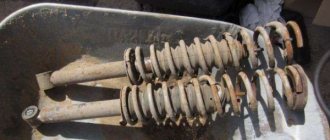
Valve location
In the VAZ-2109 model, the designers changed the previously familiar system with a camshaft chain drive.
Despite the simplicity of the old design, it was noisy and required additional adjustments after a short period of time. In the nines, the shape of the upper part of the piston was changed, and special recesses were added for the valves.
An important adjustment task is also to align the camshaft and crankshaft on the same axis so that they rotate together.
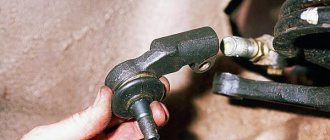
The intake and exhaust valves are located in a certain order, this should be taken into account when adjusting
When adjustment is necessary
Valve adjustment is required when problems occur with the engine or after passing a technical inspection. Experienced car owners can quite accurately determine the cause of a power unit malfunction; the main signs are the following:
Valve adjustment is also required after every 25-30 thousand kilometers . During this time, some parts wear out and structural gaps increase. Diagnostics can be done at a service center; this service is inexpensive.
Preparatory work
From the adjustment tool you will need:
- set of wrenches;
- special device for adjustment;
- measuring probe;
- several adjusting washers;
- screwdriver;
- tweezers;
- valve cover gaskets.
Before starting the repair, set the car to the handbrake and engage any gear. One of the front wheels must be suspended so that the crankshaft can turn easily.
The procedure is as follows:
- Raise the hood.
- Disconnect all pipes from the cover.
- Remove the windshield wiper housing.
- We unscrew the spark plugs.
- Remove the front timing belt cover.
Tip: To monitor the current position of the piston, you need to use the viewing window.
For many VAZ models, the adjustment technology is not much different. Those who have already had experience of working with previous versions will find it easy to understand. The gaps are set according to the order in which the cylinders operate. The exhaust valves are 1, 4, 5 and 8 when counted from the camshaft drive belt. We use the following table in our work:
We use the table to correctly determine the cylinder number based on the crankshaft position
Tip: Before starting the adjustment, it is worth placing additional marks on the pulley every 90 degrees.
- Before adjustment, it is necessary to align the piston of the first cylinder. To do this, turn the crankshaft so that the marks on the pulley and the rear belt cover coincide.
The marks on the timing belt pulley and rear cover must be at the same level - Using a 17 key, turn the camshaft 3 teeth clockwise. This is necessary so that the camshaft cams move away from the pushers.
We install the camshaft so that the fists move away from the pushers - We test the gaps with an adjustment feeler; the tool should move under the influence of slight forces.
Using a feeler gauge, determine the amount of clearance on the first cylinder
If the gaps are increased or decreased, the following actions must be taken:
- We install the adjustment device on the bearing housing.
Installing the adjustment device - Turn the pusher towards you.
- Using the lever, we fix the pusher in the desired position.
We press the pusher using the lever and fix it in this position - Use long tweezers to remove the old washer.
Using tweezers, remove the old adjusting washer
The next task is to select a new washer of optimal thickness. Calculating this parameter is simple; we use the formula below:
- H = A + (B – C), where
- H – thickness of the new washer,
- A – thickness of the removed washer,
- B – gap size,
- C is the required gap.
Install a new washer and remove the retainer. We check the gap with a feeler gauge and, if necessary, select another washer of the required thickness. The finished set of washers contains products with a pitch of 0.05 mm. This procedure is carried out for each engine cylinder.
Features of modifications with an injector or carburetor
A considerable part of the owners of the VAZ-2109 model are equipped with an injector. When adjusting here, one important fact should be taken into account - thermal expansion.
When the engine is running, metal parts increase slightly in size, which leads to a decrease in clearances. Therefore, adjustments must be made only on a cold engine.
This way you can correctly measure the gap and select the adjusting washer.
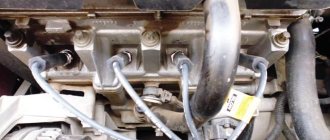
How to connect wires correctly
When replacing high-voltage conductors, they are first connected to the ignition distributor. The distributor cover is convenient in that it is always installed in one position. There is a special mark on it, thanks to which it will not be difficult to place the part in place. Before connecting the wires, inspect the cover. It must be intact, since if cracks appear, the performance of this unit is not guaranteed.
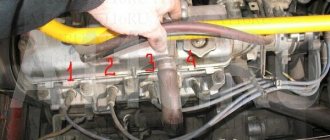
The mark on the distributor cover is located next to the wire socket of the first cylinder. The firing order of the cylinders is slightly out of order (1-3-4-2) due to the ignition slider. It moves around the circle (distributor) counterclockwise. It is precisely by this principle of movement of the slider that it is easy to remember the order of the wires. They need to be connected to carburetor and injection VAZ-2109 according to the same principle. On the distributor cover, connect the wires according to the principle of movement of the slider, this is the only way you can set the ignition correctly:
- the socket of the first cylinder is located at the mark;
- the third one is connected at the very bottom;
- on the same line with the socket of the first, there is a place for the wire to the 4th cylinder;
- at the top point the second cylinder is connected.
On the engine itself, the cylinder numbering goes from the location of the timing belt to the starter, that is, from left to right. The fourth cylinder is closest to the starter, and the first is closest to the timing belt. When connecting, it is important to look at which socket of the distributor cover the wire comes from, if you confuse their location, the car will not start.
If you have connected the wires correctly, but the car still does not start, then the problem may be in them. Check high-voltage conductors for integrity. If you haven't changed them in a while, it's worth buying a new set. The peculiarity of these wires is that over time microcracks can form on their surface. They lead to a lack of spark when the ignition distribution system is working. Moisture and dust get into these cracks, which damages the wire from the inside, although it appears intact from the outside.
Car enthusiasts recommend purchasing sets of high-voltage wires from foreign manufacturers, as they last much longer than stock or domestic ones. It is advisable to replace the spark plugs along with the wires, especially if cracks or carbon deposits appear on their surface. This is necessary so that after repair you definitely do not have problems with ignition.
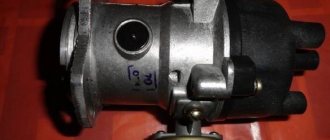
Device and purpose
So, what device and what functions does the ignition distributor perform, what is its location and what is the order of the wires on the VAZ 2109 distributor? The VAZ 2109 distributor is one of the components of the ignition systems. Its purpose is to regulate and supply an electrical impulse to the switch of the coil itself. It also distributes the spark to the spark plugs, taking into account a certain sequence.
In domestic "nines" two types of VAZ ignition systems can be used - contact and contactless. Accordingly, two types of distributors can be used. These devices may differ from each other only in design, but not in function. In particular, we are talking about the presence of contacts and sensors. In the contact system, a breaker is used directly, and in the non-contact version, a special sensor is used. As for the main technical characteristics, they are generally identical.
The operating order of the VAZ 2109 cylinders
Very often, during repairs, high-voltage wires are removed from the ignition distributor or spark plugs. The only problem is that few people remember how they were connected before. To avoid confusion, you need to know the sequence of connecting the high-voltage wires of the VAZ 2109, first to the ignition distributor, and then to the spark plugs of each cylinder.
Connecting wires to the ignition distributor
The ignition distributor cover is placed on it only in one position; it cannot be put on in another way.
The distributor cap has a mark; this mark indicates the socket of the high-voltage wire of the first cylinder of the VAZ 2109 engine. The operating sequence of the engine cylinders is as follows: 1-3-4-2. The ignition distributor slider rotates counterclockwise when viewed from the cover. Therefore, the lower socket corresponds to the high voltage wire of cylinder No. 3. The next socket, going counterclockwise, corresponds to cylinder #4, and the top socket corresponds to cylinder #2. All this is depicted in the picture below. The numbering of engine cylinders starts from the timing belt and goes from left to right.
Cylinder arrangement VAZ 2109
That is, the cylinder closest to the timing belt is the first, the cylinder closest to the starter is the fourth. If the wires from the ignition distributor are mixed up, the car will not start. Therefore, if you remove high-voltage wires, then you need to connect them back as they were before. And then there are comrades who remove the wires, mix them up and then start a panic that the car has stopped starting.
Several conditions for the correct connection of high-voltage wires to the distributor cover
1. It should be remembered that the distributor cover itself is installed on the distributor in only one position, so it is impossible to confuse anything.
2. There is an installation mark on it that identifies the wire socket to the first cylinder.
3. The wires are installed in the sequence 1 – 3 – 4 – 2, in a counterclockwise direction, when looking at the cover from the side of the expansion tank.
4. On carburetor engines (2108, 21081, 21083) of VAZ 2108, 2109, 21099 cars and their modifications, cylinder counting begins from the timing drive.
5. Each wire has a certain length and reaches from its socket in the lid to the desired spark plug with a slight sag.
The image below shows the correct procedure for connecting high-voltage wires to the distributor cover of the contactless ignition system of VAZ 2108, 21081, 21083, 2109, 21091, 21093, 21099 cars.
The procedure for connecting high-voltage wires to the distributor cover on VAZ 2108, 2109, 21099 cars
And this is the order of numbering and counting of the cylinders of carburetor engines 2108, 21081, 21083 of VAZ 2108, 2109, 21099 cars and their modifications. We connect the high-voltage wire to the socket with the required number on the distributor cover, and then to the spark plug in the cylinder with exactly the same number. We select the length of the wire experimentally.
Numbering order of engine cylinders 21083 (21081, 2108) of VAZ 2108, 2109, 21099 cars and their modifications
The operating order of the VAZ 2109 cylinders
Thus, the working cycle of the VAZ 2109 internal combustion engine is represented by the following sequential actions: 1. In the 1st cylinder, a downward movement occurs, the working stroke, that is, the combustion of the working mixture and the expansion of gases. 2. “Compression” occurs in the 3rd cylinder, the piston moves up. 3. In the 4th cylinder there is an “intake”, the piston moves down, and the working mixture is pumped into the cavity. 4. “Exhaust” is carried out in the 2nd cylinder; exhaust gases leave the cavity through the exhaust valves.
Now let's look at several cases of malfunctions in the operation of the VAZ 2109 engine. In order to find out the cause of the breakdown, you should use the following algorithm of actions:
• Start the engine and go to idle speed. Listen to the sounds of exhaust. If uniform, periodic popping noises are observed, then most likely the cylinder is not working due to suction, a faulty spark plug, reduced compression or lack of spark. • Inspect the spark plugs; there should be no traces of soot, oxidation or moisture. The gap between the electrodes should average 0.8-0.9 mm. • Replace the spark plug set. • Check the condition of the high-voltage wires of the ignition system. The insulation must be intact, and the contacts must not be oxidized or burnt. If the wires are damaged, they must be replaced. • Inspect the rotor and distributor cap. The lid must be intact, without cracks and clean, without traces of soot. The carbon contact must not be worn or damaged. The rotor must also be intact and have no signs of burnout. All faulty elements must be replaced. • If, after the actions taken, interruptions in the operation of the cylinders continue, then you should contact a service station for a full diagnosis and adjustment of the ignition system, which should be carried out on a stand. • It should be noted that normally the compression should be above 1.1 MPa. If fluctuations within 0.1 MPa are observed in one of the cylinders, then it is necessary to urgently repair the engine itself.
Thus, it is quite obvious that knowledge of engine operation will allow timely repair work and avoid serious breakdowns.
We independently regulate the system
In order for the motor to operate normally, you need to set the angle. To complete this task, you will need to prepare tools, in particular, keys and screwdrivers. Before proceeding with the adjustment, you should start the internal combustion engine and let it run until it warms up. Please note that the idle speed should be at least 800 rpm.
After the internal combustion engine is warmed up, you need to open the hood and disconnect the silicone pipe, which produces vacuum from the fitting. One end of this pipe must be brought to your finger - if after this the pipe suctions, this indicates that there is a vacuum in the system. If this is the case, you will need to reduce the engine speed until the vacuum stops. Next, you will need to turn off the engine and bend the pipe until the clearance disappears. Using a wrench, you will need to loosen the fixing nuts that secure the distribution unit (the author of the video is the Engine Repair channel! And interesting!).
What is the order of operation of the cylinders in the VAZ 2109 engine?
Operating procedure
Often when repairing an engine, it becomes necessary to disconnect high-voltage wires. Some drivers, after disconnecting the wires, do not remember the order in which they were installed. As a result, there may be confusion with the wires, and if they are connected incorrectly, the car will not start. To avoid an unpleasant situation, you need to know how the internal combustion engine operates.
Connecting wires to a VAZ 2109
The principle of operation of the power unit is based on such a property of gases as the ability to expand when heated. A standard four-cylinder engine operates in 4 strokes:
- During the first stroke, the air-fuel mixture and part of the exhaust gases are “injected”. This mixture completely occupies the volume of the cylinder.
- In the second cycle, the “compression” process occurs. In this case, the valves are closed, and the piston moves upward due to the movement of the crankshaft and connecting rod. The working mixture fills the combustion chamber.
- On the third stroke, called “expansion,” a spark appears thanks to the spark plugs, which ignites the working mixture. The expanding gases exert pressure on the piston and force it to move downward. Then, thanks to the connecting rod, the crankshaft begins to move.
- On the fourth stroke, the process of “release” of exhaust gases is carried out. Through the exhaust valves they enter the exhaust system of the VAZ 2109.
In order for the operation of a multi-cylinder engine to be smooth and the crankshaft not to experience uneven loads, it is necessary that the work processes be carried out in a certain order.
There are different schemes that determine in what sequence the cylinders will function. The VAZ 2109 uses the following scheme: 1-3-4-2. The cylinders are numbered starting from the front cover of the power unit.
Cylinder numbering on the VAZ 2109
If we imagine the working process of the engine through the cylinders, then the order of operation is as follows:
- In the first cylinder, an upward movement occurs, the working process takes place: the air-fuel mixture burns, the gases expand.
- In the third, a “compression” process is carried out, in which the piston moves upward.
- The fourth receives the working mixture as the piston moves downwards, thus carrying out the “injection” process.
- In the second, the piston moves upward, while the exhaust gases exit through the exhaust valves.
Possible causes of failure
During the operation of the internal combustion engine, various malfunctions are possible. To detect them, you should perform the following sequence of actions:
- First you need to start the car. The engine should idle. At this time, you should listen to what sounds are coming from the exhaust pipe. If you hear regular popping noises, then one of the cylinders is faulty. The cause may be faulty spark plugs and lack of spark. The malfunction can also be caused by a large amount of incoming air or insufficient compression in the cylinder.
- It is necessary to inspect the candles. If there is carbon deposits, moisture or oxidation, you need to clean it. Check the gap between the electrodes, which should be 0.8 - 0.9 mm.
- Replace all spark plugs, regardless of their appearance and vehicle mileage.
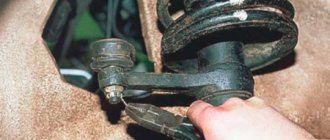
- If there are irregular emissions, you need to inspect the high-voltage wires. There should be no traces of oxidation on their tips, and the insulation should not be damaged. If defects are found, the wire should be replaced.
Wires connecting to the coil - The gas distributor cap should be inspected. There should be no soot or cracks on it. The carbon contact should be checked for damage and wear.
- The rotor needs to be inspected. It must be solid and have no signs of burnout. All parts with defects must be replaced.
- The pressure in the cylinders is allowed to be no lower than 1.1 MPa, and the compression difference should not exceed 0.1 MPa. If the indicators do not correspond, engine repair is necessary.
If after the above steps the problems remain, then you need to contact a service station to undergo a more accurate diagnosis of the VAZ 2109 engine and adjust the ignition system on the stand.
Sources
- avtozam.com/vaz/2109/poryadok-raboty-tsilindrov/
- navaze.ru/108-poryadok-raboty-cilindrov-vaz-2109.html
- vaz2109.net/ekspluatatsiya-avtomobilya/poryadok-raboti-cilindrov-vaz-2109.html
- ladaautos.ru/vaz-2109/kakoj-poryadok-raboty-cilindrov-vaz-2109.html
Features of the ignition module
Now let's talk about a more complex issue - the ignition module and its design features.
The design includes several components, each of which has its own nuances.
Component
Peculiarities
There are always two coils on a VAZ 2109. This mechanism is responsible for generating current
Switch keys also work together. Through them, the current goes to the spark plugs, plus the controller regulates the time the current is turned on, which is calculated by receiving information from the crankshaft sensor
Electronic control unit
Responsible for distributing information in the form of electronic impulses
High-strength plastic is used for its manufacture, which largely ensures the durability and reliability of the device.
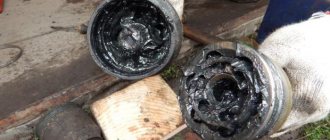
Typical faults
Since the transmission of rotation is carried out by a toothed belt, if it breaks, the motor is guaranteed to bend the valve. By default, the 2108 engine has the following “diseases”:
- poor valve cover design - periodic replacement of the gasket is required;
- low service life of cooling system components - the pump and hoses should be changed frequently;
- detonation - the problem is solved by the use of high-quality fuel;
- Solex carburetor - replacement with Ozone modifications.
Valve cover
But the 2108 engine is not picky about the quality of the lubricant - it is not so important for the owner which engine oil to use.