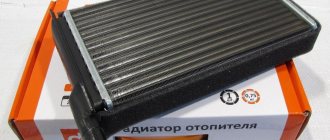
Grant stove radiator
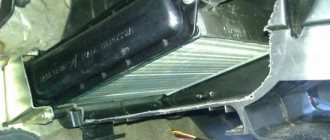
The location of the heater radiator on the Grant is not convenient for replacing it. To remove the radiator without damaging it, you will have to dismantle the dashboard, which can take a lot of time and labor due to a trivial problem that can be solved in an hour in other cars.
The radiator is located under the dashboard in its central part at the driver’s feet. Its pipes are hidden behind the decorative side panel trim. This location of the radiator makes it a little difficult to access it when replacing it, but if you use the correct replacement instructions, then removing and installing the radiator yourself will not be difficult.
Cooling
To cool the interior air, do the following:
- Switch switch 1 (see Fig. 2) of the electric fan operating modes to one of the positions “1”, “2”, “3” or “4”.
- Place the regulator handle 4 opposite the pictogram.
- In the 3 pushbutton switch block, press the air conditioner switch key. The indicator located on the switch button will light green all the time the air conditioner is operating.
When the air passing through the evaporator cools, the water vapor contained in it condenses. The condensate is drained through a drain pipe under the bottom of the car. If the ambient air humidity is high, a puddle of water may form under the car, which is an indirect sign that the air conditioning system is working properly.
Turning on the air conditioner while the engine is running under difficult conditions (long climbs, heavy city traffic, etc.) can lead to engine overheating. Monitor the coolant temperature gauge: if the temperature exceeds the permissible value, turn off the air conditioner. During long trips in city traffic, the efficiency of the air conditioner may decrease due to the intense thermal conditions of the engine. This is not a sign of malfunction; the air conditioner will operate effectively when driving under normal road conditions.
- climate block grants
- air duct grants
- air conditioning grants
- stove grants
Lada Granta has become a really popular car. And, in many ways, this happened thanks to the affordable price and good components. For example, the stove installed on the Lada Granta is quite good, as it warms up the interior to the required level very quickly. AvtoVAZ engineers did a very good job on this issue, since for our harsh winters the issue of high-quality heating of the interior is very relevant.
How to identify a clogged radiator
Checking the radiator is a fairly simple task that anyone can do. To do this, you need to check the circulation of fluid through the radiator. If the circulation is normal, then both radiator tubes will be hot, but if the inlet tube is hot and the outlet tube is cold, this indicates that the radiator is clogged from the inside.
A clogged radiator can be washed or, at best, replaced with a new one.
Why did it happen so?
Perhaps the automatic requests do not belong to you, but to another user accessing the network from the same IP address as you. You need to enter the characters into the form once, after which we will remember you and be able to distinguish you from other users exiting from this IP. In this case, the page with the captcha will not bother you for quite a long time.
You may have add-ons installed in your browser that can make automatic search requests. In this case, we recommend that you disable them.
It is also possible that your computer is infected with a virus program that is using it to collect information. Maybe you should check your system for viruses.
If you have any problems or would like our support team, please use the feedback form.
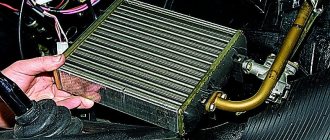
Types of Grant stove radiators
There are two types of radiators: with soldered pipes (factory radiator) and with removable ones.
Factory radiator with permanent pipes
The manufacturer produces radiators with non-removable pipes, that is, in order to dismantle it without removing the entire panel of the car, it is necessary to saw off the pipes coming from the radiator.
It is best to purchase a heater core from Datsun On-Do. The dimensions of the Datsun radiator are no different from the Grant one, with the exception of removable pipes, which will greatly reduce the pain during installation.
Review of Manufacturer Prices
Heater parameters: weight 0.5 kg, length 155 x width 167 x height 20 mm.
| Name/article | Price, rub.) |
| Heater radiator 2190-8101060 | From 2400 |
| 21900-8101060-00 | —/— |
| 21900-8101060-10 | —/— |
| 27140-5PA0A | —/— |
| LUZAR aluminum LRh 0190b | From 2100 – 2200 |
| LUZAR LRaC 0190 | —/— |
| LUZAR 482768 | —/— |
| LUZAR 353287 | —/— |
| AvtoVAZ OJSC 429612 | From 2300 |
| with air conditioning for automatic transmission LUZAR 367792 | From 2400 |
| AvtoVAZ OJSC 348402 | —/— |
| LUZAR 466443 | —/— |
Step-by-step replacement process
It is necessary to remove the battery, the air filter box by pulling it out from the rubber dampers and remove the intake corrugation. You will need this to access the thermostat.
We drain the antifreeze from the cooling radiator by unscrewing the plug in the lower right part of the radiator. To drain, you will need a container of at least 10 liters.
Attention: It is necessary to drain the coolant when the engine is cold to avoid burns.
Remove the connector from the electronic accelerator pedal and unscrew the pedal from the car body using a 10mm socket wrench. Then remove the pedal from the studs.
Unscrew the screws securing the radiator cap with a 6 mm wrench and remove it.
We remove the radiator pipes and lower them down so that the remaining antifreeze drains.
Now you need to press down the brake pedal; to do this, remove the cotter pin that secures the pedal and press on it when we remove the radiator.
If the radiator is not dismountable, that is, the pipes are not removable, they must be sawed off with a hacksaw. If the pipes are removed, they must be removed and pulled out of the holes in the engine shield.
After removing the pipes, you can pull out the radiator by pressing the brake pedal down.
We install the new radiator in the same way, pressing down the brake pedal, first removing the pipes from the radiator and installing them after the radiator is placed in its seat.
If the radiator is not prefabricated, then the pipes can be sawed off and the connection can be made on the hoses.
Features and nuances of the heater design
Note that problems during replacement are caused not by dismantling, but by installing a new radiator. There are two main nuances that make it difficult to fit the heat exchanger into the heater housing. The first one is the installation side. The radiator is pulled out towards the pedal block, and the pedals themselves prevent the radiator from “coming out”. But this does not cause problems during dismantling, since the leaking heat exchanger can be sawed and removed. But it’s impossible to install a new radiator because of the pedals.
The second nuance is the design of the radiator itself. The heat exchanger fittings for connecting the cooling system pipelines are long and pass through the engine shield. Thanks to this, the connection of the pipes with the radiator is carried out in the engine compartment and if the fastening clamps are loosened, the antifreeze flowing through the leak does not enter the passenger compartment. But due to the long fittings, you can only pull out the heater radiator by moving the heater housing toward the passenger compartment, and this is only possible with the front panel removed.
The replacement methods that car enthusiasts have come up with involve some modifications to the heater elements, allowing the installation of a heater radiator. In the future, these modifications make it possible to replace the heat exchanger without problems and in a short time.
Replacement procedure
- After the engine has cooled, unscrew the coolant expansion tank cap. The lid must be opened to equalize the pressure in the system.
Loosen the coolant drain plug on the engine block. The plug is located under the ignition unit.
Place a container to collect the liquid and unscrew the cap completely. Head plug for thirteen.
Reviews
| № | Positive |
| 1. | Vasily: for two years of operation there were no breakdowns of the heating system. Several times I noticed an antifreeze leak at the joints of the pipes. After replacing the clamp with a new one, there were no cases of depressurization. |
| 2. | Vladlen: Granta is assembled with high quality, the fit of parts is good, there are no comments. Provided regular maintenance, it will last a long time. |
| 3. | Gennady: for a year and a half of active use of the machine, I did not make any capital investments, with the exception of the purchase of consumables. I treat equipment with care, I buy only original parts. |
| 4. | Ivan: I recently underwent the fifth maintenance, the master assured me that the equipment was in good working order, there were no comments. |
| 5. | Dmitry: at 50,000 km, I replaced the return pipe once due to the formation of a crack. The system is operating normally, there are no complaints. |
| 6. | Ignat: my machine works like a watch, no complaints. I carry out technical inspections in a timely manner, fill with high-quality oils and high-octane fuel, and strictly follow the manufacturer’s recommendations. |
| 7. | Victor: It will soon be two years since I bought a Lada, I’m happy with the choice. My friends advised me to buy a Renault Logan, but I chose a domestic one. |
| Negative | |
| 1. | Ivan: I’m dissatisfied with the purchase of the Lada Grant; in the first winter, the antifreeze supply pipe to the radiator cracked. Fortunately, I noticed it in time and replaced it with a new one, otherwise the consequences could have been different. |
| 2. | Sergey: during the year and a half of operation of the car, the car underwent unscheduled repairs twice. I think this is too much for domestic transport. |
| 3. | Gennady: Now I regret buying Granta; Renault Logan is better. The car is falling apart every day. |
Conclusion There are difficulties when dismantling the stove heater. Many owners are familiar with this. At the same time, the “craftsmen” came up with a way to replace the heat exchanger without actually removing the dashboard, which significantly reduces time, money, and effort.
The final choice is up to the owner of the technical equipment. You should still listen to the recommendations of experts.
A simple way to replace the heater radiator on Lada Granta, Kalina
If you decide to replace the heater radiator on a Grant or Kalina according to the factory instructions (for Granta - TI 3100.25100.20554, for Kalina - 3100.25100.20469), then you will have to remove the instrument panel (dashboard). However, the owners found an easier way to replace the stove radiator.
Attention! The Lada Granta FL uses a new heater radiator. It is oversized and has removable tubes.
Kalina heater diagram
The Lada Kalina heater device is designed for heating and cooling the car interior. If the car does not heat up, the windows fog up, or you feel discomfort, then you need to test the performance of the heating system. Understand the functioning of the stove on Kalina.
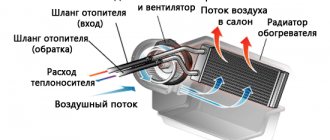
General layout of the Kalina stove
The location of the stove was designed for easy installation of an air conditioner. The system is simple, but at the same time quite reliable.
- Left side flow outlet.
- Left air duct.
- Heated side window.
- Air flow splitter.
- Stove.
- Right ventilation duct.
- Right side flow exit.
- Bottom heating duct.
- Interior heating duct.
- Central outlet of ventilation flows.
The supply and exhaust principle is used. The air masses inside the car are heated using a special liquid, which simultaneously cools the engine. The operating principle of the Kalina stove is based on the fact that the liquid warms up the radiator, where heat exchange occurs, and the heated air passes into the cabin through the air ducts.
Trick when replacing the heater radiator on Lada Kalina 1
1. Unscrew the screws securing the clamps of the heater radiator pipes in the engine compartment.
2. Unfasten the brake pedal.
3. Remove the gas pedal. Remove three nuts. To unscrew one of them, you will need to remove the tin plate.
4. The pedal does not allow you to pull out the heater core. To do this, we make a hole in the stove body so that the radiator can be moved back.
5. Install a new heater radiator. We close the hole using a soldering iron and sealant.
The process is also shown in the video:
How did you change the heater radiator on Lada Granta and Kalina?
Share on social networks:
Found an error? Select it and press Ctrl+Enter..
Rules for using a standard heating system
The car's operating manual outlines the basic principles of operation of the ventilation, air conditioning and interior heating systems. To quickly warm up, you need to switch the damper to the air recirculation position and the fan speed to the “maximum” position. In this case, the car windows must be closed. You should not drive in this mode for a long time, as this can lead to fogging of the windows.
The main reason for the accumulation of condensation is the difference in temperature inside and outside and high humidity. To prevent the windows from fogging up, you need to warm them up by pointing the heater deflectors at them and dry the air by turning on the air conditioning. However, when the vehicle is driven under heavy loads (for example, on long climbs) with the air conditioning turned on, the engine may overheat, so in such conditions it is necessary to monitor its temperature. Condensation is usually the result of luggage blocking the vents.
https://youtube.com/watch?v=RkNRzxfIfBg
The vehicle's ventilation, air conditioning and heating system creates conditions for normal and comfortable driving in any climate zone. AvtoVAZ engineers developed and implemented a simple and reliable heating concept for the Lada Granta model. But for the system to operate effectively, certain rules must be followed, which will help avoid unexpected breakdowns.