For a car to move, its wheels must rotate normally. If problems begin with the rotation of the wheels, then the driver immediately has problems controlling the car, which can cause an accident. This applies to all cars, and the VAZ 2107 is no exception. The most important element that ensures the correct rotation of the wheels of the “seven” is the hub. The driver can repair it himself. Let's figure out how to do this.
- Rounded fist
- Increased wheel turnout
- Front wheel bearing
Checking the wheel bearing
- Wheel Bearing Adjustment
- Sequencing
- Sequencing
Front hub and its purpose
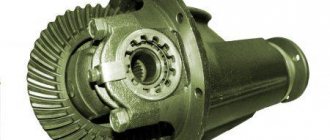
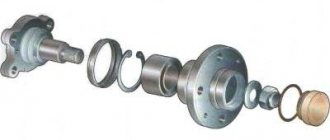
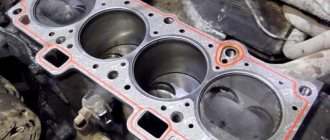
The front hub on the VAZ 2107 is a massive steel disc with a hole in the middle. This hole contains a large bushing in which the wheel bearing is mounted. Along the perimeter of the hub disk there are holes for fastening the wheel. And on the reverse side the hub is connected to the steering knuckle.
The front hub of the “seven” is a massive steel disc with a bushing and bearing in the middle
That is, the hub is an intermediate link between the moving wheel and the stationary part of the suspension. It ensures not only normal rotation of the front wheel, but also its normal turning. Therefore, any malfunction of the hub can have very sad consequences for the driver and his passengers. For example, if the wheel bearing becomes completely unusable, the wheel may jam or simply come off while driving, if the speed is high. It's not hard to guess where this will lead. That is why experienced drivers check the condition of the front hub at least once a month by grasping the top of the wheel and slightly rocking it away from and towards themselves. If even a slight play is felt when rocking, you should not drive such a car.
Replacement
Front hubs wear out over time. Therefore, it is necessary to periodically check their serviceability and replace them.
The diagnostic procedure is performed as follows:
- Place the vehicle on a level surface and apply the handbrake.
- Use special wheel chocks for the rear wheels to prevent the machine from moving on its own during the inspection.
- Place a stop to suspend the front wheel.
- Rock and spin the wheel.
Replacement
If a slight play is felt, then in some cases it can be corrected by tightening the fastening nut.
It happens that you can hear a creaking or knocking sound. In this case, the most likely cause of the problem is faulty wheel hubs that will need to be replaced.
Sometimes the wear is minor. In this case, you can try to fix the problem by performing repairs.
Often such a breakdown results in the car starting to maneuver much worse than before. This is most obvious when there is a maximum load. When turning the steering wheel, the car begins to listen poorly to the driver. For example, when turning sharply, additional noise and vibration occurs. If the indicated “symptom” occurs in the “seven” while turning to the right, then most likely the wheel bearing on the VAZ-2107 front wheel needs to be replaced.
Here are a few more signs of this type of malfunction:
- problems arise during braking. The driver may feel that the brakes are causing the steering wheel to jerk;
- while driving, clearly noticeable additional vibrations appear in the cabin;
- unreasonably rapid tire wear.
If at least one of the listed signs is present, it becomes necessary to carry out inspection and repair.
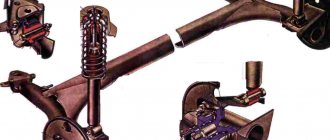
Rounded fist
The steering knuckle, mentioned above, is another important element of the VAZ 2107 suspension. Its purpose is easy to guess from the name. This part ensures smooth turning of the car's front wheels. The knuckle has two eyes with which it is attached to the paired suspension arms. On the reverse side of the knuckle there is a kingpin onto which the hub is placed along with the wheel bearing.
The steering knuckles on the "sevens" have a long kingpin for attaching the hub
The hub, placed on the knuckle pin, is secured with a nut. It should be said here that turning the wheels is not the only thing the fist is responsible for. It also has an additional function: it limits wheel rotation. For this purpose, special protrusions are provided on the fists of the “seven”. When turning too sharply, the suspension arms hit these ridges and the driver can no longer turn the steering wheel. The knuckle must have a huge margin of safety, since it bears most of the shock loads that occur when the car is moving, especially on uneven roads. However, sometimes the fist becomes deformed (as a rule, this happens after the front wheels fall into a very deep hole or after an accident). Here are the main signs that something is wrong with your fist:
- when driving, the car pulls strongly to the side, and this becomes more pronounced with increasing speed;
- the driver suddenly notices that the turning radius has become smaller, and it has become more difficult to “fit” into very sharp turns. This indicates a decrease in the angle of rotation of the wheels. And this phenomenon occurs after a serious deformation of one fist;
- turning the wheel out. There are situations when one of the knuckle eyes breaks. This is very rare, but it cannot be ignored. So, when the eye breaks, the wheel turns out almost at a right angle to the body of the “seven”. If this happens while driving, the car instantly loses control.
Increased wheel turnout
Sometimes drivers want to increase the handling of their car. The standard turning angle of the VAZ “classic” has always raised many questions among car enthusiasts. So drivers increase this angle themselves with a few simple operations. Fans of the so-called drift do this especially often: increased wheel turn allows the car to more easily enter a controlled drift, and this can be done at maximum speed.
- The machine is installed on the pit. One of the wheels is jacked up and removed. After this, the steering bipods, which are located behind the hub, are unscrewed from the suspension. There are two of these bipods.
It should also be noted that some car owners prefer not to do their own welding and installation of bipods. Instead, they buy ready-made tuning kits for VAZ “classics”, which allow them to increase the wheel alignment without unnecessary labor costs. Unfortunately, finding such a set on sale is not so easy. Therefore, the above technology for increasing wheel inversion will be popular among “Seven” owners for a very long time.
Front wheel bearing
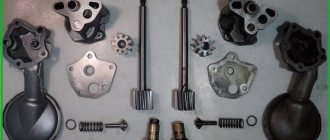
To ensure uniform rotation of the front wheels, special bearings are installed in their hubs. These are double-row roller bearings that do not require regular maintenance or lubrication.
The front hubs of the “seven” are equipped with tapered roller bearings
The reason is simple: they are pressed into the hub, so they can be destroyed when you try to remove them. Therefore, the driver removes the wheel bearings only when he decides to change them. Here are the main signs of wheel bearing failure:
- the front wheels rotate with a characteristic low hum. This indicates wear of one or more rollers in the wheel bearing. Worn rollers dangle inside the separator, and when the hub rotates, a characteristic hum occurs, which becomes louder with increasing wheel speed;
- a crackling or squeaking sound coming from behind the wheel. The driver usually hears this sound when turning. He says that one of the wheel bearing rings has collapsed. As a rule, the inner ring of the bearing breaks, and it usually breaks in two places at once. When turning, the hub carries a huge load, as does the bearing in it. At such moments, the fragments of the inner ring begin to rub against each other at the fracture points, resulting in a characteristic cracking or squeaking sound.
In all of the above cases, there is only one solution: replacing the wheel bearing.
Checking the wheel bearing
At the slightest suspicion of a bearing malfunction, the driver is obliged to check it, especially since there is nothing complicated about it.
- The wheel, from which characteristic sounds are heard, is jacked up. Then the driver manually spins the wheel so that it rotates as quickly as possible and listens. If the bearing is worn out, a characteristic hum will be clearly audible to anyone who does not have hearing problems. In some cases, bearing noise cannot be detected when the wheel is spinning too quickly. Then you need to spin the wheel as slowly as possible. If at least one roller in the bearing is worn out, the wheel will definitely hum.
- If manual rotation of the wheel does not reveal the problem, then you should pull the wheel without removing the car from the jack. To do this, the driver grabs the top and bottom of the tire and pulls the wheel several times, first away from himself, then toward himself. If the bearing rings are broken, then a slight play will be clearly felt on the wheel.
- If the play was not detected by pulling the wheel, then the wheel should be rocked. The driver grabs the top of the tire and begins to swing it away from him and towards him. Then he does the same with the bottom of the tire. Backlash, if any, is almost always detected. Either when the bottom of the tire rocks, or when the top rocks.
To identify play, the wheel must be rocked away from you and towards you.
Wheel Bearing Adjustment
Once play is identified, the wheel bearing is carefully inspected. If the play is insignificant, and no signs of wear or damage were found on the bearing, then this indicates a weakening of the bearing fasteners. In this case, the driver will not have to change the bearing; it will be enough to simply adjust it.
- Using a screwdriver, remove the protective plug from the wheel bearing.
- After this, the adjusting nut located above the bearing is tightened so that the wheel cannot be turned by hand.
Sometimes, to eliminate wheel play, it is enough to adjust the hub nut - This nut is then gradually loosened two to three turns. After each loosening, the wheel is turned and checked for play. It is necessary to achieve a situation where the wheel rotates freely, but no play is observed.
- When the desired position is found, the adjusting nut should be locked in this position. Drivers usually do this with a simple chisel: hitting the side of the nut with a chisel slightly bends it, and it no longer unscrews.
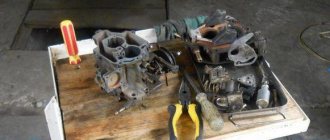
How to replace the wheel bearing on a VAZ 2101-VAZ 2107?
1. First, hang up the front wheel you need, if necessary, hang both and, most importantly, stop the rear of the car using the handbrake (For greater safety, you can also place bricks or heads under the rear), then remove the wheel from the hub (Read how to do this in the article: “Correctly replacing wheels on cars”) and using a thin flat-head screwdriver, pry out the protective cap that protects the hub nut from dirt, see the photo below for more details:
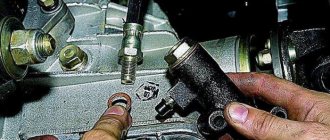
2. We go further, since the hub together with the brake disc will be removed (there is no other way to replace the bearing), in this case, remove the caliper from the brake disc, otherwise it will interfere with the hub assembly from the discs. You simply do not remove it, after After the caliper is removed, hang it by the spring without disconnecting the brake hose from the caliper, so there will be no need to bleed the brakes when you put everything back. For more details on how to perform all these operations, read the article entitled: “Replacing the brake caliper by car".
3. Now unscrew the central nut that secures the hub, it is indicated by a red arrow, it is better to unscrew it using a spanner, because you can rip it off with a wrench and something else, this nut is self-locking, so before you start unscrewing it, unscrew the nut using screwdrivers (there will be bent places there, you will immediately find them, you will need to straighten them) and turn it out with a wrench after that, by the way, depending on which side of the nut you turn out, the direction of rotation depends, let’s give an example if you unscrew the nut on the left side (see in the direction of travel of the car), then it is unscrewed in the same way as all nuts, on the right side the nut is screwed in and unscrewed in the opposite way (It has a different thread) and in order to unscrew it, you will need to not mind turn clockwise, but clockwise, remember this once and for all, there have already been many cases when the nut was simply torn off, due to the fact that they simply did not know which way to turn it.
Note! When the nut is unscrewed, remove the washer located behind it and the outer bearing cage, which comes complete with rollers and inner ring, as shown in the small photo just above!
4. After the completed operations, grab the brake disc with your hands and pull it towards you, due to which it, together with the hub, will be removed from the shaft on which it is installed, place the disc assembly with the hub on the ground (So that the back of the disc is facing you looked) and start removing the bearing, first remove the uppermost oil seal as shown in photo 1, for removal you can use either sliding pliers or a screwdriver with a thick base but a flat blade; however, as soon as the oil seal is removed, proceed to removal separator of the inner bearing with rollers, you will need to pick it up in the same way with a screwdriver or simply turn the disk over and remove it with your hands (see photo 2), then clean with your hand and then with a rag the entire internal part, where the separator stood, where the oil seal stood, from dirt and old grease (There shouldn’t be any grease left at all) and then prying up the spacer bushing with the same screwdriver, remove it (photo 3) and finally, you will need to knock out the two rings that are located inside, they are knocked out with a hammer and a drift (Instead of a drift, you can use screwdriver), first you will knock out the ring of the inner bearing (If the brake disc has not been turned over, and in fact it doesn’t matter which ring to knock out, the main thing is to knock out both of them), well, this ring is knocked out with light circular blows on it (see. photo 4), in the end it will rest against the asphalt, you will need to put something under the brake disc to make it higher or hold it in a vice, otherwise the ring will not be knocked out, as soon as the first ring is knocked out, turn it over brake disc assembly with hub and knock out the second ring, the outer bearing ring, you can see these rings in more detail in the diagram, which is located in the second photo if you look from above, there will be a photo of the hub and everything that goes inside it and by the way, all the bearings are there and the seals are laid out in order (This is a small photo, “click here” and you will go to it).
Rear hub
The rear hub of the VAZ 2107 differs from the front hub both in design and purpose. There are no steering knuckles or additional suspension arms attached to the rear hub.
The rear hub of the "seven" is not as massive as the front
Because the main task of this hub is to ensure uniform rotation of the wheel, and that’s all. It does not require a huge margin of strength and resistance to mechanical loads, since it does not participate in turning the wheels, like the front hub.
The rear hub is simpler than the front, as it does not experience huge loads
The rear hub is equipped with a rolling bearing, which is covered with a special cap. On the other hand, a dirt-proof inner ring is installed in the hub to prevent clogging of the bearing. This entire structure is put on the rear axle shaft of the “seven” and secured with a 30 wheel nut.
Repair
If there is a need for repairs, it is recommended that replacing the front wheel hub bearing on a VAZ-2107 is carried out simultaneously for the front wheels.
Before disassembling, you need to check the amount of play by rocking the wheel, and it is recommended to do this in two planes:
- to turn left or right;
- swinging in a vertical plane.
It must be taken into account that the cause of the backlash may be:
- bearings;
- silent blocks or ball blocks.
To clarify, you need to make sure that the wheel does not swing with the steering cams, but independently of them.
Another important sign is that this fault causes the wheel to heat up excessively. If one of them is much warmer than the others, there is a need for repairs.
To carry out repair work you need to do the following:
- Disconnect the hub. This is done in accordance with the instructions above.
- Then remove the bearings.
- They are cleaned of old grease and inspected for damage and wear.
- If necessary, replace the front wheel bearings on the VAZ-2107.
- The bearings are lubricated and pressed into the hub.
After this, assembly is carried out. Then they are installed in place.
What tools will you need?
To carry out this repair in the “seven” you will need:
- a jack to raise the car;
- a system for fixing wheels so that the vehicle does not move during repairs;
- wrench with heads of the required size;
- hammer;
- chisel;
- vice;
- screwdriver.
In addition to tools, you will need kerosene for washing the bearings and hub, as well as lubricant and rags.
If there is a need to replace parts, they must be purchased in advance in accordance with the article number before repairs are carried out.