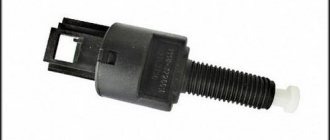
Description of the brake pedal sensor
Below we will find out how it works and how to replace it.
Purpose, location and operating principle
The essence of the system is that when you press on the brake, the piston in the cylinder begins to move. After this manipulation, fluid enters the brake system from the intake valve. It passes through the pipelines towards the main wheel mechanism, thus creating a suitable situation for the pads to move towards the wheel discs and drums. As a result, contact and subsequent braking occur. The controller itself turns on the brake lights.
Brake end piece
Typical malfunctions and methods for their elimination
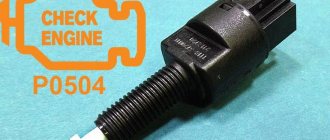
When “communicating” with a car, you can encounter various problems, but there is the most common and annoying problem. This problem is called error P0504, or otherwise “Brake pedal sensor mismatch.”
This malfunction often slows down the car. To solve this issue, you need to release the brake pedal and adjust the gap in the position sensor.
The adjustment is quite simple:
- It is necessary to hang a small but weighty weight in the area of the rubber brake pad.
- Unscrew the sensor nut a little and bring the white part to the brake pedal so that there is a gap of 0.2-0.5 mm between the body thread and the white tip. The sensor must be fixed in this position.
New replacement part
Error P0504
This malfunction is associated with an incorrect signal from the brake pedal switches. Most often, the cause of such a failure is a malfunction of the brake pedal position sensor, lack of proper adjustment, or a broken spring that is installed in this device. Procedure for checking and troubleshooting:
- We remove the sensor;
- Move the rod lock to the right position using a screwdriver;
- We use a multimeter with an ohmmeter function;
- On Largus, Vesta and Xray cars, contacts 3-4 should be closed and have a resistance close to zero. Contacts 1-2 are open and their resistance should tend to infinity.
- When you press the rod on contacts 3-4, the circuit opens, and on contacts 1-2 it closes. If this is not the case, then the sensor must be replaced.
- On Priora, Kalina, Granta, Niva cars, contacts 1-4 should be closed, and 2-3 open. When you press the rod, the situation is the opposite.
- Before reinstalling the sensor, move the rod to the left position.
Sensor locations on video:
Adjusting the brake pedal position sensor:
Any driver can carry out this procedure at home without a trip to a service station. The part has two nuts in its design. One of them is on top, and the second is on the bottom. The upper nut adjusts the pressure of the rod. First you need to release the lower one, and then tighten the upper one, thereby changing the gap of the element. You need to ensure that the rod is fully pressed and not partially pressed. After this, start the car and let it run for about 10 minutes to check if the error appears.
Instructions for replacing the brake controller
- Pump out the liquid.
- Place the vehicle on a support stand and remove the wheel.
- Use a wrench to unscrew the two wheel pins.
- Remove the brake drum.
- Then, using a screwdriver, pull out the hook of the upper tension spring and remove the part. Perform the same manipulation with the lower tension spring.
- Then remove the front pad and spacer bar, while disconnecting the pressure spring and lower the pad.
- Remove the shoe lever from the parking brake hole, straighten the cotter pin and remove it from the parking brake drive.
- Remove the washer and lever.
- Install a new block and assemble the part in the reverse order.
Rear disc brakes on Lada Kalina
Setting up the brake force regulator: “The Sorcerer” carries the hero
November 18, 2010
“The sorcerer”, or, according to the catalogue, the pressure regulator in the brake drive, it was not for nothing that people received such an apt nickname: no one really knows how it works, but, they say, being faulty, it can present an unpleasant surprise - make the car dance in an emergency. braking.
This is where the insidiousness of the “sorcerer” lies: during normal operation, without braking to the floor, its work or inaction is practically not felt, but when its help is especially needed, it may not come.
The pistons have soured, the rod or drive lever has broken off, or you installed a new one instead of a faulty regulator, but for the time being you don’t know that the unit is defective or out of adjustment... How dangerous is this?
Let’s check in our experiment how “witchcraft” affects the effectiveness of the brakes at partial and full load of the Chevrolet Niva and Kalina and what the owner should be wary of if he does not monitor the condition of the regulator. We can simulate a malfunction, from excessive activity to complete inaction, with adjustments.
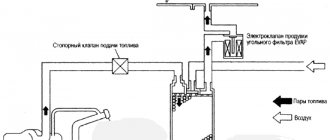
Let us remind you that the regulator’s task is to reduce the braking force on the rear axle, reducing the likelihood of skidding when braking to skid.
The regulator, mounted on the body and connected by an elastic lever to the axle beam, limits the pressure in the rear brake mechanisms depending on the position of the rear of the body relative to the road, that is, on the vehicle load.
“Sorcerer” is the predecessor of ABS, which allows to some extent prevent the rear wheels from locking when braking and thereby reduces the likelihood of skidding. “Sorcerer” is the predecessor of ABS, which allows to some extent prevent the rear wheels from locking when braking and thereby reduce the likelihood of skidding.
"CHEVROLE-NIVA"
By the way, before testing tires on cars without ABS, each time we slightly adjust the regulator taking into account the road condition (snow, ice, asphalt), ensuring that the rear wheels lock a little later than the front ones. Let's not break tradition. Our Shniva found the gap between the cheeks of the regulator to be 16 mm, which was adjusted using a stop screw.
Several brakings, and the braking distance from 80 km/h for a car with a partial load is determined: 34.4 m. With a full load... 33.6! Almost a meter shorter! At the same time, the driver noted a heavier pedal and rapid heating of the brakes, which required cooling before each measurement. Let’s remember these parameters and make adjustments to the “sorcerer” adjustment. First, let's reduce the gap to 8 mm. Now the regulator significantly limits the pressure in the rear brakes, transferring almost all the hard work to the front ones.
Description of the clutch pedal sensor
What kind of device is this and how to replace it is below.
Purpose, location and operating principle
The clutch sensor is installed directly on the clutch pedal. It influences engine control with an electronic gas pedal and provides a convenient and flexible control scheme for machine modes. On its own, it looks like a nondescript switch that has on and off modes.
Typical malfunctions and methods for their elimination
If the controller does not detect signals from the clutch, then there is a risk of error 0830. The occurrence of this problem is usually a malfunction of the clutch sensor or a short circuit or open circuit. To correct this state of affairs, it is necessary to identify the reasons. That is, inspect the contacts for breaks or corrosion.
Brake light switch VAZ Priora, Kalina
- 220 2 214k
- 150 8 225k
Current to power conversion calculator
Convert how many amperes a kW has online. Calculator for converting current amperes to power watts
To control the brake signals, Priora and Kalina cars have a brake signal switch (hereinafter referred to as BST). In addition, the BST signal, in systems with electronic throttle control, is used by the ECM. In the event of a violation in the operation of the VST, the controller’s safety system forces the engine into a reduced power mode . On a car with an automatic transmission, activation of this mode can also occur if the brake light bulb burns out.
When the brake pedal is applied, the signal switch analyzes the position of the pedal and closes the contacts, after which the brake signal lamps light up and subsequently turn off. The sensor is used when braking and releasing the brakes of cars. VST is installed on Priors and Kalinas equipped with an electronic gas pedal.
Video “Eliminating squeaks”
You can learn how to solve one of the problems associated with the clutch in a car from the video from the author Konstantin Biyanov.
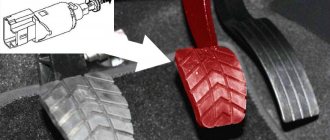
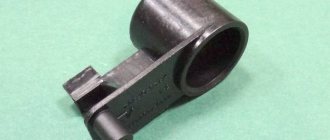
The mileage of the car is 2500 km, and the check is already lighting up with alarming frequency. The pre-installed BC multitronic displays a message that error P0504 is a problem with the brake pedal sensor. I erase it so that it doesn’t become an eyesore, but nevertheless, the error pops up. What to do? How can I adjust/change this button? In the photo this bastard is indicated by a red arrow. As people write, you need to play with adjusting it, which is done with two nuts. The most common thing is that people adjust so that the sensor button barely touches the brake pedal pad. In general, let's give it a spin and see. My BC immediately starts yelling as soon as I start the car, saying there is a mistake. I'll go dig around this weekend.
I noticed that the error pops up more often when you stand on the brake with the selector “D” on. I think the problem is deeper than just adjusting the sensor.
Yesterday, April 14, 2014, I was at the dealer for maintenance. In particular, he voiced hemorrhoids with error P0504. The dealer cheerfully undertook to fix everything. But he didn’t fix it, he said that we need to order a brake sensor, they say it’s defective. I drove out of the gate and wasn’t even surprised when the CHECK light came on again. And this morning the car did not start from the remote control, the BRAKES light was displayed on the key fob, which was corrected by pressing the brake a couple of times, then the car simply did not move, became dull, twitched, but after hitting the brake pedal again, everything was corrected, but then again. In general, the morning did not go well. I freaked out, went to the store and bought this damn sensor.
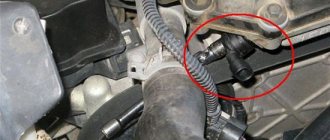
Here he is, the bastard, in the photo. I went to the dealer, where they changed it for me in 25 minutes without charging a penny. On my part, the cost is 170 rubles for a purchase in a store. So far nothing lights up or jerks. I want to disassemble the removed sensor at home and see what in such a cheap and simple part for 170 rubles was ruining the life of a car worth 450,000 rubles! The truth is, I don’t know how to assemble it, the upper part is on three clips, which are very hard, I wouldn’t want to break it.
I will continue the epic with the sensor. Today, 04/24/2014, Jackie Chan’s new dachik lit up again - P0504. Yesterday I disassembled the old sensor.
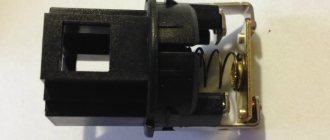
What is immediately visible is that the small spring sitting on the rod is crooked. Contacts (nickels) of different heights. In pair 3-2, contact 2 rings in a dull tone, rang with a beeper, if on all the others it beeps loudly and loudly, then on the 2nd it is dull and quiet.
The crooked spring was replaced by another, equal in stiffness, as far as I could determine, and equal in length. I understand that when the brake pedal is released, the rod goes inward and presses the floating contact to the upper group; when you press the pedal, then to the lower one. The scheme couldn't be simpler. However, it doesn't work as it should! the spots were all set up, as if a small welding was working, on one spot there was a mark from the very edge, therefore the floating contact was pressed crookedly. As I understand it, it could have been welded, which sent a signal to the brain that the car was on the brakes.
Pre-installation diagnostics
Before buying a new product and installing it to replace a seemingly faulty old sensor, try diagnosing and troubleshooting it yourself. So, on the body of the product there are two special nuts, one on top, the other on the bottom. The top nut adjusts the gap of our sensor. As mentioned earlier, in some cases the gap is set incorrectly, which disrupts the normal movement of the button. Your task is to find and set the optimal gap so that nothing interferes with the operation of the button. After the adjustment work, reset the ECU error, start the car engine and let it run for 15-20 minutes (the error does not register immediately). If the error does not appear, it means that the reason for the incorrect operation of the internal combustion engine is incorrect settings of the Granta brake sensor. Otherwise, you should replace the faulty device with a new, working one.
Checking the brake fluid level
The brake fluid level is checked periodically: daily during vehicle operation, during each maintenance, after operations to pump the brake system hydraulic drive and replace the brake fluid, when a warning lamp lights up on the instrument panel, indicating an insufficient level of brake fluid in the master cylinder reservoir.
1. We prepare the car for work.
2. Use a rag to remove dirt from the master brake cylinder reservoir.
3. Visually check the brake fluid level in the reservoir. It should be between the MIN and MAX marks on the tank body.
4. Check the degree of wear of the brake pad linings of the front and rear brake mechanisms.
5. If the wear of the brake pads is within normal limits, and the fluid level in the reservoir is below the MIN mark, then disconnect the tip of the wiring harness from the emergency brake fluid level drop sensor, unscrew and remove the reservoir cap.
6. Add new brake fluid to the reservoir up to the MAX mark (when installing the reservoir cap, the sensor float will be immersed in the liquid and its level will increase).
7. Close the tank lid tightly.
8. Connect the wiring harness block to the sensor connector.
9. Check the operation of the emergency brake fluid level sensor: with the ignition on, press the rubber lining of the reservoir lid from above. If the sensor is working properly, the warning lamp on the instrument panel will light up.
When is pumping required and how to prepare for it
Bleeding the brakes is not always necessary - if the brake system is functioning properly, then bleeding is not necessary.
It is required only in the following three situations:
- When the pedal begins to “fail” (as was mentioned at the very beginning of the article).
- After replacing any component of the brake system.
- After replacing the fluid.
All these situations are caused by one single reason - air entering the system. So, if the pedal began to “fall” by itself, then, most likely, the brake tract was depressurized in some area, and air leaked inside.
When replacing parts, air also enters the brake system in large quantities and remains inside, causing its failure (the same applies to a complete replacement of the brake fluid).
Checking brake pad wear
We check the degree of wear of the brake pads of the front brake mechanisms in the following sequence.
1. Place the car on the inspection ditch.
2. Remove the front wheels.
3. When checking the pads of the left brake mechanism, turn the steering wheel completely to the left, and when checking the pads of the right brake mechanism, turn it to the right.
4. Through the inspection hole in the movable caliper bracket, we visually determine the thickness of the brake pads.
If the thickness of the lining of at least one pad is less than 1.5 mm, we change all the brake pads of the brake mechanisms of the right and left wheels.
5. At the same time, we check the mobility of the brake cylinder pistons. If the piston becomes sour, replace the cylinder.
To check the degree of wear of the rear brake pads, you will need a flashlight.
1. We prepare the car for work.
2. Using a slotted screwdriver, remove the rubber plug for the inspection hole in the support shield of the rear wheel brake mechanism.
3. Light the inspection hole with a flashlight. If the thickness of the brake pad lining “ A ” is less than 1.5 mm, change all the brake pads of the brake mechanisms of the right and left wheels.
4. Install the plug in place.
Checking the vacuum brake booster
1. We prepare the car for work.
2. With the engine not running, press the brake pedal several times until the hissing noise in the brake booster stops.
3. Press the brake pedal and hold it down.
4. Without releasing the pedal, start the engine.
5. If immediately after starting the engine the pedal moves down a little, the brake booster is working properly.
Otherwise, we check the integrity of the vacuum supply hose to the vacuum booster, the tightness of its connection to the inlet receiver and the booster check valve branch pipe. If the hose is intact and connected tightly, the vacuum booster is faulty.
Possible reasons for the check function to light up
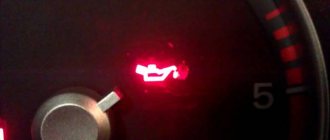
Check engine light came on during hard acceleration
This function is responsible for the operation of the engine and if it signals, then there may be problems in the operation of this particular unit. Of course, this is scary for any motorist, because repairing the power unit is complex and expensive. But don’t immediately get scared and panic, the reason may be petty.
So, let’s look at what are the reasons why the “CHECK” function on the Lada Grant came on:
- If the indicator lights up when you start the engine, then don’t worry, everything works.
- If the “CHECK” lights up and signals for a long time, then, first of all, it is necessary to make a diagnosis, and only then worry.
- If there is a “CHECK” while driving, this may mean that the oil level in the engine is insufficient (p0523 - error when the oil pressure sensor is faulty).
- The “CHECK” function is on - it’s worth checking the engine for signs of depressurization or oil leakage.
- If the above reasons do not work, but the “CHECK” is lit, then this may be a signal that the spark plug has failed or low-quality fuel has been filled.
Elimination methods
Let's consider some options for eliminating the causes of the “CHECK” function fire on the Lada Grant:
- Bad fuel. The elimination method is quite simple - drain the low-quality fuel and fill in new one. Let the engine run a little and turn it off. If everything is normal, then upon startup, the signal will disappear. AvtoVAZ recommends refueling with 95 gasoline, but it often causes errors and complaints about its quality. What kind of gasoline do you fill up with, 92 or 95?
- Spark plugs and high-voltage wires. Unscrew all spark plugs and check the gaps and the presence of a spark. Replace faulty spark plugs and wires.
Checking the pedal free play
Free play of the brake pedal is the travel of the pedal from its top position until the brake mechanisms begin to operate. It should be 3-5 mm.
To complete the work you will need a ruler or tape measure.
1. We prepare the car for work.
2. Place a ruler or tape measure near the pedal and measure the distance from the floor to the outer surface of the brake pedal.
3. Pressing the pedal with your hand, lower it until we feel an increase in resistance to the movement of the pedal.
We repeat the measurements. Based on the difference between the obtained values, we determine the free play.
The presence of free play in the brake pedal ensures that after stopping braking, the pistons of the master cylinder will return to their original position, and as a result, there will be no excess pressure left in the brake hydraulic drive. When the brake light switch is set to limit rearward travel of the brake pedal, pressure can be maintained in the brake system, causing the brake pads to apply the brakes continuously.
If the free play of the brake pedal is less than the optimal value, it is necessary to adjust the position of the brake signal switch. Increased free play in the brake pedal may be caused by play in the drive mechanism. Worn parts need to be replaced. The cause of the malfunction may also be the presence of air in the hydraulic brake drive or a malfunction of the master brake cylinder. The identified malfunction must be eliminated.
Switch design and which one to install
The brake light switch is designed in such a way that it has two groups of contacts. Both groups send their signal to the controller. One group of contacts connects voltage to Cl. 15, and the other with Kl. 30, which supplies power to the brake signal lamps.
On the Priora and Kalina models, a brake signal switch with the original part number 1118-3720010 is installed. Such a switch costs no more than 260 rubles. There is also a good analogue - AVAR (2113720), it is a little cheaper - 190 rubles.
Checking the parking brake
During the operation of the vehicle, due to wear of the rear brake pads and pulling of the drive cables, it periodically becomes necessary to adjust the travel of the parking brake lever.
The parking brake lever travel should be 2-4 clicks. In this case, the braking system must reliably hold the equipped vehicle on a slope of 23%.
If this is not the case, we check the condition of the parking brake system and, if necessary, adjust it and replace worn or damaged parts, and then repeat the check.
How to resolve the problem
If error P0363 is displayed during diagnostics of the Lada Granta, then the reasons may be:
- Use of low-quality fuel.
- No spark.
- It could also be a leaky air intake.
- Damaged/worn cylinders.
The first problem can be solved easily and quickly. It is enough just to replace the fuel used with gasoline from another manufacturer. Often this measure is enough to eliminate the skipping problem. Indeed, according to statistics, error P0363 is largely associated with low-quality gasoline.
Note: if error P0363 makes itself felt too often, and, as a result, one of the cylinders is turned off (although the engine and other elements are working properly), you can reflash the engine control unit by deleting the error data from it.
In a situation where replacing gasoline does not solve the problem, it is necessary to check the air intake, that is, replace the filter with a new one, if the existing one is already worn out, tighten the fastening screws. It is also recommended to check the pressure in the rail (it should not exceed 2.8 atmospheres).
Next, you need to check how the ignition system works, namely:
- Is there oxidation at the connection points?
- What is the condition of the spark plugs of the damaged cylinder, as well as the armored wire that is attached to it?
Checking high-voltage wires is carried out using a tester. Normally, their resistance does not exceed 10 kOhm. Otherwise, this indicates damage and the need to replace them with new ones.
If the wires are in good condition, you need to check the spark plugs, or even better, replace them immediately, especially if the existing ones are cheap.
Note: all 4 spark plugs need to be replaced, not just the one that is faulty.
In a situation where a check has been carried out and a solution has not been found, it is recommended to diagnose the cylinders, namely, measure their compression. The difference here should be a maximum of 0.5 atmospheres. If in one of the cylinders it is too low or, conversely, too high compared to the norm, it is recommended to take the car to a service station to check the engine.