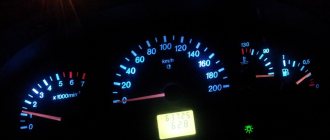
VAZ 2114 instrument backlight brightness control wiring diagram
The brightness of the instrument cluster illumination lamps on the front panel of the VAZ 2114 (2113, 2115) is regulated by a special regulator (knob) located to the left of the steering column.
Here is a diagram of its connection with a description of all its elements and operating features - inclusion. switch off and adjust brightness.
VAZ 2114 (2113, 2115) instrument backlight brightness control connection diagram
Description of the scheme
— You can adjust the brightness of the instrument cluster illumination lamps, the illumination of switch buttons, the cigarette lighter, ashtray, etc. on a VAZ 2114 (2113, 2115) car using a special regulator (backlight switch) installed in the front panel, to the left of the steering column. It is a rheostat that smoothly changes the resistance when the handle is rotated.
— The voltage to the brightness control is supplied from the positive terminal of the battery, through the “B+” terminal of the generator and the ignition switch contacts.
— The electrical circuit for turning on the regulator is protected by fuse F16 (15A) in the fuse and relay mounting block.
Notes and additions
— Catalog number of the instrument backlight brightness control for the VAZ 2114 (2113, 2115): 21060-3710310-02. Its handle is 21140-3710349-00 and its mounting nut is 21140-3710349-00.
Source
VAZ 21093 instrument lighting control
- To the beginning of the forum
- Forum Rules
- Old design
- FAQ
- Search
- Users
The lights on my instruments and the entire torpedo went out. Only the button for turning on the dimensions and the heater switch is very dimly lit. replaced the fuse in the mounting block. didn't give any result((
What could be wrong? high torpedo, everything else works.
Only the button for turning on the headlights and the heater switch is lit very dimly..
Only the button for turning on the headlights and the heater switch is lit very dimly..
I installed the old factory fuse (which I removed yesterday) and the backlight started working..
I installed the old factory fuse (which I removed yesterday) and the backlight started working..
I just installed some Chinese one with transparent plastic...
NEVER use fuses with clear plastic.
Most likely, all 5 backlight bulbs in the tidy itself simply burned out over time.
board is chipped. Could this cause all the light bulbs to not work?
If together with a piece of track - yes. I would post a photo of the board, it would be much easier to understand.
Added after 25 minutes 54 seconds:
Where is this speedometer cable and how to remove it?
I think everything is transparent from the factory
Where is this speedometer cable and how to remove it?
Pull the device slightly towards you and unscrew the ring securing the cable skirt.
I also disconnected it from the box. And so the photo. I think the problem is in the upper left light bulb, where it is broken off
Restore the path as marked in red.
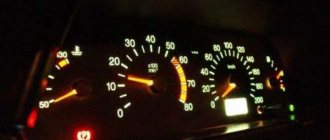
The backlight of the VAZ 2114 instrument panel does not light up: do-it-yourself repairs
The dashboard on the VAZ 2114 allows the driver to control engine data, monitor the remaining amount of fuel, his speed, and other data. The panel should be maintained in working condition so that the backlight not working does not cause discomfort, and the sensors show real values.
But quite often, VAZ 2114 owners discover that the instrument panel lights do not light up. If such a situation occurs, appropriate action should be taken immediately to eliminate it.
VAZ 21093 instrument lighting control
- To the beginning of the forum
- Forum Rules
- Old design
- FAQ
- Search
- Users
Hello! The backlight of the instrument panel of the VAZ 21093 has disappeared. At the same time, when you turn the backlight control knob to the right, the tachometer needle drops to zero (with the engine running). In the left position of the handle, the tachometer works normally.
The battery also began to drain quickly
Help me figure out what's wrong?
I had similar nonsense on my 8 with a high panel. The instrument panel backlight disappeared a couple of times; I changed the backlight level control resistor because... I didn’t want to solder (it’s a cheap part). After the second time I started looking for the short one. It turned out that the wires connected to the panel backlight bulbs were made in the form of strips of conductive material (like copper) glued to a polymer tape. In the place where this tape was connected (upper left corner of the instrument panel), the strips peeled off from the polymer base and one strip closed both contact heels. I put it on varnish and everything is ok.
How to get there? Do you need to remove the instrument panel?
Why the instrument panel does not work
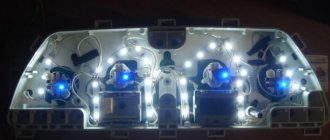
Disassembled dashboard
The first thing you need to figure out is why the instrument panel on the VAZ 2114 does not work. If the backlight goes out, there may be several reasons for this:
- The incandescent lamps burned out, the LED lighting groups stopped working;
- The connectors have oxidized;
- The electrical wiring is faulty, there are defects in the circuit;
- The fuse box has stopped working;
- Damage appeared on the common contact board;
- The dimensions system is damaged;
- There is no minus on the body (weight).
Types of panels
Instrument panels on the VAZ 2109 are of at least three types:
- Low panel;
- High panel;
- Electronic panel on nines with Europanel.
On versions with a low panel, failure of the entire panel is extremely rare. This is due to the fact that here the speedometer and econometer are equipped with mechanical drives. Therefore, it is unlikely that they will fail along with the electrical component.
Removing the dashboard
To replace the light bulbs in the dashboard of the VAZ 2114, it will first have to be dismantled. Without this action, you will not be able to access the problematic device.
Therefore, now we’ll figure out how to disassemble the instrument panel on a VAZ 2114:
- Unscrew the three screws, remove the trim and the protrusion from below. It comes out of your car's body bracket;
- Now remove five more screws located on the right console trim;
- Remove the screen; Disconnect the negative terminal from the battery;
- Disconnect the wiring harness connector from the cigarette lighter;
- Remove the handle from the lever;
- The fasteners for the electric fan of the heating system, that is, the stove, also have to be removed;
- Unscrew the steering wheel block bracket fixing bolts;
- Remove LEDs, lamp sockets and decorative inserts on the panel;
- Unscrew the hydraulic corrector illumination lamp. For this you will need a key for 21;
- Now all that remains is to remove the screws at the top and bottom.
Thus, we figured out how to remove the dashboard on your VAZ 2114. Be sure to cover the electrical circuit with something after the measures have been taken to prevent moisture, dust and all kinds of contaminants from getting there.
Proceed to replace the lamps that turned out to be faulty. At the same time, many are interested in how many light bulbs are in the dashboard of the VAZ 2114. There are 13 of them, but only 8 can be replaced. Do not forget to clean the contacts if there are traces of oxidation on them. In some cases, it is not the lamp itself that has to be replaced, but the socket for it.
Dashboard of VAZ 2110 on VAZ 2107
Which torpedo is suitable for the VAZ 2107? When you want comfort
- Replacing the dashboard;
- Replacement of the entire torpedo.
Changing the torpedo Some drivers are not satisfied with the appearance of the torpedo on the VAZ 2107. Sometimes this element from the “five” may be installed on the car. In this case, a purely practical inconvenience is added to the unpleasant appearance. You have to close the glove compartment with a universal “lock”, or rather, seal it with tape. Otherwise it will constantly open. Therefore, you can change the torpedo. Of our models, the best fit is a spare part from a VAZ 2115. You just have to use polyurethane foam to seal small non-joints. Of the foreign cars, the best fit here is a torpedo from a BMW E30. She will look much more advantageous. There is another option, to install a torpedo from a Toyota Camry. It is slightly wider than the standard part. Therefore, for a more accurate installation, you will have to trim the torpedo a little from the bottom on the sides. But even in this case, it will interfere with the window regulators. So get ready to install electric lifts right away. This will be the best option. You will also have to struggle with installing the steering wheel cover.
The standard cover will not fit into the steering wheel opening on the BMW dashboard. Therefore, craftsmen usually perform adjustments. Some people cut the panel, but it is much easier to cut off the excess from the casing. It is better to use standard mounts from the original torpedo, only they are slightly bent. Often the torpedo can sag downwards, so it is advisable to immediately provide support. Connecting the stove. Many drivers cannot connect the stove. The problem is that the air ducts do not match. Therefore, you will have to make special adapters. To do this, you can use air ducts from the Gazelle. All that remains is to adjust them a little and secure them. It is best to use a cable from the heater from BMW. It is much easier to connect it to the stove than a native Zhiguli to a new torpedo. By the way, according to
Selection of light bulbs
Today the market offers a wide range of lamps that can be used for the dashboard of the VAZ 2114. Among the most well-proven devices, we note a few. Their name and cost are presented in the table.
| Manufacturer | Price |
| LED lamps Sho-Me SM-T5 (blue, white and red (Korea) | 80 rubles - pair |
| High Brightness SMD LED Module | 20 rubles |
| LED Sho-me SM-T5-cap-super (white) | 50 rubles |
| Osram and Philips halogen lamps | About 40-80 rubles per unit |
Diagnostic procedure
In order to remove the instrument panel, you will need a set of screwdrivers and two wrenches - 8 and 21.
The entire procedure is performed in the following order:
- Unscrew the three screws and remove the trim.
- Unscrew the five screws on the right side of the console and remove the screen.
- Disconnect the negative cable from the battery.
- Disconnect the wiring harness that goes to the cigarette lighter.
- Disconnect the heater fan mount.
- Unscrew the bolts responsible for fixing the steering block brackets.
- Remove the light bulb sockets, light guide and decorative insert.
- Remove the lamp responsible for illuminating the hydraulic corrector.
- Unscrew the screws of the top and bottom rows of the panel and completely dismantle it.
Removing the instrument panel
At this point, dismantling the panel can be considered complete. Now you can move on to finding the reasons why the instrument panel of the VAZ 2114 does not light up.
Once the panel is completely removed, you should cover the electrical circuit of the wires with protective material to prevent dirt and debris from getting on it.
Checking the electrical panel backlight system is performed as follows. First, all light bulbs are checked for functionality. If they are in good condition, all connector contacts are cleaned of oxides (they can be treated with kerosene or WD-40). After this, the serviceability of the wiring itself is checked - to do this, it is necessary to “test” it using a multimeter.
If the test results show that all elements of the system are operational, but the backlight still does not work, then the problem lies in the fuse box - it should be checked and replaced with a new one (if necessary).
VAZ 2114 fuse box
The fuse block is replaced only with a similar factory-made block. Using instead blocks designed for a different amperage, as well as various homemade spacers, is strictly prohibited. This can not only cause the failure of all electronics, but also lead to a fire.
It is also worth noting that replacing the fuse box should be done very carefully, without jerking, using special dielectric tweezers.
Replacing the backlight
To improve the quality of your dashboard lighting, it is advisable to install new LEDs in place of the old ones. They provide excellent illumination, consume minimal energy, and guarantee a high level of data reading.
- Buy a set of LED lamps, having previously calculated the number of devices needed for each sensor.
- After removing the block, install the resistors and lamps in specially designated places on the VAZ 2114 - in the sockets. To dismantle the cartridges, they are carefully unscrewed counterclockwise. New sockets are installed in their place and light bulbs are inserted. Respect the polarity and position the LED heads. They will have to be carefully ground off.
- Connect the power and check how the new backlight works.
- Reassemble step by step. Be sure to route the wiring to the board and carefully secure it to it. This way, the backlight components will not interfere with the reassembly process.
- Make sure the instrument panel arrows are positioned correctly. When trying to quickly complete a job, they often become deformed and bent.
- The backlight structure is fixed with screws.
- The power for the LEDs is connected to the power supply for the light bulbs, the arrows are put on and set to zero.
- Using the on-board computer, check the operation of each sensor and device. If the IDs are functioning correctly, return the instrument panel to its original condition. That is, assemble the entire assembly.
Popular faults
If we talk about the dashboard of VAZ 2109 cars, then they are characterized by certain problems. We will tell you about them, and also tell you how to act correctly in a given situation.
| Fault type | Your actions |
| Gasoline level and temperature indicator does not work | In most percent of cases, this situation occurs due to breakdown of devices, sensors of these devices, or an open circuit of the power supply. Therefore, first check the circuit for continuity, make sure that the fuses have not blown. If this is not the case, check whether the gas level and temperature sensors are working. Only if none of the actions allowed you to get rid of the breakdown, you can begin to replace the devices themselves. No options, the problem lies in them |
| When the fuel tank is full, the arrow points to zero | If you have worked on the fuel level sensor, the fault most likely lies with you. When manipulating this device, the float limiter is often knocked down. Either the limiter is installed incorrectly or adjusted, causing the resistor winding to end. To resolve the problem, remove the sensor and then adjust the limiter again |
| The fuel gauge needle regularly jumps and ends up at zero | Here, most likely, the resistor has weak contact with the current collector. Another possible option is that there is a break in the resistor. To resolve this situation, we recommend replacing the hot level sensor with a new measuring device |
| The fuel level lamp is constantly on | If this lamp is constantly on, there is probably a short circuit in the fuel level sensor supply wiring to ground. Another option is that the sensor’s flexible bus is shorted to the fuel intake pipe. You will have to disassemble the device to align the bus and get rid of the resulting short circuit |
| Indicator lamps do not work on the dashboard | There is a high probability that the light bulbs have simply burned out, or they are poorly held in their seats due to loose contact. Replace the bulbs, but first try tightening the contacts. Traces of oxidation may be detected. When cleaned, the light bulbs can work normally again. Also, do not exclude the possibility of wiring breakage or oxidation of the tips of the supply wiring. Try going over the wires with a tester, cleaning the contacts if necessary. |
| The speedometer does not work, the flexible shaft is noisy | In such a situation, you will have to change the speedometer drive cable or replace the entire speedometer assembly. But before you bother so much, check that the fastening nuts of the tips are tightened correctly and properly. The flexible shaft may make noise during operation due to deformation or violation of the permissible bending of the shell of less than 10 centimeters during installation |
Why install LEDs?
Of course, there are cars that don't need any modifications. But there are models, especially older ones, to which the hands themselves reach out to change and improve something. With the advent of LEDs, tuning possibilities have increased noticeably, and the replacement of old light bulbs on the dashboard with new LED lamps has become more active.
- LEDs are very small, which means they can easily be disguised and placed anywhere.
- They shine quite brightly, emitting pure beautiful colors - red, green, purple, yellow or blue, so you can settle on the one you like for whatever reason.
- They consume little energy.
The instrument buttons are illuminated using light bulbs with a regular base. If you need to illuminate several devices, then the LED bulb is placed in a special socket. To make it, you need to solder. You can also buy a ready-made light bulb mounted in a socket.
It should be noted that illumination can be done using light bulbs that provide a narrow beam of light, or using diffused lighting. In the first case, the illumination will be point-like, in the second, the angle of incidence of light will be wide. Dispersion is achieved using special lenses that are used in the lamp.
For buttons, it is better to use lamps with directional light, and the speedometer panel, for example, can be illuminated with a lamp with a large scattering angle.
Causes of malfunctions
There are a number of reasons why the instrument lighting of the VAZ 2114 may stop working correctly.
The most common of them are:
- light bulbs have burned out or diodes have failed (with LED backlighting);
- contacts and connectors have oxidized;
- fuses are blown;
- damage has occurred in the wiring itself;
- the integrity of the common contact board has been compromised;
- Lost contact with the “mass”.
Light bulbs in the instrument panel
In order to find out the exact cause, you will have to perform dismantling work and carry out diagnostics. You don’t need any complicated tools for this—it’s enough to have a simple tester (multimeter) or voltmeter.
Selection of light bulbs
Today the market offers a wide range of lamps that can be used for the dashboard of the VAZ 2114. Among the most well-proven devices, we note a few. Their name and cost are presented in the table.
| Manufacturer | Price |
| LED lamps Sho-Me SM-T5 (blue, white and red (Korea) | 80 rubles - pair |
| High Brightness SMD LED Module | 20 rubles |
| LED Sho-me SM-T5-cap-super (white) | 50 rubles |
| Osram and Philips halogen lamps | About 40-80 rubles per unit |
Hands illumination
The usual illumination of instrument needles is carried out as follows. The arrows are cleaned on three sides, namely, the paint is removed from the bottom and sides. These three surfaces are painted over with a white painter's touch, white nail polish, or just white paint. All this is done in order to increase the effect.
Next, take three LEDs, which must be soldered together in series. The resulting diagram is inserted into the dashboard. As a result, the hands glow with the bright light you choose.
You can make the backlight change depending on changes in instrument readings. There is one clever method suggested on the Internet. To do this, naturally, you will need three small LEDs of different colors (traditionally: blue, green, red).
First, remove the panel and drill holes in the places where the LEDs will be placed. The LEDs are installed in the holes and glued with transparent glue, being careful not to cover or damage the contacts. There should be three LEDs in a circle under each arrow in the order in which you want the arrows to light up.
Car dashboard backlight controller
I present a controller project for controlling the dashboard lighting in a car. The controller has the following functions:
- 1 single-color channel for illuminating the instrument panel scales
- 1 RGB channel with a common anode for illuminating the instrument panel arrows
- Smooth, two-stage ignition of arrows and scales
- Adjusting the brightness of the scale backlight (25 levels)
- Adjusting the color of the arrow backlight (150 colors)
- Saving brightness values to the non-volatile memory of the microcontroller
- Control the brightness and color of the backlight using an encoder with a button
- Maximum current for scale illumination 0.5 A
- Maximum current for each RGB channel 0.5 A
- Maximum supply voltage 15 V
Controller operation algorithm
After power is applied, the backlight of the scales immediately begins to light up smoothly to maximum brightness. Behind it, a smooth ignition of the arrow illumination begins, the color of the arrows at the first start is red, at subsequent starts - the last saved one. After the arrows are ignited, the scale illumination fades to the last saved level. During operation of the controller, by rotating the encoder, the brightness of the scale illumination or the color of the arrows is adjusted. By pressing the encoder button, the controlled channel is switched. When switching adjustment channels, the selected channel blinks twice. If adjustment of the color of the arrows is selected, and no action was performed for approximately two seconds, the controller automatically returns to adjusting the brightness of the scales, which will blink once. After approximately 4 seconds of inactivity, after any changes in brightness or color, the controller saves the settings to non-volatile memory, which retains the settings even when the battery is removed from the vehicle.
The heart of the device is the Atmega48 microcontroller in a TQFP32 package. The microcontroller is powered by a linear voltage stabilizer AMS1117 at 5 V. An assembly of Darlington transistor pairs ULN2003 is used as power switches. The microcontroller pins connected to the encoder are pulled up to VCC with 10 kOhm resistors. The Reset pin is also connected to VCC with a 10 kOhm resistor. The capacitors in the diagram are standard wiring for the microcontroller and stabilizer.
VAZ 2114 devices do not work
If on a VAZ-2114 car on the instrument panel none of the indicators installed on it work (speedometer, odometer, tachometer, fuel level and coolant temperature indicators), then the first thing the driver will have to do is check the integrity of fuse F3, which is located in the mounting block. If it has burned out, then before replacing it, you need to find the reason why it burned out, otherwise the newly installed new fuse will have the same fate as the previous one. Most often, fuses burn as a result of a short circuit.
Even if the fuse is intact, then do not be lazy to take it out and check the condition of the contacts. There are cases when the contacts oxidize, and the electrical circuit in this place is interrupted. After making sure that the fuse is intact, the next step is to check the ignition relay, which is located inside the car to the left of the steering column. It is attached to a pin upside down. In the block where this relay is inserted, you can try to short-circuit the power wires using a jumper. If the instrument panel comes to life, the ignition relay will have to be replaced.
If the ignition relay is working properly, there are only two possible reasons for the instrument panel not working: the ignition switch and the mounting block. Before installing the ignition relay on the VAZ-2109 car, the lock contacts burned quite often, and they had to be cleaned by disconnecting the contact group from the lock itself. After changes were made to the principle of supplying voltage to the ignition switch, its contacts began to burn very rarely, but the likelihood of this phenomenon still remained. On the mounting block, in its board, tracks may burn out; in order to see this, the mounting block will have to be removed from the car.
In addition to the reasons listed above, which can lead to failure of the instrument panel, it is also necessary to check the reliability of fastening the ground wire.
Share this article with your friends:
4 comments
Hello! Today, on the 14th, I changed the main lighting bulbs in the cabin and after that the instrument readings stopped showing readings of revolutions, speed, fuel level and fluid temperature... I replaced the F3 fuse as written on your website and everything began to show. But the lights still don’t light up in the cabin. Thank you!
the person clearly explained the problem +1 to him. I also accidentally shorted the interior lighting contacts.....
The car starts, but the instruments do not respond! + Turn signals and wipers do not work. The relay and front are normal. Give me some advice ;)
Why doesn't it light up?
- First, remove the cover of the mounting block and make sure that the fuse is intact. The fuse markings are located on the inner surface of the cover. You should look for fuse F16 or F5, depending on the year of manufacture of your VAZ 2109.
- If the fuse is intact, be sure to check whether the contacts of the fuse you are looking for have not oxidized. It is not uncommon for shields to fail due to broken contact.
- Check if there is power to the dashboard. To do this, you will need a warning light and the ignition on. Disconnect connector X4 in the mounting block and check for voltage at pin 3. The disadvantage of the VAZ 2109 design is that when it rains, the mounting block immediately becomes wet. This causes oxidation of the contacts in the pads, which causes the electrics to stop working. Sometimes not only the contact is oxidized, but also the board of the Nine mounting block.
If none of the above actions yielded results, you will have to be disappointed. After all, now you need to remove the dashboard and check the condition of the wiring, contacts, and negative connections. Here it is better to trust a professional electrician or set aside a whole day to troubleshoot problems yourself. There is no need to rush here.
Illuminated buttons and stove control console
Replacing the backlight of the stove control console is as follows. Remove the control knobs and the glass of the control unit. A reflector is made from foil, which must be fixed under the glass of the control unit. After this, unscrew the lower part of the console, where the socket with the old lamp is located. This lamp is replaced with an LED and everything is assembled in the reverse order. You can also stick an LED strip to the bottom of the block, and connect its contacts to the socket through wires. Just make sure that the polarity when connecting the devices is correct, otherwise the LEDs will not light up.
Replacing the backlighting of the buttons on the dashboard is even easier. The button must be removed from the panel and disassembled. There is a light bulb inside, which we change to an LED.
If necessary, you can get a light filter, or you can combine it with the color of the LED and get a new shade.
The dashboard lighting can be done using an LED strip. To do this, you need to remove the dashboard, remove the color filter (scrape it off or wipe it off with a solvent) and fix the LED strip around the perimeter inside. The terminals of the tape are connected to the light bulb socket. The arrows must be painted with something white to make them glow well.
Brightness control for LED backlighting of car instruments. Smooth LED ignition circuit.
Brightness control for LED backlighting of car instruments. Smooth LED ignition circuit.
Smooth ignition & Dimming of LEDs for car instrument lighting
Many car enthusiasts convert the backlighting of their car’s dashboard from conventional incandescent lamps to LEDs, and often, especially when using super-bright ones, the device shines like a Christmas tree and hurts the eyes with a bright glow, which requires the use of an additional device with which you can adjust the brightness level , as they say, to your taste. In general, there are two methods of regulation, this is analog regulation, which consists of changing the level of constant current of the LED, and PWM regulation, that is, periodically turning on and off the current through the LED for adjustable periods of time. With PWM control, the pulse frequency must be at least 200 Hz, otherwise the flickering of the LEDs will be noticeable to the eye. Below is a schematic diagram of the simplest block implemented on the NE555 timer chip, the domestic analogue of which is KR1006VI1; this chip generates pulse-width control signals.
The brightness level of the backlight is regulated by a variable resistor with a nominal value of 50 kOhm, that is, this resistor changes the duty cycle of the control pulses. An N-channel field-effect transistor IRFZ44N is used as a regulating element, which can be replaced, for example, with an IRF640 or similar.
There is probably no point in making a list of the elements used, there are not so many of them in the circuit, so let’s move on to looking at the printed circuit board.
List of sensors and signal indicators on the panel
The diagram shows a detailed layout of the devices present.
The instrument cluster on this car, as the instructions show, has the following sensors:
- Tachometer (for instant recording of the crankshaft speed).
- Motor control module malfunction indicator.
- Signal lamp indicating left turn is on.
- Indication of low oil pressure in the engine.
- ABS indicator lamp.
- Signal indicator of a malfunction in the immobilizer assembly.
- Symbol for indicating increased coolant temperature in the engine cooling circuit.
- A lamp indicating an emergency condition of the brake system components.
- Right turn indicator indication.
- Battery charge level indicator symbol.
- Speedometer (speed controller).
- Indication of directional stability.
- Indicator that the transmission is not allowed to move to the next stage.
- High beam symbol.
- Stern fog light indicator.
- Activated low beam lamp.
- Indicator that the front fog lights are on.
- Button for resetting the daily distance traveled.
- Route controller display.
- A lamp signaling the need to close the doors.
- Low fuel level indicator.
- Symbol of lack of required tire pressure.
- Fault lamp in the electric power steering system.
- Seat belt indicator.
- Indicator of breakdowns in the motor unit (infrequently used).
- Airbag integrity and serviceability indicator.
The dashboard will definitely tell you the following:
If, after starting the engine, the engine status indicator does not “disappear,” then this implies a malfunction in one of the components of the unit or its attachments.
Possible reasons
What to do in a situation where the instrument panel backlight on a VAZ-2110 car has disappeared? First of all, you should look for the reason why this malfunction occurred. Sometimes it can be identified immediately, but in some cases this process takes some time. In fact, there may be several reasons, so you will need to check everything methodically.
The most banal and simplest option is that someone turned the rheostat knob, which is responsible for the amount of light flux, all the way to the left.
This, by the way, is often the sin of children who are placed in the front seat. “Young drivers” love to turn all sorts of knobs, press buttons and switch levers. Perhaps the adults overlooked it, and the child “corrected” the dashboard lighting. The problem, as you understand, is solved by simply returning the rheostat knob to its previous position. Therefore, before you start looking for possible reasons for the sudden disappearance of the backlight, check this particular point.
I would like to remind you of one simple rule. In a situation where there may be several possible causes of failure, when searching you need to follow the path of least resistance. In other words, test the simplest assumptions first. You may be lucky and find the problem with minimal time and effort.
A few nuances
You can experiment with color, because some people like the red glow of devices, while others’ eyes are less tired of green. As you can see, replacing and installing the LEDs back into the dashboard is quite simple. Of course, a lot depends on the car model, but there are no fundamental differences:
- the instrument panel is removed and the old lamps that illuminated the instruments are removed;
- the color filter is erased;
- LEDs are installed (they are glued or soldered);
- the panel returns to its original place.
Some craftsmen advise taking a photo of the panel before removing it, so that later you know exactly what to return where. You can look at the instruction manual to figure out how the panel is secured and thereby speed up the disassembly process.
Knowing the desire of car enthusiasts to change the colors of instrument lighting, many companies began to produce sets of LEDs for the dashboard.
They are made with a base similar to T5 and are immediately designed for on-board network voltage. There are also light bulbs with different sockets that are suitable for foreign or domestic cars.
If you use ordinary LEDs, then for their uniform glow it is advisable to include a resistor (100-270 Ohms) and a stabilizer in the circuit. Otherwise, you may encounter the problem that your backlight noticeably changes its brightness and glows unevenly, and you will also extend the life of the LEDs.
Regulator circuit
For this scheme we will not need many parts.
Transistor T1. You can use KT819 with any letter. KT729. 2N5490. 2N6129. 2N6288. 2SD1761. BD293. BD663. BD705. BD709. BD953. These transistors need to be selected depending on how much LED power you plan to regulate. Depending on the power of the transistor, its price also depends.
Potentiometer R1 can be of any type with a resistance from three to twenty kilos. A three-kilo-ohm potentiometer will only slightly reduce the brightness of the LEDs. Ten kilo-ohms will reduce it to almost zero. Twenty – will adjust from the middle of the scale. Choose what suits you best.
If you use an LED strip, then you won’t have to bother with calculating the damping resistance (in the diagram R2 and R3) using formulas, because these resistances are already built into the strip during manufacture and all you need to do is connect it to a voltage of 12 volts. You just need to buy a tape specifically for 12 volts. If you connect a tape, then exclude resistances R2 and R3.
They also produce LED assemblies designed for 12 volt power supply, and LED bulbs for cars. In all these devices, quenching resistors or power drivers are built in during manufacture and are directly connected to the on-board network of the machine. If you are just taking your first steps in electronics, then it is better to use just such devices.
So, we have decided on the components of the circuit, it’s time to start assembling.
We screw the transistor onto a bolt to the cooling radiator through a heat-conducting insulating gasket (so that there is no electrical contact between the radiator and the vehicle's on-board network, in order to avoid a short circuit).
Cut the wire into pieces of the required length.
We strip the insulation and tin it with tin.
Clean the contacts of the LED strip.
Solder the wires to the tape.
We protect the exposed contacts with a glue gun.
We solder the wires to the transistor and insulate them with heat shrink casing.
We solder the wires to the potentiometer and insulate them with heat-shrinkable casing.
We assemble a circuit using a contact block.
We connect it to the battery and test it in different modes.