Fellow car enthusiasts, without a doubt, studying the design of the parking brake will not only be interesting, but also useful for everyone who has ever gotten or plans to get behind the wheel.
You probably know what you need to do to stop the car from moving and stand still - press the brake. If this is a short-term stop, then you can hold the pedal, but during a long stop, no one other than the handbrake will cope with such a task.
Not a single car can do without a handbrake, and it has been present on vehicles since the birth of the automobile industry itself.
How is a handbrake useful?
In fact, this type of brake does not always work with a handbrake. Depending on the origin and type of car, it can be activated by tightening the lever with your hand, pressing your foot, or a special button, which is why in the technical literature it is tolerantly called parking.
In addition to its main function - immobilizing the car during a long stop, it can be used as an emergency system in case of failure of the main brake. But this is not all the purpose of the hero of today’s article.
How else can it be useful? For example, the handbrake is indispensable when starting up a hill, and is also loved by enthusiasts of aggressive and extreme driving.
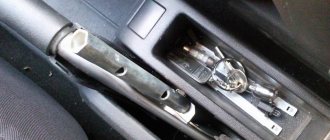
Contents of delivery
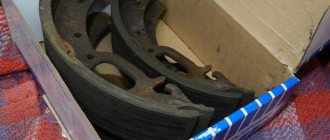
- Brake disc – 2 pcs.
- VAZ handbrake caliper assembled with pads – 2 pcs.
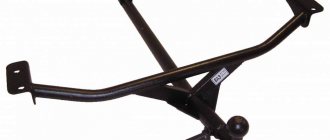
- VAZ caliper mounting bracket (faceplate) – 2 pcs.
- Brake disc protective shield – 2 pcs.
- Short rear brake hose for VAZ caliper – 2 pcs. The hoses are easy to install because... designed specifically for lifted cars and made without unnecessary adapters.
- Brake pipe 367 mm – 1 pc.
- Brake pipe 760 mm – 1 pc.
- Fasteners for civil brake calipers VAZ Patriot 2013 – 1 set.
- Hose mounting bracket – 2 pcs.
- Brake fluid – 1 pc.
- Packing: box + branded pencil case, instructions
Parking brake device: classic design
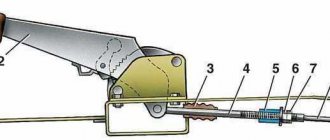
The classic of the parking brake genre is, of course, the mechanical design. It is familiar to owners of creations from the domestic automobile industry and foreign cars, so let’s look at its structure in more detail. It consists of the following parts:
- a hand lever or, less commonly, a foot pedal;
- cable system;
- rear wheel brakes.
The principle of operation of the system is quite simple. The lever, which in our case will be the usual manual one, is equipped with a ratcheting mechanism that reliably locks it in the raised or lowered position. When we lift it, the force on the brake mechanisms of the rear wheels (only they are connected to the handbrake) is transmitted through metal drive cables, of which there can be from one to three (usually three - the central one and two rear ones, connected through an equalizer, ensuring uniform distribution of forces on both mechanisms).
When stretched, the cables press the brake pads against the discs or drums - the car will not move anywhere. When we lower the lever, the tension of the cables weakens, the pads release the discs or drums and we can go.
Most easily from the point of view of engineering refinements, the above-mentioned scheme is implemented on drum brakes, which is why they have long remained and remain indispensable on the rear wheels of budget cars. All you need to do is equip the drum with an additional lever that transmits force from the handbrake cable.
Things are a little more complicated with disc brakes. The engineers had to work a little with them, and as a result, three options for connecting them to the handbrake appeared:
- screw mechanism;
- cam;
- drum
The first two types are typical for single-piston calipers. Their device is similar. In a screw circuit, the cable is connected through a special lever to a screw screwed into the disc caliper piston. When tensioned, the screw rotates and causes the piston to move, which presses the pad against the disc.
In the cam version, the piston is acted upon by a system of a cam and a pusher, which is connected to a cable through a lever. The drum variety is used in multi-piston disc brakes. Essentially, this is a separate drum-type brake mechanism, mounted on a disc and not connected to the main calipers and pads.
Advantages and disadvantages of GR
We have already noted that usually a hydraulic handbrake is installed when the drum brakes on the rear axle are replaced with disc-type devices. Before we talk about the pros and cons of hydraulic CT, let's talk about what the use of disc brakes gives:
- Drum brakes are subject to high heat, which leads to a decrease in stability over time. Disc mechanisms are cooled much more efficiently, so their characteristics are practically not subject to age-related changes - and this is considered one of the main advantages of brakes of this type;
- the second advantage emerges from the first - this is a reduction in the braking distance due to the higher efficiency of disc mechanisms. And increasing traffic safety is a very powerful argument given the ever-increasing density of traffic flow and speed on suburban highways;
- Structurally, disc brakes are more compact and noticeably lighter than their drum counterparts.
Other types of parking brakes
In addition to the classic mechanically driven handbrake, the parking brake device can also appear in other versions.
So, for example, modern cars increasingly receive a so-called electromechanical parking brake, which does not have a direct connection between the driver and the wheel mechanisms. It is turned on by a button, and the pads are tightened using electric motors.
Another version of the handbrake can be a hydraulic circuit, the so-called hydraulic handbrake. It is a hydraulic cylinder integrated into the main braking system, activated by a familiar lever in the cab.
True, in this case the overall reliability of the brakes decreases, because if you lose hydraulics (a broken line, for example), the handbrake will no longer help you stop.
Now about the unpleasant, about the shortcomings, that is, the disadvantages of this scheme:
1. If the “right front - left front” circuit fails, braking efficiency will be significantly reduced;
Agree, there are not so many shortcomings, and besides, they exist always and everywhere, but if you clearly measure the force using the handbrake handle of the car, braking is carried out very effectively and this fact has been personally verified in practice. However, a true lover of do-it-yourself tuning will never miss the chance to retrofit your car with a hydraulic handbrake , making it more advanced, as well as an excellent opportunity to gain invaluable experience and a lot of pleasure from the result.
Do-it-yourself installation of disc brakes on a VAZ 2108
1. Place a jack under the wheel and remove the wheel.
2. It is necessary to release the handbrake and remove the drums.
3. Using a hexagon, remove the hub assembly; for this it is better to use an extension with a deep head.
4. Remove the pads along with the springs.
5. Unscrew the bolts, then knock down the hub with the shield.
6. Next, unscrew the fitting, I bought an 8x10 Jonnesway wrench for this.
7. Plug the tube, then use heavy blows to knock the shield off the beam.
8. Install a new shield and faceplate between the hub and the beam.
9. It’s better to try it all on the removed hub, since you may not have enough free space and then you’ll have to remove everything back, which takes time. In my case, the camber plate took away the entire protrusion that remained on the centering support ring on the back of the hub. The good news is that the length of the bolts that were included in the kit is sufficient to install all the elements.
10. Take sandpaper or a metal brush and go over all the mating planes of the hub and beam.
11. Then fasten it all using the new bolts from the kit.
12. Secure the caliper guide bracket using spacers, then check the clearance and install the disc.
13. The installation of the caliper, as well as the brake pads, was pleasantly pleasing, everything was as it should be, no problems arose, they are attached to the pins using a thread lock, in short, everything is as written in the instructions for the brake pad.
14. Secure the new “ear” of the handbrake cable fastening to the beam using a special clamp from the ZDT kit, then properly lubricate the cable spring.
15. Pull the cable through the caliper bracket and mount, then put on the protective rubber boot (it should fit very tightly).
16. The second “ear” must be placed in a different place on the beam and secured with a larger clamp.
17. Using a “banjo bolt” lined with copper washers, connect the brake hose to the caliper, directing the other end of the hose to the “ear” on the beam.
18. Bend the brake pipe into a spiral and connect it to the hose.
Now we can assume that you have rear disc brakes on one side :-). Do the same thing on the other side, things will go much faster, believe me, His Majesty “experience” will play a big role here.
Necessary materials
If you decide to install the HTD yourself, then you will need the following materials:
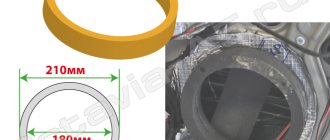
- Directly disc brakes, machined under the hub by 0.6 cm. The diameter of the disk should be 24 cm. Please note that it is not necessary to grind the disk itself. If you want to leave it unchanged, then you need to groove the hub.
- Front calipers and hoses.
- Faceplates necessary for attaching calipers. You will have to tinker with this part, since it is quite unusual and requires separate manufacturing to the exact dimensions.
- High quality pads that fit true to size.
- 12 bolts M10 × 1.25 with groovers.
- 8 spacers. You can use timing belt tensioner roller washers for the VAZ-2108.
When you have acquired all the necessary materials, it’s time to proceed directly to the replacement. The procedure is performed in several stages.
The main purpose
You can install and configure a hydraulic handbrake on a VAZ-2109 yourself if you have certain skills and tools. Despite the prohibitions, such designs can be found on sale and can be installed on any make and model of car. It is advisable to carry out all work on an inspection pit or a lift. With the help of a hydraulic handbrake you can greatly increase the efficiency of the braking system. The design provides for a regulator that allows you to distribute the force between the front and rear circuits. The regulator allows you to prevent complete blocking of the rear wheels.
Bleeding and adjustment
After any manipulations with the brake system (it doesn’t matter whether you repaired the rear, front or parking), on a VAZ 2110 it is vitally important to bleed the brakes so that an air plug does not form anywhere in them, which can negate the ability to brake at the right moment.
It is convenient to do this together, but you can do it yourself, although this requires some additional equipment. Many people know how to bleed the brakes on a VAZ 2110. The main thing is not to forget to do this diagonally, always starting with the front wheels, and pump the right one first.
After bleeding, you still need to check the braking forces. This requires an outside observer. You accelerate and brake sharply, and he watches as the brakes apply. The front ones should work first, then (with a small gap) the rear ones, and the braking force should be greater for the front ones.
What can a hydraulic handbrake do?
Using this design of the handbrake, you can completely block the rear wheels in order to warm up the tires on the front axle. This will prove useful for racing enthusiasts. Ordinary drivers will find the lock useful in reducing the chance of skidding when turning on wet roads. The device is installed near the handbrake lever so that it can be easily accessed. If the regulator is installed correctly, the force on the rear brake will be distributed smoothly, and the efficiency of the front will increase.
Minuses
Replacing brakes with disc brakes was not without the famous “fly in the ointment,” although it rather concerns precisely those problems that their installation can cause.
Firstly, our law enforcement agencies consider their installation on a VAZ 2110 as a design change.
What might this entail?
Following:
- Fine when passing a technical inspection;
- You can be simply wrong in a controversial accident if traffic police officers emphasize that you have “wrong” brakes;
- And the insurance company may also consider this a reason for non-payment of insurance.
Secondly, the handbrake will additionally need to be modified - or replaced with a hydraulic handbrake, although the latter weakens over time.
An article containing step-by-step instructions for replacing the handbrake cable can be found here:
Thirdly, it is necessary to refine or carefully adjust the sorcerer so that on the VAZ 2110 the rear wheels do not brake more than the front ones, as this will certainly cause a skid, especially on ice or wet asphalt. To do this, sometimes you even have to grind down the pads by a quarter, or even more.
Hydraulic hand brake kit
In automobile stores you can purchase a hydraulic handbrake kit. You can install it yourself, but you will need a few additional elements:
- Copper washers for brake mechanisms, 10 pcs.
- Metal tubes in the amount of 5 pcs. To save a little, you can purchase a complete set for Gazelle cars.
- Plugs.
- Twists.
- Brake hoses for VAZ-2101-2107.
- Tee for the brake system.
- Plastic clamps, 50 pcs.
- Brake regulator for VAZ cars of any model.
- GTZ for VAZ-2101. If this is not the case, then you can use any other cylinder.
In addition to all this, you will need brake fluid for subsequent refilling of the system. After all, the modification includes inserting an additional circuit into the brake lines.
We lay the brake line into the interior.
Using the technical hole in the speedometer drive cable, it is necessary to extend the brake pipe into the interior. It must be bent in such a way that it does not touch anything in the engine compartment, then connect it to the GTZ. Using the previously prepared “twist”, you need to lengthen the line using an additional metal brake pipe; a regulator will be installed at the place of twist a little later.
Preparatory work
Before starting tuning, you need to get rid of the old, imperfect system. To do this, the mechanical drive is completely dismantled. Please note that after installing the hydraulic handbrake, the operation pattern of the caliper drive will completely change. If by default the mechanisms worked in pairs, which are located on wheels located diagonally, then after the modification the circuit will turn out to be axial (rear and front). But before installing the hydraulic handbrake, you need to remove the old one.
Feel
At first, everything was somehow unusual - pedal travel, force, braking, calculation of force, and so on... I was very pleased that now the parking brake was not “dead”, as it was before, now by pulling it, it was possible to adjust the force, thus stopping the “eight” in various ways, as they say in their own way. The hydraulic handbrake perfectly fulfills its direct duty - it holds the car in place on an incline. Since that day, I “forgot” what overbraking is, braking is carried out very intelligently and the wheels of the rear axle, in the event of emergency braking, are blocked a little later than the front ones. I haven’t done any “somersaults” or tricks with the new braking system yet, it’s a little scary, I’m not used to it yet, and besides, the experts advised not to take risks yet, but just get used to the new braking system and its operation.
That's all for me, I hope that my story in detail will be useful for someone, and someone, following my example, will install a VAZ hydraulic parking brake for themselves. I look forward to your comments and thoughts regarding the above.
How to remove the handbrake cable
To dismantle the old handbrake you will need to perform several steps:
- Place the car on an overpass, inspection hole or lift. It all depends on what amenities you have. If there are no such amenities, then it is better not to even start doing the work.
- Raise the rear of the car with a jack, having previously installed stops under the front wheels.
- Install supports under the rear beam.
- Since the hydraulic handbrake can also be installed with drum brakes, the design does not need to be changed much. Remove the wheels and drums from the rear axle.
- To avoid interference, remove the resonator and muffler.
- Remove the equalizer from the rod.
- Dismantle the cable by removing it from the blocks on both wheels.
- Now you need to perform several manipulations inside the car. Open access to the handbrake lever and unscrew the fasteners. Then remove it completely from its seat.
Now you can begin installing the new system; to do this, you can use one of two popular methods.
Stage 1. Removal of the PTA
First of all, you need to remove the wheel. After this, you need to loosen the handbrake cable and bring the pads together. The guide pins are unscrewed using a 12mm wrench.
If the car is old or the brakes have not been changed for a long time, it is recommended to treat the seats with a wire brush, and also lubricate all running surfaces with WD40. This will help you remove the brake drum without much effort.
Please note that even if the drum is tight, you need to remove it gradually, gently tapping it with a hammer along the entire circumference. If you do not want to damage the part, then use a hammer with a rubber tip or a rubber gasket.
Next, remove the tension spring and guides by prying them off with a screwdriver. After this, the brake pad needs to be lifted up, the spacer bar removed and the pad and tension spring removed.
To remove the second block, you need to remove the handbrake lever from the cable. The bolts that secure the hub to the beam should be treated with WD 40 and unscrewed with a split or regular 17 wrench.
At the last stage, the brake tube of the hub is dismantled. After this, you can begin installing the HCD.
Installation method No. 1
According to experts, there are two ways to install a hydraulic handbrake on a VAZ. The simplest and most accessible involves performing the following manipulations:
- Another brake cylinder must be installed in the engine compartment. The clutch master cylinder from a VAZ-2101 is ideal.
- Remove the brake fluid expansion tank.
- You will need to make a small adapter yourself. Cut the thread and install the washer (it should have a thread for the fitting).
You begin assembling the entire system from the original GTZ to the clutch cylinder, then to the regulator, handbrake, and rear brake circuit. To connect all the components together, use tubes from the Gazelle car. Just choose those that fit in size. The tubes are fastened to the places where the handbrake cable was fixed.
Description of the spare part
Found a product cheaper in another store? Let us know, we will quickly check the information and compensate for the difference when purchasing online. Conditions
Article: 3163-3502010/11-30 (soup VAZ-2112 with handbrake)
Product size in packaging (mm): 225x500x420 Weight, kg: 29 kg
- The kits use only original components. No refurbished parts!
- GAZ and VAZ disc brake kits with calipers are inexpensive, reliable, easy to install and maintain.
Installed to replace standard rear drum brakes
Reviews Drive2
Step-by-step installation of Drive2. Nuances
Installed under standard wheels of UAZ 3163 Patriot after 2013, UAZ 23632 Pickup, except UAZ Patriot “Classic” equipment with handbrake on transfer case
“Autogur73” is the only company in the country that officially supplies this product. Unlike the counterfeits found, the kit has a patent and a certificate of conformity for this invention of disc brakes for UAZ cars and a complete package of necessary components for installation.
Sets of front and rear disc brakes for UAZ 2206, 3962, 3151, 3163, 2360, 2363, 3303, 3741, 3909 vehicles and their modifications are produced according to the manufacturer’s technological regulations.
Completion of work using the second method
When carrying out repairs, try not to allow the hose to become twisted. This may cause damage and fluid leakage. First you need to tighten the edge on which the thread is external. Then the edge with the internal thread is tightened. How to make a hydraulic handbrake yourself? The final stage looks like this:
- Fix the position of the new system, check the tightness of all threaded connections.
- Fill the expansion tank with brake fluid.
- Bleed the system according to the scheme from the far cylinder to the near one. Add fluid to the reservoir in a timely manner. Otherwise, pumping will need to be done again.
- Check the functionality of the brake system. Are the calipers pressed out normally?
Afterwards, assemble all the disassembled components and replace the wheels. Before your first ride, make sure the brakes work properly. If there are problems, fix them immediately. When driving for the first time, do not accelerate to high speed so that you can at least stop the car with the engine. All of the above methods are suitable for installing a hydraulic handbrake with your own hands on a VAZ of any model, as well as on cars from other manufacturers (including foreign ones).
pros
Let's look at why disc brakes are better than drum brakes:
- Braking becomes more reliable, braking distance is reduced;
- Braking forces are distributed more evenly, given that the VAZ 2110 is a front-wheel drive car;
- There is an effect of faster response after pressing the pedal;
- Unsprung masses are reduced;
- Heat dissipation occurs better, which is especially important when driving on a mountain road or during active acceleration/braking. For this reason, the brake system is cooled better;
- Disk ones are much easier to dismantle and replace;
- There is no need to adjust the handbrake after each repair of the rear brakes, although this will have to be done the first time;
- They do not freeze in winter after washing, like drum ones;
- Rear disc brakes installed on the VAZ 2110 are much more convenient to control and promptly notice pad wear.
This article will help you replace the rear brake pads if they are worn out:
Cost of tuning
Now is the time to draw up a detailed estimate for the spare parts used during tuning of the brake system. The price of all components may vary, depending on whether you are purchasing new or used. Approximate cost:
- Hydraulic brake assembly - cost about 2,700 rubles. You can also find cheap Chinese copies, but decide for yourself whether you should trust them. The quality of such products is very often low.
- Regulator – 400-500 rubles.
- Brake pipes for a Gazelle car – 300-400 rubles.
- Clutch cylinder (main) for classics - about 450-500 rubles.
- And small consumables - copper washers, plastic clamps, VAZ-2101 brake hose, fluid - you will spend about 500-600 rubles on everything.
By conservative standards, the cost of tuning will cost about 5,000 rubles. If this is too much for you, then abandon this idea and simply install a new handbrake cable instead of the stretched old one. Before starting work, it is recommended that you familiarize yourself with the advice of specialists and communicate with those who have already done similar work. They will be able to give you a lot of practical advice regarding improving the brake system on a particular car.
The next stage is routing the line to the rear calipers.
The wiring is carried out using internal technological holes above the rear beam.
Next, you will have to modify the hole using a drill, using a countersink, drill it to the desired diameter, and then insert the brake hose into the hole.
Now carefully insert the rubber ring, having first cut it on one side according to the principle of the front pillar.
Lay the brake hose into the resulting cut. This protection will help prevent cuts or abrasions on the body. The hose should be connected to the brake line.
Using a bolt under the car, screw a tee through the hole to the brake hose through copper washers. Connect the two remaining brake pipes to it on both sides. Using plastic clamps, secure the structure and seal the new brake system with calipers.
Do you need rear disc brakes?
The answer is ambiguous, since disc brakes have clear advantages over drum brakes. If you are already tuning the system, then do not be lazy and install discs on the rear axle. Their advantages are even in the smallest details - replacing pads is much easier than on drum pads (and the cost of the set is lower). Wheels from the 2109 model are ideal for the rear wheels of front-wheel drive VAZ cars. There are minimal alterations, everything becomes as if it were “original.” But if your budget for tuning is limited, then you can use a standard system. Drum brakes work relatively well, and the use of hydraulics will forever eliminate the need to tighten the cable. And the car will stand normally on any slope without rolling down.
Lada 2106 › Logbook › Installation of an HTD on a classic 2101-2107
Well, I don’t think it makes sense to talk about the advantages of disc brakes and why they are needed) Personally, I was not happy with the “classic” brakes from the beginning! When studying the issue (what and how to install), the choice fell on the front brakes of the VAZ 2108, for my purposes they are enough for the eyes!
I will provide a list of spare parts and modifications that will be required for installation at the end of the logbook!
Our initial task is to remove the axle shafts (there won’t be any problems with this; we know how to break them))
Remove the drum, unscrew it and remove the axle shaft!
As you can see in the photo, one drum turned out to have character, but an angle grinder and a sledgehammer have never broken anything like that!
Now we have removed everything (rear brakes, brake pipes along the tee, axle shafts, handbrake (dismantled the whole one, including the sales handle)) from the entire list we only need axle shafts!
Well, now the most difficult thing for most users)) is turning the axle shaft) The problem is that the brake. The disc just won't fit on the axle shaft!
My groove is a whole story that lasted 2 weeks) The first turner broke 2 cutters and, to put it mildly, sent me away) the second turner just sharpened for 2 weeks and did not sharpen them to the end, and the third turned out to be a Soviet-trained old man and did everything for 200 rubles right in front of me!
If you have a good turner (I only got one later))) then there are no problems at all!
I immediately changed the bearings, seals and made studs (the right thing). I made the studs as follows: I bought old-style 2108 head bolts and nuts from the Niva, all 8 pieces each!
Blank for hairpins! Leave everything as it should be, scald it, saw it off!
This is what the finished axle shaft looks like
We've done everything with the axle shafts, now we need a faceplate! There are a lot of drawings on the Internet for different calipers, I just went to the southern port and bought
Well, all the spare parts are ready, and you can start assembling!
We wash everything and change the oil seal!
We put on the faceplate and screw the axle shaft to its rightful place! I used standard bolts (some are missing them)
We install the brake disc, caliper and make sure that the disc does not rest against the caliper. My disc rested against the caliper and I had to make a 5mm spacer (I made them from standard spacers for the front wheels)
They machined it in the same way as the axle shaft
Simple assembly follows
Install the bracket and caliper
We use the following pipes - on the left side we put the pipe from the front brakes of the classic (which is short, between the cylinders) and on the right we put the pipe that goes to the left side (you can see them in the photo) and standard hoses from 2108
Here are the tubes and hoses. I bent the tubes where they needed to be and attached them to the bridge with plastic ties! Let's bleed the brakes and we're ready to have an HDT on the classic!
List of required spare parts: -Pipes (seen in the photo) -Hoses (stock before 2108) -Calipers 2108 -Disks (stock 2108) -Padders (Ferodo 2108) -Wheel studs -Plant washer (ABTechnic) -Mound axle shafts -5mm spacers (turned -Well, a bunch of small things (brake fluid, gearbox oil, repair kits for axle shafts, bolts and other crap) Budget is about 5 thousand rubles, you can do it much cheaper!
The problems I encountered: 1) It took a long time to sharpen the axle shafts 2) The disk rested against the bracket (I was making a spacer)
Ideally, buy a second set of axle shafts and swap everything in 1 day! This system is without a handbrake (I use the car every day, there are no problems) Question about the balance of the brakes - yes, the rear brakes really do over-braking (set the adjuster or swap of the front brakes to 2112)
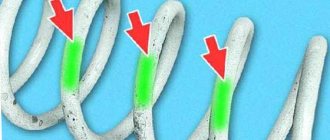
The handbrake pads are frozen to the disc
Most often, the handbrake is placed on the rear axle of the car. You can check as follows:
- Release the handbrake, select a gear on the gearbox, and move off smoothly. You need to feel if there is resistance when the car moves.
- If it is not clear, then get out of the car and see whether the rear handbrake pads have released or not. To do this, look at the track from the rear wheels. If they are blocked, they will not spin. The trail will be different from others.
- Try using the handbrake - namely, raising it up and lowering it all the way several times. Then repeat attempts to move off smoothly. As a rule, such a design of the handbrake will help against freezing.
- If all else fails, then you can drive 100 meters with sudden stops and use the brakes. When there is no result, it is better to use the tips above, for example, knock on the rear brake drum or pour hot water on it.
- In the future, to prevent freezing of the handbrake, you need to set it in winter to one “click”, i.e. do not tighten too much.
As a visual example, the video shows how to properly unlock frozen brake pads of a handbrake and get out of a difficult situation:
Repair
So, use a flat screwdriver to remove the boot from the caliper mechanism and inspect the piston surface. If there are traces of rust, it is recommended to completely replace the caliper mechanism. Because rust leads to damage to the mirror of the cylinder walls. Replacing the cuffs is accompanied by removing the piston. There are three methods with their own disadvantages and advantages. Method one: remove the piston without removing the mechanism. If it is known for certain that removing the piston to replace the rubber seals is inevitable, this can be done on the axle. After the caliper mechanism is removed from the bracket, the assistant should smoothly press the pedal. This way we will achieve an increase in pressure in the brake system, which will push out the piston. After squeezing it out, the assistant releases the brake. Advantages: the piston is easily removed. Disadvantages: inconvenient operation process and large loss of brakes.
A few words about lubrication, brake fluids and quality of work.
Like any part of a car, calipers require the use of lubricants and replacement of working fluids. And it is desirable that any intervention in mechanisms occurs only under the guidance of a person who understands what he is doing and how he is doing it.
Unfortunately, very common mistakes when repairing calipers are the use of “copper” grease or other non-specialized lubricants, as well as rarely replacing the brake fluid.
A specialized service recommends using only special silicone lubricants - SILICOT, MS Sport or ATE. It's easier with brake fluid - it needs to be changed every three years. Even doubling the replacement interval in our climate may not lead to catastrophic consequences, but it can seriously harm the entire braking system, including the ABS unit.
Rebuilding calipers with the help of the first car service that comes along is also a risky undertaking: they will most likely be able to simply replace the rubber bands/guides and, perhaps, will not even pour in the copper, but they are unlikely to bother with selecting pistons of the required size group, replacing the fittings, and even more so with complete cleaning body and geometry check. For serious repairs of aged calipers, it is still worth using a specialized service, despite the fact that many of them have one, which costs no more than regular repairs.
The editors of the “Engine” magazine express their gratitude personally to Dmitry Orlov for his help in preparing the material.