Attention, before installing the balls, lubricate them with CV joint or grease under the rubber, which is included when purchasing a pair of balls, otherwise they may soon squeak!
They were changed about a couple of years ago. Then I made the replacement with my brother. I remember we had a terrible time with him. This time I did everything myself. I decided to describe in detail how to do what. We will need: - a wrench - a pipe - heads for 19, 17, 13 - mounting (crowbar) - a jack - a bolt After you have raised the car, put something under the wheels to prevent it from rolling, unscrewed the wheel and placed it under the car, you can start working on the ball ones themselves. First we unscrewed the nut to 19.
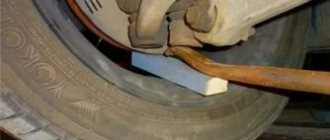
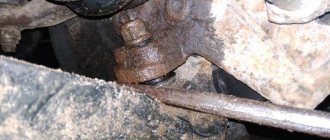
If there is a puller, then completely, if there is none, then half. If there is no puller, then insert a crowbar between the lower lever and the ball, press down and tap with a hammer at the place of the lever where the ball pin is inserted.
After you have been able to tear off the support, unscrew the bolts to 17 (2 pcs).
Then pull the lever down and take out the ball. If you are not too strong, then it would be best to unscrew the stabilizer from the body. But there is a chance that the studs will break off after you start tightening the stub. But with the stabilizer unscrewed, it is easier to pull the lever down and pull out the ball joint.
But, as I progressed, I found another way out of this situation! We simply take and place something solid under the brake disc (bars, bricks, blocks, etc.). I used the boards that cover the hole in the garage. Then we lower the car. As a result, the hub rises and the lower arm will move away from it, and you can easily get the ball joint.
You can also lift the disk with a second jack, but this is dangerous; the jack may come off. Be careful, don't rush! I tore a new boot on the ball.
But installing the ball this way is difficult! It’s still easier to unscrew the stabilizer from the body. It’s easier and you’ll save a lot of time (if you don’t break the stub studs). Reassemble everything in reverse order.
Now a few words about how I steamed with the stub. I unscrewed it, but it’s not enough to put the power back on. It's about to break! Then we take what can be placed under the brake disc. Again I used boards. We line it up longitudinally under the car (as the engine stands) and use a crowbar to pull the stub mount up and try to get into the studs.
It is better to start with the stud that is closer to the rear of the car. We tighten the nut, and the other fastener will be pulled into place.
We unfold the crowbar and tighten the fastening on the other side and again screw on the other stabilizer nut.
I also want to add 1 more method, which is the simplest. To make it easiest to put the stabilizer back, you simply lower the car from the jack with the wheels screwed on. It will fall into place on its own and you can easily screw it on without additional tools.
Replacing ball joints for VAZ 2114
It is no secret that a car owner must carefully monitor the condition of his vehicle. This also applies to ball joints. If you do not keep track of their failure and continue to drive a car with defective elements, this can lead to serious consequences. A faulty ball joint causes the wheel to simply fly off and the car to become uncontrollable. It is hardly worth describing further what could happen.
We don’t want to scare you, but simply encourage you to keep an eye on the supports on your car. The procedure for replacing a ball joint on a VAZ 2114 is quite simple; you do not need any special skills. Of course, experience in car repair will only benefit you, as it will allow you to get the job done faster and even better than some auto repair shops.
Recommendations for suspension maintenance and increasing the service life of mechanisms
- purchase spare parts and components exclusively from certified points of sale, dealers, and official representative offices;
- do not buy parts when their cost is uncharacteristically low, which indicates a fake, not original;
- take a moderate driving style as a rule;
- Operate primarily at medium speeds in the range of 80 – 95 km/h. This will increase the total resource of nodes by 15 - 20%;
- If you do not have personal experience in servicing, use the services of proven service stations and auto repair shops, where they provide a quality guarantee for the work performed.
Take a comprehensive approach to diagnosing and repairing breakdowns, replace all worn-out elements and components. Use handicraft services to a lesser extent. In order to prevent sudden breakdowns, conduct a quick inspection of the VAZ 2114 every day, check the levels of oil, antifreeze, and washer fluid in the washer reservoir.
Symptoms of a problem
Of course, replacing the ball joint on a VAZ 2114 is required when this element is in a faulty condition. But how can we determine this?
There are several characteristic signs that the support has given up its life, so it needs to be replaced with a new one in the very near future:
- When driving on a road with slight irregularities and at low speeds, a characteristic noise is observed - knocking;
- There is a squeaking sound when turning. Some people confuse it with a crunching sound when driving. It's not the same thing;
- Tires wear unevenly;
- When driving in a straight line, the car seems to wobble, although you do not perform any manipulations with the steering wheel.
But these are rather symptoms that cannot always give a clear answer. In this regard, we recommend using a more thorough method that allows you to really understand the state of the ball joint at the moment:
- To do this, hang the wheel using a jack. Of course, lift the wheel whose support you want to verify is faulty.
- The pry bar is inserted between the lever and the steering knuckle in the support area. Make several up and down movements with the pry bar.
- With such manipulations, a knock may occur. You can even feel it.
- Such phenomena indicate that the ball joint has become unusable, so it urgently needs to be replaced.
Is it possible to drive with a broken ball joint?
Many car enthusiasts who are faced with a similar problem for the first time are interested in the question: if the ball joint is knocking, is it possible to drive with such a breakdown? The answer depends on the degree of wear and damage of the specified unit. If the knocking noise from the ball joint while driving has just appeared and the car is not yet “driving” on the road, it does not knock when turning, that is, there are only early signs, then you can still drive such a car. However, make sure that the driving speed is not high, and also try to avoid potholes and uneven surfaces. And, of course, you still need to think about the upcoming renovation. After all, the sooner it is done, the cheaper it will be, firstly, and secondly, the car can be operated safely!
If the breakdown of the ball joint has already reached such an extent that the car “fidgets” on the road and the knock of the ball joint while driving is clearly audible, then it is better to refuse to operate such a car until repairs are carried out. As a last resort, you can drive it at low speed and following the rules of safe driving to a car service center or garage, where you will have to replace it (usually the ball joint cannot be repaired and is only replaced with a new one).
Source
Replacement procedure
So, your ball joint can no longer perform its direct duties, so it needs to be replaced. Now let's talk about how exactly such repairs are carried out.
To get started, arm yourself with a set of tools and materials, which includes:
- Shoes;
- Dry rags;
- Set of heads;
- Set of spanners;
- Jack;
- Litol lubricant (can be replaced with graphite lubricant);
- New ball joints;
- Carrying with a light (required if the garage is dark or repairs last until the evening).
Now you can proceed directly to the repair. Here it is important to follow a certain sequence of your actions. It will allow you to avoid common mistakes, as well as correctly assemble the unit back after replacing the old supports.
- Drive into the inspection hole or lift the car using a lift. Since we are talking about do-it-yourself repairs, it is unlikely that you will have your own lift. Therefore, a simple inspection hole will do.
- Stop the engine, set the handbrake all the way and block the wheels using the wheel chocks.
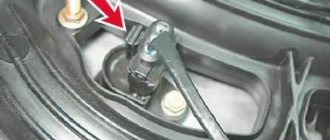
- Get under the car and use spanner wrenches to unscrew the fixing bolt of the support pin located on the hub.
- Use a pry bar to very carefully remove the support from its installation location.
- Using a 17 mm spanner, unscrew the two bolts from the bracket. They mark the fastening of the lower part of the support to the found bracket.
- Essentially, the ball joint from your car can now fall to the floor. This is quite normal, but just take care of your feet.
- Remember that ball joints are exclusively disposable elements of the car. This indicates the impossibility of repairing it under any circumstances. Any advice on this matter will be a waste of your time. Just buy new supports and that's it.
- Get rid of the old support.
- At the same time, it would be a good idea to check the brake pads and their current condition. If you find signs of a malfunction, be sure to simultaneously replace the pads.
- Inspect the bracket. If it is intact and has no signs of wear, then leave it in place. If the condition is suspicious, it is better to replace it. This also applies to silent blocks. They can also wear out and produce a characteristic knocking noise when the car is moving. Therefore, it would not be superfluous to replace this element, since you have already disassembled the unit.
- Treat the tip seat of your hub with lubricant, which will make it much easier to remove the element during the repair process in the future.
- Place the new ball joint in place of the old ball joint.
- Reassemble the unit in reverse order and check the car in action.
- If the car behaves quietly when driving over uneven surfaces, you have correctly identified the cause of the noise, and also managed to correctly replace the ball joint.
Installation
Step by step steps:
- Under the boot of the purchased product, if it is not secured, place a little special long-fiber lubricant for ball joints, although ordinary multifunctional ones also work well.
Put grease under the boot
- In closed samples with a non-removable boot, the lubricant is already present in the required quantity.
Installing a new part will not cause any difficulties. You just need to make sure that the housing bolts and the pin nut are tightened to the nominal torque, for which it is advisable to have a torque wrench.
Advice from experienced motorists
Every car owner becomes more literate, understands more about his own and other cars, and can carry out repairs with his own hands as he gains experience.
Some repair work involves disassembling certain components. And the ball joint is no exception. Experienced motorists give some practical advice on this matter, with the help of which you can kill two or even more birds with one stone.
- Inspect the condition of the entire underbody once you have climbed under the car.
- Check the quality of the cable tension from the handbrake, and also make sure that the cable itself is intact.
- Check the car for oil, lubricant, and coolant leaks.
- Make sure the sump and engine crankcase protection are intact.
- Check each unit for mechanical damage, cracks, and chips.
- Inspect the tensioner nut from the steering column. It has to be pulled up periodically. Once you are under the car, this is a good time to do this kind of work.
- Look into the transmission structure to make sure the transmission oil is at the correct level.
Of course, no one forces you to carry out all these related checks and preventative work. But think about who needs this in the first place? Of course you. This is your car, the integrity, serviceability and efficiency of which are your personal interest.
Plus, any independent repair, each small inspection is a coin into your own treasury of personal experience. With it you can perform much more complex procedures than replacing a ball joint.
Don't forget one more important point . Self-repair of many components means saving the family budget. With the money you save, you can take your family somewhere or buy something useful for your home. Or purchase a set of new high-quality tires, wheels, and do some tuning work. Indeed, technically, thanks to your efforts, the car is in excellent condition.
Choice
When choosing a new ball joint (BJ) for replacement, focus on several basic criteria.
Selection criterion
Peculiarities
Today there are a lot of manufacturers of ball joints. But not all of them produce truly high-quality parts. That’s why car owners have identified certain companies for themselves. For owners of the VAZ 2109, it is worth paying attention to the manufacturing company Trek.
A loud, well-known name of the ball joint manufacturer is not a guarantee of quality. There are a lot of fakes on the market now. To find the original, visit the official websites of trusted companies, learn about the features of the original packaging, the nuances of protection that allow you to distinguish fakes
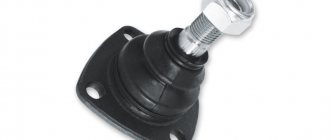
There should be no signs of damage, wear or defects on the ball body. High-quality SHOs are always welded from two elements
If you notice that the ball joint pin is painted black, there is nothing good about it. A high-quality finger is also black, but it gets this color as a result of hardening the metal under high temperature. Also try rotating your finger. If you managed to do this without a knob, this is a low quality product.
Responsible manufacturers, in addition to the SHO itself, complete the parts with nuts, bolts and boot
Make sure there is no damage, signs of wear, or other defects.
The mounting bolts must be hardened. If the bolt is yellow, its quality will most likely be terrible.
Must have a Teflon insert or cotter pin. Plus look into your finger - there should be a through hole
Often the inside of the ball joint is lubricated at the factory, but practice shows that this amount of lubricant is not enough, so when replacing you must have a little more lubricant on hand
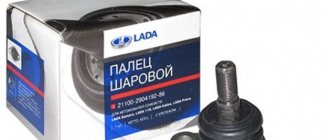
Brand new set
Signs of a faulty ball joint VAZ 2114, 2109.
If, while driving over bumps or small irregularities, you hear a knocking sound in the front suspension of a VAZ 2109, 2114, then this is a reason to start looking for a fault! There are two ways to check the ball joint of a VAZ 2109 - 2114 for a malfunction.
The first method does not require an inspection hole, but a jack is required. We hang the front wheel on a jack and sharply pull it toward and away from us. If the ball joint is faulty, it will make a sound and the wheel will have play.
If you have a garage with an inspection hole or overpass, then inspect the ball joint boots for damage. If the boot is torn, this is a sign of wear on the ball joint of the VAZ 2114 and it is better to replace such a ball joint even if it does not knock yet. Place a crowbar or pry bar between the ball and lever. Place one end on the lever and the other on the bolt or ball housing and try to move them apart. For convenience, you can turn the steering wheel towards the wheel being tested. If there is play, the ball must be replaced.
Many people wonder: can a ball joint fly out on a VAZ 2109? Answer: Yes! Maybe! Therefore, if there are signs of a malfunction of this part, do not delay repairs. Moreover, it is not difficult. Next, I will tell you how to replace the VAZ 2109 - 2114 ball joint with your own hands.
How to check the serviceability of the lower ball joint
You can check the lower balls in the same way as in the case of the upper ones, but the result will be much more effective if you use a pry bar and install the machine on an overpass or lift. It is necessary to insert the assembly between the trunnion and the lever to unload the ball joint and check the possibility of its movement. The following test methods are suitable for testing a single lever system.
Checking lower ball joints on a lift
Checking the ball video instructions
So, to check the lower ball in a single-link suspension system, you need to use a jack and a pry bar. It is advisable to drive the car onto an overpass (inspection hole) or onto a lift so that it is more convenient to carry out diagnostics. The verification algorithm in this case will be as follows:
Checking the lower ball joint on a machine without a lift
The method of checking a ball joint without a lift can be carried out using an additional support, like a stump, capable of supporting the weight of a car or a similar structure.
So, first you need to jack up the wheel under test, then place a stop under the ball joint in such a way as to load the ball joint. If it is in relative order, then the car wheel will remain suspended and will rotate freely, without making any extraneous knocking sounds. If you feel a beating and knocking noise when the wheel rotates , it means that the ball joint has failed and must be replaced.
The design of the suspension of some cars also provides for the presence of a diagnostic hole, specially made to measure the distance from the surface of the ball joint to the base of the pin. However, it is necessary to know the permissible values of the corresponding distances. They can be found in the technical documentation. The distance is checked with measuring instruments. The presence of this hole greatly simplifies the process of diagnosing the ball joint for wear with your own hands without any tools.
How to replace a ball joint on a VAZ 2109, 2114.
To replace the ball joint of a VAZ 2109, 2114, place the car on a jack and remove the wheel. Now unscrew one nut securing the ball joint to the lever and two bolts securing the ball joint to the hub.
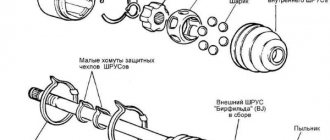
If you have a ball joint remover.
If you have a puller, place it as shown in the photo and remove the ball.
How to remove a ball joint without a puller on a VAZ 2109 - 2114.
If there is no puller, you will have to remove the lever completely. To do this, unscrew the bolt securing the stabilizer bar (egg), the nut securing the “saber” to the lever and the bolt securing the lever to the body. We remove the lever, take a heavier hammer and knock out the ball.
There are situations when the bolts stick to the silent blocks or you are simply too lazy to remove the lever. In such cases, you can use a backup option, but it may not always work.
In this option, the ball should not be unscrewed from the hub. Unscrew only the nut securing the ball to the lever. Use a gas torch to heat the lever where the ball pin fits into it. It should be heated for about 3 minutes. Next, just as in the method of checking the ball for malfunction, insert a crowbar between the ball and the lever and press on the crowbar. The longer the crowbar, the easier it is to remove the ball this way - this is important!!!
You learned how to change ball joints on a VAZ 2109 - 2114. If you have any questions, write them in the comments and I will definitely answer you!
Checking status
Before changing the ball joint, make sure that this element has actually failed and is the cause of the car's inappropriate behavior.
There are two ways to check - simple and more complex.
First way
To check you will need to do the following:
Verification procedure
Second way
The second testing method is more accurate, but will require a pit and additional equipment.
Replacing the ball joint of a VAZ 2114 with your own hands
In this article we will talk about how to repair the suspension on a VAZ 2114 car, and more specifically, about replacing ball joints.
These are the elements that fail most often, despite the fact that they are practically eternal. Judging by the instructions for use. But the service life of ball joints is affected by the driver’s driving style, the quality of the road surface, and most importantly, the initial quality of the product. Unfortunately, more and more often you can find low-quality products on the market, refurbished ones, which will last very little. There is an opinion that restored ball joints can work for quite a long time. But is there any point in restoring such a simple and fairly cheap mechanism?
The cost of a ball joint for a VAZ 2114 car, as well as for most front-wheel drive models, is no more than 500 rubles. Moreover, for such a price you will get a very high quality product. But let’s get closer to the topic of the article, namely, repairing a car’s suspension.
Requirements for a new ball
Make sure that the new ball joint boot is in good condition - there should be no cracks or damage. The new ball joint should have a grayish color to the finger. There should be no defects on the clip. The ball pin is not allowed to rotate freely - this indicates that the element is of poor quality.
For good elements, it either does not rotate in the cage at all, or does so very tightly. Try to purchase domestic products, “Track”, “Trial”, “Kedr”, “Nadezhda”, “BZAK”. You should not trust manufacturers from China or Turkey - practice shows that such elements are very unreliable and have a short lifespan.
Diagnosis of ball joint malfunction
Identifying the breakdown is quite simple; to do this, you just need to sit in the front seat of the car. In the event that a peculiar crunch appears from the suspension, we can talk about a malfunction of the VAZ 2114 ball joint.
You don’t even need to try to look for any other reasons, the fault is in this hinge. Moreover, a peculiar crunch can be observed when the car is moving slowly. During acceleration it usually disappears, but this depends on the degree of wear of the mechanism.
And the second diagnostic method is to pull the car wheel in a vertical plane with your hands. If there is a breakdown, you will definitely hear a crunch.
A similar phenomenon occurs when using a mount. It must be installed between the suspension arm and the wheel hub. If you move the mount sharply, you can still hear the same nasty sound.
To be sure, you can even drive the car onto a viewing hole or overpass. Grasp the suspension arms and pull them down several times. A good knock, as they say, will come out. And if you put your palm on the body of the VAZ 2114 ball joint, you can feel a slight vibration from the inside.
Symptoms of the malfunction and their description
If the driver is completely unaware of how to determine whether a ball joint is faulty, he needs to better study the symptoms indicating a breakdown.
We list the main ones:
There is a knocking noise while driving. The clanging appears at any speed and can be isolated or repeated periodically. It also occurs if the machine is overloaded.
Creaking noise coming from the front wheels when turning. The sounds come from the rack or hydraulic booster.
If the support is damaged, the steering wheel is at an angle (relative to the road). As a result, the tread wears along the inner edge. Uneven tire wear can be immediately seen upon visual inspection.
When braking, the trajectory of movement changes. This usually appears as a slight curling to the side. This is due to the tilt of the wheel.
While driving, the car wobbles. Most often this appears due to play in the ball. The higher the speed, the stronger the wobble. Many drivers do not notice this symptom because they drive on bad roads.
The wheel alignment characteristics have become different. The wheel on which the support has worn out will suffer the most from this. It is difficult to determine changes by eye, so you should contact a service station for help.
If the driver feels the manifestation of at least one of the listed symptoms, he should diagnose the entire system. If the ball fails, then other parts of the system are “at risk.” They should be checked comprehensively.
Preparation for replacement and tools
To carry out the repair you will need the following tools:
- Ball joint remover. The price of such a tool is about 350-400 rubles. I advise you to purchase it, as it will definitely be useful to you in the future.
- Standard set of wrenches and screwdrivers.
- Litol type lubricant.
- Jack and reliable supports.
- Wheel chocks, which are placed under the rear wheels to prevent the car from rolling away.
That's all, now you need to prepare the car for repair. To do this, you need to install wheel chocks, loosen the wheel bolts, lift the side being repaired using a jack and install it on a support. Wooden blocks can be used as support, but it is not advisable to use materials such as bricks, cinder blocks, and the like. They are fragile and the car can simply fall during repairs. If necessary, treat all threaded connections with a penetrating lubricant such as WD-40.
Necessary tool
- The jack (hydraulic or pneumatic to choose from) is designed to raise the machine to the desired level to simplify the process of checking and further replacing the VAZ 2114 ball joint if necessary.
- A set of wrenches allows you to loosen the tightening on the desired part and unscrew the bolts and nuts.
- A ball joint remover will be needed to remove them.
- Wheel chocks are used to be placed under the rear of the car. Sometimes a brick base is used here to simplify the task.
- Supports under the car to improve interaction with the jack, to ensure safety during the operation. In addition, sometimes a block of wood is also used.
Carrying out replacement
Now the crucial moment has come, it is necessary to remove the old ball joint of the VAZ 2114 and install a new one in its place. First, using a 19mm wrench, unscrew the nut that secures the ball joint pin to the front wheel hub. After this, you need to install the puller so that the small ball on its bolt is clearly in the middle of the hinge pin.
Carefully screw in this bolt until the pin comes off the wheel hub. After this, you need to use a key “17” to unscrew the bolts that secure the joint cage to the suspension arm of the VAZ 2114. That’s all, the dismantling is complete. Now all that remains is to install a new hinge, which it is advisable to pre-lubricate with Litol. To be honest, I also used CV joint type lubricant for this purpose.
I haven’t noticed much of a difference; the ball joints have been working without problems for three years now. Please note that when installing a new joint, you may have to install several blocks of wood under the arm and lower the body so that the ball pin fits into the hole in the hub. But this job can be done with a good pry bar.
The repair is complete, good luck on the roads and fewer breakdowns!
Checking the ball joint boot
When checking the condition of the ball joint, you must pay attention to its boot. It is made of rubber and its task is to prevent moisture, dust and various debris from the road from entering the joint during operation of the machine. The boot, by and large, is a consumable item and must be periodically replaced. As a result of temperature changes (including in winter), mechanical influences, damage and simply the aging process, first small and then increasingly enlarged cracks may appear on its rubber body, through which dust, sand and other small debris will get inside the ball joint . This mixture will act as an abrasive, gradually breaking down metal surfaces and washing away lubricant.
Therefore, when performing an inspection, you should always pay attention to the condition of the boot, the presence of debris and lubricant in it. If it is damaged, it must be replaced with a new one, since the use of a torn boot leads to a sharp decrease in the overall service life of the ball. And when replacing the boot with a new one, you need to remember to fill it with lubricant (Litolom, ShRB-4 or their analogues).
There is another non-standard method of checking the ball, in particular due to damage to the boot. In particular, the method is suitable for testing on machines in which the ball is positioned vertically with its finger up, that is, if water gets inside, it remains inside like in a vessel, and it enters from above through the oil seal. So, on machines where it is difficult to dismantle and generally get to the support, you can take a regular medical syringe with a needle and pour a little liquid oil into it (2...3 cubes). Next, you need to pierce the boot at the top with a syringe needle and pour the existing oil inside. After this, compare the nature of the old knock and the knock after adding oil. If a difference appears, it means that the ball has failed and it is advisable to replace it. As for the hole from the needle, water will not get inside through it, so the car owner can be calm about this.
Replacing the ball joint VAZ 2114
Upon external inspection of the front suspension, it is discovered that the boot of the ball joint is torn; it must be replaced only if the boot has been torn for a long enough time. This can be determined by the characteristic dirt and moisture inside the boot.
First we remove the wheel. For technical safety, it is best to place the car on a special “pyramid” stand if the work is performed not on a lift, but on a regular jack.
If, when dismantling the ball joint, it is discovered that all the bolts have oxidized and rusted, then we treat them with a special rust remover “WD-40”. Unscrew the two bolts.
We also unscrew the bottom bolt.
Important! Until the lower nut is unscrewed from the ball joint, do not try to knock it out, otherwise it will turn with the ball joint, which will lead to additional problems with twisting the nut. When all the bolts and nuts are loosened, use a special puller to remove the ball joint from its seat.
If, using a puller, the ball joint does not come out of the seat, then you need to slightly press the puller and tap it with a hammer from below, or on the seat on the lever.
Remember to periodically tighten the puller bolt. When the support comes off the seat, remove the puller. The lever hangs on silent blocks and on the stabilizer. Therefore, to remove the ball joint, you need to use a pry bar to move the lever down.
The ball joint is dismantled, then we begin the reassembly in the same sequence. Also, by pressing the lever with a pry bar, we install the ball joint back. If during the installation of the ball joint it is not possible to fit it to the mounting location with two bolts, you need to proceed as follows. First, we attach the ball joint to two bolts and direct the support bushing to the approximate location of the ball joint on the lever.
When everything is in place, tighten all the bolts, tighten them thoroughly, and put the wheel in place. This completes our simple process of replacing the ball joint.
Sources
- vaz-zona.ru/zamena-sharovoj-opory-vaz-2109-2114/
- luxvaz.ru/vaz-2114/31-zamena-sharovoy-opory.html
- vaz-remzona.ru/sharovye-opory-vaz-2114-zamena/
- auto-crafts.rf/zamena-sharovoj-opory-vaz-2114
Step-by-step instruction
- Loosen the wheel bolts, jack up the car and remove the wheel. For insurance, place the wheel under the threshold.
Using a power wrench and a 17mm socket, unscrew the two bolts securing the ball to the knuckle. The fastening bolts, as well as the nut, must first be cleaned and sprayed with penetrating lubricant.
Using a 19mm socket, unscrew the nut securing the ball pin to the lower arm. Please note that the nut is tightened quite tightly.
Apply penetrating lubricant where the ball is installed in the lever and put the puller on.
- Rotate the puller pin and press the support out of the lever.
- Jack up the steering knuckle slightly under the brake disc and remove the ball joint. Please note that if you do not have a puller, the ball joint can be knocked out with a heavy hammer. You need to hit the lever from the side.
Insert the new support into the lever and tighten the fastening nut.
Remove the jack from under the brake disc and screw the bolts securing it to the knuckle. To align the mounting holes, use a diameter punch.
Using a power wrench, tighten the two fastening bolts and the nut. If you have a torque wrench, tighten the bolts to the knuckle to 60 Nm, the nut to the lever to 80 Nm.
- Install the wheel and tighten the bolts.
The process of replacing the ball joint for VAZ 2113, 2114, 2115 is clearly shown in this video:
Causes of failure
The supports experience high loads during operation. They can withstand constant impacts when driving over uneven surfaces. There are several main reasons why these parts fail.
Natural wear and tear. One joint can withstand driving for a distance of 20-150 thousand km, but a high-quality part begins to wear out at about 100 thousand km. In addition to quality, wear is influenced by the presence of lubricant, care of the part and other factors.
Torn boot. This element is considered a kind of “consumable material”. For this reason, you need to constantly monitor its condition. If the boot suddenly breaks, particles of dirt and dust will get inside the support. They form an abrasive between themselves, which will “wear out” the insides.
High loads. When a driver travels on rough roads at high speeds, the suspension suffers greatly from shock. This leads to wear of the ball. The same thing happens when the vehicle is heavily overloaded with excess cargo.
Lubrication. The lubricant dries out or evaporates over time. If the boot is damaged, the lubricant will disappear even faster, thereby causing increased wear on the ball. To avoid this, it is necessary to periodically pour lubricant into the ball.
All of the above reasons do not appear overnight. This is only possible if the part was already defective. This can be avoided if, when purchasing, you purchase a higher quality product rather than a cheaper one.
The easiest way without a jack and lift
If the part is on top, you must do the following:
- Stop on a level surface and put the car on the handbrake.
- Ask a passenger for help to press the brake pedal. If there is no one to help you, then use improvised means (for example, a shovel). Lock the brake in the pressed position.
- Start to gradually swing the top of the wheel away from you, towards you.
In the event of a malfunction, these actions will lead to play. In addition, extraneous creaks will be clearly audible. However, using the presented testing technique, failure can only be determined if there is significant wear on the suspension element.
Why did it happen so?
Perhaps the automatic requests do not belong to you, but to another user accessing the network from the same IP address as you. You need to enter the characters into the form once, after which we will remember you and be able to distinguish you from other users exiting from this IP. In this case, the page with the captcha will not bother you for quite a long time.
You may have add-ons installed in your browser that can make automatic search requests. In this case, we recommend that you disable them.
It is also possible that your computer is infected with a virus program that is using it to collect information. Maybe you should check your system for viruses.
If you have any problems or would like our support team, please use the feedback form.
The design of each car has a suspension (the connecting link between the car body and the road surface), which contains such a part as a ball joint. A ball joint is a movable device that connects the wheel and the suspension arm and provides wheel control.
A few words about the detail itself.
Ball joint and signs of its malfunction
There are two types of such products: filled and with cermet bearings. Filled options are best suited for front-wheel drive VAZ cars. They withstand heavy compressive loads. Metal-ceramic products are installed on the rear wheels and are characterized by high tensile strength.
https://www.youtube.com/watch?v=oCiLI7ppwSQ
The most popular manufacturers of supports for domestic cars are Za Rulem, Kedr, Trek and BelMag. HOLA, HI-DRIVE, Moog, FENOX and some other companies deserve trust.
And if you do not constantly overcome obstacle courses, then the ball joint does its job well and for quite a long time. The only thing that can disable it is the inept actions of the car owner during repair of the front suspension or, more often, dirt and water.
But even in the event of a breakdown, replacing this unit cannot be called a complex procedure, therefore, if there is no money for specialists, it can be done independently.
Support design
The nine ball joint is simple and unprepossessing, and the suspension design no longer allows the support to collapse as quickly as in classic Zhiguli cars. However, its design is the same - it is a ball pin molded with metal cups. As a rule, a plastic (maybe polyurethane) liner is installed between the finger and the cups, which reduces the coefficient of friction and increases the support life.
For old Zhiguli models, dismountable ball joints were sold, in which the liner was simply replaced. How economically feasible this is is unclear, since the support pin remained old, it could wear out the new liner in about five thousand km. Then - replacement again. If you install a non-removable high-quality support, then its service life can reach one hundred thousand or more, if you do not overload the suspension on bad roads.