The suspension is the very unit that connects the car body to the road. It is she who perceives all the shocks and vibrations. Therefore, high demands are placed on the chassis. The suspension scheme can be different - from a beam to a multi-link. Today we will pay attention to the front suspension of the VAZ-2114. Its installation and repair are discussed further in our article.
Rack
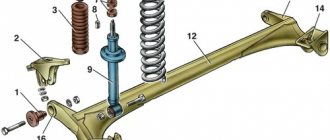
This is one of the main elements of the front suspension of the VAZ-2114. The strut combines a spring and a hydraulic shock absorber. Thanks to this part, the suspension absorbs and absorbs bumps in the road. To allow the element to rotate (at the same angle as the front wheels), a support bearing is provided at the top. The stand itself is mounted on the body cups in the engine compartment. Unlike the rear, 80 percent of all loads are placed on it. After all, all the important components and assemblies are concentrated in front - the engine, gearbox and attachments.
The service life of the racks is about 100-120 thousand kilometers. What are the main symptoms of a malfunction? This is a knock in the front suspension of the VAZ-2114, as well as the “yaw” of the car when moving in a straight line at speeds above 60 kilometers per hour. The knocks are usually dull in nature and occur even on small irregularities. The sounds may become stronger over time.
How to replace?
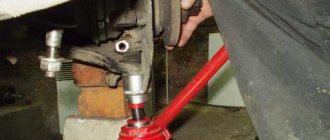
Usually the racks are replaced in pairs or as a whole. To do this, jack up the front of the car and remove the wheels. Next, release the rack from its mounting with the steering tip. Then unscrew the two nuts that secure the shock absorber to the suspension arms. The bolts are removed by hand from the reverse side. If they are rusty, you can use a hammer and attach a wooden block. Next you need to open the hood and loosen the upper fastening of the strut, which is in the cup.
In this case, you should hold the stand from below so that it does not fall. After this, the suspension module is removed entirely. A new element is installed in its place. Assembly is carried out in reverse order.
Replacement nuances
As soon as the driver removes the rear strut, which is screwed to the inside of the glass, a special hard rubber gasket usually remains here. There is no need to leave it, because the elastic band has already lost its elasticity. When purchasing an original stand, be sure to purchase an appropriate rubber spacer. When installing the spring, make sure that its last coil fits into the stand cup. You should also check whether the end of the spring extends beyond the cup. Once the installation is complete, the end of the spring should be facing away from the wheel. Before starting work, you need to put on the elastic band located on top and fix it to the coils of the spring. A rope will help with this. This is done to prevent jumping off.
Installing new front and rear struts on VAZ 2113, 2114 and 2115 is not a regular task. Nevertheless, the driver is obliged to check the condition of these components from time to time, both visually and technically. The procedure for replacing a set of front/rear struts, as a rule, takes up to 3-4 hours of free time. After installation, it is recommended to contact a service center to check the toe-in/camber angles and adjust them according to the manufacturer’s requirements.
- 5
- 4
- 3
- 2
- 1
Stabilizer
This element of the front suspension of the VAZ-2114 is designed to reduce the roll of the car when cornering. The part does not have a complex structure and consists of a flexible beam, as well as a pair of silicone silent blocks. The element has a small stroke, which ensures vehicle stability on the road. Attached to the front side members with the central part. The side parts are connected to the suspension arm on the “knuckles”. The stabilizer has a long service life - more than 100 thousand kilometers. Usually it is the silent blocks that fail. But to replace them you need to remove the stabilizer completely. Below we will tell you how to do this.
Leading manufacturers
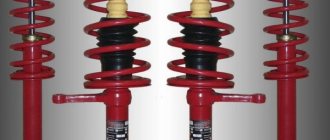
When choosing new nodes, you should think about what exactly you want to get and what it will be like for you in the future. We recommend installing collapsible struts, since their design can be disassembled into parts, thereby simplifying and reducing the cost of suspension repairs. This is one of the key advantages of collapsible units.
KYB (Kayaba)
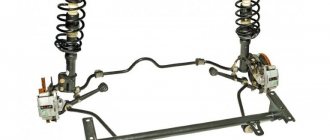
Look at the front element assembly in the photo to first understand what exactly this component of your car looks like. Choosing a manufacturer is a fairly pressing issue, since each of the options presented today has its own advantages and disadvantages. We invite you to familiarize yourself with them in the table.
| Manufacturer | Advantages | Flaws |
| Standard factory | Financially accessible | Not very reliable, can withstand about 30 thousand km, then require mandatory replacement |
| Racks from Priora | Gives rigidity, provides comfort, holds well on the road | There is no sound insulator, the bump stop suffers greatly |
| SS20 | Improved version of Priora struts | There are essentially no disadvantages |
| Plaza | Available in three versions - comfort, sport and supersport, they are of high quality | Afraid of low temperatures |
| Kayaba | The most popular, high-quality, reliable, not afraid of frost | There are many fakes on the market, which makes it difficult to find the original. |
From this we can conclude that spare parts from Kayaba are the optimal solution that will last a long time, reliably, and will not be afraid of harsh Russian winters, during which many analogues among the A-pillars simply will not be able to function normally, causing problems for you.
Repair of the front suspension stabilizer of VAZ-2114
If your car has lost its former maneuverability and strange noises have appeared in the front end, inspect the condition of the stabilizer. Perhaps the silent blocks in it have worn out. How to replace them? To do this you need:
- raise the front of the car;
- remove the bolts securing the struts from the right and left wheels;
- remove the bracket fixing nuts;
- remove the stabilizer assembly.
Old silent blocks can be removed by hand. Before installing new ones, you should thoroughly clean the area of dirt. As reviews note, polyurethane silent blocks have a longer service life than silicone ones. And in cost they are almost the same. Therefore, when purchasing silent blocks, you should give preference to polyurethane elements.
Replacement
Before you get started, we recommend watching a video on how to make the replacement. This is a useful lesson that will provide the necessary knowledge and concepts about the location of certain components of the unit.
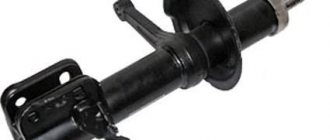
Removed suspension element
But let’s say right away that the lack of at least basic experience in car repair means that you should not start replenishing your own knowledge base with such a process as replacing these parts. It is better to entrust this issue to specialists.
If you decide to do everything yourself, then follow the specified algorithm. This will allow the replacement to be completed efficiently and without unnecessary manipulation.
- Place the car on a flat area, preferably with a hole. Loosen the bolts on the front wheels. Be sure to turn on the handbrake and secure the wheels with chocks. You need to think about safety first.
- Use a jack to lift the front of the car, then remove the wheel. Please note, when changing the front suspension elements, it is better to do this on two wheels at once, even if one of the struts is in satisfactory condition.
- Lift the hood and look for the bolts that secure the struts to the body. Look for them on the left and right, near the windshield.
- There is a plastic cap on the glass that needs to be removed. To do this, use a simple flathead screwdriver. The plastic element is pryed off and thus easily removed.
- Unscrew the mounting nuts holding the rack on top of the body.
- A brake hose with a bracket is attached to the rack. This element is also removable.
- Using a wire brush, be sure to clean all the fastening elements of the struts to the body and chassis of the car.
- Now take the pliers in your hands and use them to unscrew the nut. The one that holds the tie rod end joint to the A-pillar.
- A puller removes the hinge from the shock-absorbing strut arm. If this is your first time changing them and no one has removed them before, be sure to tighten the nut a few turns, which will protect the threads.
- Near the place where the fist is attached to the stand, there are nuts that should be removed. Just first mark where the adjusting bolts are located. This way you won’t have to go to a wheel alignment after replacing suspension elements.
- Using a hammer, knock out the bolts that hold the element and the fist. The nodes release, allowing you to pull your fist down and reach the worn post.
- Place the new part, then proceed to reassemble the unit in the reverse order. During the procedure, do not forget to check other components for defects, malfunctions, oil leaks, and so on.
When the procedure is completed, put on the wheels, but do not tighten the bolts tightly. By lowering the car from the jack, you can fully fix the bolts
This is an important rule that, unfortunately, many people forget.
Replacing the front struts is not the most difficult procedure, but it requires observance of a sequence of actions, accuracy and regularity.
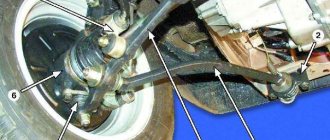
Levers
At the front, the VAZ-2114 uses independent wishbone suspension. These elements ensure the transmission and absorption of shocks that occur when the car hits an uneven surface. The front suspension arms of the VAZ-2114 are made of high-strength steel XK-60, so they can easily withstand high loads. The element is attached with one part to the ball joint, and the other to the body on a bracket. Levers do not have a specific resource. Some don't change them for decades. Therefore, you need to navigate based on the signs. The main symptom is delamination of rubber on a metal bushing.
Also, the lever must be replaced in case of a serious collision with a hole (in which the disk was bent) and after an accident. Otherwise, due to deformations, there will be problems with wheel alignment, as well as constant tire waste. How is the front suspension repaired on a VAZ-2114? Usually the entire lever changes, as does the strut. The cost of a new element is from 700 to 1 thousand rubles. The lever is interchangeable with the first generation Lada (that is, the “nine”).
Rear element design
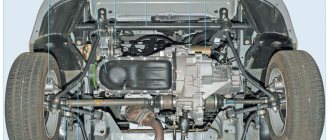
Suspension type: dependent, on a rigid transverse continuous beam. The structural elements of the rear suspension and the methods of their connection in the VAZ 2114 are as follows.
- The base is a cross beam. The structure is welded, in the shape of the letter “H”, only with a long cross member. The two front ends of the beam are secured to brackets bolted to the rear side members of the vehicle. The method of connection to the brackets is hinged, on rubber-metal bushings. The rear ends of the beam have mounting flanges for wheel hubs. The hubs are bolted to the flange; a protective casing, brake cylinder and pads are mounted on them. Inside the hub there is a double row radial bearing. The brake drum is mounted on top of the pads and secured to the hub with guide pins.
- The lower end of the strut with a cylindrical spring is attached to the rear ends of the beam on the other side of the hubs. The upper end of the shock absorber rests against a glass welded to the body through a rubber spacer.
The diagram of the rear suspension on the VAZ 2114 The diagram of the rear suspension is shown in Fig. 2. The rear chassis of the VAZ 2114 car operates as follows: the transverse beam works like a swinging pendulum, the attachments to the side members do not allow it to move along the axis of the car. Racks with springs attached to the opposite end of the pendulum limit its up-and-down movement and serve as a shock-absorbing and partially supporting element for the wheels.
Return to contents.
How to replace the lever?
To do this, raise the front part of the car (alternately on each side with a jack). Next, unscrew the nut securing the ball joint and, using a puller, remove the ball joint pin from the lever. Next, unscrew the nut securing the extension. The stabilizer link is disconnected from the lever. Next, unscrew the nut that secures the suspension arm to the body. If it is sour, use a “liquid key”. At the next stage, you can safely remove the lever from the stretch outward. The new part is installed in the reverse order.
Shock absorber: its role in suspension operation
An automobile shock absorber is a mechanism in the suspension of a car that serves to partially dampen the swaying (damping) that occurs during movement or completely absorb it.
Shock absorbers are divided according to their types:
- gas single-pipe;
- gas two-pipe;
- oil two-pipe.
On the VAZ-2115 model, standard oil shock absorbers are installed at the factory. Later, when using the car, owners often replace them with gas ones, depending on their driving style.
There are 3 types of racks with different characteristics. You need to choose them based on the roads on which traffic occurs. Oil (hydraulic) – quite elastic. Designed for drivers who prefer a calm, measured ride or frequent trips on unpaved roads.
Once the shock absorber malfunction is clearly determined, it should be replaced. You can carry out the replacement either at a service station or yourself. To do this you should have the following tools:
- a wrench for unscrewing the shock absorber rod nut;
- standard jack;
- cotter pins, vices and puller;
- hammer, chisel and pliers;
- open-end and ring wrenches for 13, 17, 19, 22, 24;
- balloon wrench.
Before dismantling the VAZ-2115 rear shock absorber, you need to remove the plastic plug from the rear strut cup and unscrew the nut securing the rod. To do this, use a special key that simultaneously fixes the rod and unscrews the nut.
After removing the nut and washer with a rubber cushion, jack up the car and remove the rear wheel to gain access to the bottom of the rear strut mount.
Using a 19-mm open-end wrench, we fix the nut, and with a 19-mm socket, we unscrew the bolt, lubricating it with pre-penetrating lubricant, unscrewing and removing the bolt from the hole, and remove the rear shock absorber from its seat. To do this, it is better to use a flat-head screwdriver, carefully prying up the lower part. The strut body is moved to the side, lowered down and the shock absorber is removed.
We take out the remaining rubber gasket inside the glass with the same screwdriver. We disassemble the old shock absorber, removing the spring, rubber bushing, cup, casing, bump stop, and then install these parts in the opposite (reverse) order on the new strut.
Upon completion of complete assembly, the rear strut is installed in the reverse order, the upper nut and the lower bolt securing it are tightened.
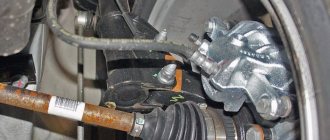
Spherical bearing
This is another important element in the suspension design. The ball joint is a balancer that bears all the load and heaviness of the front part of the body. Therefore, the part wears out much more often than the shock absorber strut and levers. It is worth noting that the ball is not only the fulcrum of the entire suspension, but also the turning mechanism. Thanks to it, the front wheels are controlled by means of a rack, rods and a fist.
If you do not monitor the serviceability of the element, it may fall out. Because of this, serious consequences are possible - the wheel simply breaks out of its fastenings while driving, and the car loses controllability. At the same time, other suspension elements are damaged and cannot be restored:
- constant-velocity joint;
- rounded fist;
- levers;
- stand and its fastening elements.
In other words, the car will need a complete front suspension replacement. The VAZ-2114 will undergo expensive and lengthy repairs. Therefore, at the first sign, this part needs to be changed.
Features that the best springs for a VAZ should have
Many people wonder what rear springs to put on a VAZ 2114?
There are several points that the owner of domestic transport should pay attention to:
- Spring diameter. Affects the level of suspension stiffness.
- Number of turns - the more there are, the lower the rigidity.
Hard rear products are liked by those people who require a good level of steering control. True, in this situation, adhesion to road surfaces decreases. That is, any option has its advantages and disadvantages. But all the same, you can always choose the appropriate type for any Russian model.
Symptoms of ball failure
First of all, the problem begins with a torn boot. Because of this, dirt, water and sand get inside. Thus, they wash out the lubricant from the ball mechanism. As a result, the element begins to work “dry”, and corrosion processes begin. In practice, this results in loud knocks and squeaks from the suspension. Next, the wheels will begin to spontaneously change their trajectory. There will also be uneven wear on the tire tread. As you turn the steering wheel, the knocking noise intensifies. If you notice the problem in time, you can eliminate emergency consequences.
How does the ball joint change?
To do this, you need to remove the front wheel mounting bolts and hang part of the car on a jack. Next, the nut securing the ball element is unscrewed. The support pin is pressed out of the lever. Similar to the previous case, this is done using a puller. If there is none, do not unscrew the nut completely. We press the lever with a pry bar and apply light blows with a hammer along the axis of the lever. Use a wooden block as a buffer. The next step is to unscrew the two bolts that secure the ball joint to the steering knuckle.
After this, the lever is moved to the side (with a pry bar), and the support is successfully pulled out. A working finger should not move with more than 0.8 millimeters of play in the support. Otherwise, it needs to be replaced, since there is a large output here. Before installing the dirt boot, it is recommended to coat the surface of the support with sealant. This way we will eliminate its premature delamination and deformation. It would also be a good idea to check the presence of lubricant in the ball. Some manufacturers save money and use very little lubricant. In this case, we purchase a specialized product and coat the entire perimeter of the element with it.
Step-by-step instruction.
Doing it yourself will work out cheaper. The sequence is as follows:
We prepare the place and tools. The surface on which the car is located must be level. A pit is desirable, but not required. Without it, work will be carried out in a lying position. To be on the safe side, install wheel chocks or chocks on the front wheels. To be sure, you can even turn up the speed; Loosen and remove the wheel bolts. A 19mm wrench is required. Before direct repairs, all nuts can be treated with penetrating lubricant (WD-40, by the way, here are the recipes) - this saves time and effort; We put a jack and lift the rear part of the VAZ 2114, after which we remove the wheels
We work with the jack carefully and carefully!; Open the trunk and remove everything unnecessary. There is a rubber plug “hiding” under the shelf - remove it with a screwdriver. Behind the plug there is a rod with a tightened nut
You can unscrew it with a 17 mm L-shaped key and a special key for fixing the rod. If there is no key, then pliers will do; Next, remove the support washer (using a magnetic handle)
Behind the plug there is a rod with a tightened nut. You can unscrew it with a 17 mm L-shaped key and a special key for fixing the rod. If there is no key, then pliers will do; Next, remove the support washer (using a magnetic handle)
- We unscrew the nut securing the shock absorber to the beam; you will need two 19mm open-end wrenches. Remove the bolt that secures the strut to the beam. If that doesn’t work, knock it out with a smaller bolt. Carefully remove the shock absorber from its seat and remove the entire rack (it may fall, be sure to support it).
Important: do not forget to remove the stuck insulating gasket (this often happens) from the inside of the glass, which is placed on the spring (see photo)
- We remove the spring, remove the spacer sleeve and shock absorber cushion. Remove the cover from the casing. Remove the compression stroke buffer (bump stop) from the rod.
- After this, we take a new rack with the rod fully extended (otherwise nothing will work) and put the casing, bump stop, cover, cushion and bushing on it. The spring and gasket are installed last. Advice: before installation, it is worth “bleeding” the shock absorbers, as this greatly increases their efficiency and service life. “Pumping” is carried out by turning the structure over. At the same time, the oil spreads throughout the spare part;
- We install the new structure in reverse order. This can be difficult. There are situations when the stand simply “does not want to climb” into its rightful place. This can be corrected by lifting the beam with a jack;
- We secure the rod with a nut and secure it with a gasket. Tighten all the nuts;
- We put the wheels in their place and remove the jacks;
- We repeat the above steps on the other side.
That's all. The withdrawal procedure was successful. Every step is important - there is no point in skipping even one. There are some removal features that you should become familiar with.