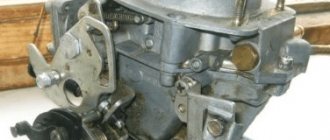
The carburetor is an important engine element that is responsible for supplying the correct air-fuel mixture. Malfunctions in the operation of the unit can lead to various engine breakdowns and disable the car. Timely adjustment of the VAZ-2109 carburetor will prevent serious damage and also improve the quality of movement in the car.
Domestic VAZ-2109 cars are equipped with a reliable and repairable Solex carburetor. The device has proven itself to be quite reliable, but to ensure a long period of operation it must be constantly cleaned and adjusted. Malfunctions of the part can lead to excessive fuel consumption and serious engine damage. The VAZ-2109 carburetor can be adjusted independently at home if you have a set of tools.
You may be interested in an article by our specialist, from which you can learn how to remove the box on a VAZ-2109.
How to determine that the VAZ-2109 electrical circuit is faulty? Find out about this in a detailed and informative article from our expert.
Signs of carburetor failure
The carburetor, like the rest of the engine, plays a big role when moving the car. Malfunctions of the unit first manifest themselves as unpleasant symptoms, and only then lead to serious problems in the operation of the motor. The first signs that you should pay attention to are the following manifestations.
- Pedal dips . When you press the gas pedal, the car drives at the same speed for some time and only after a few seconds begins to accelerate. Sometimes the interval can reach 10 - 20 seconds, and then ignoring it becomes unsafe.
- Jerk . A sharp increase and decrease in speed may indicate a carburetor malfunction. Usually the jerks are very short-lived, so they can be confused with signs of failure of other parts.
- Twitching . A series of jerks, which are repeated at some intervals, indicates problems in the carburetor.
- Rocking . Successive failures lead to a rocking effect.
- Slow acceleration . If the car begins to accelerate significantly more slowly, but there are no obvious reasons for this, then it is worth adjusting the VAZ-2109 Solex carburetor.
Although all these signs are highly likely to indicate a carburetor breakdown, sometimes situations may occur in which the characteristic features of the malfunction become uninformative.
In unusual cases, it is necessary to conduct a comprehensive diagnosis.
How to set up a carburetor on a VAZ-2109 Solex with your own hands
Initially, you need to prepare all the tools for adjusting and repairing the carburetor. Setting up is often accompanied by minor repair work, so experts recommend having all the necessary tools on hand. In the room in which the mechanism will be dismantled, it is necessary to ensure good ventilation, since strong fuel evaporations can lead to deterioration of health.
During the work, you cannot use rags or brushes, so it is worth preparing in advance a special material that does not crumble and does not change its structure.
For convenience and high-quality results, the car must be on a horizontal plane. A flathead screwdriver should always be nearby, as it is most often used when adjusting the carburetor. The part must be cleaned with special means or, in extreme cases, with pure gasoline.
We also advise you to read the article by our specialist, which describes in detail how to set up a VAZ-2108 carburetor.
Don’t know how to adjust the carburetor on a VAZ-2107? Then be sure to read the detailed material from our specialist.
Quick repair and precise adjustment of VAZ 2108/2109 carburetors: instructions and tips
One of the most common models in the country produced by AvtoVAZ can be considered the “eight” or its modification, the “nine”. Owners of VAZ 2108/2109 cars have been convinced in practice of the performance of their vehicles and their ease of maintenance. In order to prevent any malfunctions in the operation of the machine in a timely manner, you need to carefully monitor its technical condition. One of the main tasks of the driver is to control the operation of the carburetor device on the VAZ. The car owner can perform almost all types of repairs and adjustments with his own hands, since the carburetor design has a simple structure.
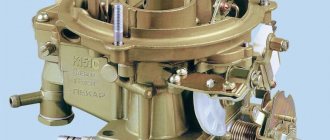
Carburetor mechanisms of the Solex series are produced at the Dimitrovgrad Automotive Accessory Plant. The designs are intended for use with front-wheel drive VAZ vehicles, in which the engine unit is located transverse to the body.
The standard model for equipping the VAZ 2108/2109 is the DAAZ 2108–1107–10 carburetor. It is paired with a 1.3-liter engine. Carburetors 21083–1107010 are installed on 1.5 liter engines.
The DAAZ carburetor is used to equip all cars of the eighth and ninth models
Modern equipment of the VAZ 2108/2109 is provided by carburetors of more advanced models, since they are equipped with a starting device in automatic mode:
modification 21083–1107010–31 has one stage of automatic control and start in a given mode;
modification 21083–1107010–35 is equipped with two stages of air damper control, which ensures more stable operation of the power unit;
modification 21083–1107010–62 is similar to the previous version of the carburetor mechanism, but has the addition of an electrical air-fuel mixture mixing system.
What determines the cost of a VAZ?
If you have high gasoline consumption and you don’t know the reason, then this article may be useful for a VAZ 2109 car with a new carburetor or an old one; it is also relevant for other cars with similar characteristics. However, you have to pay for the pleasure, both in increased fuel consumption and in the price of the car itself, cars with 4WD drive type are more expensive than other options.
Sequencing
If the accelerator pump nozzles are incorrectly adjusted, the nozzles are replaced or adjusted so that the fuel jets are directed exactly into the hole that appears when the throttle valve is opened, without intersecting. For example, in order to achieve more stable operation of the internal combustion engine at idle, it is worth abandoning the EPHH forced idling economizer mechanism and installing a plug instead.
Adjusting the air damper drive
If you did everything correctly, then the adjusted carburetor ensures stable operation of the power unit in the speed range recommended by the manufacturer. So, the car again does not drive, stalls, sluggishly picks up speed, does not pull, stalls when releasing the gas or changing gears. Consumes a lot of gasoline and does not have sufficient throttle response. Jerks when accelerating or releasing the gas pedal. Or popping noises are constantly heard in the mufflers at idle.
Setting the ignition timing - Ignition fault
| How to reduce fuel consumption on a VAZ 2109 carburetor As a result of this selection of jets, we achieve stable engine operation at idle, no dips when pressing the gas pedal when starting from a stop, while driving, and most importantly, a slight decrease in the engine’s fuel appetite. Depending on the size of the diffuser cross-section, there are different repair kits designed to work with engines 2108, 21081 or 21083, so the jets in the kits have different cross-sections. |
- After this, you will need to disconnect two drives from the carburetor body (one goes to the air damper, the other goes to the throttle). In addition, it is immediately recommended to disconnect the return spring and its retainer from the drive.
- Next, the wire is disconnected from the forced idle economizer screw.
- After loosening the clamps, you will need to remove the fuel supply pipe and the hose that works “for return”.
- The screw securing the heating block is unscrewed and the block is removed.
- The ventilation hose and vacuum hose are disconnected from the fitting at the top of the carburetor.
- After disconnecting all lines, it is possible to dismantle the carburetor assembly itself. To do this, you will need to unscrew the four nuts that secure the carburetor with studs to the intake manifold. The device is pulled out along with the gasket.
Ignition malfunction • Both on the VAZ 2107 carburetor and on other cars, high fuel consumption can be caused due to low tire pressure.
Solex carburetor design VAZ 21083
The Solex VAZ 21083 two-chamber carburetor is installed on naturally aspirated engines of VAZ 21083 cars. It consists of a cover and a main body, which includes:
- Float chamber.
- Starting system.
- Idle system with solenoid valve.
- Main dosing system.
- Transitional system.
- Economizer with accelerator pump.
- Econostat.
Fuel is supplied from the float chamber through special channels through fuel nozzles, where gasoline is mixed with air, which enters through air nozzles. The combustible mixture then flows through the carburetor diffusers directly into the engine. The throttle valve drive on this carburetor is mechanical and varies depending on the force of pressing the accelerator pedal. The carburetor provides for adjustment of the combustible mixture using quantity and quality screws.
Setting the fuel level
Adjusting the amount of fuel in the chambers of Solex carburetors is a simple procedure and does not require specialized equipment. Although in the factory this adjustment is performed using a special template, which simplifies and speeds up the work. But at home you can do without this template. To carry out adjustment work yourself you need:
- screwdrivers (phillips, flat);
- ruler (preferably a caliper);
- round rod with a diameter of 2 mm (wire or drill will do).
With such equipment you can quickly complete all work.
Recommended Method
Level control technology includes a number of stages:
- We dismantle the housing of the air filter element. To do this, unscrew the fastening nut of the housing cover, unclip the latches, remove the cover, take out the filter and tighten the 4 nuts that secure the housing to the carburetor.
- Raise the body and disconnect the rubber pipes. We move the body to the side.
- Loosen the clamps securing the fuel pipes going to the carburetor and disconnect them.
- Remove the wire suitable for the idle speed solenoid valve;
- Disconnect the drive cable of the air damper (the “choke” handle);
- Unscrew the 5 screws securing the carburetor cover;
- Having removed the cover, we immediately determine the fuel level in the chambers by lowering a ruler or caliper into one of them until it stops (using its depth gauge). If the measurement shows a level of 25-26 mm, it corresponds to the norm and no adjustment is required;
If the amount of fuel in the chamber is lower or higher than normal, we perform a visual inspection and a series of measurements on the floats, and if necessary, we correct their position.
To carry out adjustment work, place the removed carburetor cover on a flat horizontal surface with the floats facing up.
First, we look at the position of the elements from above. The outer side surfaces of the floats are parallel to the special imprints on the gasket. Deviations can cause the floats to touch adjacent elements and surfaces, causing the fuel level to be incorrect. If necessary, we adjust the position of the floats by bending their fastening levers. The next step is to measure the gap between the floats and the gasket. A rod with a diameter of 2 mm is useful here - this is how much the specified gap should be.
If it does not correspond, we bend the tongue of the floats, with which they act on the locking needle. After this adjustment, we check the total height of the floats, which is normally 34 mm. If this is not the case, check the gap again, adjust it if necessary and measure the height again.
The last stage of setup is determining the working stroke of the floats. To do this, place a caliper near the float, mark the distance from its lower corner to the surface of the cover, then lift the float with your hand and mark where the lower corner is.
A working stroke of 15 mm is considered normal; if it differs, it is adjusted by bending the tongue.
Car chassis
General diagram of the DAAZ 2108 unit. Diagram of jet placement. Diagram of purging the lid channels. Fuel jets are removed with a wooden stick or toothpick. Replacing the needle valve. This is what the floats installed on the Solex lid look like. These adjustments are carried out when the engine is unstable at idle and when certain symptoms of improper operation of the power system appear.
Jet markings
For each carburetor system, jets of different cross-sections are provided, so during repairs it is important to know what cross-section the fuel or air jet is needed. When purchasing a car, it comes with a service book, which outlines the main characteristics and its structure, as well as a jet marking scheme depending on the carburetor model.
The main metering system has fuel jets marked 80 or 95 for the primary chamber and 100 for the secondary. There are also air jets 150, 155, 165 for the primary chamber and jet 125 for the secondary. The idle system includes fuel nozzles marked 38-44 and 50, and air nozzles 170 and 160. In the secondary chamber of the transition system, fuel nozzles 50 and 80, and air nozzles 120 and 150. For the main metering system, a fuel nozzle 85 is provided.
High fuel consumption VAZ 2109 carburetor causes Carburetor malfunction
To prevent the carburetor from creating problems for you, try to use high-quality fuel, lubricate quality screws, and check the serviceability of the choke cable. In the formula Qн 0.01 x Hsan x S Hw x W 1 0.01 x D, the basic indicator becomes the consumption without load in running order Hsan, which is individual for each truck.
| Operating conditions | Flow capacity cm³/min | Operating conditions | Flow capacity cm³/min |
| Light road conditions with heavy loads (economical adjustment) | 60 | Average road conditions | 110 |
| Working with a trailer (economical adjustment) | 160 | ||
| Working with a trailer (power adjustment) | 200 | ||
| Light road conditions | 80 |
Repair
Repairing a VAZ 21083 engine with your own hands is quite simple. The main thing is to know the cause of the breakdown. Many owners of cars with a well-known engine have encountered common problems over the years. Thanks to this, it was possible to identify the main symptoms of impaired engine operation and find measures to get rid of them:
- Unpleasant knocking is often the cause of changes in valve clearance. Adjustments are made every 50 thousand km.
- The engine starts to stall. With such a symptom, it is worth measuring the compression.
- The car will not start after being parked for a long time. The reason often lies in electronics. The repair measure is to diagnose the car at a service station.
- Fuel consumption has increased - often this malfunction is the result of carburetor contamination.
Repairing the VAZ 21083 engine in service centers is quite simple due to the high prevalence of the car in Russia.
The best Lada model
VAZ 21099 was equipped with several types of engines. The most widespread power unit installed on VAZ 21099 carburetors was the VAZ 21083 engine. This gasoline 4-cylinder 8-valve engine became the founder of a whole family of engines that were mounted on all cars from the Lada Samara-2, Lada 110 model series " and "Lada Priora". Among its descendants is the naturally aspirated injection VAZ 2111-80. It was this engine that was most often installed on the VAZ 21099 injector.
It is difficult to carry out a major overhaul of the engine of a VAZ 21099 car on your own, but if the malfunctions are caused by breakdowns of attachments or ignition, cooling and fuel supply systems, then they can be repaired without contacting a car service center.
Adjustment sequence - Engine malfunctions
| How to set up a VAZ 2109 carburetor with your own hands correctly. In the second case, this is an over-enrichment of the fuel mixture at idle and, as a result, excessive fuel consumption, the inability to correctly adjust the idle speed. When you don’t have time to do repairs, but you need to get to your destination urgently, there is one way to make the engine run stably at idle. |
| Solex carburetor high fuel consumption reasons It is difficult to recommend anything specific here; in each specific case an individual approach is needed, and the best result is achieved by trial and error. With a 1.3-liter engine installed and a four-speed gearbox, the car consumes 5.9 liters of gasoline at a speed of 90 kilometers per hour for every hundred kilometers on the highway. |
- Charge the battery;
- Warm up the engine to operating temperature;
- Turn on the headlights, audio system and other elements that consume electrical energy;
- Achieve maximum idle speed;
- Rotating the quality screw, reduce the speed by 50-150.
Preparatory work • Remove the air filter housing and remove the choke lever completely.
Owner reviews
The new VAZ engine demonstrates extreme efficiency, thanks to which the car has low fuel consumption and a reduced level of harmful emissions into the atmosphere. The adjustment is carried out with the engine running by tightening and unscrewing the quantity screw until the optimal idle speed is established, which for the VAZ-2109 is 800-900 rpm; this can be tracked using a standard or connected tachometer.
Malfunction of the vacuum ignition timing regulator
Increased consumption can be caused by carburetor malfunctions such as clogged air jets; malfunction of the EPH system; a loose solenoid valve and, as a result, fuel leakage between the nozzle and the channel walls; economizer malfunction; incomplete opening of the air damper, leading to constant over-enrichment of the mixture. If, under heavy load and sharp acceleration, your fingers begin to noticeably knock and engine detonation appears, you should move the distributor a little to minus, then check the car again while driving.
Features and malfunctions of the starting device
With the onset of frost, many owners of “nines” are faced with the problem of poor cold starting of the engine, and the cause of the malfunction is often the starting device (PU), which is designed to enrich the fuel mixture in a certain proportion. When the choke cable is pulled, the air damper closes, but under the influence of vacuum it changes its position, opening slightly and to some extent allowing air to pass into the carburetor. The position of the air intake is also adjusted using a diaphragm device, which is mechanically connected to the damper by a system of rods.
Of course, a cold engine may not start in cold weather due to a weak battery, a bad starter, or because of the engine itself, if it is already worn out, but the carburetor unit is also often the culprit of the problem. The causes of the malfunction in this case:
- the air damper opening screw on the diaphragm device is incorrectly adjusted;
- the diaphragm itself is torn or has lost elasticity (there may also be an air leak);
- the choke cable is poorly secured or incorrectly installed;
- the return spring is missing or stretched;
- another spring, which is located inside the diaphragm mechanism, is incorrectly selected.
In order for the engine to start smoothly at low temperatures, it is important to adjust the starting gap (the angle of the air intake during startup). We perform the adjustment as follows:
- fully extend the choke cable;
- using a screwdriver, pressing the rod, forcefully open the air intake;
- loosen the lock nut on the diaphragm mechanism, use the adjusting screw to adjust the damper so that it is installed in the position with the specified starting gap (2.5-3 mm depending on the modification of the KU);
- tighten the locknut, use the throttle valve opening screw to increase the number of revolutions;
- pumping the gas pedal twice so that gasoline enters the carburetor, we try to start the engine;
- after starting, use the opening screw to reduce the speed, bringing it to the desired level (for the winter period - approximately 2700-3000 rpm);
- If the air damper is closed too tightly, and the engine twitches, by adjusting the engine while the engine is running, we again adjust the thermal gap.
Having achieved the desired result, tighten the locknut, do a second cold start, this time the car should start almost immediately.
Insufficient tire pressure, tire wear Adjust the float
| Do-it-yourself carburetor repair for VAZ 2109 2108: how to remove, assembly, malfunctions (does not flow, overflows, etc.), how to rinse video We remove the choke, start it, then manually adjust the blue quantity screw to achieve stable engine operation with a minimum vacuum in the vacuum advance fitting. The correct installation is checked by idling the engine warmed up to 80-90º, with the throttle valves fully closed and the air damper fully open, the wire is sharply removed from the output of the solenoid valve. |
- in traffic 9.1 l;
- on average 7.7 l;
- on the highway 5.5 l.
If you determine a large excess consumption of fuel using instruments, first make sure that the instruments themselves and the fuel level sensor are working properly. If not, replace them.
The volume of the fuel tank installed during production on the VAZ 21099 car is 43 liters. Before taking measurements, make sure that your car has an original gas tank. Otherwise, it is necessary to measure the capacity of the non-original gas storage tank.
To measure fuel consumption on an injection machine, you need to fill the gas tank to the neck and measure the number of kilometers traveled until the engine stalls from lack of fuel. It should be taken into account that the capacity of the fuel system as a whole exceeds the volume of the tank by 1 liter.
If your car has a carburetor, you can take a plastic bottle, fill it with fuel, place it in the engine compartment away from the engine and outlet pipes, and tightly connect this improvised gas tank with a flexible hose to the fuel pump. Next, you need to measure the distance traveled by the car before running out of fuel, and you will get accurate fuel consumption indicators.
In addition, some car owners install mechanical water consumption meters instead of a fuel filter. Cheap and cheerful, but not recommended.
Removal and installation of Solex. Solex tuning
According to the book instructions, the fuel level in the Solex 21083 carburetor is measured using a caliper; the distance between the upper surface of the main body and the level of fuel in the chamber is determined; it should be 24-26 mm. Thus, through simple manipulations that restored the functionality of these Solex carburetor systems, we achieved some increase in power and throttle response of the car engine without tuning or modifications, while maintaining its fuel appetite at normal levels.
Setting up the float chamber. Float adjustment
Again, the fuel mixture becomes very rich in fuel, since air enters it with difficulty through a heavily clogged air filter element. From this small guide, you were able to learn how to clean the carburetor and now you can proceed directly to performing adjustment procedures.
| Condition of the engine piston group |
| Correct carburetor settings |
| Cooling |
| Ignition |
| Brake system |
| Chassis |
Where to begin
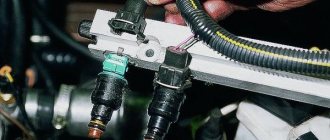
The accelerator pump provides the required amount of mixture during sharp acceleration, when the main metering system does not have time to provide this, since it provides normal supply only when the throttle is opened smoothly. At the stage of the engine control check, it is necessary, of course, to start it, and then for about thirty seconds observe the flow of fuel into the chambers from the small diffusers, using a small flashlight for a better view.
Tips for setting up, adjusting and troubleshooting Carburetor malfunction
| Solex carburetor malfunctions. possible carburetor malfunctions and repairs - AvtoSovet Whether the EMC solenoid valve is installed correctly or not in the Solex or Ozone carburetor directly determines the idle speed of the car's engine. All of the above adjustments relate to the settings of the Solex 21083 carburetor, and the nature of engine operation and fuel consumption depend on how well the unit is adjusted. |
| How to reduce fuel consumption on a VAZ 2109 carburetor: remove the cover and turn it over, hold it horizontally, look at the gap between the floats and the horizontal surface of the cover itself; it should be within 1.0-1.5 mm; At one time, in order to save fuel on a GAZ-31029 or 3110, the owners of these cars often installed VAZ Solexes, but such an installation generally did not justify itself; even if it was possible to save gasoline, it was only with very careful driving and poor acceleration. |
- Incorrect cylinder pressure. On the “Nine” it should be 9.9 kg/cm2.
- Problems in the engine cooling system. This can also lead to increased friction, which, in turn, leads to excessive fuel consumption of up to 30%.
- The ignition timing was set incorrectly.
- There is a leak in one of the fuel system elements. This can also lead to overflow in the carburetor.
- Then there are problems with the chassis system. These are not completely disengaged wheels, overtightened wheel bearings, or lack of tire pressure.
- Incorrectly selected spark plugs and gaps between them.
- Malfunctions in the operation of the vacuum advance regulator.
Dismantling, disassembling and cleaning the carburetor
In order to restore the functionality of the Solex carburetor, you must:
- remove the device from the engine;
- take it apart;
- clean and rinse;
- replace faulty elements;
- assemble and install on the engine;
- make adjustments.
We recommend: Step-by-step installation of a towbar on a Chevrolet Niva with your own hands
Removing the Solex carburetor from the engine
Required tools:
- slotted and Phillips screwdrivers;
- keys for 7, 8 (2 pieces), 10, 13 (preferably a cap).
Execution order:
- Raise the hood.
- Using a 10mm wrench, unscrew the air filter cover fixing nut.
- We snap off the latches (4 pcs).
To remove the filter, you need to unscrew the nut and press the latches
- Remove the air filter from the “pan”.
- Using a size 8 wrench, unscrew the nuts securing the air filter housing.
- Using a 7 key, loosen the clamp screw on the gas exhaust hose. Let's remove this hose.
- Remove the filter housing.
To remove the filter housing you need to unscrew 4 nuts - Disconnect the wires from the terminal of the EPHH valve and from the contact of the quantity adjustment bolt.
Disconnect the wire tips from the valve and from the quantity screw contact
- Disconnect the vacuum hose from the fitting.
Disconnect the vacuum hose from the fitting
- Using a 7 key, loosen the clamps on the fuel supply hose and on the return hose. Let's take them off.
Disconnect the fuel hoses
- Remove the crankcase ventilation hose.
Disconnect the crankcase ventilation hose - Using two 8 keys, release the air damper rod screw. Disconnect the drive cable.
Remove the air damper drive rod
- Remove the spring from the damper drive.
Remove the spring
- In the damper drive sector, disengage the cable tip. Disconnect the cable.
Disconnect the throttle valve cable
- Using a 13mm wrench, unscrew the nuts securing the carburetor body (4 pcs).
- Using a screwdriver, unscrew the screw securing the heating module.
- We dismantle the carburetor. If it cannot be removed, pry out its body with a slotted screwdriver.
Remove the carburetor from the studs
There should be three gaskets under the carburetor: top (thickest), middle (heat insulating) and bottom (sealing).
Disassembling the Solex carburetor
Required tools:
- crosshead screwdriver;
- hammer;
- drill (knitting needle) with a diameter of 2.5 mm;
- keys for 11, 13, 14;
- tweezers;
- awl;
- toothpicks.
Execution order:
- Unscrew the five screws securing the cover with a Phillips screwdriver. Disconnect the cover.
Unscrew 5 screws
- Using a drill (knitting needle) and a hammer, remove the float axis. We dismantle the floats.
Disconnect the float axis
- Carefully remove the cardboard gasket from the sealing surface of the lid.
Carefully remove the cardboard spacer - Using a 11mm wrench, unscrew the needle valve.
Let's take it off. Unscrew the needle valve - Using a 13mm wrench, unscrew the solenoid valve. We remove the seal, cup, and jet from it.
We unscrew the valve, remove the jet, seal, cup from it
- Use the same tool to unscrew the filter plug. Remove the filter.
Unscrew the plug and remove the filter
- Without changing the tool, unscrew the fuel fitting. We take it out together with the sealing ring.
- Using a 14mm wrench, unscrew the bolt securing the air damper lever. We remove it, trying not to lose the fixing ball and pressure spring located under it.
Remove the lever
- Using a Phillips screwdriver, unscrew the 4 screws on the starter cover. We remove it with the diaphragm and spring.
Removing and disassembling the starting device
- Using the same tool, unscrew the 2 screws securing the air damper.
We remove its axis from the carburetor cover. Removing the air damper - Remove the rubber seal on the idle air passage tube.
Remove the seal on the fuel channel tube
- Using a slotted screwdriver, unscrew the choke rod holder screw. Let's take it off.
Removing the bracket
- We also unscrew and remove the air jets of the dosing systems.
Unscrew the air jets
- We remove the sprayer by prying it with a screwdriver at the top “spout”.
We remove the sprayer by prying it with a screwdriver
- Use a screwdriver to unscrew the fuel nozzles. If they do not shake out of the channels, we take them out with a toothpick.
We unscrew the fuel nozzles (if necessary or, for example, in order to reduce fuel consumption, they can be replaced later)
- Using pliers, carefully remove the diffusers from both chambers.
We remove the diffusers using pliers
- Using a Phillips screwdriver, unscrew the 4 screws securing the accelerator pump cover.
Disassembling the accelerator pump
- Remove the cover with the diaphragm and spring.
- Using a Phillips screwdriver, unscrew the 3 screws of the power mode economizer cover. We remove it with the diaphragm and spring.
We disassemble the economizer of power modes
- Using a slotted screwdriver, unscrew the economizer nozzle. Let's take it out.
- Disconnect the wire contact from the quantity adjustment screw.
- Using a slotted screwdriver, unscrew the screw of the wire holder.
We remove the wire. Disconnect the tip of the screw wire, then unscrew the screw itself - Unscrew and remove the quantity screw.
- Using a Phillips screwdriver, unscrew the screw securing the throttle valve drive. Remove the mount.
Removing the throttle control sector
- Using a slotted screwdriver, unscrew the quality screw.
- We remove it using tweezers.
- If the screw comes out without a rubber seal, remove it using an awl.
- Using a size 11 wrench, unscrew the nut securing the accelerator pump drive cam. We remove the cam along with the washer that is located under it.
Remove the accelerator pump drive cam
- Using a Phillips screwdriver, unscrew the screws securing both dampers. We remove the flaps.
- Remove the spring and plastic sleeve from the damper axis of the first chamber.
- Remove the axis of the first camera.
- Using a slotted screwdriver, pry up and remove the lock washer of the shutter axis of the second chamber.
Remove the axle. We disconnect and remove the throttle valves - the carburetor is completely disassembled. Assembly is carried out in reverse order
Important: do not disconnect the dampers or remove their axles unless necessary! If installed incorrectly, they may become skewed, which will lead to incomplete opening or closing!
Cleaning and flushing the Solex carburetor
Required tools:
- a compressor or pump with a tapered fitting at the end of the hose;
- carburetor cleaning liquid in an aerosol can or acetone;
- toothbrush (preferably a children's one);
- thin wooden spatula;
- toothpicks;
- clean rag.
Before washing the carburetor, it is recommended to soak the disconnected elements in a special washing liquid for 8–10 hours. This does not apply to rubber and plastic products!
If you don't have that much time, spray the parts on the outside and inside with carburetor cleaner and wait 30 minutes.
Carburetor cleaning fluid
The most convenient way to remove external stains is with a toothbrush. Dirt deposits on the inner surface of the carburetor cover and body are removed using a thin wooden spatula wrapped in a clean rag.
After washing, parts with internal openings (nozzles, diffusers, tubes, and internal channels of the carburetor cover and body) must be blown with a stream of compressed air (preferably at least 6 atmospheres).
Replacement of faulty elements and assembly of the Solex carburetor
When completely disassembling the carburetor, it is recommended to replace all its elements that show signs of damage or deformation. The best solution when repairing a device yourself is to purchase a repair kit, which includes all the parts that may need to be replaced:
- jets;
- springs;
- seals;
- diaphragms;
- gaskets (carburetor covers and housings);
- needle valve;
- filter;
- screws (quality, quantity);
- repair studs, etc.
Assembly/cleaning or other actions with the carburetor are carried out using the Solex carburetor repair kit.
Having replaced the rejected elements, we proceed to assembling the carburetor. We produce it in the reverse order to that described above. We do not screw the carburetor cover to the body!
Breakdowns causing increased consumption
The VAZ carburetor engine begins to require a lot of gasoline when there are malfunctions of the following parts.
- Problems with the power system (needles, carburetor jets, fuel pump).
- Wheel hub too tight.
- Broken camber - toe.
- The spark plug gaps are broken.
- Faulty thermostat.
- Low compression (compression) in the cylinders.
- Tire pressure is below normal.
- The ignition timing is incorrect.
Deviations in the internal balance of the carburetor result in up to 50 additional percent loss of gasoline. An increase in flow rate can cause misalignment of the needle valve needle, incorrect position of the main fuel jet, idle jet, or throttle valve. You should not overdo it when tightening the wheel hubs. In this case, the wheel becomes more clumsy, and a lot of force will be required to turn it at a certain angle. When driving in neutral gear, heavily tightened hubs stop the car from inertia ahead of time. As a result, up to 15% “overtime” fuel may be required.
In order not to waste another +15% of fuel, you definitely need to check the wheel alignment. This is the name given to the deviation of the wheel from the vertical plane of its installation. Due to the collapse of the wheel, the car needs more fuel to travel a particular section of the road.
If the spark plugs are not gapped correctly, the spark will not be strong enough. This leads to poor ignition of the combustible mixture. As a result, another 10% of fuel is consumed.
If the thermostat is broken, the engine does not reach the required operating temperature, which prevents all system mechanisms from working at full capacity. The system is forced to compensate for deviations from the optimal operation of the mechanisms with an additional amount of gasoline (up to 10%).
Compression (the amount of pressure in the piston at the end of the compression stroke) for the VAZ 2109 should be in the range of 9.5–13 atmospheres. If deviations from the norm occur, the cylinder walls and compression rings wear out. Over time, this adds up to 10% to costs.
The combustion efficiency of the combustible mixture is also affected by the ignition timing. If it is incorrectly set, a spark is formed when the crankshaft is in the wrong position, and the resulting mixture does not burn 100 percent. And to maintain a given power, the engine requires more fuel. According to measurements, a deviation from the angle of 1 degree causes an increase in gasoline costs by 1 percent.
Knowing what breakdowns cause high fuel consumption of the VAZ 2109, you can diagnose them in time.
Peculiarities
- The 1.5 liter petrol engine is equipped with a carburetor power supply system and has two valves per cylinder. The power unit develops a power of 73 horsepower and at the same time has excellent fuel efficiency. On the highway, a car with a VAZ 21083 engine consumes less than 7 liters of gasoline in cruising mode.
- At the same time, it must be said that this power unit was originally designed for use on 93 gasoline. But we recommend that you avoid using low-octane fuel, as this leads to rapid failure of the carburetor and other vehicle systems.
- The upper location of the shaft in the VAZ 21083 engine made it possible to get rid of vibrations and inertial moments in the operation of the engine. This power unit has minimal vibrations, which improves the operating comfort of the vehicle.
- It must be said that the VAZ 21083 engine is equipped with a timing belt drive, so every 50,000 kilometers the car owner will need to carry out service work to replace the belt and guide rollers.
- According to the plant, the resource of the power unit is 125,000 kilometers. In practice, if proper care is provided, such engines will be able to travel more than 200 thousand kilometers without major repairs.
- Among the differences in this series of engines, we can note an increase in the piston diameter to 82 millimeters, as well as a change in the exhaust valves, which received a diameter of 37 millimeters.
- The design of the motor was designed in such a way that if the timing belt breaks, the valves do not collide with the moving pistons. Thus, it is possible to increase the reliability of the engine and relieve the car owner from the need for complex overhauls.
- The engine itself is made of cast iron, which increases the temperature stability of the power unit. The alloy used is durable and yet lightweight.