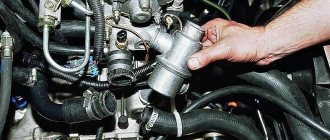
Experienced car enthusiasts understand the principle of operation of the thermostat. Beginners have only heard about this part, but do not know what it is used for. Everyone encounters a thermostat sooner or later, since the unit changes with the same frequency as any other consumable. It lasts no more than three years, and its breakdown is difficult not to notice.
Operating temperature of 8-valve
The normal operating temperature for eight-valve engines on Kalinas and Grants is exactly 90 ºC. But owners complain that sometimes it has difficulty reaching 80 degrees even in warm weather. The reason lies in the thermostat - it opens fully at a temperature of 85 degrees. Moreover, the permissible deviation from this value is very large - (85±8.3) ºС.
But the fuel mixture can only ignite normally if the engine temperature is about 90 degrees. This is the value stored in the electronic control unit. If the temperature is too low, the mixture becomes richer (the amount of gasoline increases). This is the main problem that occurs when the temperature drops. And in winter the heater works worse.
Your case
Temperature diagram. Normal operating temperature is at 90 on the instrument panel.
A stuck thermostat valve is a typical malfunction of the engine cooling system.
That is, the liquid that has not yet been heated is supplied to the cooling radiator and blown by a strong wind flow. Indeed, with an increase in air temperature, the problem will partly go away. That’s why they used to put cardboard on it and drive like that for years. But we don't recommend doing this.
Solution
The problem of low temperature of the engine cooling system can be eliminated by installing a thermostat that opens at 92ºC. The WAHLER 3091.92D element performs excellently.
Original packaging of Wahler 3091.92d thermostat.
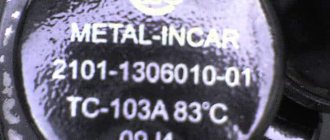
The element itself - the opening temperature is stamped on the body.
You just have to disassemble it and transfer the inside to Kalina’s original thermostat.
We saw off the plate, bend the body and take out the thermoelement.
We sharpen the spring so that the pressure point becomes flatter.
For comparison, thermoelements Wahler 3091.92d and the original one.
Be sure to use new gaskets and lubricate them with a small amount of sealant - this will prevent coolant leaks.
VAZ Kalina thermostat: replacement
At the initial stage, you need to purchase a suitable Lada Kalina thermostat. When choosing, you need to take into account the required temperature, since different devices may have different temperature control (valve actuation) temperatures. Having selected the recommended solution (Kalina 2 thermostat or Lada Kalina thermostat), you can proceed to replacement.
First, you need to prepare:
- Screwdriver Set,
- a pair of socket wrenches for 12, 13;
- silicone sealant;
- coolant drain container with a volume of about 5 liters;
Next, we will consider replacing the thermostat on your own in a VAZ 1118 Lada Kalina.
- The first thing you need to start with is to drain the coolant. The coolant is drained into the prepared container. You can also additionally use rags to prevent contamination from accidentally spilled antifreeze or antifreeze.
- Then the air filter is removed (from the side of the engine compartment, the two upper bolts and nut are unscrewed, the connector on the filter housing is removed from the recirculation valve, the valve itself is removed and, together with the tubes, is moved to the side, the connector is pulled off from the air sensor, the air hose is removed by loosening the clamp). Now you can swing and remove the filter housing.
- Now you need to remove the four hoses by loosening the clamps and using a socket wrench 8 and a screwdriver. You should be prepared for some coolant to leak out when removing. It is recommended to place a rag in advance.
After the assembly has been completed, all that remains is to start the engine and let the engine reach operating temperatures. Not only the operation of the thermostat is checked, but also the tightness of all connections. By the way, if the cooling system becomes airy during work, you must first remove the air plug.
After making sure that everything is working properly and there are no coolant leaks, you can once again check the tightness of the clamps. At this point, replacing the thermostat on Kalina can be considered complete.
The best thermostat for VAZ 2110, 2111 and 2112
| The main task of the thermostat is to prevent engine overheating, as well as rapid warm-up and timely removal of heat from heating parts. Is the thermostat not working on your VAZ 2110? No problem, just replace it with a new one. And to avoid problems with it in the future, you should choose the right thermostat in the store... |
Signs of a malfunctioning thermostat:
- The engine gets very hot.
- The engine does not reach operating temperature.
- What was the lifespan of the old thermostat?
- Which thermostat manufacturer is better?
- Is it better to replace the thermostat assembly or just its thermocouple?
ps All off-topic comments will be deleted. xn--2111-43da1a8c.xn--p1ai
Lada 2112 › Logbook › Modification of the grant thermostat
Let me start with the fact that a year ago I installed a thermostat from a grant from BEHR. For a long time I was looking for a thermostat from this particular company in my city and in the end it was found. After installing it, the car began to warm up faster and the heater began to heat a little better, which is exactly what I wanted. After driving with it during the winter, I noticed that with it the car keeps the temperature while driving at 77-79, which is very low for the proper operation of our engine. In the heat of the summer, even in the longest traffic jams, the car was reluctant to warm up, which definitely made me happy, but in the end I decided to replace the thermocouple with a 92-degree thermocouple. The Wahler 3091.92D thermocouple fits into the BEHR housing without modifications. The search for this element in my city was unsuccessful... Either the price was higher than the price of the thermostat assembly, or the waiting period was more than a month. If I'm not mistaken, I was one of the first to install the BUBLS-64 grant thermostat. After recording about the installation, everyone pestered him with questions: what? How? and why?))) It was from him that I came across an idea for improvement for people like me who couldn’t find a thermocouple from Wahler that fits without much modification. This thermoelement was Wahler 3017.92D50. Again, it was not available anywhere and I was offered a Wahler 3017.92D2 instead. They differ only in the presence or absence of a gasket. To implement it, you need to grind a new plate, because... the native one is 1 mm smaller and the consequence does not completely cover the small circle and does not maintain a normal temperature. This element was purchased for 550 rubles and given to my father to make a plate for it. Let me tell you right away that the photos are not mine, because... I did it a month ago and didn’t even think about registering for a drive, so I didn’t take any pictures)) Here is a link to his used one. Modification of the Grant 2190 thermostat or even warmer.
Spare parts for replacing the thermostat in Kalina
So, what you will need for work:
— a new thermostat itself, preferably previously tested for operation with boiling water, so as not to have to do all the work again if it becomes defective;
— 1 liter of coolant of the same brand that is poured into the system; see here
— an empty, clean container of at least 5 liters;
- silicone sealant; for example, like this
- a set of plumbing tools - screwdrivers, pliers, socket wrench - internal hexagon "5".
- desire, minimal plumbing skills and a couple of hours of free time.
It is highly advisable to wash the engine first. You don’t have to work in a garage, you don’t need a hole and you don’t have to crawl under the car. So, let's begin.
The principle of operation of the thermostat on Kalina
The thermostat has a cylinder that is located near the internal combustion engine. It contains a ball of wax that begins to expand when heated. As it expands, it pushes out a special pin, which opens a valve that prevents coolant from entering. As soon as the Lada Kalina internal combustion engine turns off and cools down, the ball returns to its original state and closes the valve.
How the device works
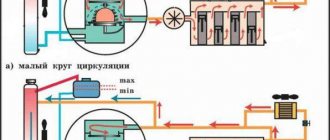
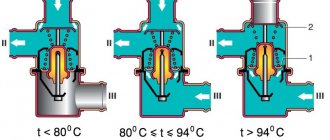
Photo 2 (Heater valve operation diagram)
Heater valve operation diagram
When the engine is cold, the thermostat valve is in the closed position, and antifreeze circulates in a small circle, passing only through the heater core and through the water jacket of the block. When the engine warms up to operating temperature, the valve opens completely and the liquid begins to circulate in a large circle, passing through the radiator, where it cools. This prevents overheating of the power unit.
In winter, warming up takes less time thanks to the thermostat - the heater radiator heats up earlier, and the cabin becomes warm within a few minutes, while saving fuel. The thermostat must be replaced if, when the temperature reaches 95 degrees or more, the valve does not open - the engine begins to overheat. If the motor, on the contrary, cannot warm up, it means that the device does not close and must also be replaced.
In design, this is a simple product consisting of a body, a main and bypass valve, a temperature-sensitive element, two inlet and one outlet pipe. Depending on the manufacturer, the thermostat is made of copper, brass or heat-resistant plastic. The heat-sensitive solid element is based on technical wax. When heated, it melts and, expanding, presses on the main valve, forcing it to open, thereby passing coolant in a large circle. The wax melts quickly thanks to the copper, aluminum and graphite powder that is included in its composition.
You can check the performance of the heater without installing it in the cooling system. To do this, place the device in a container of water and place it on the stove. As the liquid heats up, the thermostat valve opens approximately 3 centimeters. This way you can make sure that the device is working properly before installing it.
How to check the thermostat without removing it from the car
Sometimes the car's cooling system fails. The engine temperature arrow on the dashboard goes off scale after a few minutes of warming up. And sometimes the opposite happens - the temperature, especially while driving, does not reach the operating value of 90 degrees.
These are all sure signs that it's time to check the important device that controls coolant flow. Many people know that this completely closed assembly consists of a valve and a heat-sensitive substance. The latter, when heated, opens a large circuit - the radiator - through the coolant valve.
But how to check the thermostat, because that’s what we’re talking about, on your car? And most of all, car enthusiasts are interested in how to check the thermostat without removing it from the car? Let's try to give some advice on this matter.
Without dismantling the device, this is the only way to correctly diagnose it.
- Start the engine, then wait two minutes.
- Touch the hose directed from the device being tested to the radiator.
- If the hose is hot, the device is faulty; most likely, the valve never closes.
- If the hose remains cold even after 5 - 10 minutes of warming up, and the temperature on the panel is already more than 90 degrees, the unit is also faulty. Most likely, the valve, on the contrary, does not open.
Kalina thermostat: signs of malfunction, which one is better
Replacing the thermostat on Kalina if it fails to work can be easily done by the driver himself. You should consider in more detail the signs of a faulty thermostat, study the instructions for replacing it with a new device, and understand what tools are needed for this.
Thermostat functions and signs of malfunctions
The thermostat is one of the main components of the cooling system of any car; it is responsible for its optimal temperature conditions and preventing engine overheating.
A working thermostat can significantly reduce the time required to warm up the engine in winter.
The operation of the specified unit of the cooling system of the machine is carried out using 2 valves that operate automatically. The valves are opened using a heat-sensitive element, which, when the temperature in the system exceeds the normal temperature, begins to melt. The movement of coolant in the system is possible in a large or small circle. When the car engine warms up quickly, the large circle is blocked and the coolant flows through the small circle. When the system temperature reaches 85°C, the valve partially opens and the liquid begins to move in a large circle. Its full opening occurs at a temperature of 100°C. When the coolant temperature drops, the valves close.
Various malfunctions in the thermostat can be identified by the following signs:
- the engine overheats and subsequently fails;
- a longer warm-up of the engine is required.
If you notice a malfunction in the thermostat, it is necessary to urgently replace it.
The owner decides which thermostat to install on his car. The following recommendations will help you make the right choice when purchasing this part:
- The material used to make a high-quality thermostat is brass or stainless steel.
- The thermostat for Kalina should be purchased from trusted manufacturers - AvtoVAZ, Luzar, Pramo, Elekton.
Many Lada Kalina owners ask the question, which is the best manufacturer of the main components of the car's cooling system.
All of the manufacturers listed above have proven themselves to be good. But the best for Kalina, according to most experts, is the domestically produced AvtoVAZ thermostat; it is reliable, durable, allowing the engine to quickly heat up to the desired state. This device has a bolt for manual heat regulation.
Instructions for replacing the unit
Before changing the thermostat on Kalina, it is necessary to carry out preparatory work, including the purchase of a new device and the selection of the necessary tools. For further work you will need:
- thermostat Lada Kalina;
- empty 5 liter canister;
- Screwdriver Set;
- silicone sealant;
- socket wrenches for 8, 12 and 13.
Now you can start doing the main work, having first installed the machine on the overpass. A complete replacement of the thermostat consists of a sequence of simple steps:
- The coolant is drained into the prepared canister.
- Remove the air filter by unscrewing the top bolts and nut, removing the connector, valve, and air hose from the housing, having first loosened the clamp.
- 4 hoses are released; to do this, use an 8 socket wrench and a set of screwdrivers to release the clamps.
- Unscrew the nut and stud using socket wrenches 12 and 13 and a screwdriver, remove the ground wire and the thermostat itself.
- The seat for the new thermostat is being prepared: dust, dirt, and old materials are removed.
- A thin layer of silicone sealant is applied to the seat, which is left for 10 minutes to crystallize.
- A new thermostat is installed in the prepared place, and do not forget to replace the temperature sensor from the old device.
- All steps to secure the new thermostat are performed in the reverse order: the ground wire is screwed in, 4 hoses are connected and coolant is poured into the system, do not allow air pockets to occur.
- The correct installation of the device is inspected with the engine running; if necessary, the clamps are tightened to prevent leaks.
After replacing the thermostat on the Lada, you should carry out a control check.
When driving the car, monitor the current temperature level of the cooling system.
Correct installation of a new thermostat on Kalina should completely eliminate all signs of a malfunction in the car’s cooling system.
Lada Granta › Logbook › Thermostat, replacement + thermoelement
I also brought this topic up for discussion here www.drive2.ru/l/512624482658025528/ But I don’t have the patience to hold on any longer, the temperature outside dropped to 5 degrees in the morning, and I’m already tired of warming up the car and after a long drive, the maximum I have is this
Full size you'll heat it up
I decided to change it completely, I couldn’t find the luzara, the 92 gram inserts also didn’t want to boil in traffic jams around the city in the spring, I decided to do it this way, take a thermos assembly + thermocouple.
Full size we only need the body
Full size thermocouple 88g.
Full size and full set, but we won't need it
We extract the full size using side cutters.
We remove the standard 85g thermocouple from the housing.
Full size standard is much heavier in weight than its analogue
We rearrange the thermoelement, put the spring from the new thermoelement, it is softer.
Full size heating up
Full size opening started at 88g
Full size fully opened at 94
We take the modified thermos and go to the car. I drained the antifreeze in a fashionable way through the RB hose using a compressor, drained about 2.5 liters
Removing the old thermos
Full sizeMore dead than alive
It’s good that I decided to take a new housing, the old one was not sealed, it was blown out easily, it is not surprising that the car could not heat up, part of the coolant was wasted. Naturally, it was not possible to save the factory gasket, I installed another one, which was much inferior in quality, and applied a thin layer of sealant for peace of mind
Well, then we move the coolant sensor to a new thermos and put everything back together
I filled it with coolant, started and drove the car so that the face was higher, waited for the fan to work, the stove blew out with heat, which means it was pumped, although the losses when removing the old thermos were about 200g. Now the results.
Full size in the city ranges from 87 to 90g -
On the highway at a speed of 100 km/h it cools down a little, but within 86-87 degrees. I'm happy with the work done, the stove worked fine, it heats up faster, it takes about 40 minutes to replace the thermos. I boiled the old thermos out of curiosity, it works, it only opens 80 degrees narrower and siphons into a large circle, I'll try to experiment, there's a thermoelement left from the new thermos, sharpen the stem , grind the thermos so that it is airtight and let it remain as a reserve. Good luck to everyone and smooth roads.
The Granta thermostat is a key part of the engine cooling system. ensuring the optimal temperature of the coolant and the power unit itself. Thermostat malfunctions can lead to overheating and breakdown of the car engine, so it is advisable for owners to know how to check and replace the LADA Granta thermostat.
How to tell if the thermostat is working correctly
In order to find out whether the thermostat is working or not, it is necessary to warm up the engine so that the arrow indicating the temperature does not reach the red mark of the indicator quite a bit.
After that, turn off the engine, go to the hood and open it, look for the upper radiator hose. This rubber hose is usually black in color and is approximately 5cm in diameter.
There are metal clamps at its ends. The upper hose is attached to the top of the radiator. Then we look for the lower hose. It looks like the top one, only it is attached to the bottom of the radiator.
Touch the hoses carefully; they may be hot enough to burn you. If the engine temperature indicator shows that the engine is hot, but one of the hoses is cold, then most likely the thermostat valve is closed and is not allowing coolant through the radiator.
In this case, replace the old thermostat with a new one as quickly as possible (after waiting until the engine has cooled down).
There is another “folk” method for checking the functionality of the thermostat and it is as follows. Place the thermostat in a vessel with boiled (temperature should be about 100 degrees) water.
Next, we visually observe whether the thermostat valve opens. If it opens, it means it’s working. If not, we replace the damaged one with a new one. The above method involves removing the thermostat from the car.
If the thermostat malfunctions in a car, overheating or, more often, low engine temperature is observed. Such phenomena are associated with the thermostat jamming in one position; as a result, the coolant moves in one circle (large or small). Lack of adjustment of coolant distribution leads to deviations from the engine temperature regime. Thermostat failure is one of the most common problems in a cooling system. To replace the thermostat on a Lada Granta car, the coolant from the cooling system does not need to be completely drained.
You will need: TORX TZO wrench, 13mm socket, Phillips-blade screwdriver.
Possibility to do without removing the device
Next, we’ll figure out how to check the thermostat on VAZ cars. Let's start with the "classics". Here are the instructions for the VAZ 2106 car.
- Initially, you need to determine that the coolant level is normal, that the temperature arrow on the instrument panel works, and that the belt driving the antifreeze pump (pump) is tensioned normally.
- Next you need to start the engine and warm it up. If more than five minutes have passed and the temperature needle has not risen above 70 degrees, you should touch the return pipe from the radiator. If it is slightly warm, it means that the coolant immediately enters the large system circuit. Consequently, the valve of the device is constantly open.
- If the engine overheats after five minutes or more, you need to touch the upper radiator hose. Suppose it turns out to be cold - this means that the valve of the device being tested is jammed.
This instruction describes how to check the serviceability of a thermostat that has not been removed from the car.
But the following describes the procedure - how to check a removed thermostat at home.
- Make sure that the unit valve is closed at room temperature. If not, the device is faulty.
- Hang the device under test using a harness on some bracket, and the device should be inside a container of water, without contact with the walls. After heating the water, just before boiling, the valve should open. Its incomplete opening is acceptable.
- Allow the device under test to cool. In this case, the through element must be closed.
If the device turns out to be broken, it is better to replace it completely.
This instruction describes how to diagnose the operation of a dismantled device. However, to complete the picture, let’s add a few words about dismantling the unit. To do this, use a screwdriver to loosen the clamps of the three pipes suitable for the device. Then pull out the pipes and dismantle the necessary device, placing the container under the antifreeze leak.
Dismantling and installing the Kalina thermostat using the example of a 1.6 8-valve engine
To start work, we need to prepare a workspace so that we can get close to all the tubes and sensors that we will have to unscrew.
Unscrew the filler cap, then remove the plastic casing from the top of the engine:
After this, it is necessary to make access to the Kalina thermostat more free. To do this, you need to remove the air filter housing, read more about this here. Then it is worth keeping in mind that we will need to unscrew other pipes, and therefore we need to unscrew another large tube that connects the air filter and the throttle assembly.
And you can immediately look at the condition of the clamp and change it if necessary:
Now, in order to incur minimal losses of coolant, you need to pump out all the antifreeze or antifreeze from the engine. Now I will show you the fastest and easiest way to do this. We disconnect the fluid supply hose to the throttle assembly so as not to get confused, this is the one that is closer to the cable:
Then we need a compressor pre-connected to the cigarette lighter or battery terminals, depending on the type of wires. Then we screw the cone-shaped nozzle onto the end of the compressor and insert it into the fluid supply hose to the throttle assembly (marked with a blue arrow), and put a similar-sized hose onto the throttle assembly fitting, and the other end will go into a canister with the remains of the old antifreeze.
But my advice is to use an empty one, then just pour everything into the expansion tank so that after changing the thermostat and pumping the unit, fill in everything that was pumped out, and not pump or top up.
It is necessary to take into account that we pumped out the coolant from the engine cooling jacket bypassing the radiator (small circle), which means the liquid remained in the large circle, therefore, when disconnecting the pipes from the thermostat, you will need 2 of them, which go from and to the radiator, when removing tie them so that their ends point up. In this case, the liquid will not leak out.
And we also disconnect the sensor’s power plug, and now you can begin to remove the temperature sensor itself.
The thermostat itself is attached with two bolts diagonally, which need to be unscrewed:
After unscrewing the 2 bolts, carefully pull the thermostat towards the battery and reassemble everything in the reverse order!
Coolant pumping
After everything is assembled in the reverse order, we perform the following steps to pump the coolant.
- We start the car and wait until the car warms up to a temperature of 90-94. 1 fan will turn on.
- We wait, wait for the temperature to reach 100-105 - the 2nd fan will turn on
- Wait 4-5 seconds and turn off the car. The fan will still run to cool the engine. When the temperature is 85-89, the thermostat starts working, the peak is 102 degrees. At this moment, the valve opens completely and begins to circulate water in a large circle.
- We unscrew the filler cap while the fan is running, then immediately close it.
- We wait until the fan turns off completely and then open the lid again and the water will immediately go down. We top up to the MAX mark (what was pumped out) and that’s it. This completes the work.
On my own behalf I can say: Take a thermostat and DTOZh from Luzar. It works great and keeps the temperature at 81-90. I think this article will teach you to approach the maintenance of your car wisely. One of the readers of this blog, Vertass, was with you. No nail or rod for everyone.
At what temperature should the thermostat open?
The cooling system thermostat accelerates engine warm-up and maintains the required thermal operating conditions of the engine.
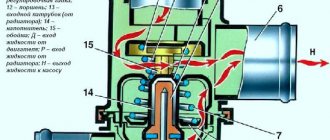
At optimal thermal conditions, the coolant temperature should be in the range of 85-95°C. The temperature values maintained by the thermostat are indicated on its bottom. The thermostat consists of a body and a cover, which are rolled together with the main valve seat. The thermostat has three pipes: an inlet pipe for coolant intake from the radiator, a bypass hose pipe for bypassing fluid from the cylinder head to the thermostat, and a pipe for supplying coolant to the pump.
The main valve is installed on the thermoelement glass, in which a rubber insert is rolled. The rubber insert contains a polished steel piston mounted on a fixed holder. Between the walls and the rubber insert there is a heat-sensitive solid filler. The main valve is pressed against the seat by a spring. There are two posts attached to the valve, on which a bypass valve is installed, pressed by a spring. The thermostat, depending on the temperature of the coolant, automatically turns on or off the radiator of the cooling system and bypasses the fluid through the radiator or bypassing it.
On a cold engine, when the coolant temperature is below 80°C, the main valve is closed and the bypass valve is open. In this case, the liquid circulates through the bypass valve into the pump, bypassing the radiator (in a small circle). This ensures quick warm-up of the engine. When the fluid temperature rises above 94°C, the thermostat's solid fill expands, compresses the rubber insert and pushes out the piston, moving the main valve until it is fully open. The bypass valve closes completely. In this case, the liquid circulates in a large circle: from the cooling jackets to the radiator and then through the main thermostat valve it enters the pump, which is again sent to the engine cooling jackets. Within the temperature range of 80-94°C, the thermostat valves are in intermediate positions, and the coolant circulates in both small and large circles. The opening value of the main valve ensures gradual mixing of liquid cooled in the radiator, thereby achieving the best thermal operating conditions of the engine.
On 2101-2107 and Niva 21213 + all its modifications there is a thermostat 2101 (the opening temperature is 80-82 degrees, the angle of rotation of the pipes is 120 degrees). The VAZ-2121 was equipped with a thermostat 2121, which differs in the angle of rotation of the pipes (180 degrees, that is, the upper one is opposite the lower one) and its own set of pipes. It is possible to install a 2101 thermostat on a 2121, but you also need to buy 21213 pipes along with it. The opposite option (installing a 21st thermostat on a 21213) is more difficult to implement due to the lack of 2121 pipe kits on sale. There are no other obstacles to technical creativity. Note: IMHO, if you are going to change it, either look for the “twenty-first” pipes and install a Hungarian thermostat (cheap and good), or invest in an “Italian” 2101 - 450 rubles at the Za Rulem TD, but the quality is guaranteed and the opening temperature is maintained. The “budget” option - thermostat 2101 produced by the Vladimir plant (together with the Poles) - costs 100-150 rubles, and there is much less risk of running into defects. Stavrovsky thermostats (the plant is a supplier of the VAZ conveyor) are a very dangerous lottery, more than half of them “raise” the temperature regime by opening later. In winter this is nothing, but in summer the consequences of being stuck in a traffic jam are obvious