How to replace the Lada Kalina muffler with your own hands
Before we talk about replacing the muffler, you need to choose the right model.
The device is matched to the car body. At the same time, it is best to purchase “Glushak” not at car markets, but in specialized stores. You can buy a model on the market for 500 rubles, but it is unlikely to last long. When in a car shop you can pick up an aluminum or stainless steel muffler housing for 1000–1500 rubles and be sure of its long service life. Typically, original exhaust system elements last for 50 thousand kilometers. To successfully complete all procedures, it is best to immediately prepare the following tools:
- WD-40 lubricant;
- two open-end wrenches for 13;
- hammer;
- flat blade screwdriver.
Dismantling procedure
Removing the resonator and plug can be considered the most labor-intensive part of the entire replacement procedure. The complexity is determined by the fact that it can be very difficult to disconnect the elements of the exhaust system from each other:
- The first step is to jack up the rear of the car or drive it into a hole.
- Then you will need to find the connecting clamp that connects the muffler and the resonator. It will be difficult to remove the clamp, since the bolted connections stick to the metal structures due to constant heating.
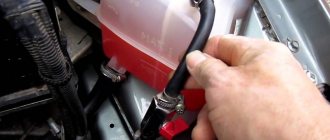
- It is best to first lubricate all connections with lubricating fluid and then proceed with removal.
- After dismantling the resonator, you need to remove the muffler itself.
- It is usually easily removed, since it is attached to the bottom of the car using rubber hangers.
It is recommended to immediately remove all stickers and wrapping from a new product.
Therefore, removing the muffler may take about 20-30 minutes, depending on how difficult it is to remove the resonator bolts. In this case, all connecting elements and seals must also be removed - their further use on the new device is impossible.
How to change seals, rubber bands and corrugation
There are usually no problems when it comes to changing o-rings and rubber bands on the muffler. All components can be purchased along with the device and rubber bands can be put on in place of the old ones.
The rubber band for the silencer is inexpensive and can be changed in a minute.
Replacing the corrugation is considered a more complex procedure. In addition, the car owner does not always have a welding machine at hand and knows how to operate it.
To change the corrugation on a still working muffler, you must perform the following steps:
- Using a grinder, cut off the remnants of the old corrugation (of course, the muffler will need to be removed before doing this).
- On the new corrugation, neat cuts are made in those places to which the pipes will be joined.
- The corrugation is pulled into place and must be fixed on both sides with clamps.
- “Glushak” is installed under the bottom.
This simplified method of replacing the corrugation is considered quite practical, although, of course, welding work would make the replacement more durable.
Corrugation element increases muffler service life
How to reduce exhaust noise
A sound wave can travel in space much faster than gases, therefore, in the design of a muffler, its noise reduction circuit is of great importance. Physical vibrations from sound waves are transmitted to the walls of the exhaust system, and its design is made in such a way that it converts the sound wave into thermal energy, which the exhaust pipe, like a radiator, releases to the atmosphere.
Read more: Lada Granta thermostat for VAZ 2114 cons
Reducing the noise level of a muffler cannot be achieved without creating some kind of resistance to the exhaust gases, as a result of which part of the engine power, quite insignificant, is spent on overcoming this resistance. To minimize the power loss that noise reduction inevitably leads to, a direct-flow muffler has been developed.
It has a minimum of partitions, does not interfere so much with the passage of exhaust gases and reduce their speed, which is why it sounds completely different.
Recommendations for replacing the resonator and muffler
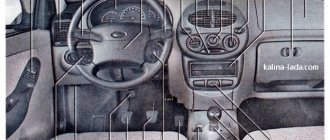
Lada Kalina Hatchback 1.6 8 cells. Port wine Logbook Airing the Kalina cooling system. Finalization
Dismantling the old part
- Unscrew the nuts securing the clamp connecting the muffler pipe and the resonator pipe. Remove the clamp. Lubricate the bolts and nuts with WD. Since they are completely stuck, it can be impossible to disconnect them. About 10 minutes after lubrication, you can begin to unscrew them. If it is impossible to twist the bolts, you can cut them off using a grinder (grinder). After this, the clamp is bent. Now, by lightly tapping on the bend of the muffler, you need to dislodge the clamp from its connection to the resonator. There is a possibility that the clamp can be easily removed without using a hammer.
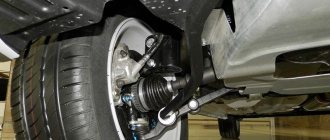
- Release the muffler from the fasteners, i.e., remove it from the rubber bands. There are two of them on the Lada Kalina. The first is somewhere near the rear beam, and the second is directly near the exhaust pipe itself.
- Remove the muffler itself.
The resonator on Kalina is screwed with three steel nuts directly to the catalyst. Since the nuts also stick very well, they must be lubricated with a rust softener. If this method does not work, a grinder can help. When replacing the resonator with a new one, all steps are carried out in the reverse order. The following method of replacing the resonator is also used. The old unit is cut off from the corrugation to the main muffler, the new resonator is welded. The cost of the resonator and muffler ranges from 1000 to 4000 thousand rubles.
Despite the huge selection of resonators from various companies and manufacturers, it is very difficult to find a worthwhile one. Since the resonator of the Lada Kalina is corrugated, it is advisable to find the same one made of stainless steel. However, there are practically no such offers on the Internet. You can install something else, the car will be able to work quietly, which will delight any car owner.
To learn in detail how to independently replace the resonator or the entire exhaust system on a Kalina, you can use information on the operation and repair of the Lada Kalina on online forums, video tutorials and photo reports.
According to experts, the car resonator must be replaced every 20 thousand kilometers. Any driver who has driven that many kilometers will be able to detect malfunctions of the device, usually by ear. It is recommended not to purchase cheap fakes. Practice proves that in this case, approximately 700-1000 km after changing the air resonator, you can return to the service station again.
Both the owner of a new car and the buyer who purchased a used car can face the problem of replacing the resonator on Kalina. Based on the foregoing, you can carry out repair work and replace parts of the exhaust system yourself or by contacting a car service center. Replacing the resonator is inexpensive. It should be remembered that without timely replacement of one of the components or if it is completely absent from the exhaust system, the remaining parts may burn out. And then repair work will cost more.
A method for making a muffler for a car yourself
To make a homemade device, you will need an outdated automotive powder fire extinguisher. This model of a homemade muffler is not only effective, but has also been tested many times, so it deserves attention. For work, in addition to a fire extinguisher, you will need the following materials and tools:
- two-inch (inner diameter) steel pipe or two sections of it;
- some elements of the old muffler;
- electric welding machine;
- welding electrodes (1.5-2.5 mm);
- small grinder with cutting wheels for metal.
Further work is carried out in this order:
- The head of the fire extinguisher is turned away and the remaining powder is poured out. The hole is expanded to such a size that the prepared pipe fits tightly enough.
- On the other side of the cylinder you need to prepare the same hole, but shifted towards the wall of the fire extinguisher.
- On the final sections of pipes (12-15 cm), those that will be located inside, round holes or through cuts should be made using a grinder.
- The prepared sections are inserted into the cylinder. In this case, it is calculated that the perforated areas are approximately in the center and opposite each other. We weld the connections on both sides of the cylinder in a circle, being careful not to burn through the metal of the fire extinguisher.
- We cut off the fastening devices from the used muffler and weld them onto a homemade product, calculating and marking with chalk the place of attachment to the car.
- To check the reliability and tightness of the welds, you can plug one of the pipes with a reliable plug, turn it over and fill it with water. There should not be even minimal leaks.
- After draining the water and blowing the product with a compressor (to completely remove any remaining liquid), you can install a self-made muffler on the car.
A plugged tube is welded into the fire extinguisher; it has 70 holes with a diameter of 5 mm. In this way, spending a minimum of resources and a little time, you can solve the problem of how to make a muffler with your own hands. A car equipped with such a reliable device will operate more quietly, and you will not have to spend money on purchasing a new exhaust system every year.
Recently, more and more car enthusiasts are making and repairing mufflers with their own hands. But why are they trying to do it themselves if the car markets are overflowing with a wide range of spare parts? It all comes down to cost. Cost is the main barrier for car owners. Therefore, today we will look at how to make a VAZ muffler with your own hands.
Exhaust Lada "Kalina system"
Owners of the Lada-Rano Kalina car either later have to deal with repairs or replacement of the muffler. This node is one of the problematic ones, which is associated with factory settings. shortcomings due to the fact that the design is made in the form of a sealed and solid body without welds; after a run of 40 thousand km, the system wears out: the integrity of the body is compromised, the sound becomes louder. The muffler can be repaired by installing a patch on the burnt area using welding. However, this is only a measure that will temporarily eliminate the problem. Therefore, it is recommended to replace the element with a new one. The exhaust system is designed in such a way that even an inexperienced motorist can carry out replacement and diagnostics with his own hands.
Part, depending on the modification of the car, So. is different, for sedan and station wagon bodies the model is used with a curved pipe, and for a hatchback - with straight inlet and outlet pipes. Catalog numbers for the following parts:
- 1118–1200010 muffler for the main Lada “for Kalina” sedan and station wagon;
- 1119 – muffler 1200010 is the main one for the Lada-Kalina.
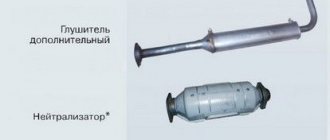
The hatchback consists of the Lada-Kalina muffler
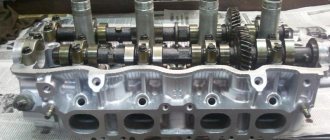
The main purpose of the exhaust system is to absorb the noise of engine exhaust gases. On the Lada-Kalina, the resonator assembly also consists of a muffler. The parts are connected between the clamp and the sealing ring. The muffler is a one-piece structure, and the resonator consists of several closed connections. The chambers of the chambers are made of tubes with small holes of the same size. This design ensures that the resonator smooths out sound vibrations. In the latest versions, the car joints are additionally laid with a noise-absorbing system.
exhaust material: 1-gasket; 2-catalytic converter; 3-sealing gasket; 4-metal compensator; 5-additional bracket; 7-catalytic manifold muffler; 8-receiving pipe; 8, 10-suspended muffler cushions; 9-metal O-ring; 11-main muffler; 12-bracket clamp
Replacing a part at a service center
When replacing a muffler, you need to be especially careful, since there are many options for the part depending on the Kalina model. The required element is selected in accordance with the mounting locations and dimensions. If problems arise during repair work, it is better to replace the Kalina-Universal muffler at a service center.
In fact, repairing or replacing a muffler is a simple but painstaking job. Its cost should be appropriate - no more than 1300-2000 rubles. If the price exceeds this level, it is most likely a scam. But if specialists ask for 200-500 rubles for work, then you won’t have to expect high-quality repairs.
Most likely, you will even need to replace the resonator - the second important part of the muffler. It performs similar functions to the main muffler. However, the resonator additionally protects the device from flames and sparks. If problems arise, you should fix the problem immediately.
Muffler replacement process
So, in order to replace the muffler on Kalina, you will need tools, namely: a 13mm wrench or socket and VD-40. Now that everything is prepared, you can proceed directly to the repair:
- We drive the car onto a pit, overpass or lift.
- We find the clamp of the middle part of the exhaust system and muffler.
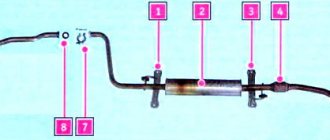
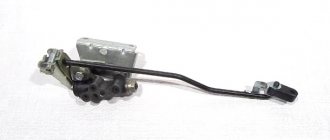
Bracket for fastening the middle part of the pipe and muffler Kalina
- Using 2 13mm wrenches, unscrew the bolts that hold the clamp.
- We dismantle the clamp and disconnect the pipes.
- Remove the muffler from the 2 rubber mounts.
- Carefully pull out the pipe.
- Assembly is carried out in reverse order.
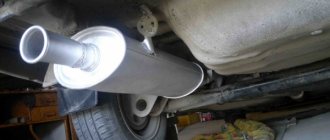
Bottom view of the installed new Kalina muffler
View along the installed new muffler on Kalina
Installed a new muffler on Kalina
Now the new muffler is installed, and you can enjoy a quiet and silent ride.
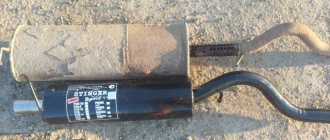
Comparison of a used muffler and a new one for Kalina
Reasons for failure
Corrosion damage to the Kalina muffler
Full view of the VAZ 1118 Kalina muffler
Muffler pipe broke off
There are not many reasons for the failure of a viburnum muffler, but every owner needs to know them. So, let's look at the main ones:
- Damage to the element structure due to corrosion damage.
- Rupture or deformation of the muffler after an accident.
- Damage to the lower part of the muffler due to collision with an obstacle.
These are all the main reasons that contribute to the fact that the unit requires replacement.
Description of the design of the exhaust gas system Lada Kalina 1117 2004 - 2013
Exhaust system:
1 — heat shield; 2 - sealing gasket; 3 — catalytic collector; 4 — oxygen concentration sensor; 5 — metal compensator; 6 — rubber cushions; 7 — additional muffler; 8 — main muffler; 9 - sealing ring; 10 - clamp.
The exhaust system consists of an exhaust manifold, integral with the catalytic converter (catcollector), additional and main mufflers and pipes connecting them.
Catcollector with oxygen concentration sensor
A sensor for oxygen concentration in the exhaust gases (lambda probe) is installed in the upper part of the catalytic collector (before the converter). On cars that comply with Euro-3 standards for the concentration of harmful substances, two oxygen concentration sensors are used: the second - diagnostic - is installed after the neutralizer in the lower part of the catalytic converter. The exhaust gas catalytic converter is designed to reduce emissions of carbon monoxide, nitrogen oxides and unburned hydrocarbons into the atmosphere.
The car is equipped with a neutralizer with a metal carrier. It consists of many honeycombs made of corrugated foil and coated with afterburning catalysts. Passing through the honeycomb of the neutralizer, carbon monoxide is converted into low-toxic carbon dioxide, and nitrogen oxides are reduced to harmless nitrogen. The degree of gas purification in a working neutralizer reaches 90-95%.
For normal operation of the converter, the composition of the exhaust gases (in particular, the oxygen content in them) must be within strictly specified limits. This function is performed by the electronic engine control unit - a controller that determines the amount of fuel supplied depending on the readings of the oxygen concentration sensor.
If there are lead compounds in the exhaust gases, the catalytic converter and oxygen concentration sensor quickly fail. Therefore, operating a car on leaded gasoline is strictly prohibited, even for a short time.
A faulty ignition system can also cause the neutralizer to fail. If sparking is missed, unburned fuel enters the converter, burns out and cokes the cells, which can lead to complete blockage of the exhaust system and engine shutdown (or severe loss of power).
The controller has the function of protecting the converter from misfires, which can be detected in one or two cylinders at the same time. In this case, the controller turns off the fuel supply to these cylinders, and the engine management system malfunction indicator located in the instrument cluster lights up in a flashing mode. In this case, it is necessary to stop driving, stop the engine, try to find the cause and eliminate the malfunction. If this cannot be done, you will need to have the vehicle towed to the nearest service station.
Mufflers and catalytic collector are non-separable units; when they fail, they must be replaced with new ones. A metal-reinforced heat-resistant gasket (common for the catalytic collector and intake pipe) is installed between the catalytic collector and the cylinder head.
An additional muffler pipe is attached to the catenary collector on three studs. The connection is sealed with a heat-resistant gasket. A metal compensator is built into the additional muffler pipe. It reduces the transmission of power unit vibrations to the exhaust system.
The rear part of the additional muffler pipe is hingedly connected to the main muffler pipe. Between their flanges there is a metal ring with a spherical outer surface. The inner surface of the flanges is also spherical, the flanges themselves are tightened with a clamp.
Heat-protective covers are installed on the body, above the additional muffler and metal compensator. The exhaust system is suspended from the body on four rubber cushions.
Maintenance of the exhaust system consists of periodically inspecting it, checking for tightness of connections and the presence of through corrosion, and involves tightening loose connections.
Source
General information about the principle of operation and design of the resonator
The operating principle of this component is based on the use of completely closed cavities located near the pipeline, which are connected to the latter using a number of special holes.
As a rule, its body contains two cavities of different volumes, which are mechanically separated by a special solid partition. The existing holes, as well as closed individual cavities, are resonators that excite oscillations with their own frequency.
The directions of propagation of noise waves with a resonant frequency can change, due to which its effective noise damping occurs. The effect occurs due to friction in the holes present in the exhaust of gas particles.
The structure consists of two parts: the outer shell, as well as the internal structure. The product can be made entirely of stainless steel AISI 316, which is an analogue of the common version 10Х 17Н 13М2. Standard dimensions correspond to 250 mm x 100 mm. The pipe is also made of high-quality stainless steel and has dimensions of 51 mm x 1.5 mm.
The internal filling of the body of a standard resonator is simple, and the design uses features that take into account the propagation of noise waves
Features and Benefits
The main task of the exhaust system resonator of the Lada Priora car is to qualitatively dampen the sounds of engine operation, as well as vibrations arising during operation.
With the loss of the original qualities of this component, there is a sharp increase in vibration, as well as the noise characteristics of the car’s power unit, reaching their peak values at maximum engine speed. In fact, this is a regular muffler that performs the same functions, which is why it is called a middle muffler based on its location in the exhaust system.
Such a muffler has the following advantages:
- effective damping of low noise frequencies;
- absence of significant barriers to the passage of gases;
- use does not reduce the overall cross-section of the exhaust system.
Causes of possible breakdowns, conditions for replacing parts
The main reasons for replacing the resonator on a car are as follows:
- burning of the body in the center of the structure;
- burnout or mechanical damage to the joints with the exhaust manifold (catalyst) or muffler;
- corrosion processes.
The resonator can burn out anywhere or undergo unwanted corrosion
As a rule, the following reasons are to blame:
- sudden changes in external temperature;
- contact of exhaust system components with reagents, salt, and moisture;
- accumulation of moisture condensate in the resonator;
- the presence of various chemical aggressive compounds in the resonator.
A faulty resonator when driving is a source of discomfort for the driver and passengers of the car. Other road users will also have a negative reaction to the operation of a car with a similar malfunction, since the movement of such equipment will be accompanied by loud noise.
Thus, signaling factors about a malfunction of the exhaust gas exhaust system of vehicles, in particular the Lada-Priora resonator, are:
- increased noise when the engine is running;
- a noticeable decrease in the power of the power unit (decreased traction, acceleration);
- intermittent engine operation (jumpy idle speed);
- entry of exhaust gases into the passenger compartment of the car;
- presence of black deposits on parts (smoke soot).
Due to its design features, full-fledged repair measures for this part are impractical, so experts recommend replacing the failed component.
Why do you need to replace the catalyst on a Kalina car with an 8-valve engine: causes and consequences
- Use of fuel additives.
- Unsatisfactory fuel quality.
- Unbalanced fuel-air mixture due to a broken oxygen sensor.
- Mechanical damage to the collector.
- Incorrect ignition operation.
For the most part, replacing the catalyst on Kalina 8 valves is done as a result of using low quality fuel. Its slow combustion occurs partly in the exhaust. The detonation of gasoline destroys the ceramic structure of the honeycomb, which over time begins to crumble and clog thin passages. The engine begins to overheat and loses traction.
An obstacle to the free passage of gases contributes to an increase in their pressure. When the internal combustion engine is turned off, in any case, the valve gas distribution system remains open in one of the cylinders. The excess pressure that should have escaped into the exhaust pipe throws ceramic particles back into the combustion chamber. At the next start, the dust will mix with the oil and turn into an abrasive paste, which can lead to complete failure of the internal combustion engine.
What you need to know
Before replacing a faulty Kalina car catalyst with 8 valves, you need to decide on the vehicle’s toxicity standards - Euro 2 or higher. On VAZ models, this is not difficult to find out - in the Euro 2 system, the oxygen controller is installed before the catalytic collector. Starting from the third generation of environmental standards, the diagnostic probe is also located after the neutralizer. It signals the efficiency of the device.
Since 2008, all VAZ cars meet Euro 3 standards and have two oxygen controllers. Before getting rid of the neutralizer, you need to consider some details:
- The unit is made with the exhaust manifold as a single unit.
- All sorts of solutions that boil down to removing the insides of the catalytic collector not only lead to a deterioration in acoustic comfort. Moreover, an empty housing creates an exhaust section with a large cross-section, which will lead to resonance of the exhaust system. So everything is in favor of using insertion.
- In the case of Euro 2, when installing the spider, an oxygen sensor wire extension is required, and the resonator-manifold connection unit must also be redone.
- In the case of Euro 3, a fake or the program in the ECU is changed.
How does a resonator work and its functions?
As mentioned above, the exhaust system includes a resonator. In a resonator, each of the constituent components has its own role. The main purpose of this unit is to dampen low-frequency sounds generated during the intensive movement of the exhaust gas stream inside the muffler circuit. Sounds of this nature occur for the following two reasons:
- from the effect of gas expansion;
- due to vibrations of components in the muffler line.
An important function of the resonator unit is reducing the speed of movement of the gas jet. Here fundamental physical laws come into play, indicating the inevitable damping of speed during the transition of a gas mass from a thin pipe into a volumetric cavity. It is precisely to achieve this effect that the design concept of the resonator is designed.
It is precisely to achieve this effect that the design concept of the resonator is designed.
In the exhaust gas circuit, the resonator component is located in front of the main muffler, thereby being the primary link in the chain of damping low-frequency sounds.
Structurally, the product assumes the presence of a perforated section of pipe inside the metal body, where there is a throttle-type hole, designed to effectively dampen vibrations arising from the movement of the gas jet. The internal space of the housing has partitions that are oriented transversely to the perforated pipe. Now you have an idea of what an exhaust system is.
In comparison with the resonators in the exhaust circuits of other models, this unit in the Lada Kalina has a corrugated element. The design necessity is due to the tendency of the device to move during the heating of the gas exhaust jet.
The manufacturer makes all resonator components only from high-quality steel. Otherwise, the car's exhaust system would constantly require repair work. But sometimes it is still necessary to replace the resonator, and in some cases, replace the muffler.
Main elements of the exhaust system
The muffler resonator is installed immediately after the exhaust pipe and the catalyst, and its task is to level out pulsations of the gas flow. In cross-section, it looks like a perforated pipe placed inside a metal chamber of a larger diameter. The pipe can change its cross-section on the way from the inlet to the outlet of gases.
The main muffler may have a more complex design and has the main function of noise reduction. Modern systems can have almost all noise reduction schemes in the rear muffler can. The chamber through which the main pipe passes can have several sections, each of which has noise reduction at its own level. Typically, these chambers are filled with heat-resistant fiber material, which further dampens vibrations and absorbs sound vibrations.
The design of a car muffler is constantly evolving, and we try to follow the news from the design bureaus of the most progressive automakers and tuning studios. Stay with us, and let your mufflers only please the ears of avid motorists. Happy travels to everyone!
Replacing the muffler Lada "Kalina"
Replacing a muffler on a Kalina is a routine procedure. On average, it lasts 2-3 years, after which it becomes unusable - it either burns out or rots. Our mufflers are often made from ordinary iron, which is susceptible to corrosion. Plus, constant condensation and high temperature accelerate this process.
Let's take a closer look at how to replace the muffler on the Lada Kalina. My muffler was “dying” slowly, but, as they say, surely. First, the lower shell completely rotted away, then the knee completely fell off - it simply rotted away at the site of the weld. The muffler was left hanging idle.
From personal experience I will say that you can change the muffler without an inspection hole or jacking up the car. We lay down the bedding in the area of the rear left door, lie down and get excellent access to the clamp. Also, if desired, you can reach the far fastening rubber band. The main muffler (11.61) is attached to the additional muffler (11.60) with a clamp. We need to unscrew it. To do this you will need 2 13mm wrenches (preferably with a ratchet). To simplify the unscrewing procedure, first moisten the nuts with a bucket.
After removing the clamp, you can remove the muffler itself. The muffler on Kalina is suspended on 2 suspensions. You need to remove both hooks from the elastic bands one by one. If it becomes difficult to get out, you can help yourself with a screwdriver.
Now you need to install the new muffler in reverse order. First we hang it on the hangers, then put on the clamp. Don’t forget to knock out the O-ring from the old muffler, which is inserted at the joints of the 2 muffler pipes.
Before tightening the clamp, make sure that the muffler hangs level and does not touch the bottom of the car with its knee. The clamp must be tightened at an angle of 45 degrees.
This is how you can easily replace the muffler on Kalina. Moreover, you can do this with your own hands, even in the field.
In the practical Russian subcompact Lada Kalina, the exhaust system consists of several important components, among which there is undoubtedly a resonator. It is designed to ensure timely removal of combustion products from the working chambers of the cylinders. If the resonator functions correctly, then the motor is characterized by the ability to demonstrate the declared power indicator. In some cases, breakdowns occur and the resonator needs to be replaced, and sometimes the muffler needs to be replaced.
Malfunctions
The following signs indicate a muffler malfunction:
- the engine makes a growling sound;
- Exhaust gases enter the interior from under the bottom of the car, which is easily determined by the smell.
The main causes of muffler malfunction:
- water, it causes corrosion in the muffler and, over time, holes form in it;
- a sharp change in temperature leads to the formation of condensation;
- mechanical damage (impacts from the muffler due to its low location);
- shaking on the roads leads to disruption of connections;
- muffler burnout.
When malfunctions occur, a problem arises - repair or replacement? In any case, measures must be taken, otherwise the powerful roar of the car will disturb others, get on the owner’s nerves and attract the attention of traffic police officers. If there is no experience in repair work, or the muffler is seriously damaged, then it is worth replacing it
If there is no experience in repair work, or the muffler is seriously damaged, then it is worth replacing it.
Replacing the resonator yourself
As when replacing the main muffler, to replace the resonator we will need to remove the mounting clamp. To do this, use two 13mm wrenches to unscrew the bolts that tighten it. By the way, if due to severe corrosion it is impossible to unscrew the bolts, you can go another way: cut them off using a grinder and subsequently replace them with new ones.
The resonator is bolted to the catalyst with two bolts. Before unscrewing, it is recommended to treat them with WD-40 and tap them with a hammer. After the nuts have loosened, use two wrenches to unscrew the bolts securing the resonator to the neutralizer. An important point: do not unscrew the nuts completely. If the car does not have a neutralizer, unscrew the bolts securing the resonator to the exhaust pipe.
Next, carefully lift the resonator and remove the rear rubber cushion from it, and then the front one.
After this, holding the resonator, finally unscrew the nuts and remove the spring washers. Remove the bolts and dismantle the resonator.
Installing a new resonator is done in the reverse order.
It should be noted that in case of severe corrosion of the mounting bolts, clamp and the resonator itself, a somewhat non-standard method can be used: the faulty unit is cut off using a grinder from the corrugation to the main muffler. The new resonator is installed in place of the old one using electric welding.
Technology for changing the catalytic converter to the 4-2-1 insert
To work, you need to prepare a set of keys for 13, 17, 19 and 22, you also need a socket head for 13 and a screwdriver with a flat blade. Parts you should purchase are two bolts with springs, a graphite connecting ring, an extension for the sensor, and a manifold gasket. Since the spider with tubes is longer than the standard neutralizer, it would not hurt to purchase a corrugation with double or triple braiding 200 mm long.
You must first remove the negative terminal from the battery. The further process of dismantling the standard part continues according to the following diagram:
- Remove the intake module using a 13mm socket, disconnect the injector wiring harness and the fuel supply hose.
- Unscrew the nuts securing the flanges of the intake pipe and catalytic converter, and then remove the pipe flange from the converter studs.
- Disconnect the oxygen sensor connectors and disconnect the wiring harness from the heat insulation shield.
- Unscrew the two nuts securing the catalytic converter bracket and remove the clamp.
To finally replace the standard catalyst on Kalina 8 valves with a modified spider, all that remains is to slide the flange off the studs and pull the assembly down. The head gasket seating areas should be cleaned. The flange is cut off from the old catenary collector with a grinder and welded to a section of the pipe with corrugation. A snag is screwed into the sensor hole or the ECU is subsequently reflashed. These measures will get rid of the Check-Engine, and will also be cheaper than buying a new converter.
How to replace the resonator?
Replacing the resonator involves performing a certain list of actions, which we will discuss further.
- We unscrew the nuts that hold the clamp that secures the butt connection of the muffler pipe and the resonator unit of the system. We recommend that you first treat the threaded connections with a penetrating substance or its equivalent, since they tend to stick and, in a non-soaked state, are very difficult to unscrew. If this approach does not have the desired effect, then the clamp will have to be “trimmed” with a special tool.
- Next, using gentle taps with a hammer, knock the marked clamp off the joint. In some cases, fasteners can be removed without using a hammer.
- Now we remove the muffler from two rubber suspension elements, the first of which is located in the rear beam area, and the second in the area of the main exhaust pipe.
- We remove the muffler.
- In the Lada Kalina, the resonator itself is attached to the neutralizer using three steel nuts, which are also prone to sticking. In order to “fight” this phenomenon, it would be useful to pre-treat them with the same penetrating composition. If the effect is unattainable, then a grinder will “help”.
- When the resonator is dismantled, the installation of a new analogue is carried out in accordance with the algorithm reverse to the removal procedure. You can also resort to another option for replacing the exhaust circuit assembly we are considering.
- An exhausted system element should be cut out within the range: from the corrugated component to the main muffler pipe.
- Now you will have to resort to welding, through which the new resonator is “mounted” in place of the removed product.
Replacing the muffler corrugation
p, blockquote 42,0,0,0,0 —>
Some time ago, only owners of foreign cars could purchase and use corrugation. Now everything has changed and this element can be installed on almost any domestic vehicle of the VAZ series.
p, blockquote 43,0,0,0,0 —>
Typically, the muffler corrugation is installed in a car service center using professional welding equipment and tools. Installation is complicated because it is necessary to select a certain temperature regime.
p, blockquote 44,0,0,0,0 —>
Traditionally, work is carried out in several stages:
p, blockquote 45,0,0,0,0 —>
- cutting down old corrugation using a grinder;
- welding a new part;
- seam processing.
It is recommended to entrust such an operation to specialists with relevant experience. Otherwise, improper installation may adversely affect the service life of the corrugation.
p, blockquote 46,0,0,0,0 —>
With your own hands
If there is any malfunction, it is not always possible to contact a car service center or there is a desire to carry out repairs only on your own.
p, blockquote 47,0,0,0,0 —>
In general, the work of replacing a muffler corrugation is not as difficult as it might seem. Only for ordinary car owners it can take several hours, but professionals will spend much less time on it.
p, blockquote 48,0,0,0,0 —>
Preparation
p, blockquote 49,0,0,0,0 —>
To make the process easier, it is best to remove the exhaust system pipe along with the corrugation. Using a grinder, cut off the faulty part as close to the welds as possible. To try on a new element, the exhaust pipe is put in place, but not secured, and a corrugation is tried on it. This must be done to avoid the occurrence of distortions in the future, which will lead to unwanted additional load on the part and its rapid failure.
p, blockquote 50,0,0,0,0 —>
Video - replacing the muffler corrugation with your own hands:
p, blockquote 51,0,0,0,0 —>
p, blockquote 52,0,0,0,0 —>
Having outlined the optimal location, it is worth welding two or three points in order to slightly grab the part to the inlet pipes, and then carefully remove the entire pipe.
p, blockquote 53,0,0,0,0 —>
Welding
p, blockquote 54,0,0,0,0 —>
Ideally, have a semi-automatic device, with which you can completely forget about the existence of car services. But in its absence, inverter equipment with electrodes with a diameter of 1.6 to 2 mm will do.
p, blockquote 55,0,0,0,0 —>
Before work, the pipe must be thoroughly cleaned. The welding itself should be carried out with a minimum current value depending on the selected electrode, simultaneously chipping away the slag. At the end of the work, the welds must be treated with some kind of automotive coating (enamel or primer) or sealant.
p, blockquote 56,0,0,1,0 —> adsp-pro-3 —>
Since the use of conventional welding equipment is not provided for in this operation, a little training on a thin sheet of metal will not hurt. A regular tin can works well. In this case, the tightness of the seam is very easy to check. If the result is positive, you can move directly to your main job. Otherwise, you still need to learn. It is worth noting that working with an inverter welding machine is difficult, but possible with a certain skill.
p, blockquote 57,0,0,0,0 —>
Finally, all that remains is to put the exhaust pipe in its place, at the same time replacing the gaskets of the connecting flanges.
p, blockquote 58,0,0,0,0 —>
The exact service life of the corrugation cannot be determined, since the operating conditions of the vehicle are taken into account. If you drive carelessly, the corrugation can quickly fail even with high-quality installation. Therefore, welding is not always the best option and in some cases you can do without it. Craftsmen have found one good and effective way.
Muffler selection
It is worth considering this issue in more detail, identifying the articles and manufacturer.
Original
The original catalog number of the Lada Kalina muffler is 1119-1200010. It fits perfectly into standard seats and does not require modifications or alterations. The average cost is 2500 rubles.
Side view of the new muffler Lada Kalina
View of the Kalina muffler without packaging
Full general view of the muffler on Kalina
General view of the new Kalina muffler
Analogs
There are two analogues of the original Kalina muffler:
- Fobos (42244) – it also fits on standard landing mounts. The average cost is 2000 rubles.
- Izhora muffler (136110) – it requires improvement in terms of fastening. This is due to the fact that the ear of the elastic fastening is located a little further. Therefore, you will have to purchase a non-standard rubber washer, which will secure the muffler to the body. The cost of such a product is about 3,000 rubles.
Izhora muffler in packagingPackaging and notes for the Izhora muffler
The Izhora resonator is painted dark gray