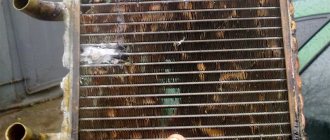
The most common reason for replacing the cooling radiator on a Niva car is its failure due to breakdown or corrosion. There are craftsmen who solder all defects themselves, but in most cases they prefer to install a new radiator. Below is a detailed guide for removal and installation, as well as a list of all the necessary tools to complete this job.
How to choose a radiator for a Chevy Niva
The Chevrolet Niva has two main configurations - with and without air conditioning. Regardless of the presence or absence of a condenser, the engine cooling radiator is the same on all Niva Chevrolets. All that remains is to choose a good brand and install a new part on the car.
The article number of the original spare part is 2123130101200.
Famous brands:
- Hola - a radiator from this company will cost the car owner 2,500 rubles. This is a famous Dutch manufacturer of various auto parts, ranging from belts to complex suspension parts and bearings. User reviews speak for themselves - the price/quality ratio is well maintained here.
- DAAZ - price 3000 rubles. It is a famous domestic manufacturer of a wide variety of spare parts for Lada and foreign cars. Many of the parts are supplied to the VAZ conveyor, so there is no doubt about the quality.
- Luzar - inexpensive radiators priced at 2880 rubles. The quality is average, but for its price the Luzar radiator on the Chevrolet Niva works quite well.
The brand rarely affects the service life of a part. Rather, it determines the likelihood of a manufacturing defect. If the radiator is made incorrectly, it will immediately leak.
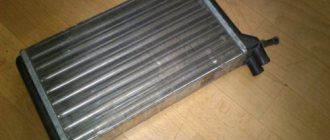
How to replace the heater radiator on a Chevrolet Niva with air conditioning
When a car is equipped with an air conditioning system, replacing the heater radiator at home is much more difficult, but still possible.
What tools will you need?
For dismantling you will need:
- Screwdriver Set;
- keys (heads) at “8”, “10”, “19”, “24”;
- cross bits and Torex T20;
- knife;
- Head Torch;
- sealant.
To dismantle the radiator, you will need to prepare a certain list of tools
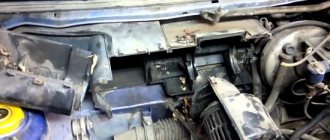
How to remove the evaporator and fan
Before removing the radiator, you will need to provide access to it. To do this, you need to remove the air conditioner evaporator. We carry out the procedure step by step:
- We remove the glove compartment, for which we unscrew all the fasteners.
- We dismantle the airbag (if the car is equipped with one). We remove the negative terminal from the battery, then look for the red airbag connector and remove it. Using a suitable tool, unscrew the pillow mounting bolts. Using a flat-head screwdriver, pry up the plug on the panel, press the latches at the bottom and pull the pillow up.
Using a wrench or socket of a suitable size, unscrew the two airbag mounting bolts - Remove the air duct from the passenger side. Use a flat screwdriver to pry up the ventilation grille plugs, unscrew the screws and remove the grille. Remove the tape and remove the air duct.
To remove the air duct on the passenger side, you will need to remove the ventilation grille and remove the tape. - We dismantle the pipe in the passenger's feet. Unscrew the hose fastener and pull it towards you.
At the passenger's feet you need to remove the pipe, for which we unscrew the hose fastener - To remove the air conditioner evaporator you will need to remove the fuse box and control unit. There is no need to completely dismantle them; you can simply leave the devices hanging. We unscrew the cover of the control unit using a “10” socket, and use a Phillips screwdriver to unscrew the fastening bolts.
Before dismantling the air conditioner evaporator, you will need to remove the control unit and fuse box - To dismantle the fan, remove the air filter and unscrew the 4 screws that secure the electric motor.
To remove the heater fan, you need to remove the cabin filter and unscrew 4 screws - At the bottom of the stove, unscrew the screw with a bat to “7”.
We insert the bit on “7” into a key of a suitable size and wrap it with electrical tape - We bend the metal brackets.
To ensure that nothing interferes with the removal of the evaporator, you need to bend the metal brackets - Carefully remove the cable responsible for adjusting the damper so as not to lose the latch. We remove the structure itself to the right.
- To disassemble the fan into two parts, remove the latches (6 pieces) by prying them off with a screwdriver. After this, the housing can be separated and pulled down.
To separate the fan parts, it is necessary to remove the latches, after which the elements are removed - The next step is to remove the air conditioner evaporator. To do this, unscrew the air conditioning pipes under the hood. Since freon will begin to leave the system, it is better to avoid getting it into the respiratory system.
- Unscrew the nuts from the nearby studs.
In the engine compartment you will need to unscrew the nuts from the studs and remove the evaporator tubes - Carefully unscrew the bolts securing the evaporator housing so as not to tear off the nuts, and one self-tapping screw located near the radiator pipes.
In the cabin, carefully unscrew the evaporator mounting bolts, as well as the self-tapping screw - We move the evaporator nozzle to the right until it is free, but you will have to apply some force. The left front bracket will interfere with the removal of the assembly; it must be tightened and removed from under the panel fastening. In addition, the clamps of the radiator pipes will prevent removal. It is better to loosen them and pull them down. After this, remove the evaporator itself.
To remove the evaporator, it is necessary to apply some force to remove the bracket on the left side from under the panel mounting
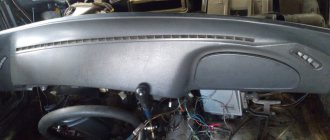
How to remove a radiator
Dismantling the evaporator is one of the preparatory activities before removing the stove radiator. First, perform the following step-by-step actions:
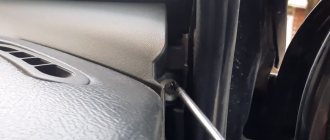
- To prevent antifreeze from leaking onto the floor, we place a plastic film under the heat exchanger itself to allow the liquid to drain into a suitable container. To drain the antifreeze from the radiator and prevent it from getting on the floor, we drill a hole in the lower part of the element. If this is not done, then the probability of filling the floor with antifreeze through the pipe is quite high.
You need to drain the remaining antifreeze from the old radiator, for which a hole is drilled in it from below - We loosen the fastening of the clamps and unscrew the screws of the heating radiator. We take out the heat exchanger and tighten the pipes.
To remove the heater radiator from its seat, loosen the clamps, unscrew the heat exchanger mount and remove the part itself
This completes the dismantling process. Assembly is carried out in reverse order. It is recommended to use new pipes during installation, since rubber elements lose their elasticity over time. If desired, the hoses can be sealed with sealant. Upon completion of all procedures, coolant is poured into the system to the required level in the expansion tank.
This is interesting: Mercedes-Benz published a photo of the new generation Viano
When is it necessary to change the radiator?
The radiator does not have any replacement frequency. It works until it gets a hole and starts leaking. This part can be killed by a random stone that hits the honeycomb at high speed during movement or natural aging. The fact is that all modern radiators are made of aluminum and plastic, and with prolonged use these materials begin to deform, inevitably causing antifreeze leaks.
The main sign of a malfunction is traces of antifreeze under the radiator, on its body or drain plug. By the way, in the case of a cork, it can be tightened by half a turn so that the part will serve for at least another six months.
Preparatory work
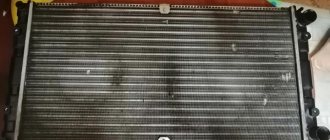
If there are visible signs of damage, even without a coolant leak, the cooling radiator requires replacement.
Before you start work, make sure that you have all the tools at hand, WD-40 fluid for the best removal of soured parts, a container with a volume of at least 5 liters for draining used coolant, as well as an additional container for draining the power steering fluid.
How to change the radiator on a Niva Chevrolet?
To replace, you will need a garage, a standard set of tools and a container for collecting antifreeze. By the way, this is an excellent opportunity to replace the latter. Therefore, it is recommended to immediately purchase 10 kg of new coolant.
Follow this procedure in the following order:
- Remove the front bumper. Alas, nothing will work without removing the bumper.
- Remove both headlights from the vehicle.
- Remove the air filter housing with the pipe and the mass air flow sensor.
- Remove the washer reservoir.
- Unscrew the power steering heat exchanger and move it to the side.
- Unscrew the front amplifier mount and remove it.
- Drain the antifreeze.
- Unscrew the air conditioner condenser fasteners and push both radiators forward. Disconnect the pipes from the radiator, disconnect the connectors from the fans.
- Next, all that remains is to remove the old radiator, rearrange the fan unit and reassemble in the reverse order.
Photos of the process:
Algorithm for replacing a radiator
Most often, the radiator is replaced when a leak appears that cannot be eliminated with conventional sealant. The manufacturer recommends installing only original parts that exactly fit in size and fit.
Along with the radiator, you can also change the cooling fans by disconnecting them from the network and unscrewing the fasteners from the cases.
Replacing the radiator of a Niva Chevrolet - work algorithm:
- Remove the negative terminal from the battery.
- Remove the crankcase protection and mudguard by unscrewing the fasteners.
3.Unscrew the coolant drain plug, having first unscrewed the cap of the expansion tank and switched the damper to “hot air”.
4.Remove the decorative radiator trim.
5.Disconnect the terminals from the cooling fans.
6. Unscrew the top and side bolts securing the upper casing and remove it.
7. Remove the lower casing in the same way.
8. Remove the lower hose from the thermostat by unscrewing its clamp. Carefully pry off the pipe with a screwdriver and do not tear it.
9. Unscrew the upper radiator mounting brackets and remove them.
10. Pull the radiator towards you and remove the return hose.
11. Disconnect the bolts securing the electric fan housing and pull the radiator towards you to gain access to the lower pipe. Loosen its clamp and remove the hose.
12. Carefully remove the radiator.
Assembly is carried out in the reverse order of removal. If you are going to change the fans, remove their nuts from the housing. When tightening, do not overdo it; with too much force, the plastic may burst.
If you don't remember when you changed the coolant, it's better to fill it with new one. It is not advisable to filter old antifreeze or antifreeze, which already contains debris and dirt.