Brake pads, like car tires, wear out as you drive and require periodic replacement. The peculiarity of the car’s braking system is that the load during braking is unevenly distributed on the front and rear axles. The front wheels, and, accordingly, the brake pads, experience greater loads than the rear ones. This means that they also have to be changed much more often. The front brake pads on Kalina are replaced two to three times more often than the rear ones. To do this, you can contact specialists or do the work yourself. In the latter case, you must have a set of standard tools and new front brake pads. The procedure for replacing front pads on a Kalina equipped with and without ABS is the same.
Selection of pads and part numbers
Every Kalina car owner faces a difficult choice of spare part. What is better, original or analogue? After all, pads are the first link in traffic and braking safety. The answer lies on the surface. Both of them are quite good in quality and effect. But modern analogues are becoming even better, since the friction material of the majority is much better and more durable.
So, let's look at what front pads are suitable for the Lada Kalina.
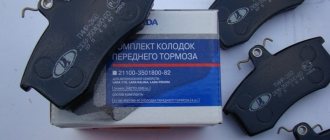
Original pads
Let's start with the original part from AVTOVAZ. The catalog number of the part by which the search is performed looks like this - 2110-3501080. These are the same pads that are installed on the VAZ 2110 and Priora. The factory decided not to change the structure of the front brakes. Their cost is 400 rubles per set.
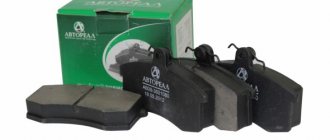
Analogs
Red Ferodos brake better, but it is believed that they eat up the brake disc a lot
Now, let's look at possible analogues that can be installed instead of the original brake pads on the Lada Kalina.
A table of analogues, as well as their catalog numbers and prices.
| Manufacturer's name | vendor code | Average price in the Russian Federation in rubles |
| Dafmi | D140IE | 390-450 |
| Master-Sport | 13-046D-2965-2-E-SET/4/-MS | 590-630 |
| Tomex | 10-361 | 600 |
| Mapco | 6502 | 620 |
| Pilenga | FD-P2003 | 850 |
| Trialli | PF965 | 850 |
| Fenox | BP40006O7 | 865 |
| Finwhale | V210 | 910 |
| Hola | BD811 | 950 |
| Optimal | 12075 | 978 |
| ABS | 37079 | 1070 |
| EGT | 322107EGT | 1150 |
| Denckermann | B111048 | 1165 |
| LRP | 05P988 | 1165 |
| Samko | 5SP988 | 1185 |
| LINXauto | BD-4601 | 1200 |
| FiT | FP0289 | 1320 |
| TRW | GDB1446 | 1350 |
| Road House | 2221.02 | 1350 |
| Icer | 181308 | 1360 |
| Brembo | P41003 | 1700 |
| Delphi | LP551 | 1765 |
| Girling | 6114461 | 2400 |
| Feredo "Premium" | FDB1325 | 3000 |
As you can see from the table, the choice of front brake pads for the Lada Kalina is quite wide and the owner will have plenty to choose from. Of course, the pricing policy for many analogues is too high, since compared to the originals at 400 rubles and the analogue at 2000 rubles. many people choose the original.
Non-original pads for Kalina, Nippon brand, very popular among Kalinovods
But, if you take Brembo, then the quality and service life of the pads is 2-3 times better, and the level of braking is 50% higher (according to the results of independent tests). At the same time, they wear out 3-4 times slower, since they are made from higher quality material.
How to replace the rear ones
To avoid mistakes when installing new rear pads on the Lada Kalina, you should follow a series of steps step by step.
- Shift the gearbox to first gear, place chocks under the front wheels and jack up the rear of the car.
Sometimes, for reliability, additional stops are placed under the body.
- Once the wheel is lifted, unscrew the clamps and remove it to gain access to the drum.
The removed wheel can be placed under the body for insurance purposes.
- Using a wrench, unscrew all the pins holding the drum, then remove it. To make the process easier, you can tap the back of the drum with a hammer to loosen the fastening.
Use a wooden spacer when using a metal hammer to avoid damaging the drum. A mallet is better suited for this
- Remove the cotter pin with pliers by turning the rod clockwise. Then remove the lower spring that tightens the pads and the short mounting spring from the central part of the pad.
It is better if your hands are protected with gloves
- Without removing the top spring, grab the center of the block and move it sideways until the plate placed under the spring falls.
Move the block to the side until the plate falls out
- Disconnect the retaining spring, remove the plate and remove the loose pad.
Be careful with the springs: new ones are not included in the replacement kit!
- Install new pads and then follow the reverse procedure.
How to change: video example
Reasons why pads may need to be replaced
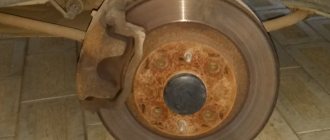
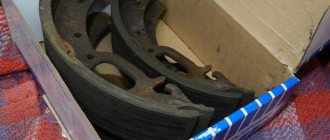
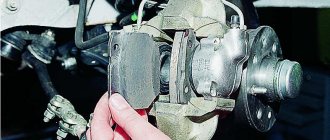
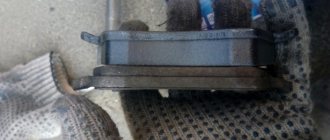
Old and new pads. The wear of the old ones is not yet catastrophic, but according to the regulations, replacement is necessary, otherwise they will “eat up” the brake discs
There are a number of reasons why it is recommended to change the front brake pads on the Lada Kalina. Namely:
- The front wheels squeak when you press the brake pedal.
- When the pad scatters inside the caliper, it begins to “rumble.”
- When buying a used car at a car market or in a showroom.
- When the pad wear has reached its maximum. This is usually a friction thickness of less than 1.5 mm.
- Once a year, after the winter riding season.
- When the brakes apply unevenly when braking.
All of these factors become fundamental for replacing the front brake pads on the Lada Kalina.
Pad life
According to technical and regulatory documents, the service life of the front brake pads of the Lada Kalina manufactured by AVTOVAZ is 20,000 km. At the same time, the same parts from Fenox, Brembo or Girling last up to 30-35 thousand km.
An important aspect of the service life of front brake pads is driving style. If you press the brake pedal sharply often, the pads will fail faster. The same thing happens in urban operating conditions, if the car only drives around the city. The pads wear out less on the extra-urban cycle, provided that traffic rules are followed.
Necessary tool
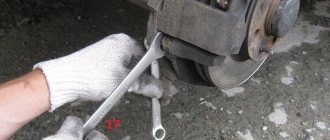
The key is 17/14. Will need another 13.
To carry out dismantling, you will need 2 keys ( 13 and 17 ). If ABS is available - TORX (1/4″; E8 ).
Replacement algorithm
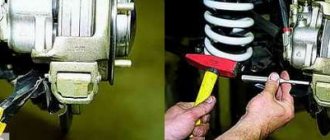
- Raise the car on a jack, having first removed the bolts from the wheel.
Loosen the bolts while the wheel is on the ground. - Remove the wheels themselves and use a pry bar and a screwdriver to press out the brake cylinder. To make the process easier, it is recommended to immediately turn the steering wheel to the left or right, depending on the side. Let's jack up the wheel. For insurance, we place the wheel under the bottom. Push the piston in with a screwdriver.
- On the other side of the caliper, remove or press out the locking plate.
Bend the bracket with a thick screwdriver. - 17 wrench to hold the nut and unscrew the guide bolt with a 13 .
It is more convenient to unscrew the upper bolt using a socket head with an extension. - Open the brake caliper to remove the old pads.
We remove the caliper and take out the old pads. - Bring the cylinder to the very end and insert new parts, then close it and assemble everything in the reverse order, go to the other side of the car. We insert new pads. We put on the bracket and check the position of the antennae, which should rest against the bracket.
If you have an ABS system, you need to take into account the feature . Before starting work, you should unscrew the sensor so that it remains intact during dismantling. It is secured with 1 screw , which is unscrewed with an E8 . If the bolts do not unscrew, you must first spray them with WD-40 , and after 15 minutes try to unscrew the parts. It can also be used for a new pad to make it easier to insert them.
Car with ABS.
The procedure for removing and installing the pads takes no more than half an hour for 1 side.
Immediately after installation, you need to bleed the brakes by pressing the pedal several times. Over the course of 500-700 km , the plates will grind in, so braking will be worse.
It is recommended to remove the brake fluid to a minimum before starting work. This is necessary so that it does not leak out during replacement, since new parts are always thicker than old elements. In this case, when replacing, you will need to “ bring the caliper together .”
If the brake fluid is under the cap, pump out a small amount with a syringe so that the fluid does not flow when the brake cylinder is compressed.
We change the front ones with our own hands
To install new front pads, you must follow the following instructions.
- Slightly unscrew the fasteners on the wheel where replacement needs to be done. After this, put the car on the handbrake, put chocks under the wheels and lift the front part with a jack.
Not everyone has such a reliable jack, so use jack stands and the front wheels removed during replacement as a safety net.
- Turn the steering wheel completely in the direction from which you want to remove the wheel. This will make it easier to access the drum.
For ease of dismantling, turn the steering wheel to the side
- Using a 13mm wrench, completely unscrew the clamps on the wheel and lift the brake caliper. Then, using pliers and a screwdriver, bend the plate, while keeping the nut from accidentally turning with a 17mm wrench.
It is advisable to use a long and thick screwdriver
- Remove the pads and press the clamp onto the piston to press it into the caliper.
If you don't press the piston into the caliper, the new pads won't fit into place.
- After doing the above steps in reverse order, install new pads. After completing the work, it is important to check the presence of brake fluid and, if the amount is insufficient, add it.
Video on how to replace and assemble front pads
Features of replacement on a car with ABS (ABS)
When installing pads on a Lada Kalina with an anti-lock braking system (ABS) installed, it is important to take into account several nuances.
- Before starting the replacement, you will need to tighten the ABS sensor so as not to damage it when removing the old pads. The sensor is mounted on one screw, which can only be unscrewed using a deep E8 star-head.
- When removing the brake drum from the mount, you should be careful, since there is a built-in ABS sensor disc underneath it. Damage to the disc may cause the braking system to malfunction.
Common Problems
During work, you may encounter problems that will prevent you from replacing the pads. If, when removing the drum, it stays securely in place, you can spray WD-40 around the area where it is placed and wait as long as necessary (usually after 10-15 minutes), then proceed with dismantling. The aerosol is also useful for easily removing the pad from its place of fixation. If it is not possible to install a new pad, you need to push the piston deeper into the cylinder until the fastening is loosened.
By installing new pads on your Lada Kalina in a timely manner, you can extend the life of the brake system. Properly functioning brakes will help prevent dangerous situations on the road and make driving extremely comfortable.
Home → Maintenance and Repair → Sources used:
- https://korean-car.ru/zamena-perednih-tormoznyh-kolodok-na-lada-kalina/
- https://carfrance.ru/kak-zamenit-perednie-tormoznye-kolodki-na-lada-kalina-artikuly-i-algoritm/
- https://ladaservice.info/lada-kalina/hodovaya-chast-lada-kalina/zamena-perednih-tormoznyh-kolodok-lada-kalina/
- https://carnovato.ru/kak-zamenit-tormoznye-kolodki-na-lade-kaline/
The importance of brake fluid level
Before you begin the replacement process, you should definitely estimate the amount of this fluid. If its level is at the maximum, you need to drain a little using a syringe or bulb. Why do this? This is necessary so that when the piston is pulled back, the liquid does not spill out. The fact is that new pads are much thicker than old and worn ones.
For a good result, you need to leave about half of the liquid in the expansion tank.
Step-by-step instruction
Repairs are best done in a pit or on a lifting mechanism . This will be the most convenient way to work. As a last resort, you can use a jack, but the car must be installed on the handbrake and additionally secured with wheel stands.
Tools
- key to 7;
- flat screwdriver;
- hammer;
- pliers;
- knob with 30mm head;
- mounting blades.
Description of procedures with photos
To gain access to the disk, jack up the car and remove the wheel.
- Unscrew the guide pins.
Use a wrench to unscrew the spacers on the brake disc.
- We knock the drum off the hub using a hammer with a wooden backing.
Tap the disc with a hammer to remove it from the hub
- Using a flat-head screwdriver, remove the upper and lower springs from their engagement.
Use a screwdriver to pry the hook of the spring and disengage it.
- Remove the clamping mechanism and pull out the block.
After removing the clamping mechanism, the brake pad can be easily removed
- Remove the spacer bar.
We take out the spacer bar
- To dismantle the second part, disconnect the pressure spring and disengage the lever.
Pull the spring towards you and remove the lever from engagement
- We take out the cotter pin with pliers and remove the washer.
Using pliers, pull out the brake pad cotter pin.
- We pull out the “finger”.
Remove the rear brake pad pin
Before installing new parts, the brake disc must be thoroughly wiped. Assembly is carried out in reverse order. To tighten the springs, use a regular screwdriver. Make sure the hooks on the edges are fully seated in the holes.
Tip: After completing the repair, press the brake pedal several times so that the pads come close to the disc.