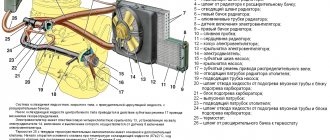
Vacuum brake booster
The main sign that tells a car owner that the vacuum brake booster has failed is difficult movement of the brake pedal. This can lead to poor braking, which can lead to a traffic accident in an emergency. On a VAZ 2109, replacing the vacuum brake booster must be carried out. Replacing the vacuum brake booster on a VAZ 2109 can be easily done on your own.
Examination
Replacing the vacuum brake booster of a VAZ 2109
Vacuum booster repairs are carried out in specialized auto repair shops using equipment designed for this purpose. In the context of garage repairs on a VAZ-2109, the vacuum brake booster is replaced with the installation of a new one. Before making a decision to replace, it is necessary to check the operation of it itself, as well as the check valve.
Checking the operation of the vacuum booster
VAZ 2109 vacuum brake
To check the operation of the amplifier you need to:
- Press the pedal with your foot, thereby increasing the pressure in the brake system. The pedal remains depressed.
- Keep your foot on the pedal and turn on the engine.
- When you start the engine, the foot with the pedal begins to move towards the floor of the VAZ body, which means that the vacuum booster is working and the entire system is in good working order.
Note. In another case, the foot and pedal remain motionless, that is, in the upper depressed state, which means there is a malfunction somewhere. First you need to check the vacuum hose at the connections. Also check the check valve for leaks.
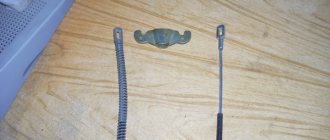
Check valve
VAZ 2109 vacuum brakes
To check the operation of the check valve:
- inspect the pipe connections;
- feel these places with your hands;
- tighten the clamps at the connections of the pipes;
- on the intake pipe fitting;
- on the non-return valve fitting, on vacuum.
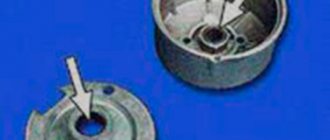
Then check the valve itself. To do this, remove the rubber tube from the vacuum, using a flat-head screwdriver if necessary. Since the tube is very difficult to remove. Take a pre-prepared rubber bulb-shaped injector of suitable diameter for the fitting:
- Paste it;
- Squeeze the syringe;
- Squeeze the air out of it.
Release your hand if it remains clenched then the valve test is complete. That is, the valve fulfills its design purpose. If the injector is filled with air, then the valve will have to be replaced. You can also check the operation of the valve with your mouth:
- Blow the air out of your mouth; it should easily pass into the vacuum;
- Then apply suction; the air coming out should not be felt.
This completes the check of the brake system vacuum booster and check valve. If no defects are found in the connected parts and the check valve is working properly, the vacuum is replaced.
Replacement
VAZ 2109 vacuum brake booster
To do this, you need a simple set of keys:
The repair is carried out in the garage, where the hood should be raised and a support installed.
Removing the vacuum
Sequence of work:
- remove the negative terminal from the battery;
- disconnect the rubber tube from the brake vacuum, first unscrew the clamp;
- disconnect the electrical power supply terminal for the level sensor from the brake master cylinder cover;
VAZ 2109 checking the vacuum brake booster
- then, inside the car, move the driver’s seat to the farthest position, as far as the runners will allow;
- lower under the steering column towards the brake pedal.
Note: if necessary due to lack of lighting, use a portable lamp with a safety flashlight.
- Using pliers, remove the locking ring from the sleeve that connects the pedal itself to the vacuum rod connector;
- remove the rod, lower it to the floor of the body.
Note: the rod connector is a U-shaped plate with holes for attaching to the pedal bar.
- return to the set vacuum;
- Now you have to carefully remove the brake master cylinder;
VAZ 21093 vacuum brake booster
- it must be removed together with the corresponding brake system pipes.
Note. This must be done so as not to add additional work of filling the brake fluid and pumping the entire brake system to all four calipers.
- clean the threaded connection on the master cylinder bushings and use a metal brush to carry out this work.
Note. Carefully unscrew the nuts, turning them forward and backward several times, so as not to strip the threads on the screws. Remove the nuts from the screws, and also remove the washers that are in a compressed state.
Vacuum brake booster
To make the work easier, use a flat screwdriver to go along the cylinder body and lightly, as carefully as possible, release them from sticking.
Note: if the nuts cannot be unscrewed, you need to drop a few drops of 70% acetic acid on them, wait 30 minutes, clean the threads with a wire brush and repeat unscrewing.
After removing the washers, you need to begin removing the brake master cylinder. It will be difficult to remove. Therefore, you need to be careful, so as not to break or bend the brake pipes too much, to apply force sharply, but not too much. The brake cylinder must be removed forwards, without deviating to the side. The last final step is removing the vacuum. It is attached to the interior partition on a bracket.
- The bracket is attached to two studs; clean the threads as indicated above.
- Unscrew the nuts and remove the vacuum along with the bracket.
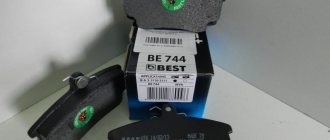
Then after removal, unscrew the two blind bolts from the vacuum. Set it aside. Carefully screw the new vacuum to the bracket. Reassemble in reverse order. The price of a vacuum brake booster is 2,500 rubles. When choosing it, you should pay attention to the packaging. Manufacturer's guaranteed packaging must be made of corrugated cardboard.
- manufacturer's name;
- batch number;
- Date of issue;
- The article number must also be indicated: 2108-3510010TM.
Because there are fakes on the market. Therefore, you need to buy from trusted sellers, in stores that have been able to establish themselves on the positive side. When doing the work yourself, you need to watch the video very carefully. The most important thing will be to remember the order of repair work. For a better understanding, take a photo of the repair site. At home, number them in order in advance. Performing work one by one, move the photos down. Don’t be lazy to do this, since during assembly you can check the sequence of correct execution of the process. It also doesn’t hurt to read the instructions for car repairs to avoid unexpected situations.
Choice
We will give some recommendations regarding the choice of a new vacuum amplifier.
Selection criterion
Required parameters
The cost of a good vacuum cleaner is now about 2.5 thousand rubles. These are not the most expensive, but not the cheapest Chinese options. Optimal for VAZ 2109
This packaging, used by a genuine manufacturer, is made of corrugated cardboard
The label should be clearly legible - the production batch number, the production date of the part and the name of the manufacturer itself
The vacuum unit corresponding to the technical parameters of the VAZ 2109 has article number 2108-3510010TM
You should not buy from market traders. There are many good, trusted spare parts stores in any city. Don’t be shy to ask for certificates, documents for parts
Choosing wisely
Now there are a lot of fakes on the market. Such parts cost the same as the originals, but last much less.
Signs of amplifier failure
You will be interested in: TFSI engine: decoding of the designation, features and characteristics
There are several signs that indicate a malfunction of the vacuum brake booster on the VAZ-2109:
- Stopping efficiency is very low. When you press the pedal you don't feel any braking happening. It becomes almost impossible to stop the car. Sometimes there is a strong kickback in the pedal.
- The brake pedal becomes too heavy and difficult to press.
- There is a significant drop in crankshaft rotation speed when the pedal is pressed.
If the first two signs of VUT failure occur, it is necessary to diagnose the element. It is not a fact that it was the amplifier that failed.
If there is a drop in the crankshaft rotation speed when you press the brake pedal, you need to check whether there is air leakage in the engine intake tract. Be sure to inspect all vacuum hoses. When air is not sucked in, we can talk about a breakdown in the design of the amplifier. Later in the article we will talk about replacing the vacuum brake booster on a VAZ-2109.
Before starting work, preparations need to be made. It is best to install the machine on a level area. There should be enough space near the driver's door so that it can open freely. It is also recommended to completely disconnect the battery - it can interfere with dismantling the mechanism.
Initial stage of dismantling
Let's move closer to removing the element. When replacing a vacuum brake booster on a VAZ-2109 (the price of a new one is 800-1000 rubles), you will need a minimal set of tools; there is no need to drain the fluid from the system. Be sure to make sure that the new amplifier is of proper quality. Subsequently, during installation, follow all the recommendations given in the article.
First you need to disconnect the brake booster rod from the pedal. Before this, you need to remove the cotter pin that connects the amplifier rod and pedal. Please note that on one side there is a locking bracket that must be removed using pliers. Then you need to disconnect the hose from the amplifier in the engine compartment. To do this, you just need to remove it from the fitting using a little force. You don't need to use any tools.
Reassembly
If you decide to dismantle and reassemble yourself, be sure to follow several recommendations when installing a new VUT:
- The vacuum rod and the brake pedal are connected to each other immediately after the device is seated on the mounting studs. That is, before they started tightening the nuts.;
- Experienced VAZ 2109 owners recommend applying sealant between the vacuum brake booster and the brake cylinder. This is due to imperfect design;
- The vacuum rod, which acts on the main brake cylinder, may move during transportation of the part. Also, displacement often occurs during the installation process. Therefore, be sure to check this fact and install it correctly if necessary. To do this, press the rod all the way. If the stem is not installed correctly during assembly, the brakes simply will not operate properly. The consequences are hardly worth talking about.
Final dismantling
Now you will have to unscrew the two nuts that secure the brake master cylinder to the booster housing. After this, you need to move it as far as possible, but try not to break the tubes. There is no need to do extra work, unscrew all the lines that connect the main cylinder to the actuators on the wheels. Since in this case you will have to pump the entire system. The vacuum seal can be removed quite simply, you just need to move the brake cylinder away.
Then unscrew the four nuts that secure the amplifier housing to the body. To be more precise, there is still a bracket between it and the body. It is he who is fixed to the body. This is where the hardest part awaits you. Access to fasteners is very problematic, so you will have to sweat a little.
Once you unscrew all the nuts, you need to remove the amplifier from under the hood. And finally unscrew the amplifier bracket. These are two nuts, unscrewing them is not very difficult.
Before checking the vacuum brake booster of the VAZ-2109, make sure that the intake tract creates a vacuum. Without it, the amplifier mechanism will not be able to work.
Installing a new amplifier
Reverse the installation procedure. First secure the bracket. Be sure to put a rubber casing on the rod, which will not allow dust to seep into the mechanism. Then the vacuum body along with the bracket is installed on the car.
Now you can tighten the nuts. Pay attention to how the brake booster rod and pedals are connected. It happens that the cotter pin fits tightly, after which the pedal may not return. In this case, it is necessary to reduce the cotter pin slightly in diameter using a file.
Finally, check the tightness of all threaded connections. Make sure the vacuum hose is installed correctly. After which you can start operating the car. The new vacuum brake booster on the VAZ-2109 can last 5 years or more, depending on the intensity of use of the car.
Rules mandatory for compliance with the installation of a new VUT
When installing a new vacuum mechanism, consider the following rules:
- the VUT rod is connected to the brake pedal after placing the device on the fixing pins;
- to perfect the sealing components, lubricate the space between the brake cylinder and the vacuum device with sealant;
- the VUT rod in the VAZ-2109, which affects the main brake cylinder located on the front side of the frame, can move during transportation or installation. Therefore, to check the condition of the product, press it all the way.
Determining the correct installation of the vacuum brake booster is not difficult - the brake pedal, if the product is installed correctly, works without failure.
Video instructions on how to replace the vacuum brake booster in a VAZ-2109 with your own hands are presented below:
Replacing the vacuum brake booster of VAZ 2109.
The vacuum brake booster (VBR) is the heart of your car’s braking system. It is this that creates sufficient force for good braking; the safety of driving a car directly depends on its serviceability.
Today’s article is devoted to the symptoms of a faulty vacuum brake booster, and I will also describe a step-by-step procedure for replacing this part on a VAZ 2109 car.
Efficiency of use
The VAZ 2109 model was one of the first domestic cars to receive such a unit as standard equipment (before that, not all cars were equipped with an amplifier). This innovation has significantly improved the efficiency of driving and reduced its braking distance, regardless of the road surface.
Braking efficiency with this unit increases on average by 30-40%, depending on the specific model and road conditions.
On video of the VAZ 2109 vacuum brake booster:
Signs of a faulty vacuum brake booster.
Signs of a VUT malfunction include:
- Insufficient braking efficiency;
- “Heavy” brake pedal (I wrote in more detail here);
- Reducing engine idle speed when pressing the pedal.
At the first two signs, the “vacuum seal” should be checked; it is not at all a fact that it has failed. When the idle speed decreases when you press the brake pedal, first, you need to check the air leaks into the vehicle’s intake tract, as well as on all vacuum hoses. If there is no air leak, the part needs to be replaced.
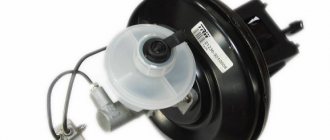
Device and application
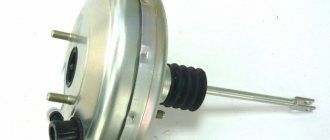
The brake booster is made in the form of a single block part (round in shape with two rods). Structurally, this block is divided into two unequal parts, each of which performs a specific function.
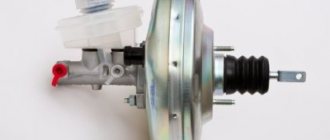
One side of the amplifier is directly connected to the master cylinder, while the other faces the driver (connects directly to the brake pedal).
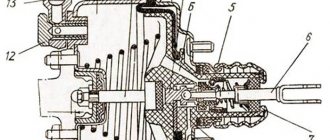
The part that faces the brake pedal and ends in a chamber through the rod, which is connected to the rest of the part. Such a chamber is called atmospheric.
Another chamber in the block body is called vacuum.
Each of the cameras performs its own specific function. The atmospheric valve, when the gas pedal is pressed, comes into contact with the atmosphere and builds up pressure, which is why the gas pedal has an easy move.
In the released position, the valve is at rest and is connected to another part of the amplifier (vacuum chamber). On the opposite side, the vacuum chamber is connected to the brake cylinder through a rod and, when the brake pedal is pressed, creates pressure in the form of vacuum through the valve.
The vacuum is created by a vacuum region through a valve, which in this case is located close to the intake system (intake manifold). Thus, when you press the gas pedal, both chambers interact through the valves, acting on the master brake cylinder and making it easier to control the car.
How to check the vacuum brake booster of a VAZ 2109?
The vacuum brake booster (VBS) is the main mechanism in the operation of the vehicle braking system. The process of braking the car and the safety of the driver and passengers depend on its performance. VUT requires periodic inspection for malfunctions or defects in its operation.
Causes of VUT malfunction:
- The diaphragm has ruptured;
- There are cracks in the hose that goes to the amplifier or it has broken;
- The spring is broken.
The device can be repaired in technical centers that have the necessary tools and specialists who know their job. If a trip to a service station is beyond your means, you can do it on your own by replacing the device in full accordance with the instructions supplied with it. But before you make a replacement, you should make sure that the cause of the breakdown is in the VUT.
Fault diagnosis
Driving without a brake booster is at least dangerous, since the braking distance is structurally calculated taking into account the operation of this unit. If it malfunctions, this indicator significantly worsens, the driver loses control over the behavior of the car, which in many cases leads to traffic accidents.
Therefore, diagnosing and timely replacement of this unit is the responsibility of every conscientious driver.
Diagnosing a faulty vacuum brake booster is not a complicated procedure.
For video repair of a vacuum booster:
Even while driving, there is a uniform method for checking functionality:
- If, when moving at any speed, the gas pedal is very tight, there is a clear problem with this particular unit. Failure can be caused either by a design defect in the unit itself (manufacturing defects) or by mechanical damage (failure of operating valves, breakage of one of the diaphragms);
- The deterioration of the braking properties of the car in this case, when the brake booster breaks down, the effect of the brake pedal is necessarily reinforced by a significant deterioration in the braking distance in relation to the working version.
How to check the vacuum brake booster on a VAZ 2109?
The method of checking the device is very simple and does not require any tools or mechanisms. To see the problem, just turn your attention to the brake pedal. For example, when in order to achieve braking of a car it is necessary to press the brake pedal harder to the floor, the braking process itself has become not as effective as before and others - this indicates the presence of defects in the operation of the VUT.
To check the VUT VAZ 2109 you must:
- Stop the car and turn off the engine.
- Press the brake pedal firmly several times, and then release the pressure mid-stroke.
- After this, without removing your foot from the pedal, start the engine.
If the VUT is operating normally, there will be a feeling that the pedal has fallen down a little; if this does not happen, then the vacuum booster or braking system has failed.
Visual inspection of VUT VAZ 2109
- Check the integrity of the connection, pipe and check valve.
- Make sure there is no damage to the flange.
- Then conduct a thorough inspection of all bends in the pipe. If you find cracks or wet marks on it, you must replace them immediately.
- If there are defects or problems in the tail seal, which is located under the steering column, the vehicle itself may slow down a little. To prevent such a problem, you should check it by removing the mat and inspecting the protective cap. If it starts to stick, this indicates a malfunction.
- Next, remove the cap and start the engine. After this, swing the valve shank several times, and if you hear a hissing sound, you can talk about a breakdown of the device.
If you notice at least one hint of VUT malfunction, carry out a timely replacement. The device is inexpensive and very easy to replace, so to insure yourself, it is better to replace it than to hope that everything works properly.
Self-replacement of the vacuum brake booster of VAZ 2109
To carry out an independent replacement, you will need to have a set of open-end and socket wrenches with sizes 10, 13 and 17, as well as a new device.
Instructions for replacing the vacuum brake booster:
- Disconnect the rod that comes from the VUT from the brake pedal.
- Unscrew the brake cylinder from the booster, which is located in the engine compartment.
- Next, you need to remove the cylinder from the vacuum; to do this, you can unscrew all the tubes passing from the brake cylinder to the body, or remove one nut at “10”.
- Disconnect the hose leading from the booster valve to the intake manifold.
- Using the cardan, disconnect the mounting bracket from the body.
- The VUT is attached to the car body using four nuts at “13”.
- After removing the device, place the mounting bracket on the new amplifier by unscrewing the two nuts to “17”, and then install it on the car.
Node examination
The need to replace the vacuum booster on a VAZ 2109 should already be stated in the event of an increase in the force applied to the brake pedal. However, a simple check will help ensure the correctness of the diagnosis:
- turn off the engine;
- press the brake pedal 5-6 times;
- hold down the brake pedal;
- start the engine.
The identifier of a serviceable VUT is an immediate, noticeable movement of the brake lever forward.
An alternative symptom will help diagnose a unit malfunction: when the engine is running, a “hissing” can be heard under the hood in the area where the intake manifold pipeline connects to the VUT check valve fitting. Experienced specialists additionally prefer to check:
- integrity of the suitable pipe; tight fit of the main element on the fitting (hissing may appear as a result of a loose connection).
The initial stage of failure of the vacuum booster is especially clearly identified on “nines” with a carburetor power system. The brake pedal is activated, as expected, with a light force, braking is good and informative, but:
- at idle speed the engine “troits”;
- when you press the brake pedal, the idle speed stabilizes;
- after applying pressure to the accelerator in neutral gear, “dips” occur, regardless of carburetor adjustments.
If the symptoms described above are present, it is advisable to remove the pipe from the “vacuum manifold” fitting with the engine running and plug the hose with a suitable object or finger - the idle speed has returned to normal and, therefore, replacing the vacuum booster on the VAZ 2109 is inevitable. If a malfunction is detected along the way in this way, the movement should be continued with the VUT turned off: the pedal will be hard, but the information content will remain.
How to replace a defective vacuum booster on a VAZ 2109: list of actions
The initial task of repair is to disconnect the pedal from the amplifier rod. Dismantling is carried out in the area of the pedal assembly: it is necessary to disconnect the two units connected to each other by a pinned pin using a flat-head screwdriver.
Further work is carried out in the engine compartment:
- disconnect the power supply connector for the brake fluid level sensor;
- dismantle the bracket that secures the hydraulic lines relative to the car frame (unscrew the nut with a head to “10”);
- disconnect the main brake cylinder by unscrewing the two nuts securing it to the VUT using a 17" wrench.
Note. When changing the brake booster, do not disconnect the hydraulic lines from the master cylinder. The lengths of the pipes make it possible to move the unit outside the working area.
After access to VUT is opened, the plan for replacing the vacuum booster of the VAZ 2109 brake system comes into force, including the following measures:
- disconnect the pipe connecting the amplifier chamber to the intake manifold;
- remove the front strut strut (installed additionally);
- unscrew the four nuts that secure the amplifier housing to the body studs (use a set of wrenches + extension + universal joint + head on “13”);
- remove the assembly from the studs and remove it from the engine compartment.
operating principle On the back side of the amplifier (on the drive fork side) a seal is installed and a bracket is attached, through which the unit is connected to four studs on the car frame. The parts must be dismantled: it is enough to unscrew the two fastening nuts with a “17” head and remove the iron structure by moving it towards you. The boot is easily pulled off the stem.
Having mounted the mounting bracket and rubber seal on the new amplifier, you can begin installing the VUT, which proceeds according to the reverse scenario. When installing, you should pay attention to three facts:
- The vacuum booster rod should be connected to the brake pedal immediately after the unit is seated on the mounting studs (before tightening with nuts);
- experienced owners additionally apply sealant between the brake cylinder and the VUT, indicating the imperfection of the sealing elements;
- the VUT rod acting on the main brake cylinder (located on the front side of the housing) may move during transportation or installation (it is necessary to check and, if necessary, install correctly by pressing until it stops).
For your information. An incorrectly installed actuator rod will result in the brakes not working after assembly.
Master brake cylinder
It is not uncommon to discover problems with the master cylinder when checking the condition of the brake assembly.
When changing the vacuum seal, it would be logical to study the current state of the gas turbine engine and, if necessary, replace it.
The replacement procedure itself is as follows.
- Disconnect the negative terminal from the battery.
- Disconnect the wire block from the fuel oil level sensor. It is located in the tank and is built directly into the lid.
- Use a special wrench for brake pipes to loosen their tension. There is no need to unscrew it completely.
- Unscrew the pair of nuts that secure the GTZ to the vacuum chamber. Only now can the brake pipes be completely unscrewed.
- Remove the cylinder from the studs.
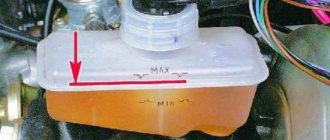
- If necessary, remove the brake fluid reservoir itself at the same time. To do this, you need to carefully rock the tank and remove the leg from the bushing.
- Assess the condition of the removed cylinder. Also be sure to check for any defects on the tank. If there are any, be sure to replace the brake fluid reservoir with a new one.
- Armed with a new GTZ, put it in place and tighten the nuts. Fasteners can be fully tightened immediately.
- Install the reservoir and fill it with brake fluid to the maximum mark.
- Now a very important step is to extract air from the cylinder. To do this, you need to close the holes in the front brake pipes with your fingers. At the same time, your assistant should gently, but not sharply, press the brake pedal. This will create pressure in the system. Continue this manipulation until you feel liquid coming out of the holes.
- As soon as the liquid flows, put on the tubes, install and fix them in place. In this case, the brake pedal cannot be released.
- By analogy, the rear tubes are connected. When they are installed in place, there must be pressure in the system, that is, the brake pedal is pressed to the floor.
After completing the replacement of the turbocharger, do not forget to bleed the brake system according to the rules.
Disassembling the unit with the TJ tank
It is quite possible to change the vacuum seal and cylinder with your own hands. The work will take a few hours, but will save a lot of money on visiting a car service center.
vacuum booster The vacuum booster, which “lightens” the brake pedal, is a toroid divided by a diaphragm into two chambers: one is permanently connected to the intake manifold, the other is connected to the atmosphere when the pedal is pressed. The “assistant” is mounted in the engine compartment behind the main brake cylinder and is connected to the brake pedal through a rod.