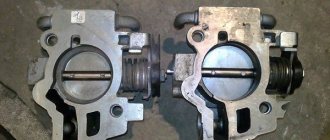
It is recommended to replace the gaskets on the VAZ intake manifold after each removal. But I had to do this prematurely, as I discovered a significant air leak, which mainly manifested itself on a cold engine. Every cold start was accompanied by a terrible tripping.
In addition to the tripping when cold, there was a slight drop in speed when sharply pressing the gas pedal. This applies to both a cold and a hot engine.
A homemade smoke generator made from a cigarette helped me detect the air leak. A very simple and primitive contraption that has helped me out more than once.
My car (Kalina 1.6 8 valves) has a plastic intake manifold (receiver). The same will be installed on all VAZ family cars with an 8-valve 1.6-liter engine (2114, 2110, etc.). 4 rubber rings act as gaskets. According to reviews, black rings last much longer than white ones. And I was convinced of this personally - these gaskets lasted for about six months and began to let air through. They felt like plastic to the touch. Unfortunately, I didn’t find black ones, so I’ll install white ones again. I hope these last longer.
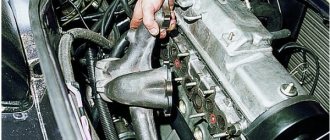
To remove the intake manifold (receiver), you must first unscrew the corrugation from the air filter, the throttle cable, and the small crankcase ventilation hoses. I will not remove the throttle and its heating.
The intake manifold is attached to 5 studs - one in the center, two on the sides. To unscrew them you will need a 13mm socket. After unscrewing the nuts, you need to remove the receiver itself from the studs and move it to the side. Remove the old gaskets and wipe the seats from oil and dirt. You also need to wipe the seat on the engine.
Gasket for Kalina manifold 8 valves
These are: fuel system, exhaust gas recirculation system.
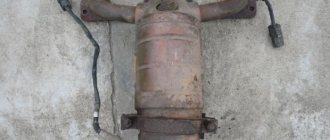
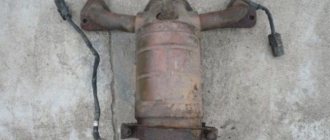
After a run of 80-100 thousand km, the metal housing of the exhaust manifold begins to crack at the seams. Flange connections are torn away from their seats.
Replacing a catalyst with a spider, as a process, is divided into several stages.
This does not take into account the fact that the catalyst itself needs to be changed due to burnout of internal parts due to systematic contact with a hot flame flow. The average gas temperature reaches 600℃.
So, division into stages: collecting data on the number and location of catalysts in the car; preparation of spare parts in each specific case for modification;
Priora fuel system
• gas tank;• pump and filter located in the tank;• fuel line;• pressure regulator;• fuel rail;• four injectors;• throttle valve;• intake manifold;• electronic engine management system.
The work is based on the fact that when the ignition is turned on, the electric fuel pump starts working, which builds up pressure in the rail. Further, when the engine is cranked by the starter, the electronic control unit opens and closes the injectors, the air-fuel mixture enters the combustion chambers, according to the operating diagram.
After fuel enters the combustion chamber, a spark is formed between the electrodes of the spark plugs. The fuel ignites and the engine starts. The injectors are electromagnetic valves, and the control unit is responsible for their operation. He is also responsible for the quality of the mixture, the ratio of air and gasoline. Sometimes problems arise and you have to disassemble the fuel system for repairs.
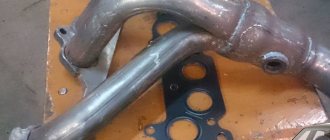
Replacement of the intake pipe gasket and catalytic collector
The intake pipe and catalytic collector are connected to the cylinder head through a common sealing gasket. The gasket also covers two channels of the cylinder head cooling jacket, which extend into the plane of the junction of the head with the intake pipe and catalytic collector. We carry out the work on an inspection ditch or overpass. Drain the coolant from the engine (see “Checking the level and replacing the coolant”). We remove the receiver (see “Removing the receiver”) and the fuel rail with injectors (see “Checking the injectors, removing the fuel rail and injectors”). Disconnect the engine management system wiring harness block from the oxygen concentration sensor wiring harness block (see “Removing the control oxygen concentration sensor”). Having unscrewed the three nuts securing the pipe flange of the additional muffler to the flange of the catalytic collector, we disconnect the additional muffler from the catalytic collector (see “Removing the additional muffler”).
Using a 13mm socket, unscrew the two nuts of the bracket securing the catenary collector.
. and remove the bracket from the bracket studs.
Using a 13mm wrench, unscrew the two bolts securing the catalytic converter bracket to the cylinder block.
. and remove the bracket.
Using a “13” wrench, unscrew the nut of the upper fastening of the right support bracket of the intake pipe. Remove the ground wire tip from the intake pipe stud.
Using a 13mm socket, unscrew the bolt of the lower fastening of the right support bracket of the intake pipe.
. and remove the bracket.
Remove the spacer bushing from the intake pipe stud.
Using a 19mm wrench, unscrew the nut securing the clutch housing to the cylinder block, which also secures the lower end of the left support bracket of the intake pipe.
Using a 17mm wrench, unscrew the nut of the upper fastening of the left support bracket of the intake pipe.
. and remove the bracket. On the left rear side of the engine...
. Using the “13” head, loosen the tightening of nut 1 securing the coolant pump pipe bracket, unscrew nut 2 securing the catalytic collector and nut 3 of the general fastening of the catalytic collector and intake pipe to the cylinder head (for clarity, shown on a dismantled engine).
Move the coolant pump pipe bracket aside.
Remove the heat shield from the cylinder head studs and the washer from the top stud. On the right rear side of the engine.
. Using the “13” head, unscrew the two nuts securing the heat shield and the eye.
Remove the heat shield and ring from the cylinder head studs. ..using the “13” head, unscrew the nut for fastening the catalytic collector and the nut for the general fastening of the catalytic collector and inlet pipe, located on the same studs. Remove the washers from the studs.
Using a “13” socket, unscrew two nuts 1 of the upper fastening of the intake pipe and one nut 2 of the upper fastening of the catalytic collector. Remove the washers from the studs.
Using a “13” socket, unscrew the two nuts of the common lower fastening of the catalytic collector and the intake pipe to the cylinder head. Remove the washers from the studs.
Remove the inlet pipe.
Remove the sealing gasket of the intake pipe and catalytic collector.
After each removal of the intake pipe or catalytic collector, the gasket must be replaced with a new one. Before installation, we clean the mating surfaces of the cylinder head, intake pipe and cathode from remnants of the old gasket and carbon deposits. Apply graphite lubricant to the cylinder head studs. We carry out assembly in reverse order. At the four common fastening points of the intake pipe and the catalytic converter (their joints), it is necessary to install thick washers with a large outer diameter on the studs.
Common mounting points for the intake pipe and catalytic collector (shown on a dismantled engine for clarity).
Dismantling
There is only one difficulty in this process - the inaccessibility of some fasteners. It is best to carry out this “operation” in a viewing hole or on a lift. Of course, this is not necessary, but it is much more convenient.
Work order:
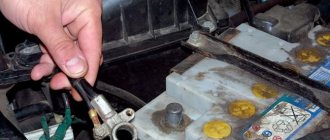
- First you need to remove the negative terminal from the battery or turn off the mains switch.
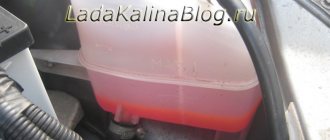
- Next, it is recommended to drain all the antifreeze into a container prepared in advance.
- Next, you need to disconnect the fuel pipes. If the coolant is not drained, at this stage it will go into the cylinders.
- Now you have to find the throttle position and idle speed sensors, and then remove the wires from them.
- We first remove the crankcase ventilation from the hoses, then the brake booster.
- Remove the intake manifold (receiver) together with the throttle assembly.
- Then remove the fuel rail (without disassembling) and the wires from the injector.
- There's not much left. Now you need to remove the heat reflecting screen. The exhaust pipe of the muffler is unscrewed from the manifold.
- We remove the exhaust manifold Kalina 8 valves from the BC head studs, to do this we unscrew the fastenings shown below in the figure
Required tools and materials
The list of what is needed is, in principle, standard: a standard set of tools, an extension cord with various heads, WD-40 or other similar lubricant. If you know that the problem is broken studs, then a stud extractor, taps, drill and drill bits will be added to the above list. In addition, a bucket or basin, possibly an old canister, should be at hand.
Advice! A few days before replacing the exhaust manifold, you can begin to lubricate all fasteners in the system. Can be lubricated several times a day. This will greatly simplify the task and make replacement quick.
Why do you need a catalyst?
I already have an article - what is it , I won’t repeat it. You need to understand that a catalyst (and scientifically, a catalytic converter) is needed only to clean the car's exhaust from harmful emissions and make them less harmful.
In simple words, it purifies harmful gases (while glowing almost “red hot”) and “almost” harmless CO2 and N2, O2 emerge from harmful CO, CH and other compounds. This way we save the environment at least a little.
Its structure is quite simple - it is a thickened pipe, which inside has something like a honeycomb, only long and hollow. They are usually made of ceramic elements coated with noble metals (usually platinum group metals are used - iridium, rhodium, palladium).
It is because of this that its cost, to put it mildly, is not small! From 30 to 150,000 rubles, it all depends on the class of the car and its volume.
In order for gases to transform from toxic to less harmful, the temperature of the catalyst must be about 750 degrees Celsius, otherwise the chemical reaction will not occur. The gases that come out of a car engine have a temperature of approximately 500 - 550 degrees Celsius (which is not enough), when they pass through the catalyst, a chemical reaction occurs with the release of heat - thus, the heating is exactly what is needed (750 - 900 degrees).
Technical features of the insert for Lada Kalina 8V
The industry offers two types of tuning inserts, the design of each of them depends on the location of the pipes. Moreover, each design is designed for a specific power unit:
- Insert 4-1 is installed on forced engines with a speed range from 5,000 to 10,000 rpm. structurally suitable only for 16-valve engines.
- The 4-2-1 insert operates over a wider range and is considered a "low-end" insert. It is possible to increase engine power by about 3-5%. This is the model most often installed on the VAZ 1118.
Is there an alternative
Will Priora work without a catalyst? Of course it will be! The absence of a catalytic converter will not affect its performance in any way, as some “experienced” craftsmen claim. Yes, the car will no longer meet established environmental standards, but it will not work any worse.
If you don’t want to spend money on a standard catalyst, you can always buy a universal device, which will cost you half the price, taking into account installation. Essentially, it is the same catalytic converter with the same functions and similar design. And they are produced mainly in the same factories as the original ones, and their price is lower due to the absence of various trade markups.
Well, if you want to easily tune your Priora, buy a good flame arrester for it. It is installed instead of a catalyst. With it, the engine power will increase due to improved exhaust gas flow, and the sound of the power unit will acquire sporty notes.
Sequence of work in the 8-valve Kalina
The first step is to fill all threaded connections with liquid wrench. When exposed to high temperatures for a long time, nuts become deformed and destroyed due to corrosion, so unscrewing them is quite problematic. After tightening the nuts, the following work is carried out:
- the coolant is drained;
- lambda probe chips are removed;
- unscrew the bolts that secure the intake manifold to the cylinder head and exhaust pipe;
- the holding bracket is dismantled;
- the exhaust manifold is removed;
- the lambda probe wire is extended;
- “spider” is installed;
- the system is assembled in reverse order.
There are different spider options: 4-1 system; 4-2-1; 4-2-1 with modified sound. The most popular is 4-1. The design has four pipes converging into one, which are welded to the cylinder head plate. The 4-2-1 system is also made of four pipes, the first and second of which converge into one, as well as the third and fourth. The two pipes then form one and transmit the exhaust gases further into the system.
When installing the 4-2-1 spider, the exhaust pipe is shortened. As a result, it will be impossible to install a 4-1 design blende or a new catalyst into the car without modification. The 4-1 system is completely identical to the Kalina factory catalyst.
Instructions
Replacing the cylinder head gasket is a procedure consisting of several stages. By following the step-by-step guide, you will be able to complete this job quickly and without any problems. To perform this work, prepare sets of open-end and socket wrenches, a set of heads of different sizes, screwdrivers, rags, and a container for draining coolant and fuel.
First, turn off the power to the car. Remove the negative terminal from the battery. Then set the 1st cylinder (its piston) to the TDC position. Drain the coolant.
After this, you need to make sure that the pressure level in the power system is low enough. To do this, unscrew the cap, which is located at the rear end of the fuel rail, press the spool and drain the fuel, then screw the cap back on. It is very important to consider that these actions can only be carried out a couple of hours after using the car. If you do this immediately after stopping the car, it is possible that you will get burned both from contact with the spool and from the fuel that will be sprayed under pressure. In this case, it will not be possible to safely drain it.
How to determine the malfunction of the Lada-Kalina muffler
To find a faulty exhaust system, you don’t have to be a car mechanic or have extensive experience in car repairs. To identify problems, you need to act in the following sequence:
- Pay attention to noises that are made while driving. If the muffler is faulty, the sound will be quite loud. Extraneous noises also indicate problems with the exhaust system.
- Raise the car with a jack or drive onto an overpass and inspect the system body. A working device should have no holes or rust. The presence of traces of corrosion indicates that, most likely, there is a problem with the housing.
- While driving, you need to monitor the color of the exhaust: the periodic appearance of black and dense smoke will indicate that there are problems with the exhaust system.
- Start the engine and press the gas pedal for several minutes. Then turn off the ignition and check the engine temperature. During this time it should not get very hot. If it has risen significantly, it means that there are problems in the performance of the mechanism.
Quite often, the muffler body is exposed to corrosion, which leads to the appearance of holes and, as a result, a loud exhaust sound.
Malfunctions of various types can occur with the exhaust system, but the most common is unreliable installation of muffler elements. As a result of poor-quality connection, the unit quickly fails. In addition, common malfunctions include:
- loss of tightness as a result of burning out of individual elements (corrugations, gaskets);
- catalyst problems;
- mechanical damage;
- exposure to corrosion, which leads to the appearance of holes.
One of the malfunctions of the Lada-Kalina exhaust system is burnout of the corrugation
To shoot or not to shoot?
So, you are faced with the final failure of the catalyst and the impossibility of resuscitating it. Should I delete the device or not?
- Without it, the quality of the exhaust deteriorates: it begins to meet EURO 2 standards. It is believed that this makes it difficult to undergo maintenance. However, this argument seems dubious to us: catalysts are installed only on injectors, and besides, cars are necessarily electronic. Somehow, Ladas from 1 to 7 models undergo technical inspection;
- The car’s power begins to surpass previous figures, which will be a balm for the owner’s soul.
- We also add lower fuel consumption as a plus. The reduction sometimes reaches 10-15%;
- In terms of cons, the list turns out to be quite impressive. First of all, this is an almost 100% occurrence of errors in reporting and a continuous lighting of the Check engine. Some may be indifferent to this, some will be annoyed by it, but the main thing is that there is a possibility of missing a serious warning about other problems in the car;
- The muffler will work worse. Moreover, it will burn out faster, since exhaust gases with an unacceptably high temperature will begin to break into it. Plus the exhaust will have a loud and unpleasant sound. Fire is likely to appear from the exhaust pipe;
- The engine will become noisier; Vibration is likely to be transmitted to the interior.
In our opinion, the pros and cons of catalyst removal are combined with the predominance of the latter. It will be completely insufficient to simply cut it out: too much is lost. At a minimum, you will need a flame arrester instead of a catalyst. And to remove the constant Check engine reminder, you also need to install a decoy lambda probe like “Stronger”.
Moreover, in many cases, blende is not enough, and the issue has to be resolved by installing a series RC filter. All the work taken together, even if carried out with the participation of auto experts, still turns out to be cheaper (and much!) than a new catalyst. However, before it breaks, it is still better to take care of it so that it lives as long as possible.
What does the muffler consist of?
The main part of the exhaust system serves to absorb noise. On the Lada Kalina car, this function is performed by a pipe, which includes the muffler itself and its resonator.
The thickening is the resonator, the end is the muffler itself
The pipe has a completely sealed body, which is manufactured using the rolling method, that is, without the use of a welding machine. Thanks to this, the muffler is durable and does not corrode. And the resonator, which is also located in the pipe, consists of several closed chambers. These chambers are connected to each other by small tubes with holes in them. Thanks to this structure, the resonator can quickly smooth out all acoustic vibrations. In the latest modifications of the Lada Kalina, the inside of the resonator is lined with sound-absorbing material.
Content
Actions in emergency situations Daily checks Operating instructions Warnings and technical rules Basic instruments, measuring Engine and its systems Transmission Chassis Steering Brake system Vehicle electrical equipment Body Interior ventilation and heating system Applications Fault codes Electrical diagrams
Sources
- https://expertvaz.ru/2110/premer-komplektatsii-tsena.html
- https://videoremont-mashin.ru/remont-kpp-vaz-21108/ustanovka-konditsionera-v-vaz-2110-ot-priory-svoimi-rukami/
- https://monolith.in.ua/predohraniteli-lada-2110/
When is it necessary to replace and remove the exhaust manifold on a VAZ-2114
Huge temperature changes are the main problem faced by the exhaust manifold and the gasket, for which it is removed. The collector itself is made of a special grade of cast iron; it can withstand high temperatures (up to 800-900 degrees) , however, these are critical values, after which the collector may warp or crack.
Exhaust manifold VAZ-2114
Its main task is to collect exhaust gases and distribute them into the exhaust pipe of the muffler.
Replacing or dismantling the VAZ-2114 exhaust manifold is necessary in the following cases:
- Mechanical damage to the collector.
- Warping and loss of tightness at the junction with the cylinder head.
- Burnout of the gasket between the head and the manifold.
- The appearance of cracks as a result of engine overheating.
- Replacing the collector with a device of a different configuration, adapted to a more severe operating mode.
In the event that we are not going to participate in high-speed races for the prize of the head of the regional traffic police, replacing or dismantling the collector may be necessary in a number of cases.
Tools and materials for dismantling
There are a number of symptoms that will indicate that you need to prepare to remove the exhaust manifold:
- increased noise level in the engine compartment , the engine produces a characteristic, loud sound in any operating mode;
- breakthrough of exhaust gases into the engine compartment and sometimes into the cabin;
- reduction in engine power due to a mismatch between the exhaust gas outlets in the cylinder head and in the manifold.
Many people decide to replace the standard manifold with a “tuning” one, made of stainless steel and having a different configuration, thereby wanting to increase engine power and reduce the resistance that the standard manifold provides to exhaust gases. As a rule, the most common reason for dismantling a unit is gasket burnout .
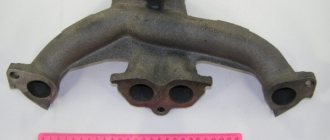
Exhaust manifold gasket
The manifold gasket on the VAZ-2114 is made of pressed reinforced asbestos and is designed to ensure a tight connection between the block head and the manifold flanges. Asbestos is used to correct the coefficient of thermal expansion of the aluminum alloy from which the head is cast and the cast iron from which the manifold is cast. At high speeds and under prolonged loads, the gasket may burn out. Then its replacement and dismantling of the collector are inevitable.
To dismantle the manifold, you will need a standard set of tools, a set of sockets with extensions, and WD-40 penetrating lubricant or its equivalent. In case of broken studs, a stud extractor, drill, drill bits and a set of taps will be useful. A day or two before dismantling the collector, it is worth moistening all the fasteners several times, this will significantly simplify the removal procedure .
How to remove the receiver on a Priora
Tools that may come in handy: - 10mm socket; - key 13; - screwdriver.
To remove the intake manifold you will need:
- Due to the fact that in the next steps of the instructions there will be manipulations with electrical wiring, it is necessary to remove the negative terminal of the battery.
- The next step is to remove the plastic screen (cover) from the engine housing. This is done so that it does not interfere with your work.
- After which, it is necessary to remove power from the four ignition coils and dismantle them. To do this, pull out the contact chips. Take a 10mm socket (or a wrench of the same size) and unscrew one fastening bolt on each coil. Simply pull the coils upwards using the necessary force. Now they can be removed. There is no need to remove the spark plugs themselves; they will not interfere with removal. On the other hand, it is advisable to take advantage of the situation and check their condition (gap and spark quality).
- Our next task is to dismantle the throttle assembly. The receiver cannot be removed without removing it. To remove the throttle and avoid excess antifreeze leaking out of the cooling system pipes, you need to prepare first (unscrew the cap of the expansion tank with coolant). To remove the throttle, it is necessary to disconnect all the pipes connected to it, including those responsible for the air supply (corrugation) and cooling. In order to remove the assembly itself, you need to unscrew the two fastening nuts with a wrench or a 13mm socket. Now the assembly together with the sealing strip can be removed, and at the same time inspected and, if necessary, cleaned.
- At this point, locate and remove the crankcase ventilation hose. To do this, loosen the tightened clamp using a flat-head screwdriver and pull it towards you.
- The next step is to dismantle the dipstick structure to check the oil level. It is attached to one screw, which must be unscrewed.
- Now the most important thing is to remove the Priora 16 valve receiver. Doing this is not as difficult as it seems. First of all, we need to unscrew the nuts from the three connecting bolts at the junction of the block and the manifold. It is most convenient to work from a repair pit or using a lift, having previously dismantled the underbody protection of the car. After that, you just have to unscrew two additional nuts.
- It's time to move into the engine compartment and unscrew the two special mounting bolts that are located on the right and left of the receiver housing.
- After which the receiver can be carefully removed.
- Depending on the type and configuration of components in your engine, you may need to unscrew, rotate or remove any component that prevents the receiver from being removed (for example, power steering or a generator).
Product delivery options
Note! Below are the shipping methods available specifically for this product. Payment options may vary depending on the shipping method. Detailed information can be found on the “Delivery and Payment” page.
Parcel by Russian Post
Available payment methods:
- Cash on delivery (payment upon receipt)
- Using cards Sberbank, VTB, Post Bank, Tinkoff
- Yandex money
- QIWI
- ROBOKASSA
Shipping throughout Russia. Delivery time is from 5 to 12 days.
Parcel by Russian Post 1st class
Available payment methods:
- Cash on delivery (payment upon receipt)
- Using cards Sberbank, VTB, Post Bank, Tinkoff
- Yandex money
- QIWI
- ROBOKASSA
Shipping throughout Russia. Delivery time is from 2 to 5 days. More expensive than regular delivery by Russian Post, approximately 50%. Parcel weight up to 2.5 kg
Express Parcel EMS
Available payment methods:
- Cash on delivery (payment upon receipt)
- Using cards Sberbank, VTB, Post Bank, Tinkoff
- Yandex money
- QIWI
- ROBOKASSA
Shipping throughout Russia. Delivery time is from 3 to 7 days. More expensive than regular delivery by Russian Post, approximately 100%.
Summary
According to some motorists, after tuning the car becomes faster, there is no hysterical roar when the revolutions approach 5,000. The exhaust sound has also changed, it has become more pleasant. In most cases, there is a decrease in fuel consumption. The financial component is also very noticeable - installing a 4-2-1 spider costs at least half as much.
Often my blog (and my channel) receives a lot of questions regarding the catalyst, and some readers still have many misconceptions in their heads. One of them (for example) is that if you remove this part of the muffler, then it will be VERY bad for the car, it will literally stand up and refuse to go! I decided to answer all the questions at once, so today we will talk: - is it worth removing it or not (what are the pros and cons of such manipulation), what will be the consumption after cutting it out, is it necessary to flash the ECU (and what are the risks), and well a few words about “deception”. In general, it will be interesting, as usual, the video version at the end...
At the very beginning, I would like to say that this unit is NOT SOMETHING IMPORTANT for the car, but now “a bunch of stones” will fly at me, they say, what are you saying, but what about ECOLOGY? But if we put aside all the exclamations of the “greens”, then a car without a catalyst will work BETTER, CONSUMPTION will be lower, and the POWER will increase a little.
Causes of malfunctions
The key factor that causes 90% of exhaust manifold malfunctions on VAZ 2114 cars is high temperature and poor quality materials from which the parts are made. During operation, the steel repeatedly heats up and cools down, which leads to the appearance of cracks in the body. This is a common occurrence for VAZ cars older than 7-8 years.
Auto repair shops offer crack welding services using argon welding. However, for a number of reasons, this activity is useless for cars older than 7 years.
1) Just removing and installing the exhaust manifold will cost about 2.5 thousand rubles. Taking into account the work of the welder and other actions, the cost of repairs can be 4-5 thousand rubles. If you do the work yourself, buying a new part will cost less.
2) Welding, even argon welding, disrupts the structure of “tired” metal. A boiled part rarely lasts longer than a year, after which new holes appear. The older the car, the faster the problem returns, and the collector has to be removed again.
If the car is older than 8 years and there are problems with cracks in the manifold, it is better to remove the part and replace it with a new one.
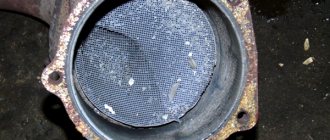
Catalytic converter
A much more insidious defect is when ceramic particles begin to crumble from the surface of the honeycomb. The cause of destruction of ceramics is most often low-quality fuel, which burns out during the exhaust stroke. Moreover, crumbling begins in the hottest zone, on the edges of the honeycombs located closer to the engine.
When the engine operates at different modes, some of the exhaust gases may be thrown back into the engine cylinders. Ceramic dust, which is an abrasive and gets into the cylinder with the gas flow, will quickly damage the piston group and lead to scoring on the cylinder walls.
However, this phenomenon is not dangerous for all engines. We won’t even talk about models in which the neutralizer, contrary to global trends, is fixed under the bottom of the car, and therefore harmful particles would have to travel almost a meter “against the flow.” Some manufacturers, thanks to the use of correct design solutions, avoided these problems or managed to eliminate them in a timely manner.
How's the warranty?
Against the background of such an attitude towards the consumer, the position taken by the Kia concern causes a sharply negative attitude. Until the beginning of 2016, in the service book of cars of this brand there was an inscription that the warranty for the catalytic converter extends up to 1 (!) thousand kilometers. Roughly speaking, two refuelings, and then “bad Russian gasoline” can damage the catalytic converter, but the company is no longer responsible for this. However, since 2016, the warranty for the catalytic converter has been extended to 150 thousand km.
In the author's opinion, the warranty on the catalytic converter should be at least as long as that on the car.
Now let’s take a closer look at what a car owner should and shouldn’t do to ensure that the neutralizer serves a long and happy life.
Causes of catalytic converter failure:
- Poor quality fuel - most often with a low octane number. The engine management system switches to late ignition. This causes the mixture to burn out at the outlet and an increase in the temperature of the exhaust gases.
- Incorrect operation of the ignition system (misfire). Fuel that is not burned in one cylinder is immediately ignited and burns in the neutralizer.
- Mechanical damage to the catalytic converter. Increased vibration of the power unit and impacts on the catalyst lead to crumbling of the ceramic block.
- Thermal shock. Instantaneous cooling of a hot neutralizer when overcoming a puddle, for example, can cause cracks in the ceramic element.
- Incorrect air-fuel mixture, caused, for example, by a faulty oxygen sensor. Leaky, leaking injectors will cause the same effect.
- Adding additives to gasoline. Cocktails from unverified manufacturers or a concentration imbalance may increase the exhaust combustion temperature.
- The newest engine designs with minimal toxicity are programmed to quickly warm up the converter. In cold conditions, to speed up warm-up, the engine control units initially over-enrich the mixture, which burns out on the surface of the converter.
- There have been blatant design defects in the neutralizer throughout history. For example, Suzuki carried out a recall campaign to completely replace converters on SX4 cars.
From personal experience
Second half of the nineties. I worked as a fleet manager for a commercial company. The boss calls and says: We will sell Karina (Toyota Carina E). Go to the car wash and let your engine shine like...
Replacing the gasket
The marker of a failed gasket is considered to be soot that forms in the place where the exhaust escapes. In this case, proceed to replacing the defective seal.
What is needed for repair
To replace the exhaust manifold gasket, prepare the following materials and tools:
- screwdrivers (slotted and Phillips);
- sharp knife or spatula (remove used gasket);
- spanners included;
- anti-rust liquid (for example, WD-40);
- 5 liter wide-neck container (for draining antifreeze);
- dry rags.
ATTENTION! When replacing the manifold gasket on a VAZ 2114 (as on other factory models), it is necessary to drain the antifreeze in advance, otherwise the engine intake windows can be flooded.
Step by Step Actions
The process of replacing a seal when it fails is simple, but has nuances for different engines. In general terms, the algorithm for dismantling and subsequent installation of the VK gasket looks like this:
- Open the hood and remove the air intake with the carburetor, under which there is a manifold.
- Remove the thermal screen covering the VC (some older models do not have a screen).
- Unscrew the bolts that attach the spider to the exhaust pipe, and then the bolts connecting it to the engine block.
- Proceed to removing the exhaust manifold itself, on which sits a burnt-out gasket, which often “sticks” to the VC.
- Carefully clean the area between the cylinder head and the manifold with a spatula, removing carbon deposits and fragments of worn gasket from the second.
- Once the area is shiny, coat it with graphite lubricant and install a new gasket.
- Treat the fasteners with the same lubricant (to prevent corrosion).
Finally, return all dismantled parts to their rightful places.
When is cylinder head repair required?
The seal for the VAZ cylinder block cover has a complex structure: sheets of steel, cardboard, and fiber pressed together. They are coated with a layer of sealant, which improves the connection of the parts to each other. Replacement must be carried out if this gasket burns out during engine repairs. The following symptoms indicate a problem with this component:
- Air bubbles in the antifreeze appeared in the expansion tank of the cooling system. This is the first sign that the seal has been broken.
- Exhaust gases begin to escape through the seal. In this case, the gasket may be damaged after repair if you overtightened the mounting bolts.
- White smoke appeared from the muffler, a bit like steam. This happens when coolant enters the cylinders through a breakdown in the gasket.
- White foam has appeared on the oil level dipstick. This is another sign that coolant is present in the engine - it is mixed with the engine oil.
- Increased fuel consumption with insufficient engine power, the car takes more time to gain speed. If the gasket wears out significantly, the vehicle may stall when driving uphill, and when pressing the gas pedal, the driver will feel a dip in the power of the power unit. In the most difficult cases, the car will stall when moving the gear lever to neutral or when stopping at a traffic light.
- Oil stains on the surface of the antifreeze in the expansion tank. This is another sign that the cylinder head is leaking.
- The spark plugs are filled with antifreeze. This malfunction can be detected if you remove the high-voltage wires from the spark plugs and then unscrew them.
In all these cases, you will need to purchase a new spare part to replace it with the failed one.