It is well known that the serviceability of the brake system in a car is of great importance, since it is directly related to road safety. Therefore, if any problems occur in this system, it is necessary to urgently repair and replace parts that are problematic.
Rear brake cylinder
Replacing the rear brake cylinder on a VAZ 2110, VAZ 2111, VAZ 2112
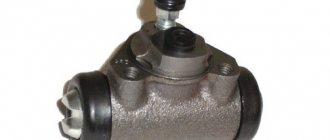
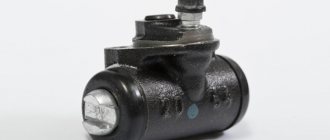
Rear brake cylinder. Thanks to it, the brake pads are in contact with the brake drum, and from this contact the car slows down. If the cylinder is damaged on one side, the wheel either does not brake at all or brakes very weakly, and sometimes it happens that the brake fluid leaks through the drum. It is advisable to check the brake mechanism from time to time as it is the braking mechanism of the vehicle and if it fails at any time, it is very likely that an accident will occur.
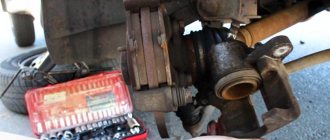
To replace the brake cylinder you need wrenches: Wrenches, as well as a spanner, if you have a special wrench for the clutches of the working cylinders, this will be very useful, but you can still do without it, and by the way, after replacing the pump you will need a brake system, and for pumping you will need a larger set of tools, one of the most important of which is a clean, empty liter container and a short hose for it and pumping the nipple!
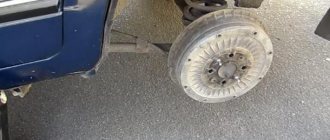
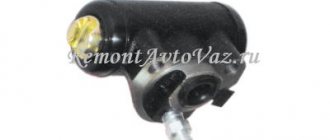
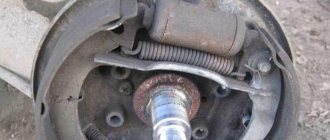
Where is the rear brake cylinder located? You will have to remove the brake drum, after which it will be very easy to see, unless you have no idea what it is and have never seen it in your life, in which case look at the photo below, where it is marked with a red arrow and, as you can see , its ends (marked with blue arrows) are connected to the brake pads, we have already mentioned that it presses on the brake pads, namely the pistons, marked with blue arrows, extend and press on the pads with their pressure.
When should a rear brake cylinder be replaced? If there is jamming and leakage, jammed cylinders are easy to understand, in this case one wheel cannot brake at all or stop braking, and, most importantly, the wheel continues to brake, all these situations say that in some positions the brake cylinder is jammed. If it is leaking, it is much more difficult to determine whether it is actually starting to disappear - the first symptom that should concern you is that the brake fluid is running low and leaking on one of the rear wheels (if you see a photo, it is very likely that the brake hose is cracked, but if This is real brake fluid, you'll see that soon.)
Vacuum brake booster
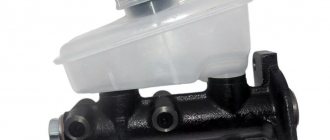
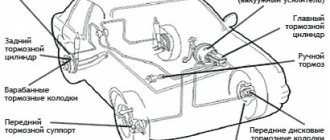
A rod connected to the amplifier is connected to the pedal. The design of the VAZ-2107 vacuum brake booster is quite interesting; it is shown in the figure:
The amplifier is a sealed container, internally divided into 2 chambers by means of a membrane. The chamber located closer to the pedal is called atmospheric, and the chamber separated from it by a membrane is called vacuum. The diaphragm itself is connected to the piston rod of the master cylinder.
The vacuum chamber is connected by a pipe to the intake manifold of the engine, where the vacuum comes from. The design also includes a follower valve controlled by the pedal rod, which does all the work.
When the pedal is released, this valve connects the chamber cavities through a channel, providing identical pressure. When the pedal is applied, the valve closes the channel connecting the chambers and opens the channel connecting the atmospheric chamber with the atmosphere. Since a vacuum is maintained in the second chamber, atmospheric pressure begins to put pressure on the membrane. Since it is connected to the piston rod of the master cylinder, due to the movement of the piston, fluid is displaced from the cylinder into the pipelines.
How to replace the rear brake cylinder on a VAZ 2110-VAZ 2112?
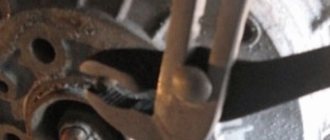
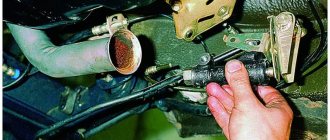
1) Removing the cylinder is not difficult, we even say it’s very simple, but getting to it is not so easy, because you need to remove the brake drum, brake pads and most importantly the brake line. In this regard, you will have to turn it off. what kind of brake fluid will pour out of it immediately, by the way, the hose from the cap of the pumping nozzle can be closed so that practically no air gets into the system, and all the fluid remains intact (we will explain to you how to do this later), well, let’s replace it, first we’ll sort everything out parts that prevent access to it (For information on how to disassemble the drum and pads, see the article: “Replacing rear brake pads on a VAZ”).
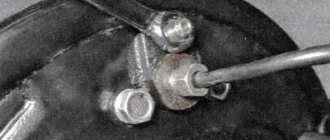
2) Come on, now remove the plastic cap from the inflatable nozzle (indicated by the blue arrow), just don’t lose it, and still check its condition, it shouldn’t be cracked or even different, otherwise replace the cap with a new one, then take a special key or just the most common ring wrench size 8 (depending on what kind of key you have) and with its help completely unscrew the pumping nozzle (this is the one that was closed with a cap), it has edges, in general you will understand everything right away) then we approach the brake hose (namely, to its muzzle they are marked with a blue arrow) and using a special key or the regular “8” key. Using a flat wrench or a regular 10mm wrench, break the tightening of this tube at the edges and with a regular wrench, unscrew the tube and finally disconnect it (when the tube is disconnected from it, the brake fluid will flow so that it does not leak out, close the tube with a plastic plug because that they still need to be replaced every year, depending on the intensity of driving. Plus, they are not that expensive. So, with everything listed above in our arsenal, let's get started.
Before you begin any work, provide a place to place all spare parts, and when removing them, remember the order and methods of removing them. This will make the reverse process much easier. In addition, before such a procedure, it is worth acquiring a set of brake pads, because they need to be replaced every year, depending on the intensity of driving. Plus they are not that expensive. So, having all the above elements in our arsenal, let's get to work.
Replacing the Rear End The first step is to access all the wheels at once, as this will make it easier to bleed the entire system later.
At the first stage, it is necessary to provide access to all wheels at once, since it will be easier to subsequently pump the entire system. To do this, place the machine on supports and lift it. It is most convenient to implement it with a jack, but it is also possible without it.
We unscrew the wheel we need using a wheel wrench.
How to upgrade
To completely remove air from the system, you will need an assistant. The latter must press the brake pedal on command. You will also need a container into which the airy liquid will be released. It is best for it to be transparent. A regular mineral water bottle will do. You will also need a hose through which the liquid will flow from the fitting into the container. This can be any rubber or silicone tube. It is desirable that it is also transparent.
So, how to properly bleed the brakes after replacing the rear cylinder? First, add fluid to the plastic reservoir of the master cylinder to the required level. Then we connect the hose with one end to the unscrewed fitting, and lower the other into the bottle. The assistant should press the brake pedal 4-5 times and press it “to the floor” at the last time. As you press, hydraulic fluid will begin to exit the system. The first time it contains many small air bubbles. It would seem that it was possible not to pump. But they are the ones that interfere with effective braking. The compressive force of air is much lighter than that of liquid, which results in greater heating.
When to finish the procedure? After each pumping step, the amount of air, namely bubbles, will decrease. This is done until they completely disappear from the liquid. To determine this, use only clear tubes and a container. After this, screw the fitting back and check the fluid level in the master cylinder reservoir. It should decrease. Top up again to the maximum level. Remember that the brand of the substance used for topping up must be the same as what is currently used in the car.
Replacing the rear brake cylinder on a VAZ 2114: Where is it located
Using pliers, unscrew the studs that secure the drum to the hub. And remove it evenly, although you may have to tap the back of it with a hammer through a pad of wood. Be careful when doing this as the drum is made of very fragile material. Also, use a wire brush to remove any rust or dirt from the cylindrical surface of the hub.
Then carefully remove all parts of the brake system. But more often it is better to remove everything, since the coating, as a rule, needs to be treated and painted with at least a primer.
After this, you should begin disassembling the cylinder itself. To save yourself the hassle, carefully scrape off the cylinder-brake hose connection. Please note that they can be steel or copper. Therefore, care must be taken in all actions to avoid damaging them.
- How to unscrew the rear brake cylinder on a VAZ 2114 if the connections are jammed?
- You can try to unscrew the nipple with a 10mm wrench, but most likely the edges will come off, so we generously wet all the connections with WD-40 for a while. It dissolves all metal oxides in a relatively short time, and due to its microscopic nature it penetrates even into microcracks. Usually after this action the tap is easily unscrewed. But even if this does not help, and there are practically no chamfers, there is a special key, which is a socket with a socket and a clamping screw. This simple device allows you to unscrew each hardened connection without much effort. It must be tightly attached to the nut, tightened with a bolt and turned.
After removing this connection, you need to unscrew the brake cylinder itself. Here it is much simpler, because it is screwed on with only two M6 screws, wrench 10. Usually they are easily unscrewed, and the cylinder is easily removed from the hole.
After removing the old insert, carefully check the condition of the newly unscrewed connector and the assembly location. Any defects must be corrected and burrs removed.
Install the brakes in reverse order. Start checking the drive only after the entire wheel brake mechanism has been assembled. When installing the pads and bar, do not forget to reconnect the handbrake cable. This is a common problem in this case. The main thing is to put everything exactly as it turned out.
Are there any advantages to a drum mechanism over a disk mechanism?
It would seem that this is simply impossible. How can an archaic system be better than a more modern one? But there are several undeniable advantages of drum brakes that cannot be taken away from them:
1. Because the contact patch extends around the entire circumference of the drum, the braking force transmitted to drum brakes is greater than that of a brake disc of the same size.
2. Don’t take it as a joke, but we read on specialized websites that using drum brakes saves weight, money for the production of an element for a car company and, ultimately, money in the wallets of car owners.
If we knew about the last two points for a long time - indeed, it is difficult to find a simpler and cheaper design, then we didn’t even know about the weight. Somehow the cast iron bass drum did not inspire too much confidence in this. However, if you consider that in a disc brake, in addition to brake hydraulics, there is also a huge disk (also cast iron), then that’s what it looks like. With the same weight, the drum brake will be more powerful due to the larger contact patch of the pads in it. But with the same power, it will be lighter than its modern counterpart.
Sources
- https://skolkogramm.ru/info/zamena-zadnego-tormoznogo-czilindra-vaz-2106-svoimi-rukami-foto-remont-vaz-2106
- https://prometey96.ru/modeli/ustrojstvo-zadnego-tormoznogo-cilindra.html
- https://avto-lover.ru/drugoe/zadnij-tormoznoj-cilindr-2108.html
- https://alfcars.ru/brake-system-diagram-and-repair/how-to-disassemble-the-brake-cylinder-vaz-2106-replacement-of-rear-brake-cylinders-vaz.html
- https://bumper.guru/klassicheskie-modeli-vaz/tormoza/tormoznaya-sistema-vaz-2106.html
- https://AutoManya.ru/lada-drugoe/remont-zadnego-tormoznogo-cilindra.html
- https://otdelka-remont.ru/remont-zadnego-tormoznogo-tsilindra-vaz-2106/
[collapse]
Required Tools
After pumping, carefully check the new cylinder and its connection to the pipe for leaks. To do this, press and hold the brake pedal as hard as possible several times.
- To make your job easier if the new cylinder you purchased breaks, so as not to do the job wrong. You can check the cylinder without a drum, but here you need good physical strength and two mats to compress and hold the pistons.
- When the brakes are adjusted properly, the front wheels engage the pedal first because they are closest to the master cylinder, and then both rear wheels engage simultaneously. If this is not the case, pump out the system or send it back to the service center.
- However, sometimes it is possible to repair the rear brake cylinder; for this purpose, repair kits are sold, which include several o-rings and two injectors. But this is only desirable if its inner surface is in perfect condition.
2 more reasons why rear brakes stick
Rear brakes jam like this: the pads stick to the brake discs or drums, as a result the wheels do not rotate and the vehicle does not move.
Why do the rear brakes stick? There may be two reasons:
- The car “rested” on the handbrake for more than a month.
- The brake pads got wet when the vehicle got into a puddle, and the driver drove the car into a garage or parking lot without drying them.
You will have to be quite nervous in such circumstances. The rear brakes are jammed, there is no way to even get to the service station. You'll have to do the repairs yourself. Below are tips on how to deal with this situation.
Finalization
Many, believing that the brakes are bad and repairs do not help them, decide on significant alterations and tuning. For example, tuning the brake system of a VAZ 2110 may include replacing the rear drum mechanisms with disc ones.
It is especially important to know here that braking of the rear wheels should be softer and occur a little later than the front wheels to prevent skidding. Another possible tuning idea is to replace the vacuum booster and the brake master cylinder
Instead of standard ones, they are installed from Lada Priora. This usually helps, first of all, in that vibration is not felt and the pedal works with optimal force.
Another possible tuning idea is to replace the vacuum booster and the brake master cylinder. Instead of standard ones, they are installed from Lada Priora. This usually helps, first of all, in that vibration is not felt and the pedal works with optimal force.
And do not forget - after each intervention in the brakes, they need to be pumped.
Sources
- vazweb.ru/desyatka/tormoza/tormoznaya-sistema.html
- vaz.today/0-5-tormoznaya-sistema-remont-osobennosti
- luxvaz.ru/vaz-2110/45-tormoznaya-sistema.html
Malfunctions
Symptoms of a malfunctioning TTS:
- The brake fluid leaves the reservoir;
- The rear drum is wet, fluid leakage is noticeable;
- The braking efficiency has disappeared, the pedal “takes” at the very end of the stroke, sometimes not from the first stroke.
Reasons for inoperability:
- Natural wear and tear;
- The cuffs are corroded due to mixing different types of brake fluid;
- Poor quality of the part;
- The pistons were squeezed out due to severe wear on the pads.
It happens that the pistons inside the housing become jammed. If this happens with the pistons spread apart, the car begins to constantly slow down and the drum overheats. You cannot drive with such a defect; the car must be urgently repaired.
There is one nuance that is worth focusing on. Often, when bleeding the brakes, technicians try to unscrew the bleeder fitting on the cylinder and break off. Even WD-40 doesn't help. This happens due to the fact that over time, the “pumping” begins to boil in the ZTC body. Therefore, before bleeding the brakes, you should have a supply of new replacement parts.
There is also a tricky way that will help you avoid breaking off the fitting. Before unscrewing, you must carefully (do not break the fitting with a hammer!), but thoroughly tap the housing around the bleeder fitting and try to move it out of place.
After this, without using much effort, we try to weaken the “pumping”. Doesn't work? Then tap again. Most likely, patience will be rewarded, and problems associated with unscheduled cylinder replacement will not arise.
Required spare parts
Just 10 years ago, old pads were not replaced; they were glued on, linings were changed, or they were riveted. Today on the market you can easily purchase the entire mechanism. To replace, you need to prepare new pads. Experts believe that it is better to install replacement factory parts, article number 2110-3501080-60 (TIIR-260), 21100350180082 or 2110-3501080. There are other opinions. Some motorists believe that pads from well-known brands provide the best braking parameters on the VAZ 2110, 2111, 2112. These are parts from brands such as Brembo, ABS, Ferodo, TRW, Bosch, Optimal or Delphi.