Brake pads in a car belong to the category of consumables, the scope of which involves gradual natural wear. This pattern also affects the modern Russian model of the universal class Lada Largus. The service life of the pads is directly influenced by the intensity of use and driving style. On the rear axle, these consumable components are replaced much less frequently than on the front axle, since the operating principle of the entire assembly is based on greater braking force on the front mechanisms.
In order for the replacement of rear brake pads on a Lada Largus car to be successful, you need a clear understanding of the structure of the brake unit, both as a whole and its individual components. Our material is aimed at considering the design features of the brake system parts and the sequence of manipulations that should be resorted to when the need arises to replace the rear pads. We will also provide a number of recommendations to extend the resource intensity of these consumables.
How to find out when it’s time to change the pads on Largus
There are several types of diagnostics of car brake elements. The car owner must master the basic principles of checking brakes and make the right decision regarding further actions.
The first thing a car owner should pay attention to is signs of wear on the brake pads. They may manifest themselves in the following:
- extraneous sounds when braking;
- deterioration of the braking properties of the car;
- slight beating in the brake pedal;
- The handbrake stopped working.
All these symptoms indicate that it is necessary to check the brake system of the Lada Largus. First of all, you need to check the brake fluid level.
When the linings are fatally worn, the level drops noticeably. Therefore, if it has decreased, this is a signal for a full diagnosis of the pads.
The second step is a visual diagnosis of the pads. The condition of the front linings is assessed with the wheels removed.
If the residual thickness of the friction lining is less than 1.5 millimeters, this indicates severe wear and the need for urgent replacement.
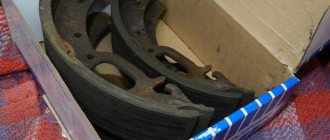
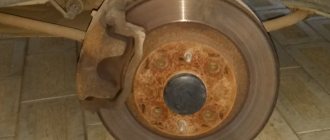
To check the rear pads, you need to remove the drum. It is recommended to do this every 60 thousand kilometers. The permissible residual value of the lining is at least 1.5 mm.
Types of brakes
In the automotive industry there are three main categories of brake mechanisms installed as standard:
- strip structures;
- drum systems;
- disc brakes.
The first “instances” at the dawn of the automobile industry had band brakes. This product covered the entire perimeter of the wheel rim, which allowed the driver to direct the braking force there at a certain moment. He could only pull the tape, which led to the slowdown of the “cart”.
Evolution has done its progressive work, and the outdated “ribbons” were replaced by drums, as in the Lada Largus. The principle of their operation was not intricate, but involved free rotation of the wheel paired with a drum, which, by expanding the pads present in its cavity, received the braking force, causing the car to slow down. This concept worked quite well, but over time some of its shortcomings became apparent. Here the intensity of the drum system has a special influence. The design is closed, and the pads overheat very quickly, which directly affects the deterioration of the braking effect. Along with excessive heating, moisture ingress turned out to be detrimental to the drum mechanism. The presence of water and dirt inside the assembly causes a decrease in performance. It is also not uncommon for a part to break inside a closed drum mechanism. On the one hand, the noise that appears will provide the driver with information about the breakdown that has occurred, and on the other hand, it can provoke damage to the internal working area of the drum itself.
The disc brakes installed in Lada Largus have proven to be the most reliable. In them, all the shortcomings inherent in the previous categories are completely leveled out. The operating principle is as follows. Paired with the wheel, the brake disc itself rotates until it is subjected to the compressive force of the pads. This action is possible by moving the brake rod from the cavity of the hydraulic cylinder present in the caliper. The disc uses a ventilation system that allows you to effectively cool the working area during intensive braking. Note that in the vast majority of cars only the front mechanisms are ventilated. Also, the fact that moisture gets on the disk cannot cause significant damage, since it dries quickly, and the remaining debris is spontaneously removed by centrifugal force. Although there are frequent cases of disc distortion due to frequent alternation of overheating and the passage of water “obstacles” (puddles). The disk mechanism better tolerates loads, so the entire system is as efficient as possible.
Due to the significantly lower cost of drum assemblies compared to disk counterparts, many manufacturers in their budget models resort to a combination of mechanisms, with disks in front and drums in the rear.
How to choose brake pads for Lada Largus
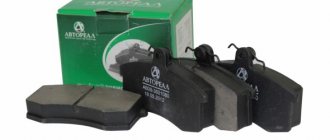
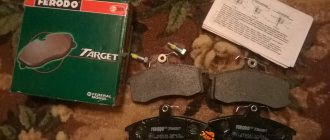
Before selecting analogues, you need to familiarize yourself with what the original spare parts look like in order to have a “standard” and not make a mistake with your choice. So, the article numbers for these elements are:
- 410602192R – front, for 8-valve engine;
- 410608481R – front, for a 16-valve engine;
- 7701210109 – rear.
Attention! It is worth considering that the pads for Largus equipped with K4M (VAZ-21129) and K7M (VAZ-11189) engines are different, as they have different calipers. Many people mistakenly believe that the pads have a difference: with and without ABS, but in fact, the difference is only in the engines.
Below is a clear difference between two brake pads for different configurations of the Lada Largus:
Having understood the difference, you can decide on the choice of analogues. Fortunately, the choice is quite large and below there is a table with article numbers of good budget and expensive substitutes with prices.
| Manufacturer | Article for 16 cells, front | Article for 8th grade, front | Article, rear |
| Finwhale | V1067 | V706 | VR811 |
| Sangsin | RP1564 | SP 1243 | SA191 |
| Pilenga | FD-P 3316 | FD-P 2885 T | BS-P 8455 |
| Hi-Q | SP1564 | SP1243 | SA191 |
| Bosch | 0 986 424 795 | 0 986 495 212 | 0 986 487 754 |
Hi-Q and Sangsin are considered to be the most optimal in terms of price/quality. Saving on pads will not lead to dangerous situations if the vehicle is operated in a calm manner.
But fast movements with frequent braking in the city will require really high-quality products. They will cost more accordingly.
About the operating principle
The brakes in the Lada Largus turned out to be quite balanced and effective. This is confirmed by a lot of tests. For this station wagon, the manufacturer has provided the possibility of equipping it with the following mechanisms:
- front axle – disc units, which are equipped with the function of ventilation and holding a floating bracket;
- rear mechanisms - drum.
The stern brake components are traditional closed designs that are equipped with mechanisms that allow the pads to self-center. Due to this action, the gap is adjusted.
The pads are driven by a hydraulic system, the actuators of which at the front and rear are brake cylinders with retractable pistons. The entire system is dual-circuit, where the order of distribution of braking force occurs according to a diagonal pattern. The complex also has a vacuum booster.
Many cars today are equipped with a useful ABS system. This mechanism prevents the wheels from locking when the brakes are activated, which is especially important in extreme braking modes, when there is a high probability of skidding.
The parking brake is activated via a corresponding lever located in the passenger compartment. The force on the pads is transmitted by a cable located under the bottom in a special line.
The forums are full of questions regarding modifications of the pads installed on the LADA Largus configuration, both with eight and 16-valve engines. Note that the manufacturer installs different brake mechanisms for different versions of the model, which have their own geometric parameters of discs and calipers. The brakes installed on modifications with 16-valve units are more effective.
How to change front brake pads
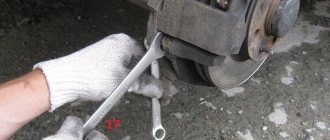
To replace the pads, you will need a tool that consists of a wheel wrench, open-end wrenches 13 and 15, as well as a flat-head screwdriver, brake cleaner and caliper lubricant.
Almost no one uses lubricant and it’s a waste of time. Lubrication allows you to extend the life of the guides and reduce the likelihood of caliper knocking.
Simple pads are the easiest to change. To do this you need to perform a few simple steps:
- Lift the front wheel and remove it. Securely secure the vehicle to prevent accidental falls.
- Release the pads using a flathead screwdriver. To do this, insert it between the disc and the lining and pull it back with force until the piston sinks into the cylinder.
- Using a 13mm wrench, unscrew the lower bolt securing the caliper to the guide bracket. The finger must be kept from turning with a key at 15.
- Lift the caliper by turning it upward.
- Remove the old brake pads.
- Take out the metal brackets and clean off any dirt.
- Install new ones.
- Reassemble in reverse order.
We recommend that you familiarize yourself with the process visually using the following photographs:
Attention! It is definitely recommended to remove the caliper guides and lubricate them with special grease.
After replacing the pads, it is recommended to drive about 10-20 kilometers under several sharp braking conditions. In this way, the new pads are ground in and “accustomed” to normal operation. This procedure will help protect them from overheating, bending or destruction.
Causes of malfunction
The causes of rear brake pad failure are no different from the front ones. But it’s worth dwelling on them to know them:
- Wear of the friction part. It can only be seen if you take the drum apart. According to the manufacturer's recommendations, the friction part should not be less than 2 mm.
For comparison: on the left is a new brake pad, on the right is an old front brake pad
- If brake fluid gets on the linings , it also leads to replacing the pads.
- The friction part is cracked , broken off or chipped. This indicates that the pad needs to be replaced.
All these reasons become decisive in the decision to replace the rear brake pads.
Tuning
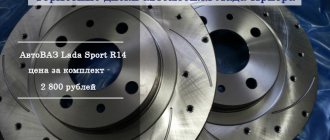
Many car enthusiasts want to improve the rear brake; to do this, they replace the standard drums with ventilated disc brakes. This operation is done quite simply, but in frequent cases, the hub needs to be replaced.
Installing rear disc brakes
The old rear drums are thrown out and replaced with brake discs, calipers and front pads. This significantly improves the car's braking. These and Sparko offer a full set of rear ventilated brake discs.
As practice shows, disc brakes are 30% more efficient in use, and replacement is carried out in the same way as front brakes. In this case, you do not need to buy separate pads for the rear and front parts. It is enough to buy 4 sets of front pads (each set contains 2 pads).
Replacing rear brake pads on Lada Largus
With the rear brakes on Largus everything is a little more complicated. The process can cause difficulties even for an experienced car enthusiast, and the first problem is the drum that cannot be removed.
You can beat it endlessly with a hammer and split it at the end, or you can remove it carefully. To do this, we perform the following procedure:
- We remove the wheel.
- Clean the drum seats with a wire brush.
- We pour WD-40 on everything and leave it for half an hour. Now let's try to dismantle it.
Unlike classic VAZs, on Largus there are fewer problems with removing the drum, but it’s better not to count on a quick completion of the procedure.
Follow this procedure:
- Knock off the hub nut cap using a hammer and chisel.
- Unscrew the hub nut using a 36mm socket.
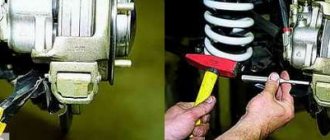
- Insert a flat-head screwdriver into the special hole, inside of which there is a mechanism that releases the drum pads. By turning the gear, the shoes can be loosened and the drum can be removed.
- Remove the rear pad clamps.
- Remove the lower tension spring, disconnect the handbrake cable from the wheel mechanism.
- All that remains is to separate the lower part of the pads and pull them out along with the retaining bar.
- Replace the brake linings and reassemble in reverse order.
The process is clearly described in the photo:
When assembling, the most important thing is not to forget anything. There is a high probability of losing the handbrake cable already under the bottom. To avoid this, do diagnostics more often and change pads less often.
PTF lamp fog lamp
The lamp is not accessible from the engine compartment, so replace the lower part.
- Remove the wheel arch trim by unscrewing the screws;
- Disconnect the shoe from the lamp by loosening the lock;
- Remove the lamp by turning it a third of a turn counterclockwise.
Lada Largus removing gaskets replacing lamps in PTF Lada Largus replacing lamps in PTF Lada Largus
Install the lamp in reverse order.
Attention! In practice, replacing bulbs in a Largus headlight is much simpler. In other words, there is no need to remove the battery and earbuds (cabinets). If you can use the key you can access all the lights from the engine bay
If you can use the key, you can access all the lights from the engine compartment.
Let us remind you that this category contains other instructions for operating and repairing Lada Largus. Find the answer to the question about interest in content.
During operation of the vehicle, the headlight bulbs may burn out. If you decide to replace them not at the dealer, but yourself, we recommend that you first study the instructions. The fact is that on the Lada Largus the lamps in the headlights change with some features, which we will discuss later.
What kind of bulbs are in the headlights?
- Low and high beam lamp - H4, power 12V, 60/55W;
- Bulb dimensions - W5W, power 5W;
- Front turn signal lamp - PY21W;
- Fog lamps - H11, power 12V, 55W.
Low and high beam lamp - H4, power 12V, 60/55W
Bulb dimensions - W5W, power 5W
Front turn signal lamp - PY21W
Fog lamps - H11, power 12V, 55W
Low and high beam
One lamp is responsible for low and high beam. Its resource is 2000-4000 hours. To gain access to the left headlight unit, you must remove the battery.
- Turn the lid counterclockwise;
- Remove the cover by releasing the latch.
replacing low and high beam lamps Lada Largus
replacing low and high beam lamps Lada Largus
- Remove the block with wires by unclipping the lock;
- Remove the rubber cover by prying it off by the edge.
replacing low and high beam lamps Lada Largus
replacing low and high beam lamps Lada Largus
- Unscrew the lamp clamp to the side;
- Remove the headlight bulb.
replacing low and high beam lamps Lada Largus
replacing low and high beam lamps Lada Largus
Side light bulb
There is no access to the lamp from the engine compartment, so replacement is made from below.
- Remove the fender liner by removing the screws;
- Remove the lamp socket by turning it clockwise (for the right one - counterclockwise);
- Remove the baseless lamp from the socket.
remove the fender liner Lada Largus
replacing the side light bulb on Lada Largus
replacing the side light bulb on Lada Largus
Install the new lamp in the reverse order.
Turn signal lamp
There is no access to the lamp from the engine compartment, so replacement is made from below.
- Remove the fender liner by removing the screws;
- Remove the lamp socket by turning it counterclockwise;
- Remove the lamp by pressing and then turning it counterclockwise.
Removing the fender liner Lada Largus
replacing turn signal lamp Lada Largus
replacing turn signal lamp Lada Largus
Install the new lamp in the reverse order.
PTF lamp (fog lamp)
There is no access to the lamp from the engine compartment, so replacement is made from below.
- Remove the fender liner by removing the screws;
- Disconnect the block from the lamp by pressing the lock;
- Remove the lamp by turning it a third of a turn counterclockwise.
Removing fender liners Lada Largus
replacing lamps in PTF Lada Largus
replacing lamps in PTF Lada Largus
Install the lamp in the reverse order.
Attention! In practice, replacing lamps in a Largus headlight is much easier. In other words, it is not at all necessary to remove the battery and fender liners (lockers). If you get the hang of it, you can access all the headlight bulbs from the engine compartment
If you get the hang of it, you can access all the headlight bulbs from the engine compartment.
Let us remind you that other operating and repair instructions for Lada Largus are in this category. Find the answer to your question conveniently by content.
The headlights installed on the Lada Largus are exactly the same as on the Renault Logan. Therefore, all the lamps in their headlights are exactly the same. Unlike the new generation Renault Logan, Largus has ordinary lamps with sockets h4, h11 and others. For reference, the new Logan has PSX24 lamps installed in the fog lamps, the price of which is from 500 rubles and a power of 24 watts.
When to tighten and when to change?
During operation of the machine, the steel cable gradually stretches and begins to sag. Then part of the lever stroke is used to remove this slack (the first 2-3 clicks), and only then the force is transferred to the brake pads of the rear wheels. As a result, they are weakly pressed against the surface of the discs or drums and the car does not brake reliably.
The first sign of a malfunction is that the handbrake stops working on the first two clicks of the handle and is raised by hand without any effort. In this case, it is definitely necessary to tighten the hand brake, or rather the cable drive.
But the operation of the mechanism also depends on other factors:
- on the degree of wear of the brake pads;
- from the depth of excavation on the surface of the steel disk or drum.
Abrasion of the linings does not have much effect on the operation of the main system, since the stroke of the hydraulic pistons is quite large. But the effect of the mechanical “handbrake” gradually weakens. To return it to working condition, it is necessary to compensate for the wear of the elements by tensioning the drive. If the cable itself is in satisfactory condition, the extension of the tension pin will be enough to ensure the operation of the parking brake at any degree of wear on the linings.
The cable is replaced in the following situations:
- The element has stretched to such an extent that at maximum tension the pads do not grip the discs and the car rolls away on any slope.
- Due to the constant ingress of water under the cable casing, it rusted and became tightly jammed. This happens when a motorist rarely uses the handbrake.
Cable jamming also occurs in winter, when water trapped under the casing freezes inside. In this situation, do not rush to change it; first warm up the car in the garage, and then drive out the moisture using WD-40 aerosol lubricant.
Tips for using brakes
First of all, you need to change the brake fluid every 1–2 years. As a result of the brake system's operation, moisture enters the fluid, which reduces the boiling point. Over a long period of intensive use, the liquid boils in the cylinder, which causes an air leak and will not provide the required pressure. As a result, the productivity of the fluid decreases sharply.
Therefore, it is worth regularly monitoring its level in the tank. If the level drops quickly, a leak occurs. In such cases, you should immediately contact the service. If the fluid level slowly decreases, you should check the condition of the pads.
It is recommended to replace the pads when they are worn to 70%. The brake system requires the most care because it ensures safe driving. After the winter period, it is advisable to have the brake caliper cleaned at a service station.
The most important recommendation: saving on pads is dangerous. Good quality parts should be installed so that the pads do not fail at a critical moment.
What types of brakes are there?
Throughout the history of the automotive industry, 3 types of brakes have been installed on cars:
- tape;
- drums;
- disk.
The first cars had a band brake system. The wheel axle was covered with tape. The driver had access to it at any time. If he needed to slow down, he pulled the tape, and this allowed him to reduce the speed.
Through “evolution,” the band brake was replaced by a drum mechanism. The principle of operation is the simultaneous rotation of a hollow drum with a wheel, which is bursting inside with pads. This slows down the car. This type of brake has proven itself well, but it also has disadvantages. With frequent heavy use, the drum overheats, since the ventilation in this closed system is not the same as that of a disk mechanism.
Just like overheating, moisture getting into the mechanism is also harmful to the drum. When individual parts become wet, the effectiveness of the brakes decreases. If any part in the drum wears out or falls off, it remains inside the system. This is both a minus and a plus. Indeed, in this case, the driver will hear a knock, and it will be possible to take measures to replace the part.
The disc brake system is the most reliable mechanism that eliminates the above-mentioned disadvantages of previous systems. Disc brakes work by rotating the disc simultaneously with the wheel, and when you press the brake pedal, the pads jam the rotation of the disc from the outside. Unlike the drum, the disc is ventilated, so it is less susceptible to overheating than the drum. The discs do not retain moisture and damaged parts. The operating principle of this system is based on the ability to work under heavy loads. Therefore, you can stop your car faster with disc brakes.
Such mechanisms are often front-facing and ventilated. Ventilation holes cover the entire radius of the disc. Some modifications have transverse ventilation holes. With their help, excess heat is removed, weight is reduced and worn parts are removed.
Due to the fact that the drum mechanism costs much less than the disk mechanism, today both disks and drums are used.
Checking the operation of the hand brake
There are two methods to find out whether the parking brake system on the Lada Granta is in order. They work separately: if at least any type of check shows something wrong, the handbrake needs adjustment. What will you need:
- The car is stopped on an ascent or descent with a slope of about 23-25 degrees, then the handbrake is put in the raised position and turned off; what remains for our client to do is transfer. At the same time, the car should remain in one place and not even roll down. If this happens, the handbrake
is working properly and nothing threatens you. Otherwise, the handbrake on your car needs adjustment. - manual braking accounting programs is checked . If the ratchet mechanism clicks 2-4 times before being completely moved to the parking position, there is no need to worry, the handbrake is working properly.
The principle of operation of Largus brakes
Lada Largus is equipped with a modern European brake mechanism, which was developed through various tests and trials. The heir to Renault Logan adopted the quality and reliability of the brakes from its predecessor. The following service brakes are installed on the station wagon.
| Location and type | Characteristics |
| The front ones are disc. | The front ones are ventilated and have a floating bracket. |
| The rear ones are drums. | The rear brake system is a closed drum in which the centering of the pads is carried out independently using mechanisms that regulate the gap between the pads. |
The brake mechanisms are hydraulically actuated, are dual-circuit, arranged diagonally and have a vacuum booster. A huge plus in some trim levels is the presence of an anti-lock braking system (ABS), which has become an indispensable thing in modern cars. It prevents the wheels from locking during braking, in particular emergency braking. The handbrake is actuated mechanically by transmitting drive to the rear axle using a lever.
There are misunderstandings on various forums about whether the same pads are installed on Largus, which has an engine with 16 valves and which has 8 valves. On configurations with separate power units, different brake systems are installed with different calipers and brake disc dimensions. Therefore, its configuration depends on whether your car has 8 valves on the engine or 16 valves. Based on this, one or another mechanism is established.
The Lada's pads with a 16-valve unit are slightly better.
Manual brake lever - removal and installation, adjustment
Removal
Place the vehicle in the work station, apply the parking brake and turn off the ignition.
Remove the floor tunnel lining. (see here)
Cut the floor mat at the rear of the arm and move the mat pieces to the sides.
Figure 17-1 — Disconnecting the manual brake lever cables:
1— handbrake lever; 2— equalizer cable for the manual brake lever; 3— adjusting nut of the equalizer cable; 4— manual brake cable equalizer; 5— manual brake cables; X - adjustment dimension for cable tension, X = 16 ± 0.3 mm
Loosen adjusting nut 3, Figure 17-1, of the handbrake lever equalizer cable
... and disconnect both cables 5 from the equalizer 4.
Unscrew the two nuts securing the lever to the floor tunnel studs,
Move the front seats all the way forward, lift the lever and disconnect the wiring harness block from switch 2, Figure 17-2, warning light of the manual brake lever (replaceable head 13, extension and knob).
Figure 17-2 — Removing the manual brake lever:
1— lever attachment points; 2— signal lamp switch
Remove the handbrake lever.
Unscrew the adjusting nut from the end of the front cable and disconnect the short cable from the lever.
Remove the handbrake warning lamp switch by unscrewing the screw securing it.
Installation
Connect the wiring harness block to the warning light switch of the manual brake lever, install the lever on the mounting studs and secure with two nuts. The tightening torque of the nuts is 8 N.m (0.8 kgf.m) (replaceable head 13, extension and wrench, torque wrench).
Install the handbrake cables into the holes in the equalizer.
Tighten the adjusting nut of the manual drive lever so that dimension X, Figure 17-1, from the upper end of the adjusting nut to the end of the threaded part of the equalizer cable is 16 ± 0.3 mm (spanner 10, caliper).
Adjusting the hand (parking) brake drive
Note: The parking brake adjustment is shown here in more detail.
Place the vehicle on a two-post lift, apply the parking brake and turn off the ignition.
Lower the handbrake lever.
Tighten and lower the manual brake lever five times to its original position to bring the drive cables into working condition.
Make sure the rear wheels rotate. If this is not the case, check the following items and repair or replace them if necessary:
— manual brake cables;
— wheel cylinder piston;
— automatic gap adjustment mechanism.
Remove the rear wheels.
Loosen adjusting nut 3, Figure 17-1, cable tension (wrench 10).
Install the manual brake lever on the second cutout of the gear sector.
Tighten the adjusting nut until the brake drum stops rotating by hand.
Tighten and lower the handbrake lever 2-3 times and check the rotation of the brake drum. If the drum does not rotate, gradually loosen the adjusting nut until the drum rotates freely
Install the rear wheels.
Install the floor tunnel lining.
Check the effectiveness of the service brake system.