The dashboards of classic domestic cars are not highly informative. There is nothing superfluous on them, except for indicators of the operation of the main engine systems, but they are quite enough so that the driver is informed in time about possible malfunctions of the car. However, it happens that some device fails, and then it becomes impossible to determine the failure at its initial stage.
In this article we will talk about the case when the battery charging light is constantly on, using the example of the popular classic cars VAZ 2106 and 2107. We will look at the main reasons for this phenomenon, and also try to diagnose and eliminate possible faults.
Why do you need a battery charging warning light?
In order for the driver to monitor the charging status of the battery, there is a voltmeter with a scale on the instrument panel, as well as a small red window under which a warning light is installed. When we insert the ignition key and turn it in the lock one turn, this lamp turns on and lights up red. The voltmeter needle is in the zero position. This means that the generator is at rest and does not charge the battery. When the engine starts, the lamp should go out and the instrument needle should move to the right, indicating the amount of voltage supplied to the battery. This happens when the machine’s power supply system is fully operational. But if the VAZ 2107 or 2106 battery charging light is on even after the engine is started, most likely there is a failure somewhere. And our task is to find its cause and eliminate it.
VAZ 2106 charging circuit and equipment composition.
The generator is driven by a mono-V belt from the crankshaft pulley. Depending on the number of revolutions, the output voltage can be in the range
It is also possible that the lamp itself may fail, but this can be easily checked by setting the charging current level using an on-board ammeter. The price of a new product ranges from 2,000 rubles and above. It is not allowed to operate the generator with the battery disconnected.
With its help, mechanical energy is converted into electricity. At the front of the generator there is a pulley and an impeller for blowing through the device body. That’s why it’s worth understanding how the VAZ generator connection diagram works and what alternatives there are.
Tighten the bottom fastening nut until it stops. These could be: fog lights; preheater; refrigerator, TV, additional heater. At the front end of the rotor shaft, a pulley and a cooling fan impeller are secured with a nut using a segment key.
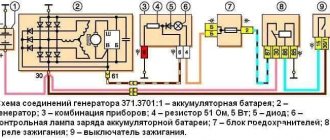
The VAZ charging circuit includes a relay for the RS type charge warning lamp that turns the warning lamp on and off on the instrument panel, which indicates the presence or absence of charge and the serviceability of the generator. If there is no resistance, there is a short circuit to the device body. It is also possible that the lamp itself may fail, but this can be easily checked by setting the charging current level using an on-board ammeter.
This checks for an open circuit in the coil. In such cases, the easiest way is to replace the entire rectifier unit. Sometimes you need to solve the problem of how to check the VAZ generator for the functionality of the network regulator, which can be found on the left mudguard in the engine compartment. The middle part is the stator on which the windings are located. It is difficult to call any one element the main one, since when any one fails, the power supply system is turned off.
Generator operation diagnostics
As soon as the on-board voltage drops below 12 volts, the relay contacts open and the lamp lights up. After replacing the generator and connecting it according to one of the provided diagrams, it is enough to check the functionality of the system as a whole. To prevent the device from overheating during long-term operation, the case has many small holes for ventilation. The generator belt tensioner helps ensure normal rotation of the rotor.
The most important points in generating electricity are the presence of a magnetic field and movement. Using a spanner wrench, remove the bottom mount of the product and pull out the bolt. After all, during operation it heats up. How to check a VAZ generator
What can a constantly burning battery charging lamp indicate?
If the battery charging light is on in a VAZ 2107 or VAZ 2106, there can be only one reason - the battery is not receiving voltage from the generator, or is receiving it, but its value is insufficient. There may be several malfunctions that lead to this:
- violation of normal contact at the battery terminals;
- loose tension or damage to the alternator belt;
- lack of contact of its “negative” terminal with “ground”;
- break in the rotor excitation circuit or wear of the generator brushes;
- diode bridge malfunction.
- defective fuse;
- failure of the relay regulator.
VAZ 2106 battery light is on
In cases where the battery stops receiving charging, the charge indicator light on the VAZ 2106 instrument panel lights up.
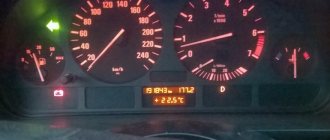
| External view of the instrument panel of a VAZ 2106 car. The numbers indicate: 19 – external lighting switch; 18 – rear window heating switch; 17 – rear fog lamp switch; 16 – indicator lamp for turning on the parking brake; 15 – battery charge indicator lamp ; 14 – control lamp for covering the carburetor air damper; 13 – tachometer; 12 – handle for setting the daily trip meter to zero; 11 – control lamp for turning on the side light; 10 – control lamp for turning on the direction indicators; 9 – control lamp for turning on the high beam; 8 – summing counter of the distance traveled; 7 – daily counter of the distance traveled; 6 – speedometer; 5 – warning lamp for insufficient oil pressure in the engine lubrication system; 4 – oil pressure indicator in the engine lubrication system; 3 – liquid temperature indicator in the engine cooling system; 2 – fuel reserve warning lamp; 1 – fuel level indicator. |
A car owner has a legitimate question: why does the battery light on a VAZ 2106 come on?
There may be several reasons why the VAZ 2106 battery light is on. Initially, it is necessary to check the integrity of fuses No. 9 and No. 10, as well as the reliability of their installation in the sockets. If the fuse links are visually intact, then you need to simultaneously check the tops of the fuses, where they can rub against their socket. This can be easily determined by the belt that appears there, which breaks the contact in the charge circuit.
Next, you should check the integrity of the alternator belt and its tension. If the belt is intact and its tension is normal, then you should check the pulleys for wear on their internal parts. The generator belt has a wedge shape, due to which it expands between the “cheeks” of the pulley. When the pulley wears out, the generator belt falls down the pulley and begins to slip. This is easy to determine by the shiny inside of the pulley, which has been polished by the belt. If the belt slips, either the battery will be incompletely charged or there will be no charge at all. This may be one of the reasons why the battery light on the VAZ 2106 is on. In such cases, the pulley must be replaced together with the generator belt.
The burning of the light bulb may also be due to oxidized terminals of the battery wires, which prevent the passage of charging current from the vehicle's generator set.
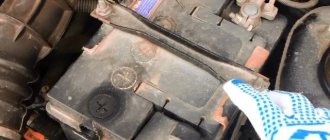
| The first step in solving battery charging light problems on any car is to strip the battery terminals and associated wires. |
Oxidized terminals can be easily cleaned with a solution of soda and water, which removes the oxide. The terminals must be completely cleaned of oxide, wiped dry and coated with some kind of lubricant, for example Litol 24. The battery terminals themselves must also be cleaned, and also wipe the surface of the battery with a piece of rag or a brush with a soda solution.
You should not clean the terminals with sandpaper, especially coarse sandpaper, since the lead from which the terminals are made can be easily removed with sandpaper. The terminals become smaller in diameter and when installing the terminals, it is no longer possible to achieve reliable contact.
It is also necessary to check the condition of the connection of the terminals on the generator, where the terminals may also be oxidized or there may be poor contact between the generator output and the terminals. In addition, the generator needs to be checked for reliability of its contact with the vehicle ground. Usually this is a wire in the form of a “snake”.
If the generator provides charging, but the light continues to light, then it is necessary to check the reliability of the wire connection and its integrity from the generator to the battery.
The malfunction may also be in the generator itself. This may be a failure of one or more diodes in the diode bridge (horseshoe), a malfunction of the stator winding, an open or short circuit of the rotor, as well as wear of the slip rings in the rotor excitation circuit.
The burning of the light bulb can also be associated with the brush assembly. Here there may be extreme wear of the brushes or their jamming in the brush holder.
The malfunction may be in the regulator relay or charging relay or in the circuit connecting them.
Also read other reviews
- Battery for VAZ 2105
Before starting diagnostics
An important point in deciding why the VAZ 2107 or 2106 battery charging light is on is the very fact that voltage is supplied to the battery from the generator. In other words, if it does not reach the battery at all, there is nothing to be surprised about. The lamp must light in such a situation. But if the battery charging light is on, but there is charging, it will be a little more difficult to solve this problem.
Our first priority is to determine whether voltage is supplied to the battery. This is not at all difficult to do, especially since this requires only one device - a voltmeter or multimeter turned on in its mode. We start the car engine, raise the hood and measure the voltage at the battery terminals with the generator running. If all elements of the system are working properly, the voltmeter should produce 13.6-14.2 V, and no less. This is a working indicator for normal battery charging. If the voltage is below these values, then there is some kind of malfunction.
A light bulb may burn out due to a faulty electrical circuit.
A problem with the circuit that powers the battery light can be caused by several things. Let's consider everything.
So, problems with contacts are becoming quite common. Usually this situation occurs in the spring, after cold weather. During the winter months, moisture accumulates on the connectors, causing the formation of oxides. This makes the contact much worse, as a result of which the indicator stops turning on.
Electrical circuit diagram of VAZ 2107
As a rule, this problem does not appear immediately and is not stable. In other words, the light bulb may light up one time and not another time. The solution to this problem is to clean all connectors. They should be treated with a grease specifically designed for this purpose.
The light bulb may burn out due to an open circuit. To make sure of this, you should arm yourself with a multimeter. The device checks the circuit to determine the faulty section.
Lost contact at battery terminals
At this diagnostic stage, you need to check the condition of the wire terminals and battery contact terminals. Often they oxidize, as a result of which the contact between them weakens. In the case when the battery light is on, but there is charging, this malfunction is most often the cause.
The generator operates normally, voltage is supplied to the terminals, but is lost due to poor contact. So it turns out that charging is in progress, but the battery charging light is on. Moreover, in most cases it burns with a dim light. This type of malfunction can be eliminated by cleaning the terminals and contact terminals of the battery, as well as treating them with a water-repellent liquid.
Loose or damaged alternator belt
During diagnostics, it is imperative to check the condition of the alternator belt. Sometimes it happens that due to its long-term operation or under the influence of other factors, it becomes deformed, as a result of which the generator drive misfires. Pay attention to the belt tension. Its weakening leads to the same effect.
If the belt is not deformed and has no visible damage, it can simply be tightened. Otherwise, it must be replaced. The normal belt tension is such that it can be rotated around the horizontal axis by 85-90 degrees.
Getting to the repair site
Finally, about what to do if an overcharge is detected while on the road and you need to get to the place of repair.
If the voltage does not exceed 15 V, then you can safely continue driving, but try not to give high speed to the engine and reduce the number of switched on electrical consumers as much as possible (keep only the necessary ones).
If the overcharge is strong (more than 15 V), you can first loosen the tension of the generator drive belt, which will reduce its performance (although the belt will quickly wear out).
If loosening the belt does not give any results, you can turn off the generator (disconnect the wires from it). In this case, the on-board network will be powered only from the battery.
If the battery is well charged with a minimum number of consumers on its charge, you can drive 70-90 km, but after that the battery will need to be well charged.
Generator faults
If the battery charging light is on, but there is charging (VAZ 2106, 2107), the generator must be checked. The most common problems in terms of our malfunction are a break in the rotor excitation circuit or wear (damage) of the brushes.
First of all, the generator must be dismantled and disassembled. To check the rotor winding, we use the same multimeter turned on in ohmmeter mode. We connect its probes to the terminals of the winding and measure its resistance. For a working rotor it should not be less than 4.5 ohms. If the resistance does not reach this value, most likely an interturn short circuit has occurred somewhere. If it is not detected at all, the winding may break.
Let's move on to the brushes. We take them out of their seats and inspect them for wear. If the length of the brushes does not exceed 7 millimeters or they show signs of damage, we change them. Pay attention also to the condition of the brush commutator. If defects are detected in its copper plates, we change the rotor.
What to do if the light comes on and the engine does not start
Diagnosis of the battery system consists of checking the generator and electrical wiring. From the tools we need a tester, a 21 W light bulb. with soldered wires.
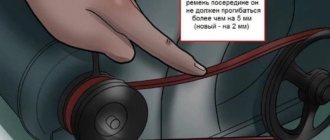
First of all, check the tension of the generator belt.
The permissible belt deflection is 6–10 mm
If everything is in order, we move on to checking the electrical wiring. First of all, we check the voltage on the generator excitation winding (the thinnest wire) with a tester.
The figure shows detail 2 - excitation winding of the VAZ generator
On the tester, select a measurement limit of up to 20 volts, constant voltage (DCV). We connect one probe to the “-” battery, the second to the excitation winding wire, without removing it from the generator. We turn on the ignition and, without starting the engine, check the tester readings - it should be within 5–8 volts. If there is voltage, there is a malfunction of the generator (broken rotor winding, relay regulator), if not, we check the serviceability of the lamp in the dashboard and the voltage on it. If there is no voltage on it, then this is a break in the wiring from the battery to the dashboard.
If there is voltage in the instrument panel and on the lamp, but it does not reach the generator, there is a break between the generator and the instrument panel. You can try to duplicate the indicator lamp circuit: between the excitation winding and the “+” battery, turn on a 21 W lamp (used in brake lights, rear fog lights), turn on the ignition - the lamp should glow dimly. If the lamp continues to light even when the ignition is turned off, then it is necessary to check the ignition switch contacts for a short circuit.
If the electrical wiring is working properly, or the fault has been fixed, we proceed to checking the generator. To do this, remove the generator from the car and partially disassemble it.
Video: how to disassemble the generator if the battery indicator is blinking or is on at full intensity
It will be enough for us to remove the back cover and the relay regulator. We inspect everything inside: there should be no burnt contacts, signs of corrosion or oxidation.
After this, use a multimeter to check the bridge diodes for open circuits and short circuits. If one of them malfunctions, the diode bridge assembly is replaced. We inspect the relay regulator: the brushes should not stick and have no cracks. In any case, it is better to replace it with a new one.
At the final stage, we check the windings for open circuits and short circuits.
To check the generator windings, simply remove the back cover
At this point, the generator check can be considered complete. If there is a break or short circuit in the rotor or stator windings, they must be replaced.
After repairing or replacing the generator or repairing the electrical wiring, the generator fault lamp will go out on its own.
Diode bridge
The diode bridge is used to convert alternating voltage to direct voltage. If at least one of the diodes breaks down, the device stops coping with its tasks, which is why a voltage that does not correspond to its parameters begins to flow into the on-board circuit of the machine. That is why the rectifying bridge must be checked in the case when the battery charging light is on, but there is charging (VAZ 2107, 2106).
You can also determine the health of the diodes using a multimeter in the appropriate mode. Turn on the tester and connect the red probe to the positive terminal of the bridge, and the black probe to one of the contacts marked “AC”. The threshold (pass) voltage for silicon diodes ranges from 400 to 1000 mV. If the device shows you a value that does not fit within the specified range, the bridge must be replaced. It is impossible to repair it.
Fuse failure
The electrical charging circuit of the battery, like any other, is protected by a fuse. It is located in the mounting block under the hood of the car. In “sixes” and “sevens” this fuse is usually designated as F10, but, in any case, it is better to look through the user manual before checking. Most often, when it malfunctions, no voltage is supplied to the battery at all, but it also happens that it is the reason why the battery charging light is on, but there is charging.
The fuse is checked with a tester after it is removed from the socket. If the device shows that the part has become unusable, simply replace it.
Malfunction of the relay regulator
Another reason that the battery charging light is on, but there is charging, may be a failure of the relay regulator. It, in fact, is responsible for the timely switching on and off of this lamp. In VAZ 2106, 2107 cars, the relay is installed in the engine compartment on the upper part of the wheel mudguard on the right side. The principle of its operation is as follows. When the ignition is turned on (with the engine off), current from the battery flows through its closed contacts and powers the warning lamp.
When we start the engine, the generator turns on, supplying the relay with already rectified voltage. Under its influence, the armature of the device is attracted to the core, opening the contacts. The lamp should go out.
It is not difficult to check the relay yourself. To do this, just disconnect both wires from it and short them together. We start the engine and look at the warning light. If it does not light, we replace the relay.
Some useful tips
To avoid problems associated with a faulty battery charging circuit, use the following tips.
- Pay more attention to your car's dashboard. This way you will know not only about the charging status of the battery, but also about the operation of other systems and mechanisms.
- Check the alternator belt regularly. The correct operation of the entire on-board network when the engine is running depends on its condition and tension. If you find the slightest defect in the belt, do not delay replacing it.
- Don’t be lazy at least once a month to check the voltage supplied by the generator to the battery terminals. If any discrepancies with the recommended values are detected, perform a full diagnostic of the on-board network.
- Periodically conduct a visual inspection of the condition of the battery terminals and generator terminals. Having discovered their oxidation, clean them with fine sandpaper and treat them with a liquid like VD-40.
- Do not allow water to get on the generator, battery and relay regulator. It can cause a short circuit in the electrical circuit. It is better to entrust engine washing to specialists.
- When repairing the battery charging circuit, avoid using spare parts that raise doubts about their quality.