Angel Eyes is a beautiful, spectacular invention by BMW; today it is very popular among car owners of various cars.
We will tell you how to install angel eyes on a VAZ 2110 with your own hands, using ingenuity, ingenuity, some available materials and LEDs.
Angel eyes on VAZ 2110
For the first example, let's take the Kirzhach headlights and look at how you can make tuning angel eyes for the headlights.
How to make angel eyes on a VAZ 2114
Although the headlights on the VAZ 2114 are not round, the classic round angel eyes (AG) look quite decent in them. Therefore, our first DIY AGs will be round.
Angel eyes with two LEDs
Although you will have to tinker with this design, it will cost you pennies. To implement the project you will need:
- Two round solid plexiglass rods with a diameter of 8 mm and a length of 400 mm.
- Four any super-bright LEDs with a diameter of 5 mm.
- Four resistors of 1 kOhm each.
LEDs and resistors can be purchased at any specialized store or radio market. The asking price is a couple of tens of rubles. With rods it’s a little worse, but we can solve this issue too. Stores sell canes for blinds, but look for a solid one without a hole inside. They are usually 1 m long, so one is enough for two AGs.
The blind cane is ideal for our AGs
You won’t need anything extraordinarily unusual in terms of tools either:
- Drill with 5.5 mm drill bit (if possible).
- A hacksaw or a piece of hacksaw blade.
- Pliers.
- Soldering iron.
- Technical hair dryer (if possible).
Materials:
- Sealant.
- Insulating tape.
- Heat-shrinkable tubes of different diameters (if possible).
- Wires.
First of all, you need to make the rings. For VAZ 2114 they must have a diameter of no more than 90 mm. Find a metal can with a suitable diameter and punch a hole in its wall that matches the diameter of the rod. Secure the jar, for example, in a vice or in any other way. Insert one end of the rod into the hole you made and start heating it with a hairdryer near the can itself. As soon as the plexiglass becomes plastic, bend the rod and at the same time move the hair dryer further along it.
Bend the rod into a ring using a hair dryer
In case you don't have a hairdryer, you can use boiling water. Place the rod in boiling water and when it becomes plastic, wrap it around the same jar using two pliers.
Bending the rod using boiling water and pliers
Now cut off the excess rod with a hacksaw so that a gap of about 10 mm is formed in the ring, and the rings are ready. It's time to take on LEDs. Find the anodes (initially the anode lead is longer than the cathode) and solder resistors to them.
Resistors must be soldered to the anodes of the LEDs
Now we shorten the cathodes, connect them in pairs and solder the wire - this will be the “minus” of the power supply.
Connecting LEDs in pairs
We put heat shrink on the resistors, shape the diodes so that they look in different directions, and the distance between them is about 8 mm (see photo below). Then we connect the leads of the resistors and solder the positive wire to them.
Molded pairs of LEDs
Now we drilled holes at the ends of the rings with a diameter of 5.5 mm and a depth of 8 mm. Place a drop of any nitro varnish or colorless nail polish into each and insert the LEDs. If you don’t have a drill, you can fix the LEDs in their places using heat shrink, but to do this, you will have to increase the gap in the ring using a hacksaw.
Assembled and prepared for assembly angel eyes for VAZ 2114
All that remains is to make small cuts 0.5 mm deep on the angel eyes. It is through them that the light from the tube will come out.
Sawn AG for VAZ 2114
In principle, everything is ready, it’s time to check the AG in operation. To do this, connect them to a Krona battery, a car battery, or any power supply with a voltage of 9-12 V. In this case, the positive terminal of the power source must be connected to resistors.
Checking angel eyes on a VAZ 2114
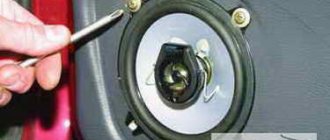
That's all. It's time to install AG in the headlights of the VAZ 2114. To do this, the headlights are dismantled, the glass attached to them with four latches is removed. If you have another modification of the headlights and the glass is sealed, warm the glass carefully and thoroughly with a technical hair dryer. Once the sealant softens, the glass can be easily removed by prying it off with a screwdriver.
Headlight VAZ 2114 with glass removed
We install the angel eyes in place and secure them with sealant, passing the power wire into the hole made in the reflector. Using latches or sealant (depending on the modification of the VAZ 2114 headlight), we install the glass in place.
VAZ 2114 headlight with an installed angel eye (an industrial “eye” was used)
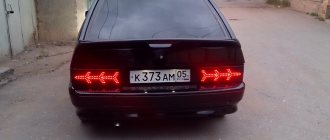
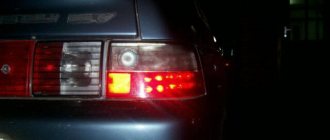
It will look something like this:
VAZ 2114 with ring AG
Now let’s figure out what kind of red circles are indicated in the photo above. These circles indicate the location of the rings, if you are a fan of double AG and decided to install just such on your VAZ. To do this, naturally, you will have to make another set of rings. It will look something like this:
VAZ 2114 with double angel eyes
LED tube angel eyes
If you are not satisfied with round angel eyes, then you can make AG of any shape for your VAZ 2114. To do this, you need to use a special flexible LED tube designed for tuning cars.
LED tube for car tuning
It comes in different lengths, so your scope for imagination is unlimited. Let's try to place this tube around the perimeter of the VAZ 2114 headlight reflector. So, open the headlight and glue the special fasteners that come with the tape using a heat gun (you can screw it in) around the perimeter of the reflector. Fasteners are needed because the LED tube is practically not glued with a heat gun. We fix the tape in the fasteners and take the wire outside the headlight.
Angel eyes for VAZ 2114 from an LED flexible tube
It will look something like this:
VAZ 2114 with angel eyes from an LED tube
Sealed side glow LED strip
Tuning features
Auto-tuning “angel eyes” consists of luminous rings that are located on reflectors. Such rings give the car originality and unusualness. It is worth noting that this type of tuning is the most attractive in terms of finishing of domestic vehicles.
Note! BMW is considered the creator of such tuning.
Glowing rings are formed from LED strip, making this tuning:
- durable;
- resistant to mechanical damage;
- provides high-quality lighting;
- Quite easy to assemble.
Due to the fact that the basis of the luminous rings is an LED strip, anyone can do such tuning with their own hands. To do this, you just need to strictly follow the instructions given below.
Ready-made rings for headlights
If you don’t want to bother making your own angel eyes for the VAZ 2114, you can purchase ready-made ones. It will cost more, of course, but all you have to do is install them in the headlights and connect them, which will not be difficult for any car owner. Today in stores you can find three types of angel eyes for VAZ:
- Gas discharge.
- On SMD LEDs.
- Cluster.
The first are gas-discharge fluorescent tubes, made in the form of rings of one size or another. Since gas-discharge lamps are powered by high voltage (hundreds of volts or more) and require a special ignition system, a ballast is usually included with such eyes.
Gas discharge angel eyes
The SMD angel eyes on the VAZ are assembled from individual LEDs located on a ring board. This design, unlike the gas-discharge tube, is not afraid of shocks and vibrations, but looks like a series of points (the gas-discharge tube produces continuous light). If you want to have “point” angel eyes, then the SMD type is what you need.
Angel eyes on a VAZ, assembled using SMD LEDs
Cluster angel eyes are, in fact, also LED, but they are assembled not on individual diodes, but on an OWL matrix - a set of microdiodes filled with a common phosphor. Thanks to this design, cluster angel eyes on the VAZ, like gas-discharge ones, provide continuous light.
Two-color cluster angel eyes on a VAZ
Cluster devices can produce not only continuous light - it all depends on the design of the matrix. You can often see cluster devices for the VAZ 2114 with a spiral, less often dotted, glow.
LED and cluster angel eyes for VAZ require 12 V for their power supply, therefore they need a voltage stabilizer (in the on-board network the voltage can reach 14.5 V). Some manufacturers complete their “eyes” with ready-made stabilizers.
Third method
In theory, it is the simplest, since you are simply buying a ready-made device, which has a diffuser, an ignition unit and other necessary components. It’s just important to choose a quality product, since the Internet offers many options that are not of the best quality.
Eyes based on CCFL rings have proven themselves to be excellent. They have high reliability indicators and are in many ways superior to their LED counterparts.
If we talk about Aliexpress, then I would not advise you to buy ready-made angel eyes based on LEDs. Low-quality products are used here, which can quickly overheat when the head optics are turned on. As a result, in less than a year they will have to be removed due to the significantly reduced brightness level.
How to connect a VAZ 2114 to the wiring
The angel eyes have been assembled and installed, all that remains is to connect them correctly to the VAZ 2114 circuit. Usually they are connected in parallel to the side light lamp. But if you want to turn them on independently of other lighting devices, you can connect them to the on-board network through a separate button, which can be located in any convenient place on the instrument panel. The VAZ 2114 panel even has places for installing additional buttons.
I already noted above that in the on-board network of a VAZ car and on the size lamp, the voltage fluctuates between 12-14.5 V, while LED eyes, including those made on a tube or strip, need strictly 12 V. Otherwise, they will come out in a few days out of service. Therefore, we will turn on the angel eyes correctly - through a voltage stabilizer.
The exception is the AG on the VAZ 2114, which are equipped with their own stabilizer. For such “eyes”, of course, there is no need to make a second stabilizer.
The easiest way to assemble such a stabilizer is on an integrated circuit, which is available in any radio parts store and costs about 20 rubles. This is KR142EN8B (foreign analogues ESG7812P, MC7812, L7812CV).
Microcircuit KR142EN8B and its pinout, where:
- 1 – input;
- 2 – general;
- 3 – exit.
The voltage stabilizer circuit will look like this:
Voltage Stabilizer Circuit for LED Angel Eyes
The stabilizer chip must be placed on a small (5 x 5 cm plate) radiator or screwed to metal parts of the car. In the latter case, make sure that the microcircuit fits tightly to the metal, and the metal itself should not be painted. One such stabilizer can power both angel eyes. To do this, they need to be connected in parallel.
If your tuning involves installing four angel eyes, then this circuit will cope with them too.
And here is another, more interesting stabilizer circuit that will prevent the angel eyes from “disappearing” when the headlights are turned on:
Stabilizer circuit with automatic brightness adjustment of angel eyes
While the high or low beam headlights are off, transistor VT1 is closed, and stabilizer DA1, instead of 12 V, produces a reduced voltage, which depends on the position of the trimmer resistor R2. Angel Eyes operate at reduced brightness. As soon as you turn on the high or low beam, the transistor will open and the output of the stabilizer will be set to full 12 V. The angel eyes will shine at full strength.
Any silicon low-power transistor of the npn structure can operate in place of VT1. Adjusting the circuit comes down to setting the desired brightness of the angel eyes with the headlights off. It is produced, as I indicated above, by turning the engine of the trimming resistor R2.
Step-by-step instruction
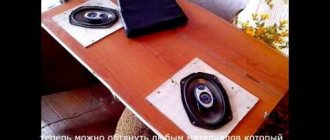
Installing LEDs on a strip
Installation of LEDs on the rear lights is carried out in the following sequence:
- The flashlight must be removed from the car. Next, it needs to be cut into two parts - a high-quality burning device can handle this. The result should be an even and thin seam.
- Now you have access to the reflectors and reflectors - they need to be removed.
- The taillights need to be completely disassembled. It is recommended to mark with a marker the position of future LEDs on external surfaces.
- Inside you need to stick circles of self-adhesive film with a diameter of 15 mm.
- The surface of the side lights and brake lights must be coated with silver paint. When the paint is completely dry, the self-adhesive film can be removed.
- The reflectors are installed on a small layer of epoxy glue. After this, you can coat all joints with sealant as a preventative measure.
- The LED boards are attached to the wiring and placed in the headlight housing.
- A stabilization circuit is installed that will regulate the LED connections.
- The pivot blocks can now be assembled and connected to the taillight. It is necessary to place the modules on epoxy glue. If the optics are working properly, then you can glue the block together - the tuning is complete.
Will they be fined for having rings in their headlights?
The issue is very serious, and it needs to be resolved even before installing angel eyes on the VAZ 2114. We open the relevant provisions and read (I will not give the numbers of articles of the Code of Administrative Offenses and GOST - those who do not take their word for it will find it themselves):
- All front lights and reflectors on a vehicle must be white only, of any color temperature.
- It is allowed to install lighting devices from other models on discontinued vehicles.
- It is prohibited to operate a vehicle with modifications made to it that are not provided for by the design.
- It is prohibited to operate a vehicle with lighting devices that have undergone modifications that are not provided for by the design of these lighting devices.
The first and second points, in principle, work for the VAZ 2114. But you won’t be able to get around the third and fourth ones, even if you install the branded white “eyes” in a specialized service station. It turns out that you will be fined for making your own angel eyes? No, they won't fine you. According to current legislation, your headlights will simply be confiscated, and you yourself will be turned into a pedestrian, deprived of the right to drive a vehicle for six months or a year.
We can finish here. Now you know how to make angel eyes with your own hands and install them in the headlights of a VAZ 2114.
Photo gallery
Don't have enough imagination on how to design the front lights? We have prepared a photo gallery for you that will help you solve this problem and get inspired for amazing results!
TAXI 2, Samy Naceri, 2000, © Lions GateDo you want a photo of your seven to appear here? Send photos directly to the comments in the form below the article! We will definitely post your best works in the gallery!
It will also be useful to watch the video tutorial before installation, as this will help you do everything correctly and avoid possible mistakes.
Knitted angel figures
Angels made using a crochet hook require more painstaking and lengthy work, but at the same time they are in no way inferior to paper ones in originality, airiness and solemnity. To create an openwork angel, you need to purchase white “iris” yarn, a No. 4 hook and starch, which will make the angel’s shape stable.
The manufacturing process takes place in three approaches. In the first, the head is knitted, in the second - wings, in the third - a skirt. Patterns for knitting an angel can be downloaded from the corresponding website.
The finished angel product must be starched to ensure the stability of the openwork material and decorated with satin ribbons, feathers, fluff and sparkles. How to make an angel correctly is shown in the photo.
FakeHeader
Comments 136
Cool, tell me the diameter of your rings
They look very cool! What about DPS? Aren't they slowing down for this? Is there no fine?
beautiful) I have these too)
thanks for the answer and for the idea. I'll install it for myself soon)))
Hello, I really liked everything. I also wanted to give myself a B in my eyes. You answered here that you put eyes on double-sided tape. Holding up great? And one more question: did you glue it with tape only from the bottom and top? or on the sides too? How did you attach them to each other? Did you connect the wires from them together?
Hello ! Yes, it was double-sided tape