The fact that there is a current leak is obvious, since the named devices are in working order. After you have removed the ignition key, you can determine and measure the current leakage with a microammeter at the fuse terminals by removing them one by one. By turning the key to the 1st position, you can also check the current and compare it with the rated one for the consumers connected to the fuse. Similarly, you can continue checking with the ignition on.
A melted positive wire is caused by a large current, such as the one that goes to the starter. The main terminals of the starter receive current through the thick wire, bypassing the fuses (from the fuse, the current through the thin wire goes only to the starter relay drive). Check the thick wire that goes to the starter, there is a terminal in the shape of the letter “G”. – If the nut on the terminal is loose, then the terminal may tilt and, with a strong impact or shaking, touch the engine block, and the battery jumper would immediately burn out (it is unlikely that the wire itself). If dirt has accumulated there, then a current leak may occur, which will negate the charging of the battery.
Sooner or later, the VAZ-2114 generator will stop providing the necessary charging, which will create a lot of troubles and problems. It’s just that at one point the car may not start because this unit has not properly charged the battery. This article tells you how to find and fix a problem in the form of incomplete charging of the generator.
What to do if there is no charger?
So, you have discovered that your car's alternator is not charging. It is immediately necessary to look for the root cause of this breakdown, because it can get to the point where the engine simply refuses to work, since it will not have enough electrical energy. Consequently, the battery capacity decreases, making it impossible to crank the starter while starting the engine. Please note that if your generator is fully operational and operating in ideal mode, the battery practically does not need to be charged. Even in cold weather, although the capacity of most batteries may drop, a working alternator will ensure that the charge level is always above 60%. But now we need to figure out why the generator does not charge and the battery runs out.
Consequences of overcharging
So, for those who believe that all this is not serious and you can ride with it, I’ll dedicate it to you, I’ll break it down point by point:
Overcharging causes the electrolyte to boil, it splashes onto the surface of the battery, and then flows onto many parts under the hood, for example: - terminals, pipes, body metal, radiator, wires, etc. Since there is acid present here (even if not concentrated), it can still corrode everything that I have listed for you, even if not immediately, but it will do it.
Terminal oxidation. Since acid gets on the terminals, they will oxidize very quickly and a green coating will appear.
- The electrolyte level drops, the lead plates are exposed, but the charge continues! Thus, they will heat up, which has a negative effect on them - if you do not dry them out for a long time, they will “crumble”, the banks may short out, or the battery will die altogether. Just throw away the battery.
- Since the electrolyte evaporates, and these are essentially explosive gases (oxygen and hydrogen), the battery itself can explode, and it won’t seem like much. The entire engine compartment will be covered in acid.
- Some fuses may fail because they are not designed for 17 Volts.
- If the regulator relay is covered, then sometimes it can heat up, to such an extent that it almost melts, and this can indirectly cause a fire, or the wiring will get better.
Fix this breakdown, it's serious! Believe me! My battery exploded in an old VAZ.
As you can see, everything is banal and simple, but these simple “little things” make up complex things or entire systems, such as an electrical circuit: generator – battery – starter.
I think this article was useful to you, read our AUTOBLOG, there will be many more interesting things.
(35 votes, average: 3.77 out of 5)
Basic faults
In the event that generator malfunctions begin to appear, you must first pay attention to the entire on-board network. It is quite possible that the wiring that records the excitation winding of the generator in the installation is broken. Please note that the generator provides little charging if its power is much lower than the total of all consumers. This happens when you have installed on your car, for example, a very powerful sound system, lighting, as well as other gadgets that are not provided as standard. This leads to the fact that when the internal combustion engine is running, the entire on-board network is powered not only from the generator, but also from the battery. In this case, the battery actively releases its charge. But it itself does not recharge at this time. Therefore, when tuning domestic cars, be sure to pay attention to the generator set. It is advisable to have a reserve of power. Only in this case will you ensure the most complete charging of the battery, as well as ideal operation of all consumers.
Theory of the issue
While the car is moving, a dead battery receives a charge voltage of 13.6 to 14.2 V. For the correct and stable operation of all systems in the car, these voltages must be maintained until the engine starts and the crankshaft rotates. Together with the motor, torque is supplied to the generator through the drive belt. At this moment, an amount of energy is generated that will be sufficient for the stable functioning of all systems and to maintain a charge on the battery.
The internal combustion engine can operate in different modes. At the same time, the number of revolutions on the crankshaft changes. The number of revolutions of the pulley also changes, this leads to an increase in the voltage produced by the generator. To maintain a level of 13.6-14.6 V in the on-board network, there is a special relay in the excitation circuit. It regulates the voltage level. When the rise exceeds the normal value, then the current supplied to the winding will decrease. At the same time, the magnetizing force of the rotor also decreases. This leads to a decrease in output voltages.
If the generator does not charge, then in most cases the reasons must be sought in the excitation circuits, as well as in the output voltage circuits from the generator to the battery. But this is not always the case. Sometimes problems are related to the generator itself.
When the driver turns the key in the lock, the relay in the ignition system also starts at the same time. “Plus” flows through the relay and fuse in the mounting block. Next, the voltage passes through the on-board network, reaching the battery charge lamp and charge sensors. It then passes through diodes, relays, elements in the mounting block and finally to the connector in the generator. There, electricity comes to the relay-regulator and, passing through brushes and slip rings, enters the exciting winding.
As the crankshaft speed increases, the phase stresses increase. Then, through a diode block, they increase the voltage on the excitation winding and on the diode of the control lamp. When the output phase voltage reaches 12 V on both terminals, the voltage will be equalized. Due to the lack of voltage difference, the control lamp will go out. In this case, the generator produces a voltage that is higher than 12 V.
Algorithm for finding faults
So, now in more detail about how to search for all generator faults. After all, the main reason is important to you. The generator does not charge - this is just a symptom. If the car’s equipment is standard and you do not have any extra consumers of electrical energy, you can safely begin diagnosing the generator itself. In the same case, if you have additional electricity consumers, they need to be turned off for a while. Moreover, you need to disconnect it directly from the on-board network, and not just with a button. First, measure the flow rate with the engine off. It is important for you to find out whether electricity is consumed while the car is parked. Please note that the alarm must be turned off at this time. Unfortunately, most domestic cars have a small current leak. True, it is not capable of draining the battery even after several weeks of parking. After this, all electricity consumers must be connected. Similarly, check for leakage with connected consumers. If the leakage current is very large, look for the cause of the breakdown not in the generator or battery, but in any device connected to the vehicle’s on-board network. This can be done by elimination.
Replacing the generator voltage regulator on VAZ 2113, VAZ 2114, VAZ 2115
Welcome! Voltage regulator - it is present in any generator on any car, thanks to it the voltage in the on-board network does not jump and stays even, also thanks to it the voltage in the on-board network does not go too high (The higher the voltage in the on-board network, the faster the wiring will burn out) and as it should be within normal limits (Basically for all cars, the norm is 13.2-14.7 volts in the car’s on-board network), this voltage is enough for the battery to charge and for other devices to still light up (The more devices in the car you turn on, the voltage and will become stronger, thanks to the same voltage regulator), when the regulator becomes unusable, the first thing that begins is a problem with the voltage and, in connection with this, a problem with the wiring occurs, for example, if the regulator suddenly stops restraining the voltage then it will rise to high marks, then the wires will begin to melt first, but if you have all the fuses for the required amperes, then there is nothing to be afraid of, you’ll just change the fuses every five minutes when the voltage jumps and this will continue until you change the regulator to a new one (But this may not be from him, fuses in general can blow out for various reasons, one of the most striking is water getting on the wiring, after which the fuse immediately blows).
Note! Replacing the voltage regulator that is on the generator is not so difficult, especially if you have a set of tools, in this set you should have: Wrenches, as well as screwdrivers, you will also need a test (This is a 12-volt test lamp) and a megohmmeter (Data devices are needed only to check the regulator for operability, if you don’t need to check anything and you are sure that your regulator has become unusable, then in this case you don’t have to stock up on these things)!
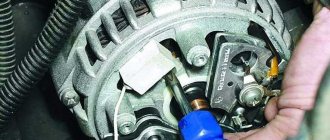
Where is the voltage regulator located? It is located, as we said a little earlier, on the generator itself and bolted to it; for clarity, we have attached a photo below, in which the generator removed from the car is clearly visible and the arrow to all this indicates the voltage regulator itself, the replacement of which we are talking about today In this article.
When should you change the voltage regulator? The regulator, the name itself even speaks for it, namely, it regulates the voltage in the on-board network and it should not exceed or fall below the norm, but if the voltage fluctuates (either high or low), then the regulator needs to be replaced, by the way, there is no way to check its functionality will not be difficult, for this you will need to use a 12 Volt test lamp, namely, connect the leads from it to both brushes of the regulator and at this time apply a voltage of 12 Volts (a battery is perfect for this) to the positive terminal, and apply a negative one to the negative one wire coming from the battery (the minus in the voltage regulator can be bushings, one of these is shown in the photo below in the detailed diagram).
Note! If after such manipulations the control lights up, then this indicates that the regulator is working, but this does not mean that it is completely working, and in order to make sure of this completely, do the same operation, but only not 12 volts in this In this case, apply 15 V and see the result, a normal working voltage regulator should not allow the lamp to light up, but if the lamp does light up, this indicates that this regulator is faulty and needs to be replaced!
If there is no current leakage in standby mode
It is much worse if there is no current leakage with the engine turned off, but the battery is discharged. To do this, it is necessary to inspect the generator more carefully. There can be many reasons for its failure. Often there is no contact or it is very weak in the brush assembly. In this case, of course, the generator does not charge the battery. This happens when the brushes are almost completely worn out. There may be destruction of the field winding. It is also possible that a short circuit between the turns appears in this winding. On the rotor, the winding can be short-circuited to the housing. Similar faults are sometimes present in the stator. It has three windings, which may also have breaks, a short to the body or between the turns. If the rectifier unit contains one or more faulty semiconductor diodes, the generator will not produce voltage at its output. And of course, various mechanical influences are capable of exerting their influence. For example, stretching the drive belt. It’s worth talking about all these breakdowns in more detail.
Why is the battery not charging?
The generator stops charging the battery if the brushes, diode bridge, rotor or stator winding, as well as the belt connecting the rotor to the crankshaft fail.
| What's wrong | What to do |
| Worn graphite brushes are the most common generator malfunction. | They have their own resource and wear out over time. Thus, the contact of the brushes and rings on the rotor weakens, and the VAZ 2109 does not charge. There is only one solution to the problem: replacing the brushes with new ones. They are inexpensive and are sold at any auto store. |
| Due to poor connection of the output contact, diode bridge and stator winding, the bridge heats up, melts and fails. | But it was precisely on the VAZ 2109 and VAZ 2108 models that the most reliable diode rectifiers were installed from the factory. Tested by time. Therefore, the bridge on the “nine” rarely fails. Well, in the event of a breakdown, the entire bridge will have to be replaced. |
| Another common case is a broken, slipping or insufficient tension of the generator drive belt. | To check whether the belt is tensioned, press in the middle part and check the downward deflection. The permissible deviation standards are specified in the VAZ operating manual. The pulleys can also wear out, causing the belt to slip. Well, if the belt breaks, we simply replace it with a new one. |
The most difficult malfunction is damage to the stator winding or rotor electromagnet. Buying new wiring does not cost much, but the complexity of the repair is ensured. If all these elements of the generator are in working order, but the battery still does not charge, the cause of the breakdown lies in the on-board network circuit or the condition of the battery itself.
There are cases when charging on a VAZ 2109 is lost not because of the generator. The on-board network circuit involves connecting the battery to the generator through a charging relay, fuse box and ignition switch. To identify faults of this kind, open the operation and repair manual and look at the order of connections. First of all, we check the fuses. Maybe one of them just burned out.
If you find an error, please select a piece of text and press Ctrl+Enter.
Insufficient contact
Please note that if the brushes and rings on the rotor become oily or dirty, contact may be lost for a short time or permanently. It is possible that the springs in the brush holder have deteriorated. With their help, the brushes are pressed against the rings on the rotor. Consequently, the total resistance of the excitation winding increases, or the electrical circuit is completely broken. In this case, the generator gives a weak charge or stops working altogether. To get rid of this problem, sometimes you can simply wipe the brushes with a lint-free cloth. It is advisable to moisten it in solvent or gasoline. Of course, if the brushes are very worn, they need to be replaced. In the event that oxidation of the rings has occurred, it is necessary to clean them using glass sandpaper.
Winding destruction
It is not very pleasant if the excitation winding is suddenly destroyed. If such a malfunction is present, the generator will not work completely, since there is no magnetic field. The fact is that the operating principle of any generator is based on the presence of a moving magnetic field. This malfunction can be identified very simply. Firstly, if you touch the generator housing during operation, it will turn out to be too hot. Secondly, a light with a battery drawn on it will definitely light up on the dashboard. It indicates that the battery is not charging. You can also use the multimeter in resistance measurement mode. To do this, you need to measure the resistance value between the rings. But these are not all the reasons why the generator does not charge well.
Short circuit between turns
Occurs when the outer insulation of the wire with which the winding is wound is destroyed. Please note that in the presence of an interturn short circuit, excessive heating of the winding occurs. In this case, the current consumed by the excitation winding increases many times. For accurate diagnostics, it is necessary to completely disassemble the generator, and then use a multimeter to measure the coil resistance. If it differs from the reference one, we can conclude that there is a short circuit between the turns of the winding.
Shorting the windings to the housing
In the event that there is a short circuit in the winding specifically to the housing, the generator set stops working. Most often, a short circuit occurs in the place where the terminal leads are located. These are the places where the winding is soldered to the slip rings. To check the rotor winding, you need to take a lamp with an operating voltage of 220 volts. Please note that all safety precautions must be followed. You will need to connect one terminal from the lamp to power. Connect the second pin to the slip ring. The second power wire must be connected to the rotor housing. In the event that there is a short circuit of the rotor winding to the housing, the light will definitely light up. If there is no short circuit, the lamp will not light up. And if there is, then you were able to understand the reason why the generator does not charge the battery.
BRUSH DEVICE
The generator brushes are also located inside the housing and perform a very important task - they are responsible for transmitting voltage between the slip rings. The brush assembly itself includes two small so-called brushes, which are made of graphite and pressed by several springs inside their seat. Since the brushes heat up quite strongly, they are covered on top with an aluminum cover, which is quite easily cooled by the oncoming air flow when the machine moves. If you need to replace the generator brushes on a VAZ 2114, then you don’t need to worry about the price; you can find the option of good brushes with a price of up to 200 rubles.
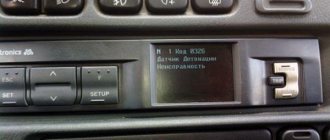
Article on the topic: VAZ 2114 malfunctions: error codes
Location of brushes in the generator
Stator problems
Similar problems can arise in stator windings. In particular, if there is an interturn short circuit, the battery will not charge. Of course, the generator can work, but in emergency mode. Firstly, its power will drop significantly. Secondly, the batteries will not be charged. Thirdly, excessive heating of the generator housing occurs. The winding may also short-circuit to the housing. Excessive heating, humming, loss of power - all those signs that are inherent in rotor winding failures. The check is carried out in the same way as in the case of a rotor winding. To carry out repairs, it is necessary to replace all faulty coils. It even happens that in generators the positive terminal is closed to the housing. Consequently, a short circuit also occurs between the terminals of the battery. This poses the risk of a fire. Of course, the generator does not charge in this case.
Lada 2115 2005, 77 l. With. — self-repair
Comments 7
Participate in the discussion can only registered users.
Yesterday I decided to measure whether the charge was going to the battery, started 13.6 at xx, gave the gas the same 13.6, what could be the joke? Tell me?
Great! I also had a moment when the charge disappeared, as it turned out later, one diode also burned out. I drove almost 200 km with a charge of 12.3 and sometimes 11.8. These are the kind of electricians we have, they know what’s going on but don’t really want to do it. What happened to the money?
I bought “brushes” and “chocolate” for 150r; the diode bridge was from an electrician for 500r
Good luck with the repair. Tell me what happened. It became interesting for me.
They made me a generator, it turns out that when I was doing electrics for the first time, one diode was a little bad (he admitted it to me when I arrived at his place) due to the fact that the generator was giving some kind of charge, he didn’t touch it, but this time that diode died altogether just changed the diode bridge and now charging with a load of 13.8.
There was the same crap, the battery was covered with pussy. I changed both the diode bridge and the winding in the gene. And somehow they don’t advise removing the terminals from the battery, if I’m not mistaken, then the brains may burn out... Maybe someone can correct me, of course. So write down what happened!
I’ve already removed the terminals many times, so I had to install another battery to start it, until I was lucky and my “swallow”’s brains didn’t burn out. I still haven’t had time to figure it out, but yesterday my generator stopped producing it altogether... I’ve now removed the generator, I’ll go tomorrow and give it to another technician, maybe he’ll tell me in more detail what’s wrong with it, as soon as I find out, I’ll write back immediately.
Full version of the site
How to remove the generator?
You will need the following set of tools:
- Mounting blade.
- Two keys for 17, one for 10 and 13.
- Penetrating lubricant such as WD-40.
The latter is extremely necessary if the generator has not been removed for a long time, and there is a lot of rust and dirt on the threads. If this is the case, be sure to treat all connections with penetrating lubricant an hour before starting work. This will make the work easier. At the same time, pay attention to the condition of the belt; there should be no cuts or other damage on it. If there are any, be sure to install a new one during assembly. It is quite possible that the generator does not charge precisely because the belt tension is weak or it is broken.
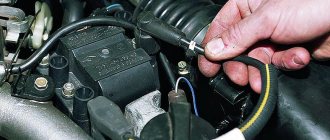
Disconnect the “–” terminal from the battery, after which you can proceed to further work. Unscrew the nut that secures the “+” wire to terminal 31 of the generator. You've sorted out the connection, move on. Using a 17mm wrench, unscrew the nut from the top mounting and move the generator towards the engine. At the same time, the belt tension becomes weaker, and it can be quickly removed. Then unscrew the nut on the lower fastening, holding the bolt with a second 17mm wrench.